Prisma AIRS
Deploy the HSF Cluster
Table of Contents
Expand All
|
Collapse All
Prisma AIRS Docs
Deploy the HSF Cluster
Deploy the HSF Cluster through the Software Firewall Orchestration
plugin.
| Where Can I Use This? | What Do I Need? |
|---|---|
|
|
After ensuring that the prerequisites to deploy the HSF are met, navigate to
Panorama > SWFW Orchestration > Setup and click the vCenter
name where you plan to place your firewalls.
It is recommended that you refrain from rebooting or performing a High
Availability (HA) failover on the Panorama during deployment. Failure to comply
with this may result in a stale VM within vCenter, persisting in a powered-off
state. Should this occur, remove the affected VM and subsequently initiate the
recover process.
- Enter the following details in the vCenter Info pop-up:
- Name - Name of the vCenter.
- Description - Description of the vCenter.
- IP Address/FQDN - IP address of the vCenter.
- Username
- Password
- Confirm Password
- Click Validate to check if the entered credentials are valid for HSF deployment and if the vCenter is accessible. Alternatively, you can also check the validity of the vCenter under the Deployment Permissions section of the vCenter page.
- Click OK and commit.
Navigate to Panorama > SWFW Orchestration > Deployments. Click Add.- Click VM HSF Cluster Details and enter the following details:
- VM-HSF Cluster Name - Name of the HSF cluster.
- Description - Description of the HSF cluster.
- vCenter - Choose the relevant vCenter on which you wish to deploy your HSF cluster.
![]()
- Click OK.
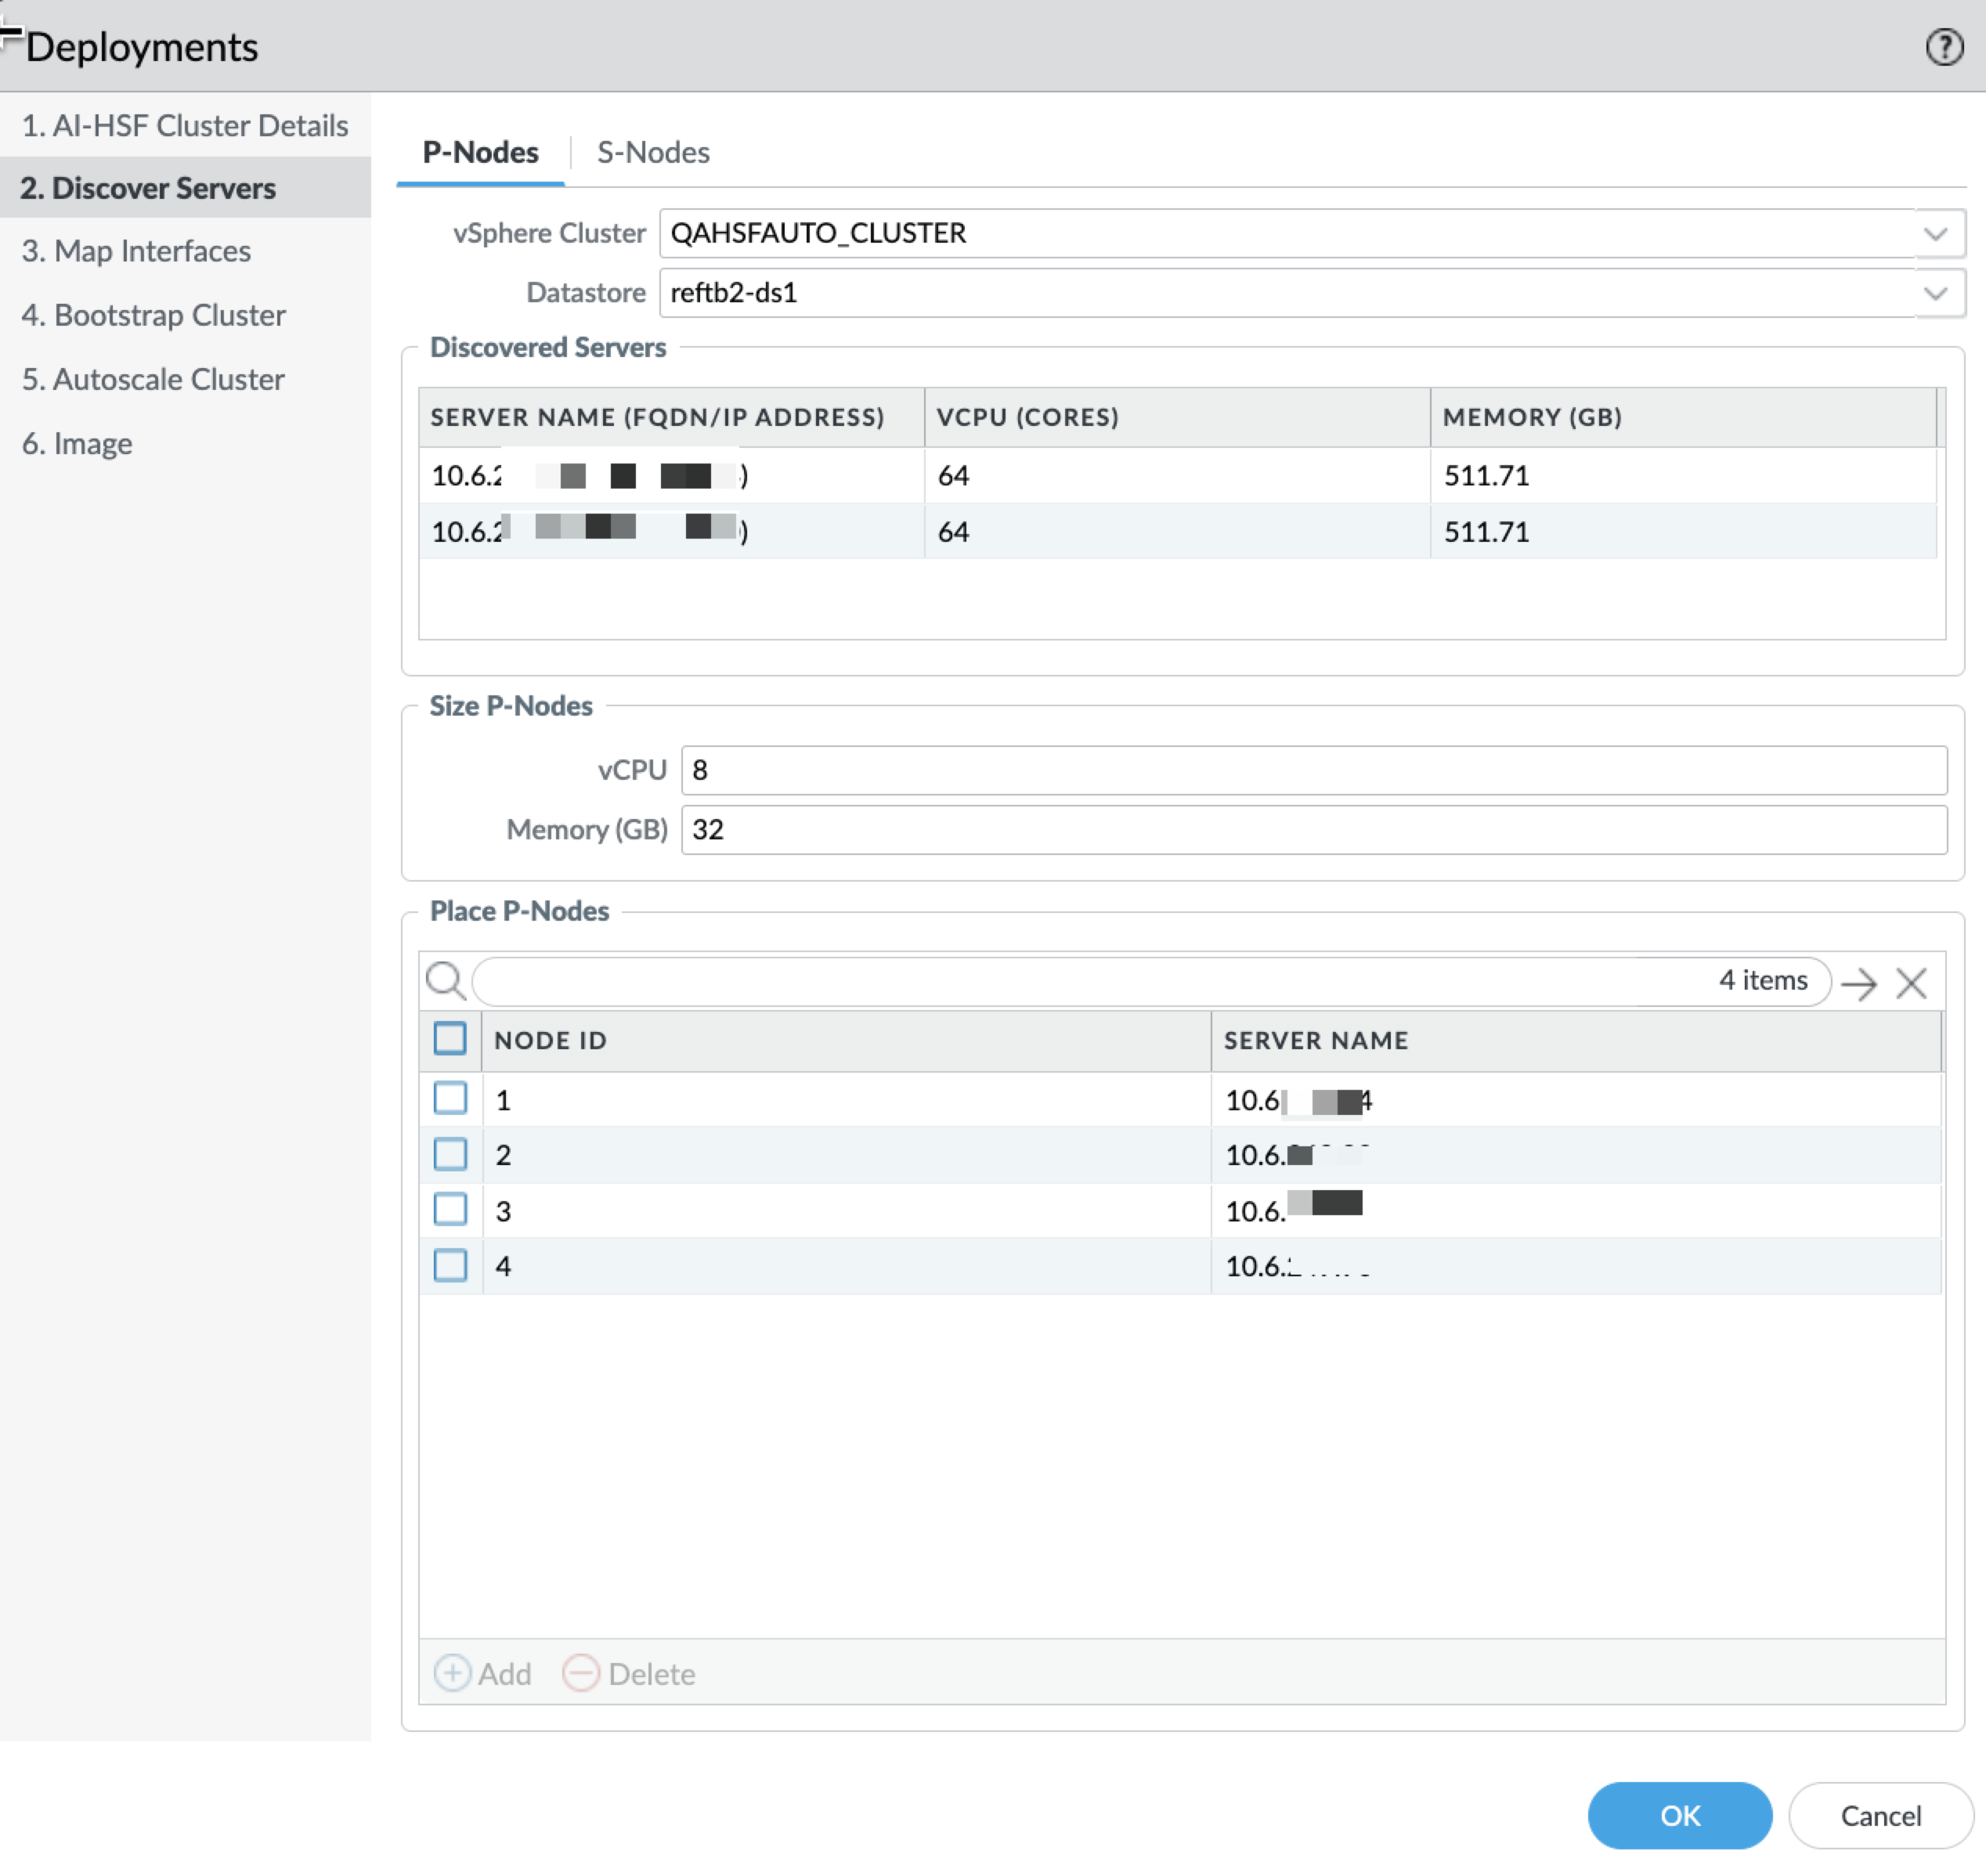
Click Discover Servers and configure the P-Nodes.![]() You can deploy a maximum of four P-Nodes and six S-Nodes.
You can deploy a maximum of four P-Nodes and six S-Nodes.- vSphere Cluster - Choose the vSphere Cluster in which you wish your gateway to reside in.
- Datastore - Choose the necessary datastore you wish to store your data in. Each VM will have a default storage of 60GB. Datastore can be shared datastore or local datastore. For local datastore, create a local datastore with the same name across all hosts within the vSphere cluster.
- Discovered Servers - Verify the FQDN/IP Address, VCPU, and Memory of the selected server.
- The discover servers table is a ready only table which displays the servers available in the chosen vsphere cluster along with its corresponding details such as memory, vCPU and so on.
- Ensure that the P-Node's memory is at least twice the S-Node's memory.
- Size P-Nodes - Enter the Number of vCPUs and memory you wish to allocate to your gateway.It is recommended that the size of the P-Nodes be twice that of the S-Nodes.
- Place AI-Gateways - The node ID (Unique Identifier of the node in a
cluster) of the gateway that you wish to associate your cluster with.
- Autoplace - Plugin does the auto-placement of the server on which the VM will be associated with.
- IP address of the desired server - manual selection of the
server to which you wish the VM to be associated with.If you select multiple gateways for deployment, then you cannot choose a mix of autoplace or desired host.
- Click OK after all the tabs are configured.
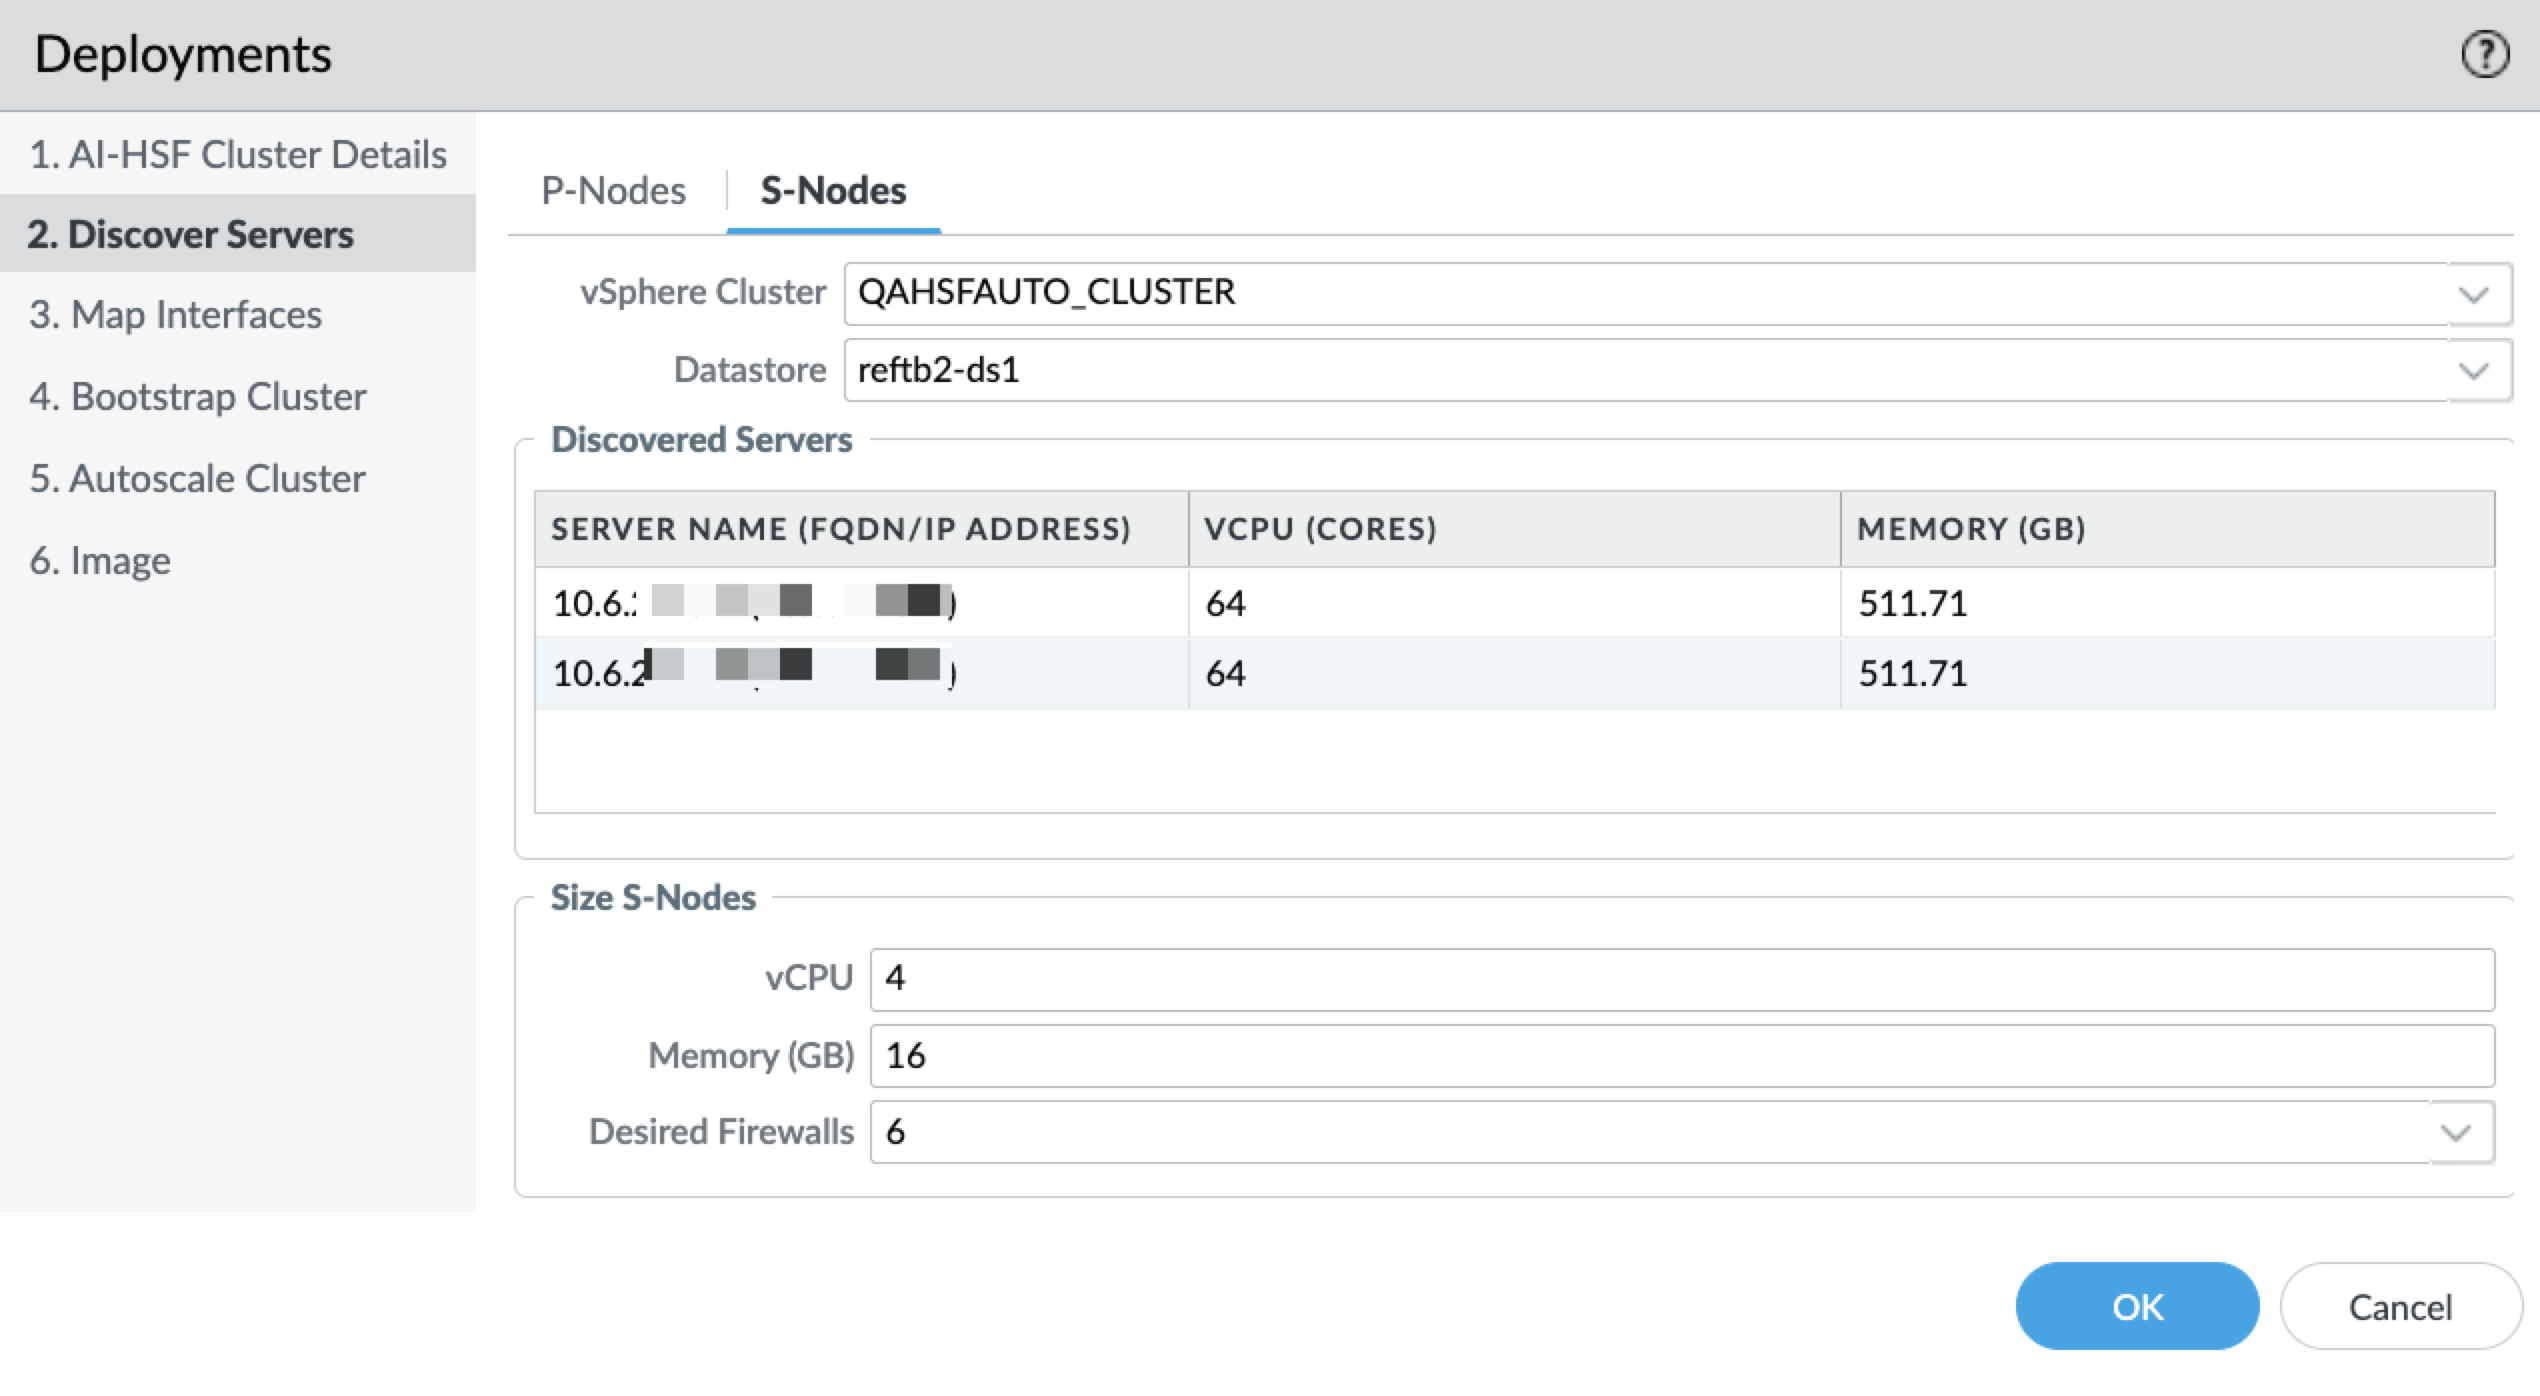
Click S-Nodes and configure the following:![]()
- vSphere Cluster - Choose the vSphere Cluster in which you wish your S-Node to reside in.
- Datastore - Choose the necessary datastore you wish to store your data in. Each VM will have a default storage of 60GB. Datastore can be shared datastore or local datastore. For local datastore, create a local datastore with the same name across all hosts within the vSphere cluster.
- Discovered Servers - Verify the FQDN/IP Address, VCPU, and memory of the selected server.The discover servers table is a ready only table which displays the servers available in the chosen vsphere cluster along with its corresponding details such as memory, vCPU and so on.
- Size S-Nodes - Enter the Number of vCPUs, memory (a minimum of 8GB memory is required), and the number of S-Nodes you wish to allocate. These S-Nodes will be deployed as part of the initial deployment.It is recommended that the vCPU and Memory of the S-Node be half of the vCPU and Memory of the P-Nodes.
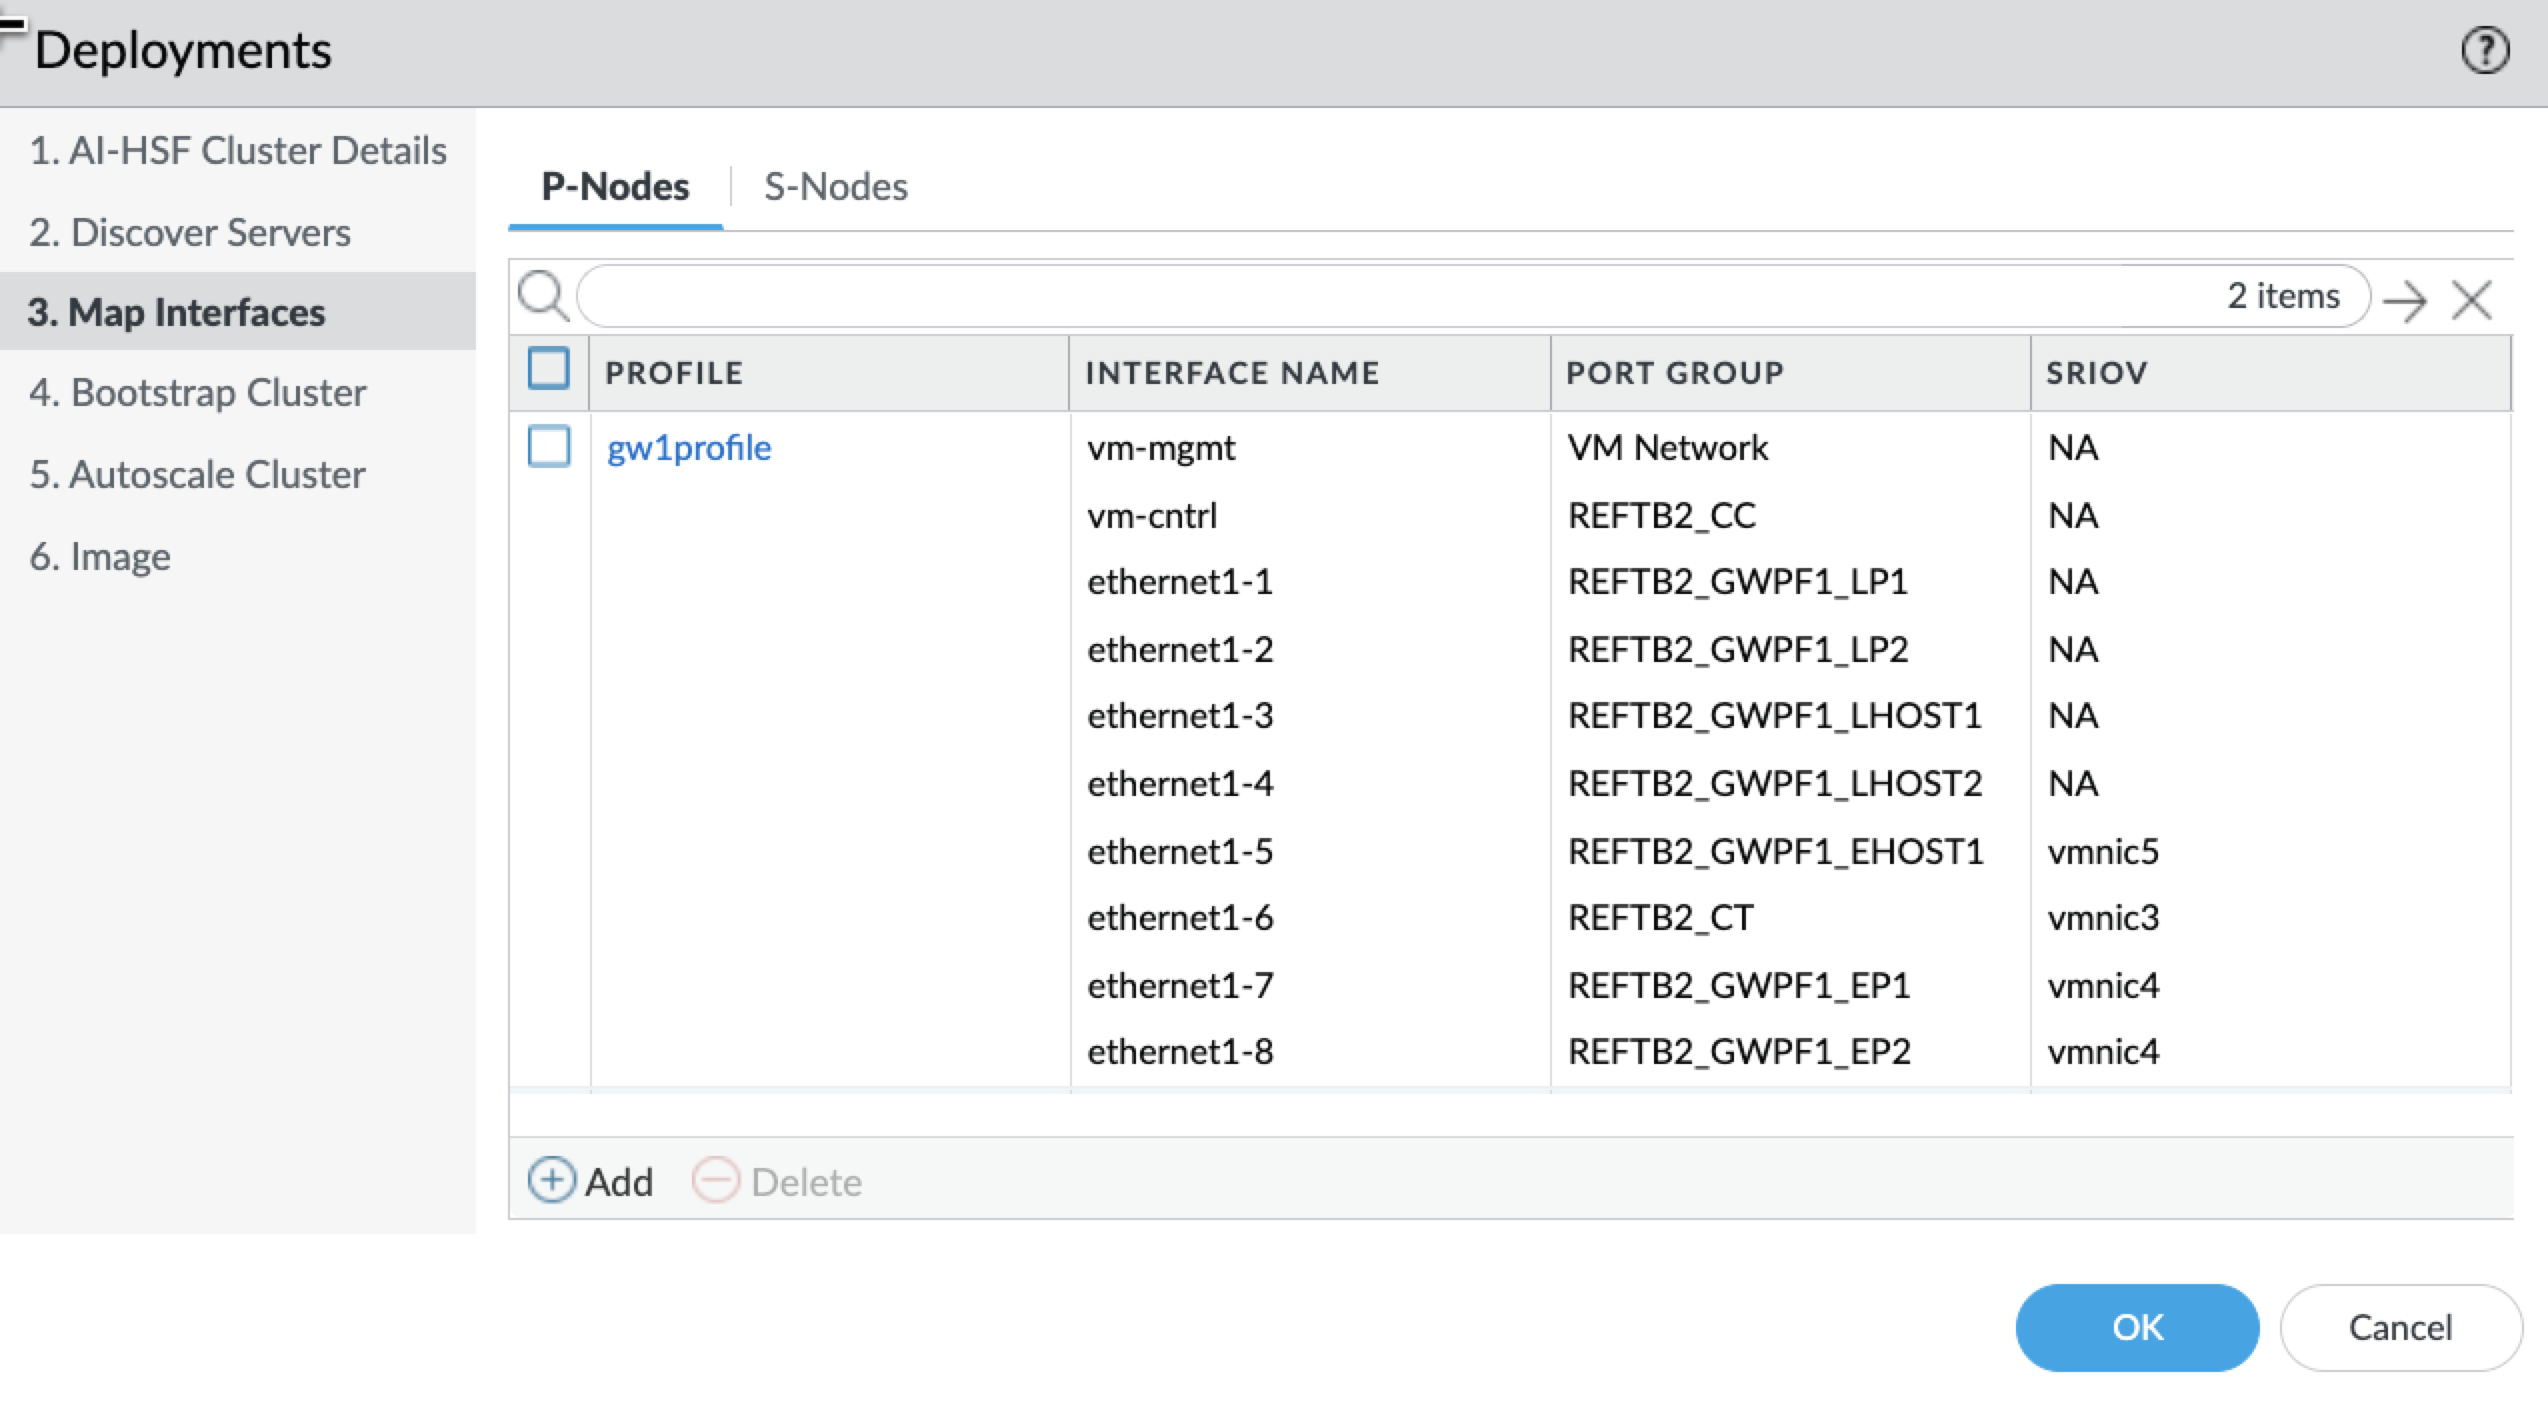
Click Map Interfaces and configure the interfaces for P-Nodes and S-Nodes.- Click Add under the P-Nodes tab.
![]()
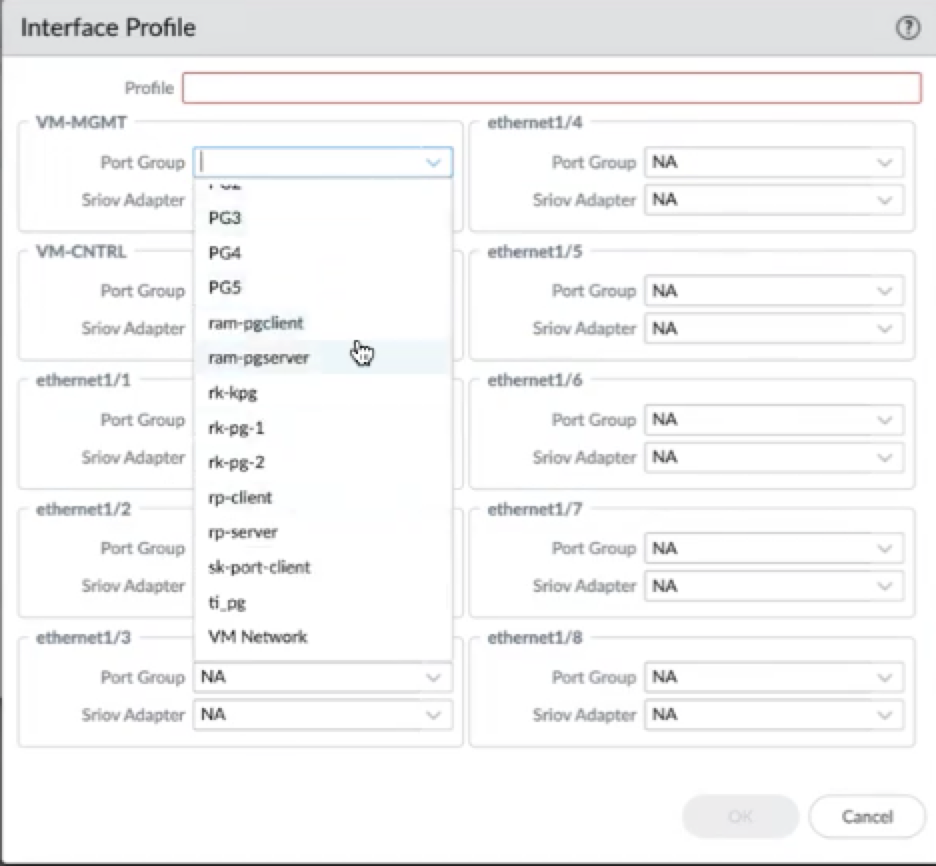
- Enter a Profile name.
- Each VM can have 10 interfaces out of which the VM-MGMT, VM-CNTRL, and ethernet 1/1 interfaces are mandatory. The rest of the interfaces can be configured as per your requirement
- Refrain from deleting an interface profile that is currently in use by existing nodes within the Software Firewall orchestration plugin configuration. Ascertain which profile is assigned to each node in the cluster by viewing the firewall details section under the deployment details status.
- If you don’t have enough servers within a chosen vSphere cluster and you need to have multiple gateways on the same server, then you will need to configure multiple profiles on the same server. For example, if you wish to deploy 2 P-Nodes and have only 1 host within your vSphere cluster, then create 2 profiles on that host and configure P-Node1 with profile1 and P-Node2 with profile2.
- For all external interfaces, the plugin automatically generates dummy placeholder port groups and virtual standard switches, and interfaces mapped to NA connect to these. For vmxnet3, select the appropriate port group for each interface. You can retain NA for unconfigured external interfaces, which will connect to the dummy port groups.
- Select the required Port Group from the drop down. These are the
port groups present in the selected vCenter.
![]()
- (optional) Select the SRIOV Adapter from the drop down.It is mandatory that you add the SRIOV as the last interface and all of them must be added continuously one after the other. For example, if the sixth interface is SRIOV then all the interfaces that follow should be SRIOV. For SRIOV, select both the port group and the SRIOV adapter, adding SRIOV interfaces in ascending order (for example, eth1/8 first) due to an ESXi limitation that groups all vmxnet3 interfaces before SRIOV. In mixed mode, VMXNET3 interfaces precedes SRIOV. All SRIOV adapters must be at the end, as the plugin doesn't support placing them between VMXNET3 adapters. The validate button confirms correct SRIOV placement.
Click the S-Nodes tab and click Add.S-Node does not have external interfaces.- Enter a Profile name in the Interface Profile window.
- Select the desired Port Group and SRIOV Adapter for VM-MGMT, VM-CNTRL, and ethernet 1/1 interfaces.
- For vmxnet3, choose the corresponding port group for each
interface.SRIOV interfaces must be added from bottom up. For example, the first SRIOV interface should be eth1/8. For mixed mode, the vmxnet3 comes first in the order and followed by SRIOV interfaces.
- Use the validate button to validate the SRIOV order placement.
- Click OK.Repeat the interface profile configuration for minimum number of DP.
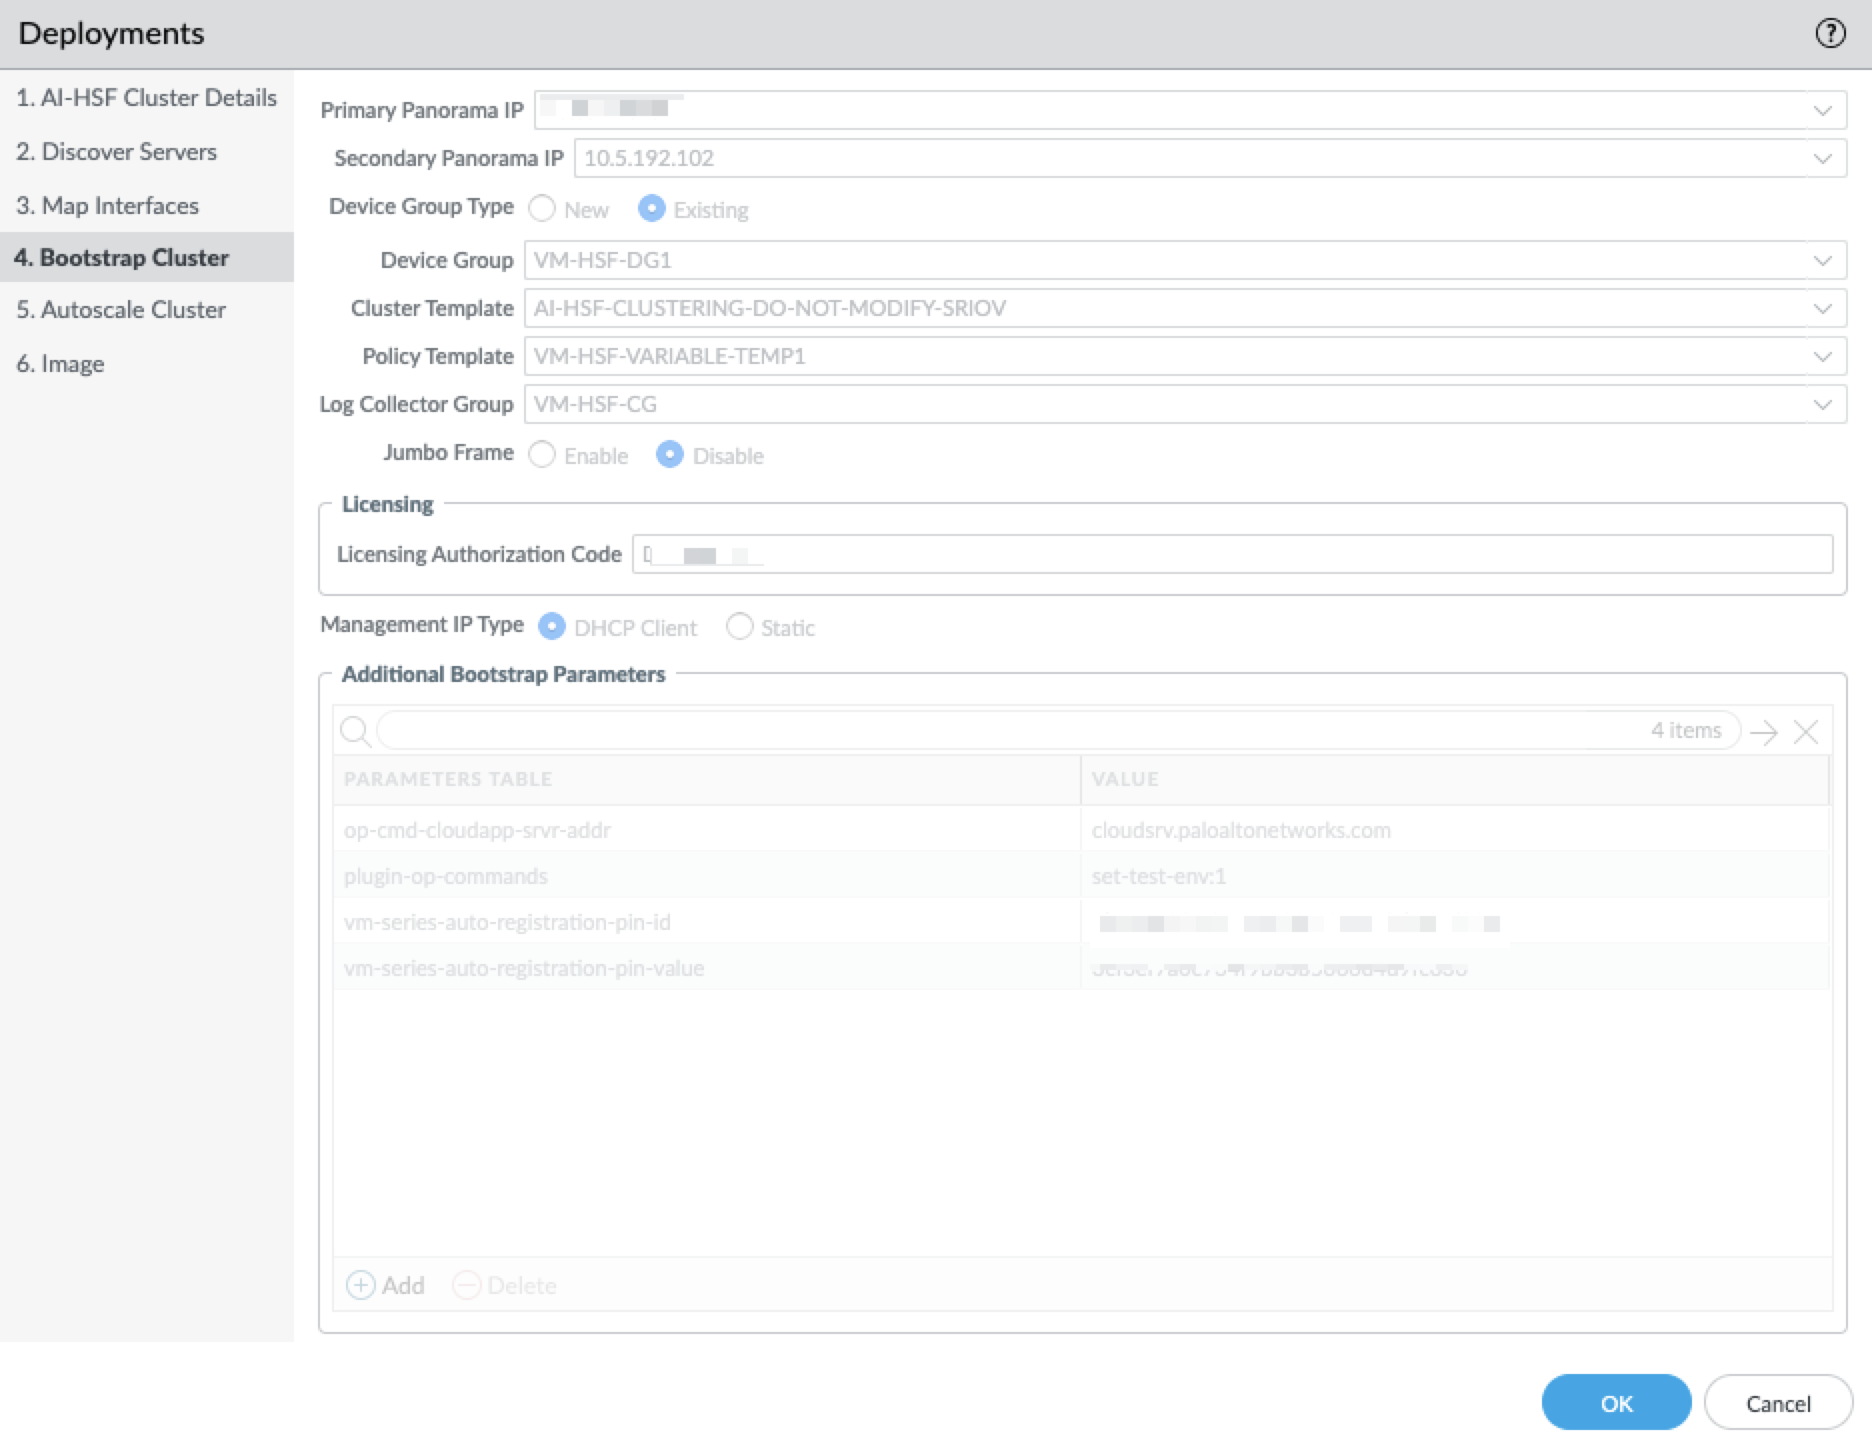
Click Bootstrap Cluster and configure the following bootstrap information for the VM.- Enter the Primary Panorama IP address.
- Enter the Secondary Panorama IPaddress, if you have high availability configured in your setup.
- Select either New or Existing Device Group Type.
- Select a Cluster Template. The template should either be the default template or the clone of the default template.
- For vmxnet3, choose plugin created fixed template - AI-HSF-CLUSTERING-DO-NOT-MODIFY
- For the SRIOV interface, clone and modify the fixed template and choose that.
- Choose a policy template for external interfaces and policies.
- (optional) Select a Log Collector Group Type.
- Choose to Enable or Disable Jumbo Frame.
- Enter the Licensing Authorization Code.Authcode must have an HSF subscription.
- Choose if the Management IP Type is DHCP Client or Static. If you choose Static, enter the following details:
- Default Gateway IP
- Netmask
- Subnet Address
- Primary DNS IP
- Secondary DNS IP
- You may choose to add Additional Bootstrap Parameters. For more information, see key-value pair.
Click OK.
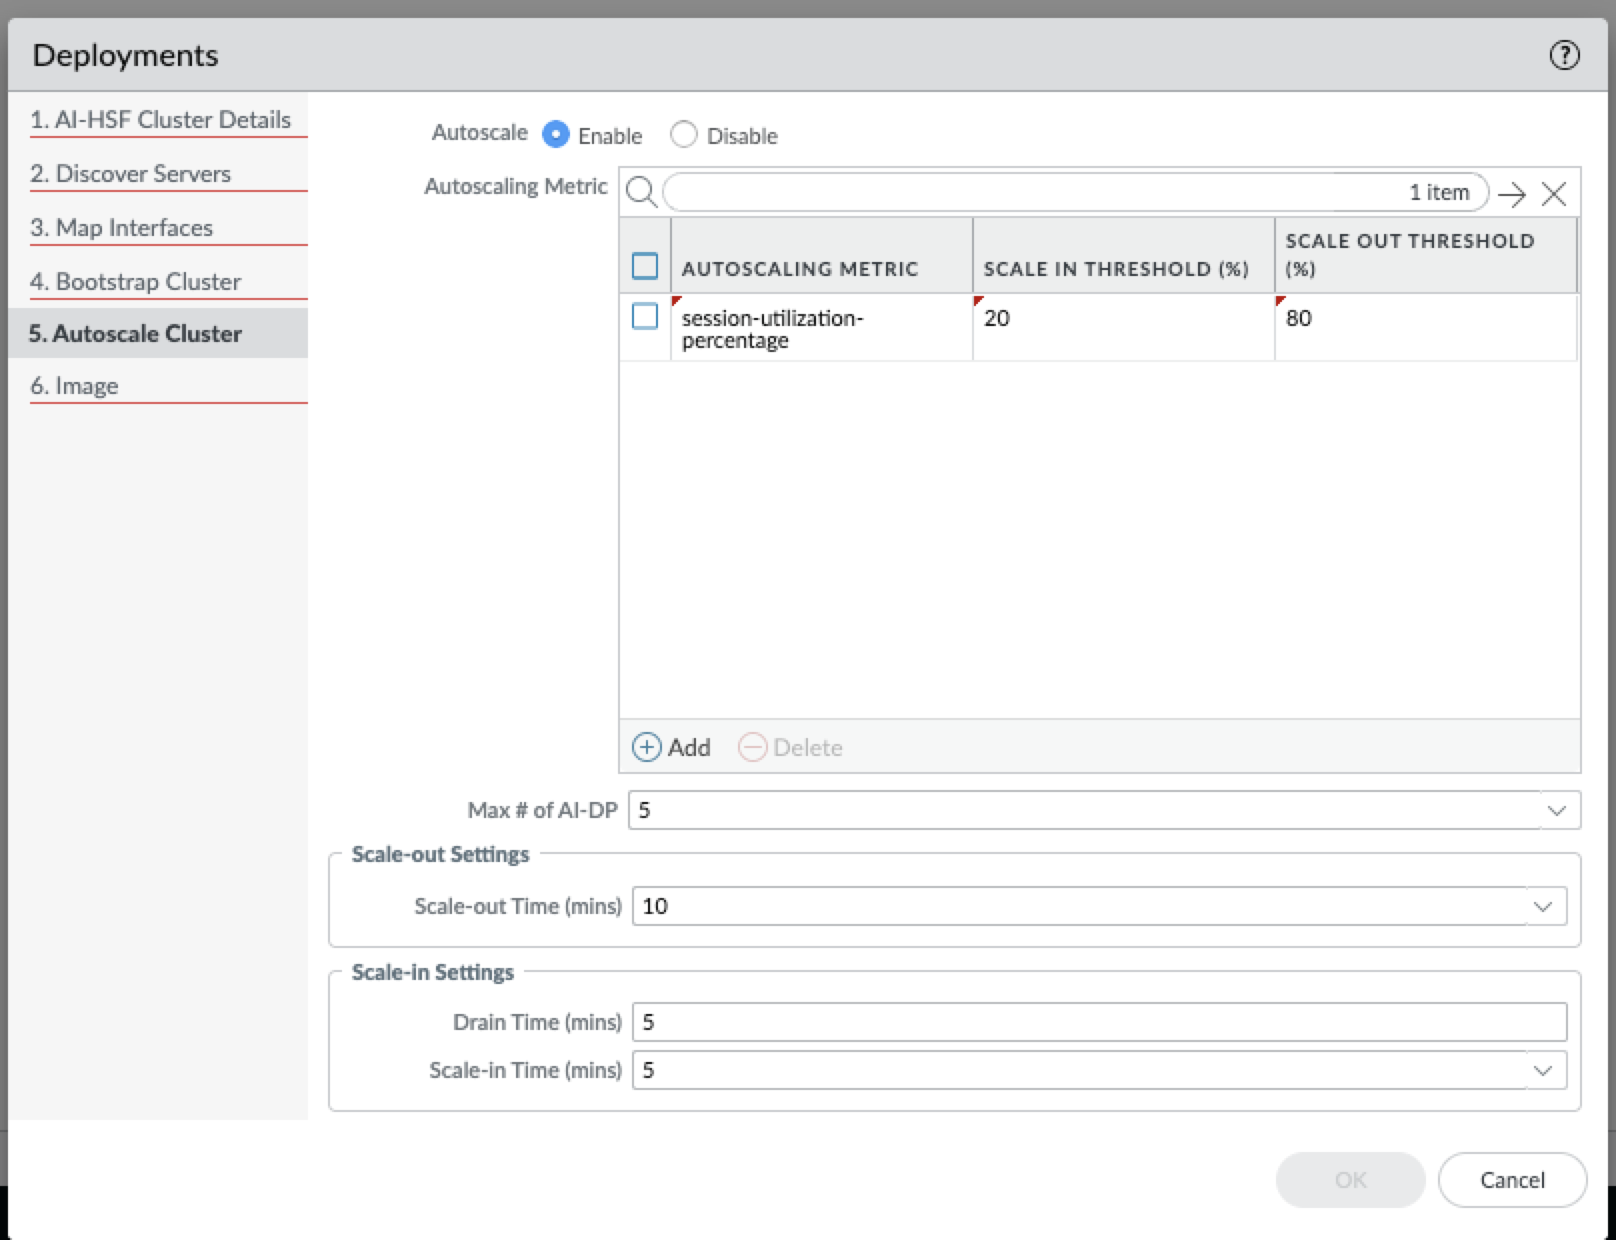
![]() Click Autoscale Cluster and choose to Enable or Disable autoscaling.Autoscaling is supported for S-Nodes and not for P-Nodes within the HSF.
Click Autoscale Cluster and choose to Enable or Disable autoscaling.Autoscaling is supported for S-Nodes and not for P-Nodes within the HSF.- Autoscaling Metric: session utilization percent is the only metric currently supported.
- Ensure that the Max number of S-Node is greater than the desired number of DP configured.
- If you choose to enable autoscaling, select the Autoscaling Metric as session_util and verify if the Scale-out Settings and Scale-in-Settings are set.Scale out time and Scale in time can be between 5-60 minutes. The default drain time is 5 mins and is allowed up to 60 mins.
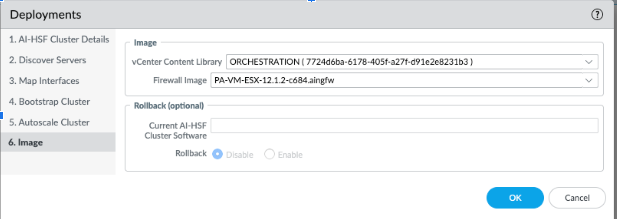
Click OK after all the tabs are configured.![]() Click Image and configure the image settings.Before you go ahead with configuring the image settings, ensure that you have uploaded your Prisma AIRS image to your vCenter Content Library.
Click Image and configure the image settings.Before you go ahead with configuring the image settings, ensure that you have uploaded your Prisma AIRS image to your vCenter Content Library.- Select the vCenter Content Library in which you have uploaded your PA-VM OVA image.
- Select the Prisma AIRS AI Runtime firewall Image.The Rollback options are applicable only to upgrade scenarios.
- Click OK.
![]()
Click Commit. When the commit begins the Cluster Status changes to Not Deployed.- Click the Deploy button. After the deployment is complete, the Cluster Status changes to Success, Warning, or Failure state. Click Update if you wish to make changes to an existing cluster deployment settings.
- After the deployment is complete the status can change to Success, Warning, or Failure.
- Click the Cluster Status link displayed against a cluster to get Deployment Status Details such as Firewall Details and Cluster Details.
- (optional) Click Undeploy if you wish to delete a cluster deployment.
- Click Update to modify or update an existing deployment.
(optional) Click Recover to recover an existing HSF cluster deployment that's in Failure or Warning state after an Update is run on an existing HSF Cluster Deployment.


