Best Practices
At Palo Alto Networks, it’s our mission to develop products and services that help you, our customer, detect and prevent successful cyberattacks. We’ve developed our best practice documentation to help you do just that. Whether you’re looking for the best way to secure administrative access to your next-gen firewalls and Panorama, create best practice security policy to safely enable application access at the internet gateway and the data center, or learn the best way roll out a decryption policy to prevent threats from sneaking into your network, you will find the guidance you need here in our best practice documentation. And, our best practice library keeps growing and evolving to keep up with the ever-changing threat landscape, so be sure to check back often!
Spotlight
Transition to Best Practices
Documents, checklists, videos, webinars, best practice assessment tools, and more help you learn about and apply security best practices.
Best Practices for Managing Firewalls with Panorama
Use the Panorama Best Practices to help manage and secure your firewalls.
Administrative Access Best Practices
Firewalls and Panorama centralized management servers are the gatekeepers and protectors of your network. To prevent attackers from gaining access to these devices and reconfiguring them to permit malicious access to your network, follow these best practices to secure administrative access.
Documentation
Data Center Best Practice Security Policy
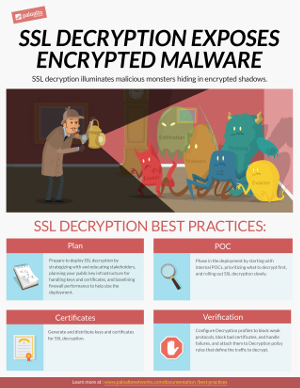
Decryption Best Practices
You can't defend against threats you can’t see. By enabling decryption on your next-gen firewalls you can inspect and control SSL/TLS and SSH traffic so that you can detect and prevent threats that would otherwise remain hidden in encrypted traffic. Use the best practice guidelines in this site to learn how to plan for and deploy decryption in your organization.
Best Practices for Managing Firewalls with Panorama
Learn the best practices for managing firewalls centrally using Panorama.
Administrative Access Best Practices
Firewalls and Panorama centralized management servers are the gatekeepers and protectors of your network. To prevent attackers from gaining access to these devices and reconfiguring them to permit malicious access to your network, follow these best practices to secure administrative access.
DoS and Zone Protection Best Practices
Protect against DoS attacks that try to take down your network and critical devices using a layered approach that defends your network perimeter, zones, and individual devices.
Security Lifecycle Review (SLR)
Starting Best Practices with the BPA and Security Assurance
Best Practices Implementing Zero Trust with Palo Alto Networks
Eliminate implicit trust from your enterprise and continuously validate every stage of a digital transaction to secure your enterprise.
Internet Gateway Best Practice Security Policy
Internet access exposes your network to risk from malicious websites, phishing scams, and other types of cyberattacks. Create best practices internet gateway security policy to safely enable applications, users, and content while protecting your network.
Security Policy Best Practices
Security policy best practices for rule construction, including profiles and logging, rulebase order, Policy Optimizer, the App-ID Cloud Engine (ACE), and SaaS and IoT Policy Recommendation.
WildFire Best Practices
Learn the best practices for using WildFire as part of your network threat detection and prevention solution.
PAN-OS Best Practices for Applications and Threats Content Updates
Learn the best practices for keeping application and threat content signatures up-to-date seamlessly.
IoT Security Best Practices
Apply best practices during the planning, deployment, and maintenance of your IoT Security implementation.
User-ID Best Practices
Learn the best practices for implementing User-ID so that you know and control every user on your network.
URL Filtering Best Practices
Use the URL Filtering best practices to guide you how to reduce your exposure to web-based threats, without limiting your users’ access to web content that they need.
Best Practices for Securing Your Network from Layer 4 and Layer 7 Evasions
To monitor and protect your network from most Layer 4 and Layer 7 attacks, follow our best practice recommendations.
Recommended Topics
Block malicious traffic, including viruses, vulnerability exploits, bad file types, bad websites, and more.
Tech Docs: SSL Decryption Best Practices Light Up Hidden Malware
Ways to Strengthen Your Internet Gateway
Policy Optimizer Webinar: Strengthen Your Security Rule Set
Translated Best Practices Documentation
GlobalProtect Best Practices Webinar
Videos
Introduction to the Best Practice Assessment Plus (BPA+) Tool
Best Practice Assessment Plus (BPA+) Tool Demo
Strengthen Your Internet Gateway
How To Implement App-ID on Your Next-Generation Firewall
How To Implement User-ID on your Next-Gen Firewall
Find the Hidden Threats in Your Traffic
BPA+ YouTube Channel
Click "View BPA+ Playlist" to access all of the BPA+ videos, including best practice network security checks and a demo.
Use Policy Optimizer to Improve your Security Posture
What is Zero Trust?
Webinars
Policy Optimizer - Strengthen Your Security Rule Set and Save Time
About this webinar
App-ID increases the value of our next-generation firewalls by making it easier and faster to determine the exact identity of applications traversing the network, enabling teams to set and enforce the right policies.
Join Palo Alto Networks experts and learn how you can use the New Policy Optimizer capability to migrate your legacy rule set to App-ID based rules. In this webcast, you will:
- Learn best practices for rule management
- Find out how Policy Optimizer can help you achieve a more secure and easier to manage security rule set
- Learn how App-ID can reduce complexity and minimize human error, the leading cause of data breaches
- Get your questions answered in our live Q&A
How to Prevent Breaches through Application Controls
About this webinar
Employees are accessing any application they want, using work or personal devices, regardless of the business and security risks involved.
Join the webinar and discover:
- How attackers use apps to infect and exfiltrate data
- How to use app control the right way to prevent breaches
- How to extend visibility and control to SaaS apps
How to Implement User-Based Controls for Cybersecurity
About this webinar
Visibility and policy control based on users is critical for cybersecurity. User-based policies readily show their business relevance, are more secure, easier to manage, and allow better forensics. In this webinar you will:
- Learn the value of user-based controls using real-life data breach examples
- Discover a step-by-step approach for implementing User-IDTM on your Palo Alto Networks Next-Generation Firewall
Enabling and Deploying Your SSL Decryption
About this webinar
The growth in SSL/TLS encrypted traffic traversing the internet is on an explosive upturn. Given the primary benefits associated with encryption, the private and secure exchange of information over the internet, compliance with certain privacy and security regulations – such as the Health Insurance Portability and Accountability Act and Payment Card Industry Data Security Standard, or HIPAA and PCI DSS – the trend in SSL adoption is expected to continue to rise.
Watch as our Palo Alto Networks® team of experts presents the “hows and whys” of SSL decryption. In this webcast, you will:
- Learn why you need to enable decryption and the key metrics to support your case
- Find out how to address internal logistics and legal considerations
- Discover how to effectively plan and deploy decryption