Autonomous DEM
Enable ADEM for Your Remote Sites
Table of Contents
Enable ADEM for Your Remote Sites
As long as you have purchased the Remote Sites license while purchasing ADEM, you can
enable ADEM monitoring on your remote sites.
| Where Can I Use This? | What Do I Need? |
|---|---|
|
|
To enable ADEM for your Prisma Access Remote Sites, you must enable ADEM using the
aggregate bandwidth workflow for your Prisma Access deployment on Panorama Managed Prisma Access and Cloud Managed Prisma Access.
To on-board and register a Prisma SD-WAN remote site on an ADEM portal,
ADEM remote network bandwidth license should be allocated on the compute location.
You should have already configured Prisma Access and the Prisma SD-WAN device. Aggregate Bandwidth must be configured on
your Prisma Access.
Strata Cloud Manager
If you have purchased the Remote Networks license when purchasing ADEM, you can allocate
your Remote Networks bandwidth licenses on Prisma Access for each compute
location.
To enable Autonomous DEM for Remote Networks in Cloud Managed Prisma Access:
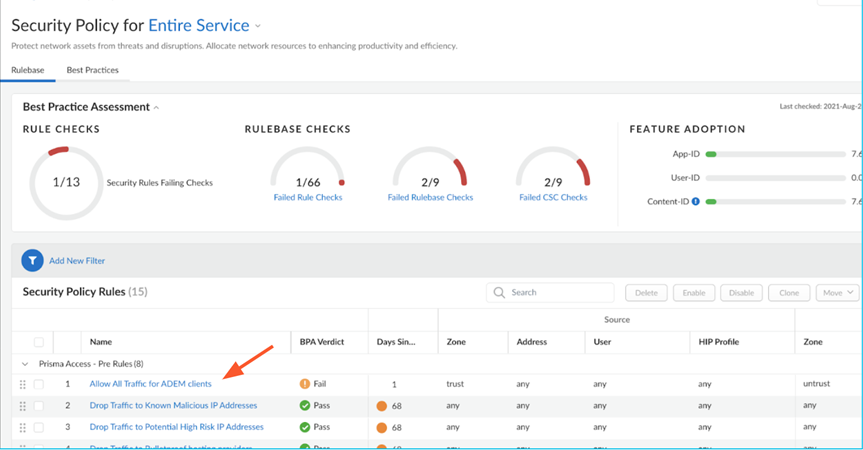
- In Strata Cloud Manager, select .In Remote Networks Setup, under the Autonomous DEM column, to enable Remote Networks on a Compute Location, move its slider to the right until it turns blue.Make sure you have security policy rules required to allow the GlobalProtect app to connect to the ADEM service and run the synthetic tests.The following screen shows you an example of what fields you need to configure.
![]() You must add the ADEM URLs to make the endpoints register to the ADEM portal.
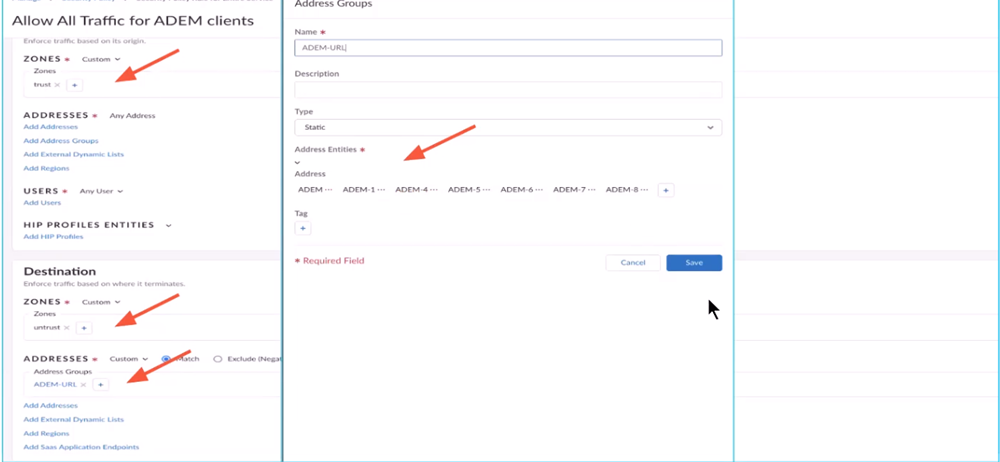
You must add the ADEM URLs to make the endpoints register to the ADEM portal.- Add a security profile for your access experience agent registration. You will need to create a security policy for it.Click Allow All Traffic for ADEM clients.
![]() The Allow All Traffic for ADEM Clients page opens.
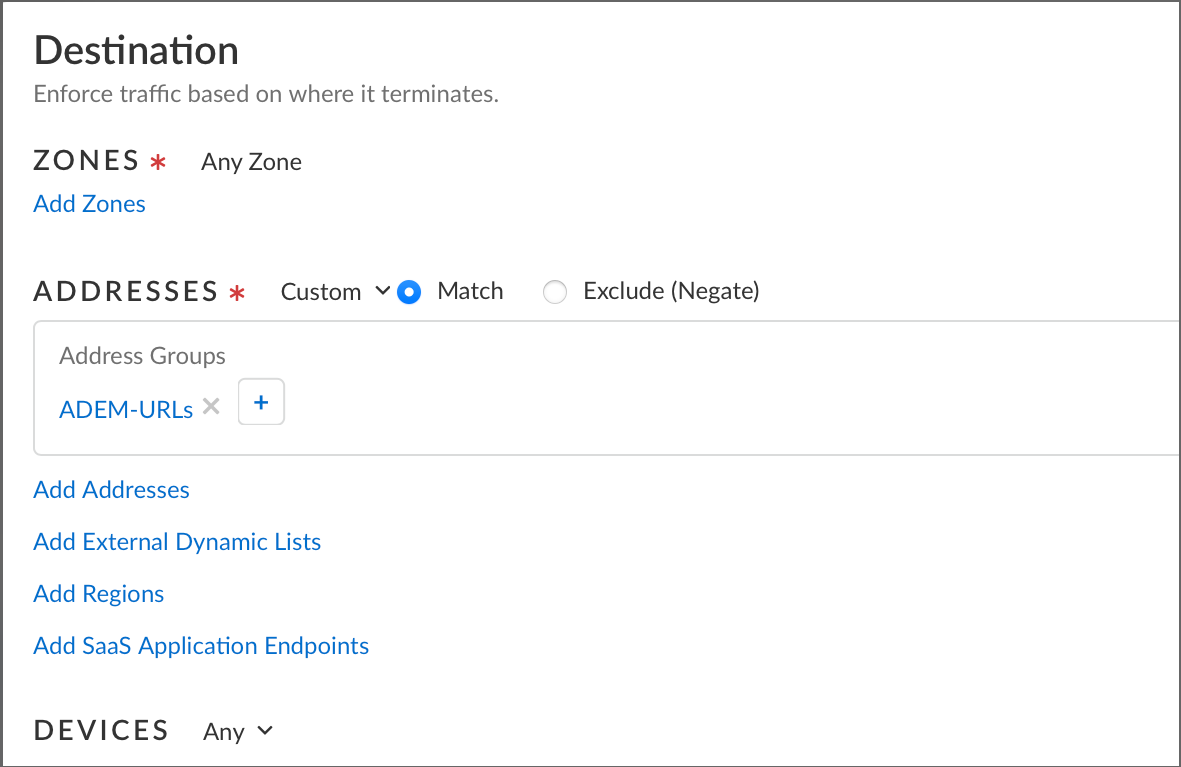
The Allow All Traffic for ADEM Clients page opens. - Add the ADEM URLs.To do so, click the + icon under .
![]()
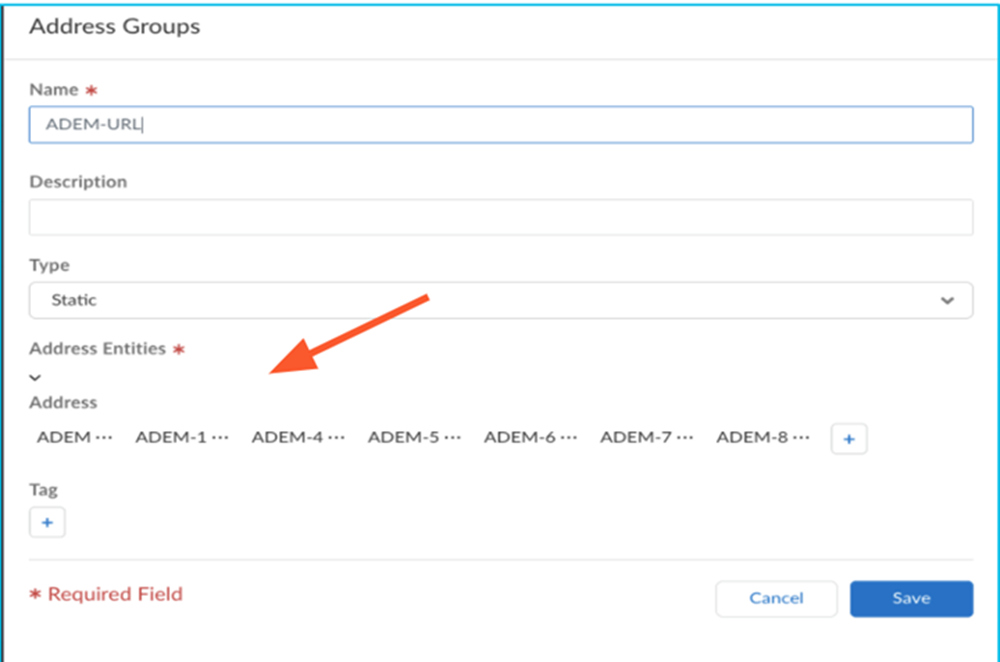
- The Address Groups page opens. Click the + icon under .
![]() Add the following URLs one by one by clicking the + icon:
Add the following URLs one by one by clicking the + icon:- agents.dem.prismaaccess.com
- updates.dem.prismaaccess.com
- features.dem.prismaaccess.com
- agents-prod1-us-west2.dem.prismaaccess.com
- agents-sg1-asia-southeast1.dem.prismaaccess.com
- agents-au1-australia-southeast1.dem.prismaaccess.com
- agents-jp1-asia-northeast1.dem.prismaaccess.com
- agents-ca1-northamerica-northeast1.dem.prismaaccess.com
- agents-eu1-europe-west4.dem.prismaaccess.com
- agents-uk1-europe-west2.dem.prismaaccess.com
- agents-in1-asia-south1.dem.prismaaccess.com
- agents-de1-europe-west3.dem.prismaaccess.com
- agents-ch1-europe-west6.dem.prismaaccess.com
- agents-fr1-europe-west9.dem.prismaaccess.com
- To enable the app to connect to the ADEM service and to run the application tests, you must have a policy rule to allow the remote sites to connect to applications over HTTPS.
- To enable the app to run network monitoring tests, you must have a policy rule to allow ICMP and TCP traffic.
- (Optional) If you plan to run synthetic tests that use HTTP, you must also have a security policy rule to allow the remote sites to access applications over HTTP.
Panorama
If you have purchased the Remote Networks license when purchasing ADEM, you can allocate
your Remote Networks bandwidth licenses on Prisma Access for each compute
location.
Based on your capacity planning, you allocate your Remote Networks bandwidth licenses on Prisma Access for each compute location. The unit of measure for bandwidth
licenses is Mbps.
Below
are some points to consider when allocating bandwidth for ADEM:
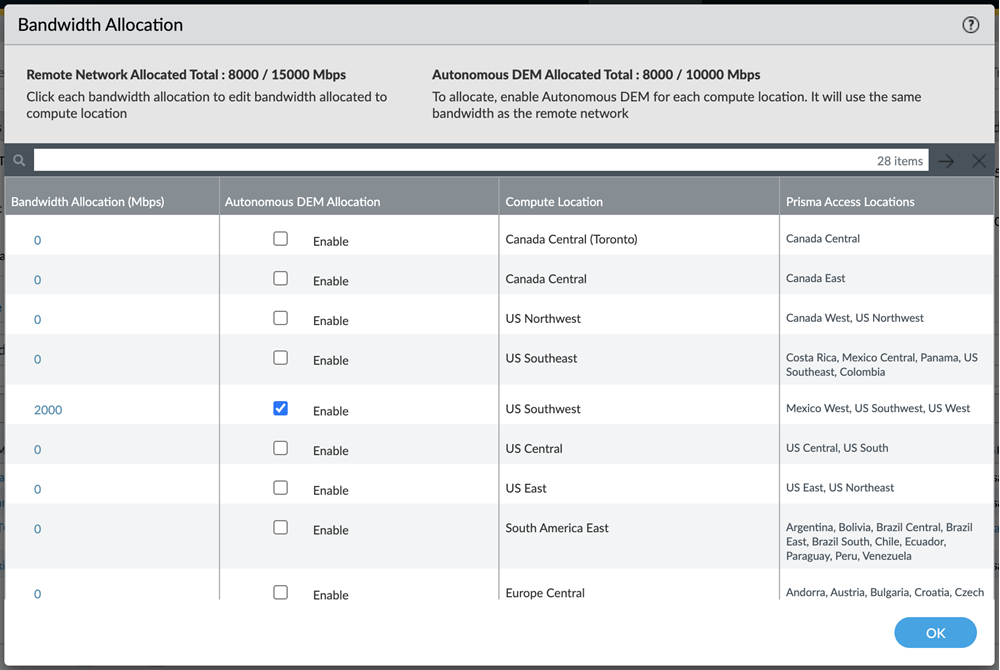
- When enabling ADEM on a compute location, the amount of ADEM bandwidth allocated on a compute location will mandatorily be equal to the bandwidth that you had already allocated for Remote Networks (see Bandwidth Allocation (Mbps) column) on Prisma Access for that compute location.As soon as you enable ADEM on a compute location, the same amount of bandwidth allocated for Remote Network is automatically deducted from the overall ADEM pool of bandwidth licenses (shown by Autonomous DEM Allocated Total).
- The Autonomous DEM Allocated Total shows you how much bandwidth has already been consumed by ADEM and how much is remaining.
- For any compute location, you can Enable ADEM only if you have enough ADEM bandwidth license available in the overall ADEM bandwidth pool (shown in Autonomous DEM Allocated Total) matching the allocated Remote Networks bandwidth. For example, if you are trying to Enable ADEM on a compute location where 100 Mbps of Remote Networks bandwidth is allocated, if your ADEM pool of licenses does not have at least 100 Mbps bandwidth available, you won't be able to enable ADEM on that compute location unless you add more ADEM bandwidth license to overall pool.
- Also, when ADEM is enabled on a particular compute location, if you increase or decrease the amount of Remote Networks Bandwidth Allocation (Mbps) on that compute location, it will correspondingly increase or decrease the overall bandwidth in the ADEM pool of licenses (Autonomous DEM Allocated Total).
- When you Enable ADEM on a compute location, all the sites that connect to the compute location get ADEM enabled and those Prisma SD-WAN sites can connect to the ADEM portal. Hence all those sites can be monitored.
- After you have enabled ADEM on a compute location, if you would like to free up some ADEM bandwidth to allocate to some other compute location, you can deselect the Enable check box. Doing so will release that bandwidth back to the ADEM pool of licenses, but it will also disable ADEM on the compute location which results in synthetic test monitoring to be stopped on all sites connected to that compute location.
To enable Autonomous DEM for the compute location, follow these steps:
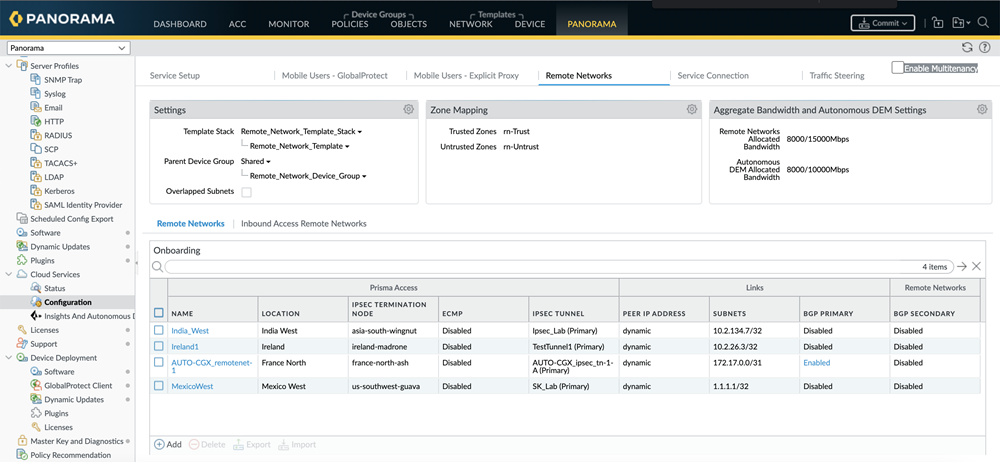
- Open Panorama.In the left panel, expand Cloud Services and select .
![]() Edit the Aggregate Bandwidth and Autonomous DEM Settings.Enable the compute locations for which to allocate the bandwidth for ADEM.
Edit the Aggregate Bandwidth and Autonomous DEM Settings.Enable the compute locations for which to allocate the bandwidth for ADEM.![]() The Autonomous DEM Allocation column will be visible only if you have purchased the ADEM for Remote Networks license.Click OK.Add the following URLs to make the SD-WAN site register to the ADEM portal:
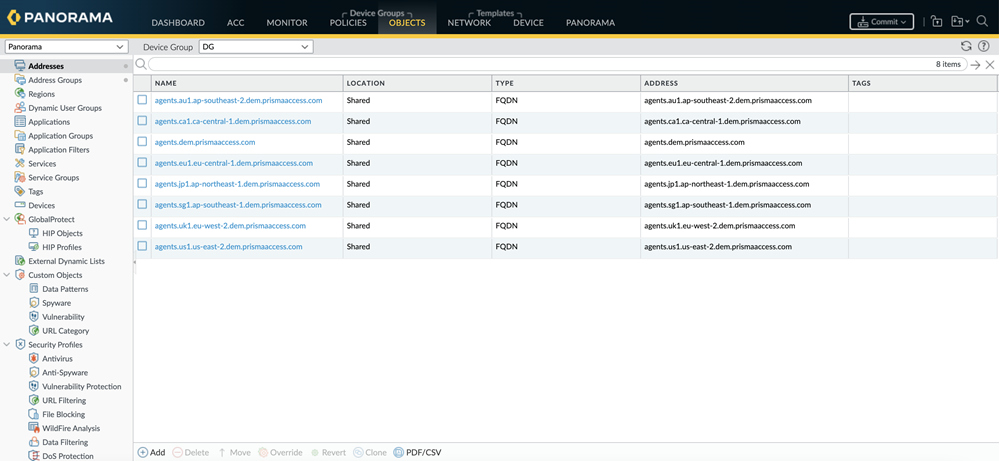
The Autonomous DEM Allocation column will be visible only if you have purchased the ADEM for Remote Networks license.Click OK.Add the following URLs to make the SD-WAN site register to the ADEM portal:- In Panorama, go to . Click on Add and add the following ADEM Service Destination FQDNs.
- agents.dem.prismaaccess.com
- updates.dem.prismaaccess.com
- features.dem.prismaaccess.com
- agents-prod1-us-west2.dem.prismaaccess.com
- agents-sg1-asia-southeast1.dem.prismaaccess.com
- agents-au1-australia-southeast1.dem.prismaaccess.com
- agents-jp1-asia-northeast1.dem.prismaaccess.com
- agents-ca1-northamerica-northeast1.dem.prismaaccess.com
- agents-eu1-europe-west4.dem.prismaaccess.com
- agents-uk1-europe-west2.dem.prismaaccess.com
- agents-in1-asia-south1.dem.prismaaccess.com
- agents-de1-europe-west3.dem.prismaaccess.com
- agents-ch1-europe-west6.dem.prismaaccess.com
- agents-fr1-europe-west9.dem.prismaaccess.com
![]()
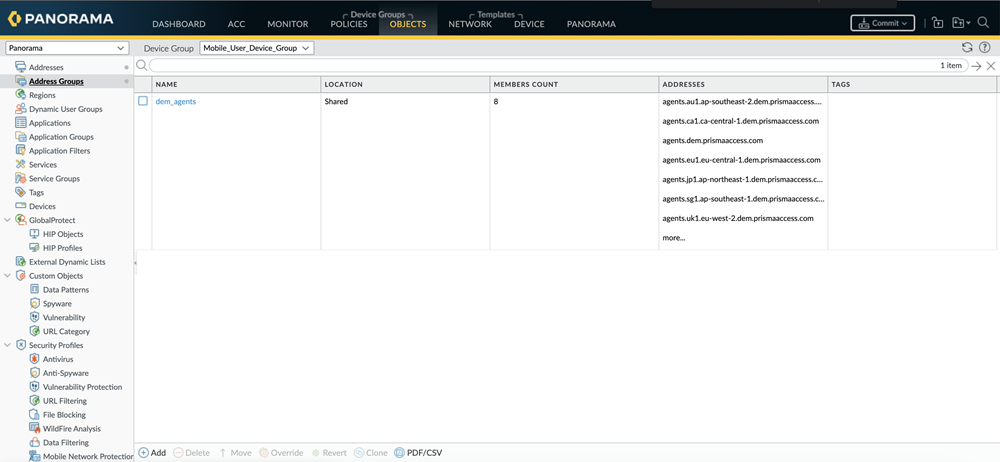
- Create an address group to contain the addresses above by going to , clicking Add and providing a name for the address group.
![]()
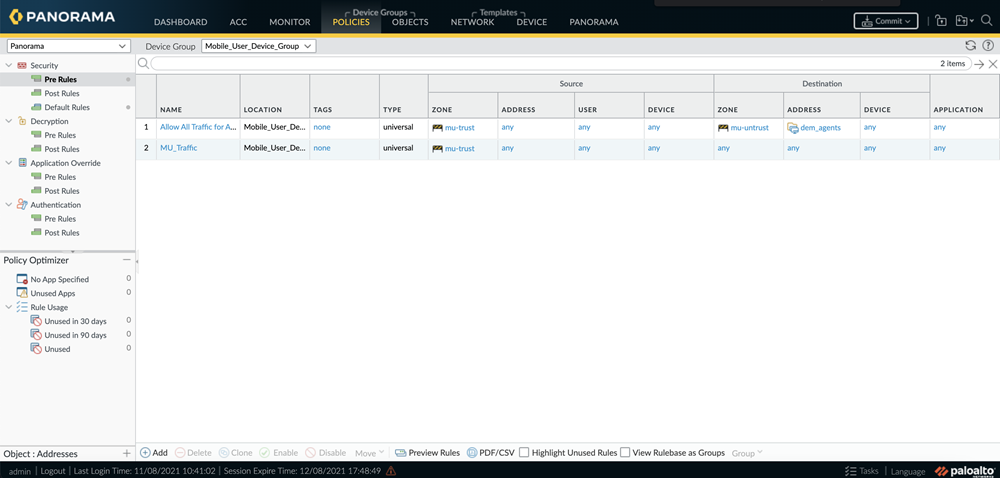
- Add the address group you just created into the security policy. Go to . Click Add and add the address group to the policy.
![]()