Cloud NGFW for AWS
Cloud NGFW for AWS DNS Security
Table of Contents
Expand All
|
Collapse All
Cloud NGFW for AWS Docs
Cloud NGFW for AWS DNS Security
Learn how to secure your VPC traffic from DNS-based threats.
| Where Can I Use This? | What Do I Need? |
|---|---|
|
|
Domain Name Service (DNS) is a critical and foundational protocol of the internet, as
described in the core RFCs for the protocol. Malicious actors have utilized command and control (C2)
communication channels over the DNS and, in some cases, have even used the protocol
to exfiltrate data. DNS exfiltration can happen when a bad actor compromises an
application instance in your VPC and then uses DNS lookup to send data out of the
VPC to a domain that they control. Malicious actors can also infiltrate malicious
data and payloads to the VPC workloads over DNS. Palo Alto Networks Unit 42 research
has described different types of DNS abuse
discovered.
Cloud NGFW for AWS allows you to protect your VPC traffic from advanced DNS-based
threats, by monitoring and controlling the domains that your VPC resources query.
With Cloud NGFW for AWS. You can deny access to the domains that Palo Alto Networks
considers bad or suspicious and allow all other queries.
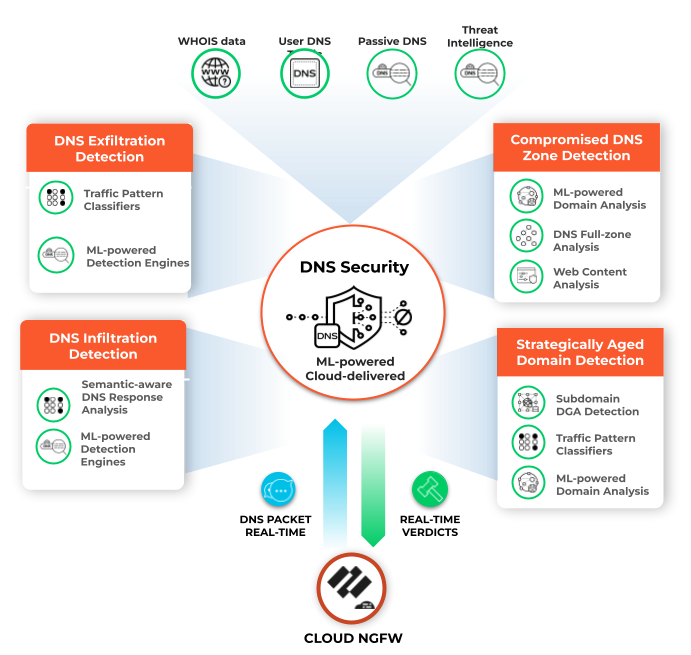
Cloud NGFW uses the Palo Alto Networks DNS Security service which proactively detects malicious domains by generating DNS
signatures using advanced predictive analysis and machine learning, with data from
multiple sources (such as WildFire traffic analysis, passive DNS, active web
crawling & malicious web content analysis, URL sandbox analysis, Honeynet, DGA
reverse engineering, telemetry data, whois, the Unit 42 research organization, and
Cyber Threat Alliance). DNS security service then continuously distributes these DNS signatures to your
Cloud NGFW resources to proactively defend against malware using DNS for command and
control (C2) and data theft.
DNS Security for Cloud NGFW requires Panorama. Configure all DNS
Security-related policy rules on Panorama and push them to Cloud NGFW resources as
part of a Cloud Device Group.
To enable DNS Security in Cloud NGFW resources:
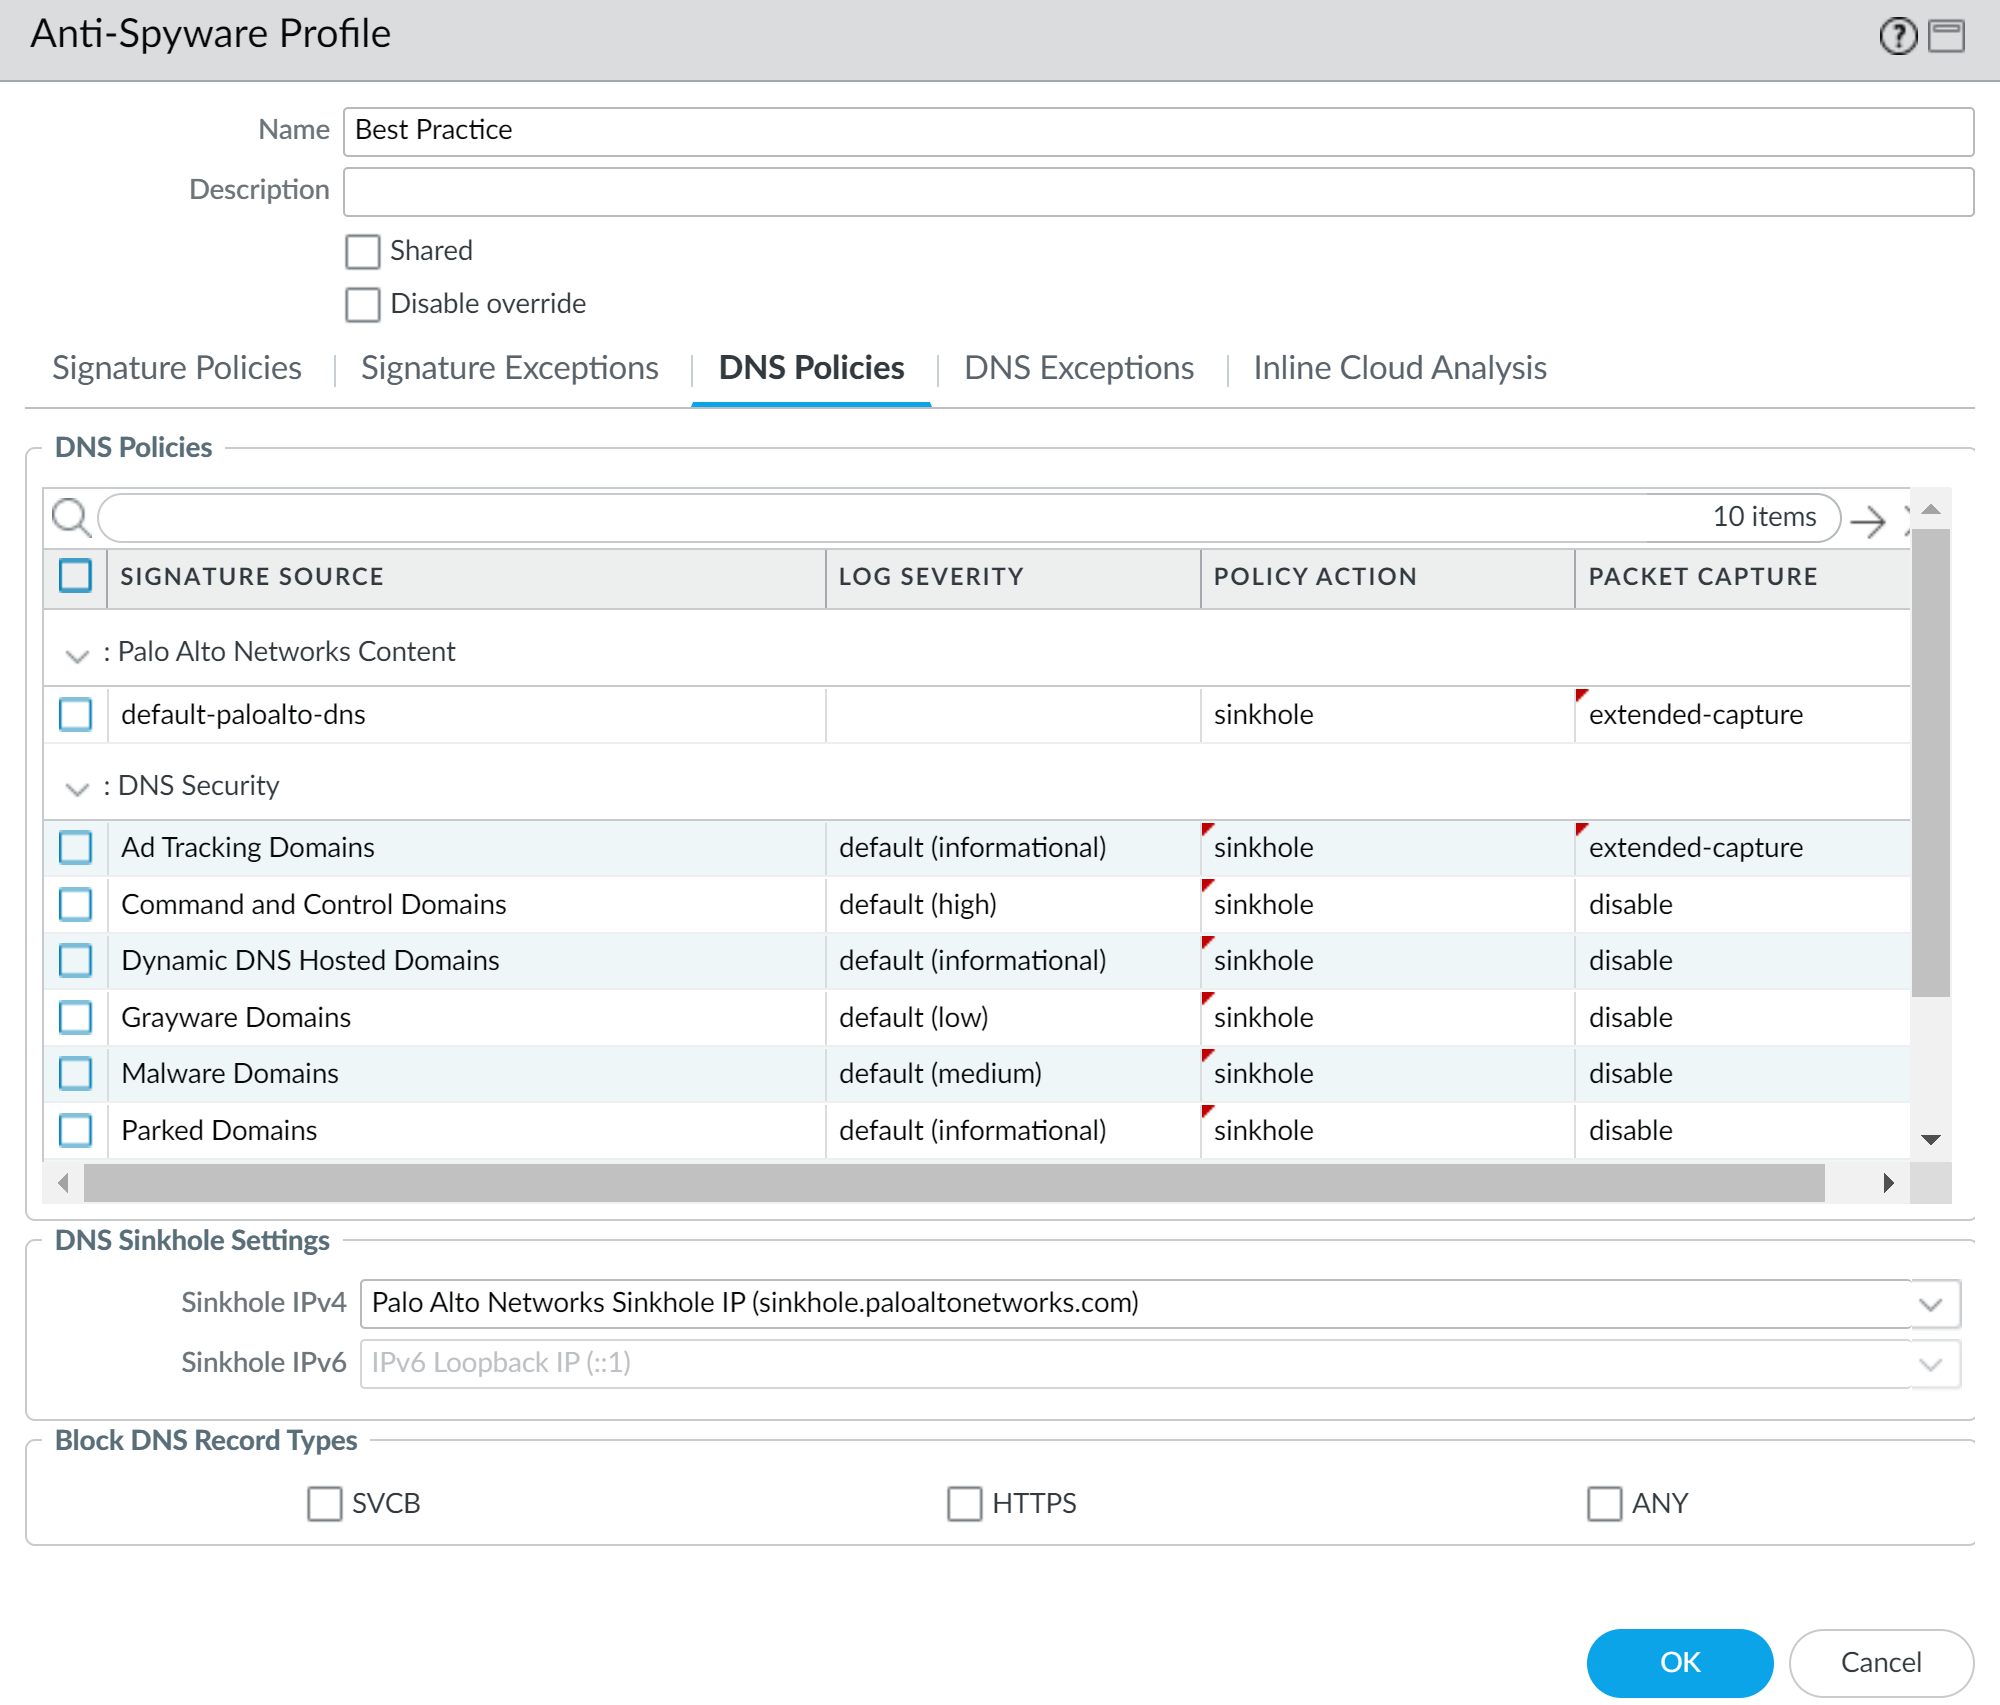
- Enable DNS Security in Panorama by creating an Anti-Spyware profile in Cloud Device Groups associated with your Cloud NGFW Resources.
![]() Redirect your DNS traffic in your VPC to your Cloud NGFW resource. How your configure traffic redirection depends on your DNS server setup:
Redirect your DNS traffic in your VPC to your Cloud NGFW resource. How your configure traffic redirection depends on your DNS server setup:Private DNS Server
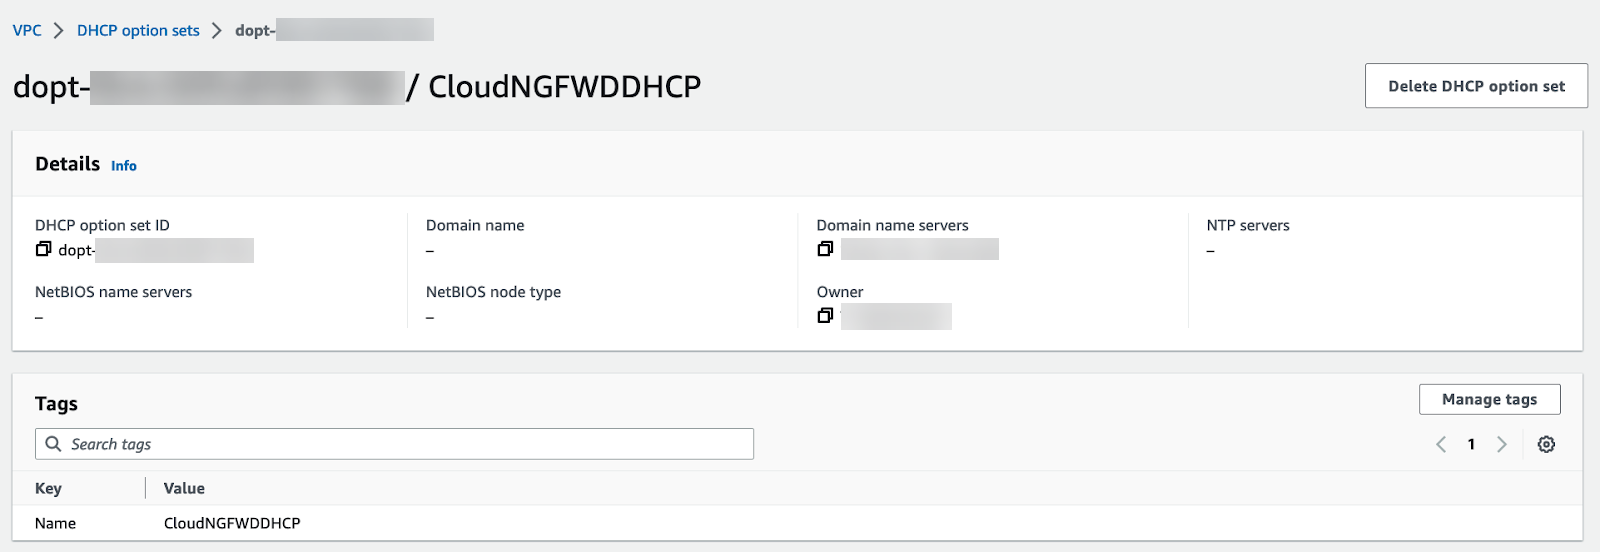
When using a private or on-premises DNS server, complete the following procedure to direct DNS traffic to your Cloud NGFW endpoints.- Log in to the AWS console.Select your VPC and then DHCP option sets.You can create a new DHCP option set and add your DNS server IP address. In this example, 172.18.10.1 is the private DNS server address. If you have an existing DHCP option set with your DNS server configured, view the details and take note of the DNS server IP address.
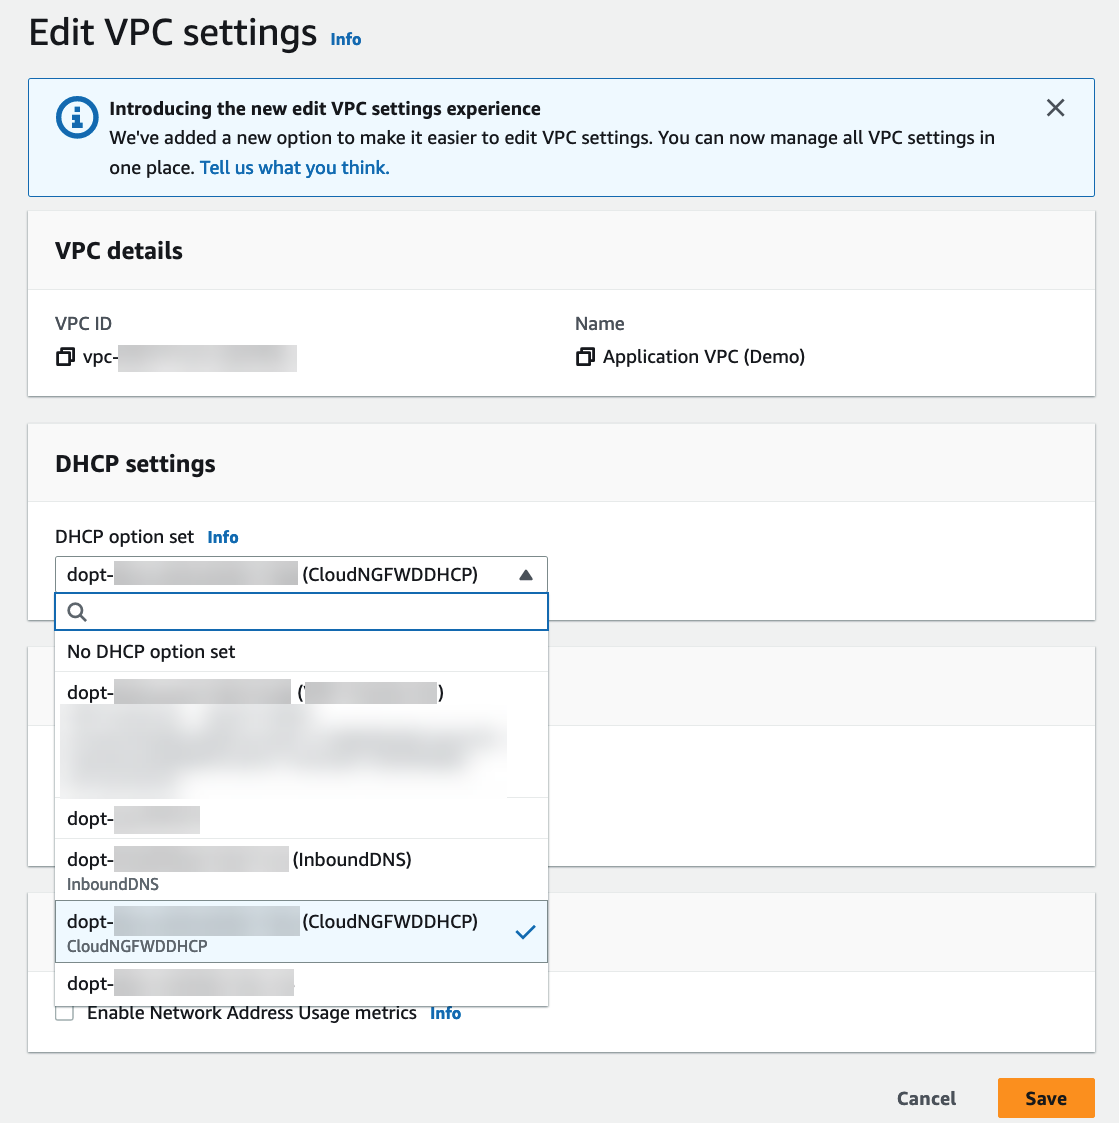
![]() Select VPC and choose the VPC to secure.From the Actions drop-down, select Edit VPC settings.Under DHCP settings, choose the DHCP option set with your private DNS server configured from the DHCP option set drop-down.Click Save changes.The selected VPC now directs all DNS queries to the configured DNS server.Edit your subnet route table.
Select VPC and choose the VPC to secure.From the Actions drop-down, select Edit VPC settings.Under DHCP settings, choose the DHCP option set with your private DNS server configured from the DHCP option set drop-down.Click Save changes.The selected VPC now directs all DNS queries to the configured DNS server.Edit your subnet route table.- Select VPCRoute tables.Select the route table for the subnet you want to secure.Add a route and set the destination to the IP address of your DNS server.
![]() Click Save changes.Any DNS traffic from the protected subnet is routed through the Cloud NGFW endpoint and on to the Cloud NGFW for inspection and enforcement.
Click Save changes.Any DNS traffic from the protected subnet is routed through the Cloud NGFW endpoint and on to the Cloud NGFW for inspection and enforcement.Route 53 DNS Service
Complete the following steps to secure DNS traffic in your VPCs when using Amazon’s Route 53 DNS Service. Create a subnet in each availability zone containing workloads to deploy resolver Inbound endpoints.- Log in to the AWS console.Create an inbound endpoint.
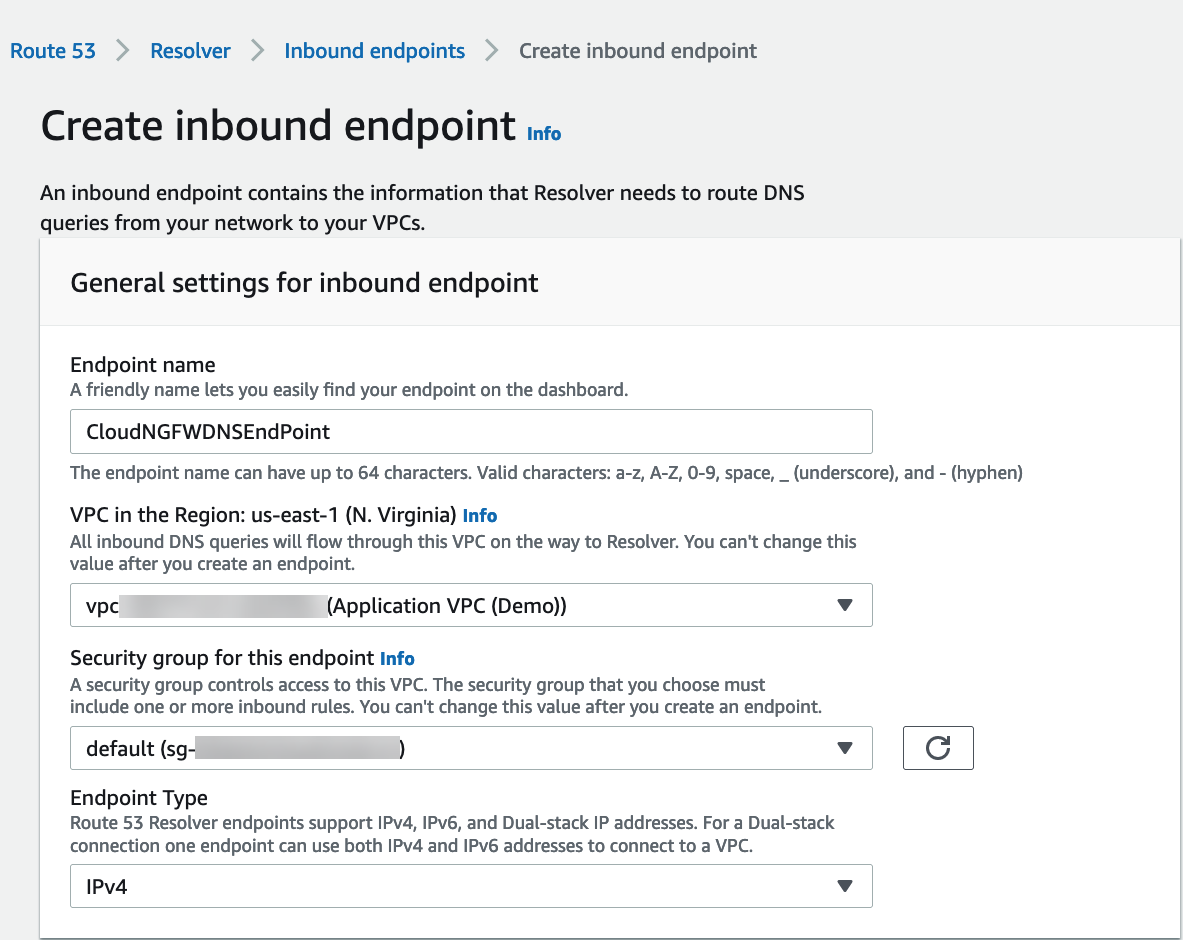
- Select ServicesRoute 53ResolverInbound Endpoints.Click Create inbound endpoint.Enter a descriptive Name.Select the VPC for the endpoint.Attach a security group for this endpoint.Set the Endpoint Type to IPv4.
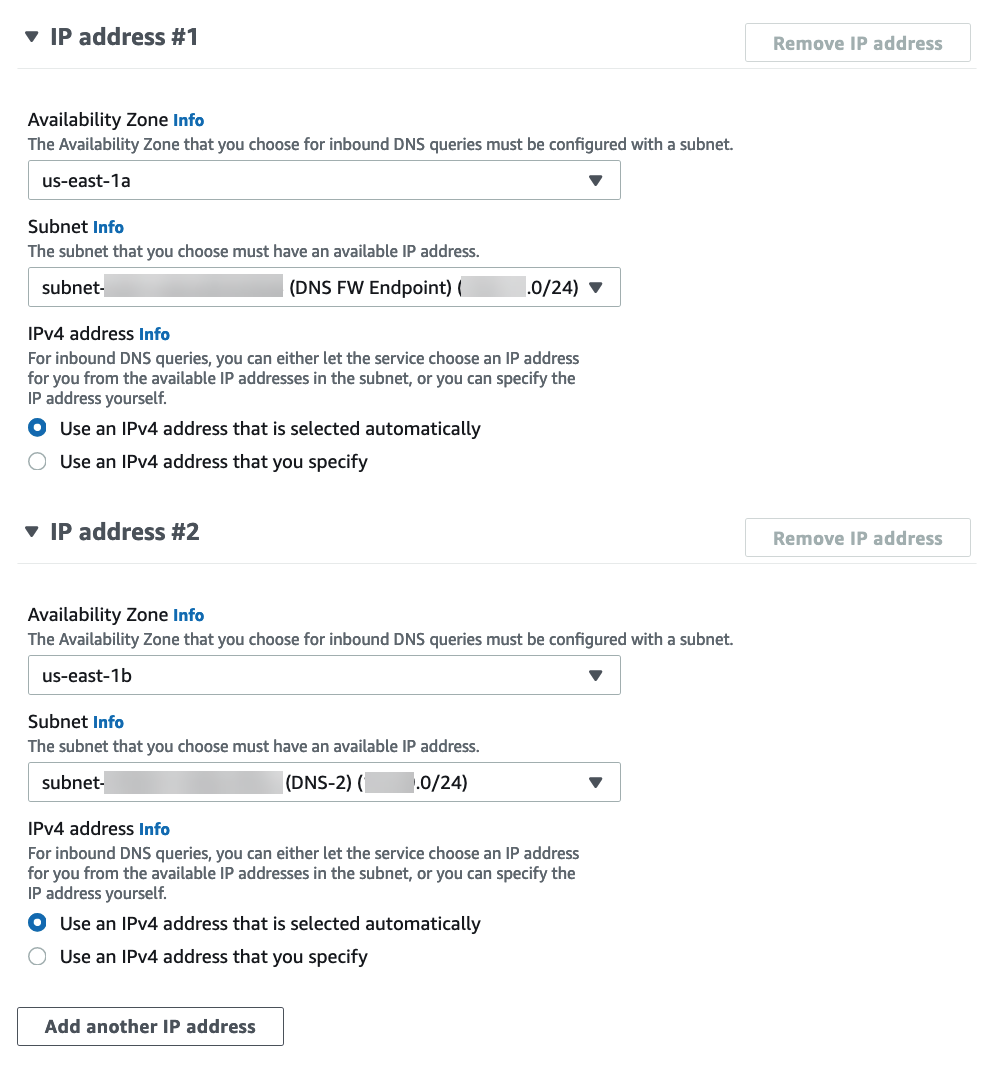
![]() Select the availability zone.Select the subnet you created above.If you have more than one availability zone, you must specify the availability zone and subnet for each.
Select the availability zone.Select the subnet you created above.If you have more than one availability zone, you must specify the availability zone and subnet for each.![]() Click Create inbound endpoint.Note the IP address associated with each subnet attached to your inbound endpoint. Use these IP addresses when configuring your DHCP option sets in the following steps.Select VPCDHCP option sets.You can create a new DHCP option set and add the IP address for each availability zone. If you have more than one availability zone, enter each IP address as a comma-separated list.
Click Create inbound endpoint.Note the IP address associated with each subnet attached to your inbound endpoint. Use these IP addresses when configuring your DHCP option sets in the following steps.Select VPCDHCP option sets.You can create a new DHCP option set and add the IP address for each availability zone. If you have more than one availability zone, enter each IP address as a comma-separated list.![]() Select VPC and choose the VPC to secure.From the Actions drop-down, select Edit VPC settings.Under DHCP settings, choose the DHCP option set with you created above from the DHCP option set drop-down.
Select VPC and choose the VPC to secure.From the Actions drop-down, select Edit VPC settings.Under DHCP settings, choose the DHCP option set with you created above from the DHCP option set drop-down.![]() Click Save changes.The selected VPC now directs all DNS queries to the configured DNS server.Edit your subnet route table.
Click Save changes.The selected VPC now directs all DNS queries to the configured DNS server.Edit your subnet route table.- Select VPCRoute Tables.Select the route table for the subnet you want to secure.Add a route and set the destination to the IP address of your DNS server and set the target to the Cloud NGFW endpoint.
![]() Click Save changes.Any DNS traffic from the protected subnet is routed through the Cloud NGFW endpoint and on to the Cloud NGFW for inspection and enforcement.
Click Save changes.Any DNS traffic from the protected subnet is routed through the Cloud NGFW endpoint and on to the Cloud NGFW for inspection and enforcement.Private Hosted Zone DNS
To create a Private Hosted zone in AWS, see Creating a private hosted zone.To allow your Cloud NGFW resource to query Route 53 Resolver for any DNS zones (e.g., Private Zones) hosted on Route 53, you create a Route 53 Inbound Endpoint as discussed earlier. The Inbound Endpoint is a bridge for other services to query Route 53 for domain name resolution. When you create an Inbound Endpoint, AWS creates an elastic network interface (ENI) in each availability zone (AZ) that you specify will receive inbound DNS queries.- Open the Amazon VPC console.Create an inbound endpoint.
- Select ServicesRoute 53ResolverInbound Endpoints.Click Create inbound endpoint.Enter a descriptive Name.Select the VPC for the endpoint.Attach a security group for this endpoint.Set the Endpoint Type to IPv4.
![]() Select the availability zone.Select the subnet you created above.If you have more than one availability zone, you must specify the availability zone and subnet for each.
Select the availability zone.Select the subnet you created above.If you have more than one availability zone, you must specify the availability zone and subnet for each.![]() Click Create inbound endpoint.Note the IP address associated with each subnet attached to your inbound endpoint. Use these IP addresses when configuring your DHCP option sets in the following steps.Select VPCDHCP option sets.You can create a new DHCP option set and add the IP address for each availability zone. If you have more than one availability zone, enter each IP address as a comma-separated list.
Click Create inbound endpoint.Note the IP address associated with each subnet attached to your inbound endpoint. Use these IP addresses when configuring your DHCP option sets in the following steps.Select VPCDHCP option sets.You can create a new DHCP option set and add the IP address for each availability zone. If you have more than one availability zone, enter each IP address as a comma-separated list.![]() Select VPC and choose the VPC to secure.From the Actions drop-down, select Edit VPC settings.Under DHCP settings, choose the DHCP option set with you created above from the DHCP option set drop-down.
Select VPC and choose the VPC to secure.From the Actions drop-down, select Edit VPC settings.Under DHCP settings, choose the DHCP option set with you created above from the DHCP option set drop-down.![]() Click Save changes.Edit your subnet route table.
Click Save changes.Edit your subnet route table.- Select VPCRoute Tables.Select the route table for the subnet you want to secure.Add a route and set the destination to the IP address of your DNS server and set the target to the Cloud NGFW endpoint.
![]() Click Save changes.Any DNS traffic from the protected subnet is routed through the Cloud NGFW endpoint and on to the Cloud NGFW for inspection and enforcement.
Click Save changes.Any DNS traffic from the protected subnet is routed through the Cloud NGFW endpoint and on to the Cloud NGFW for inspection and enforcement.

