Next-Generation Firewall
Perform the Initial Setup and Configuration for NGFWs
Table of Contents
Perform the Initial Setup and Configuration for NGFWs
Learn about the initial setup and configuration needed for all NGFWs.
| Where Can I Use This? | What Do I Need? |
|---|---|
|
|
Perform the initial configuration for your NGFW. You can perform these initial
configuration tasks either from the MGT interface, even if you do not plan to use
this interface for your NGFW management, or using a direct serial connection to the
console port on the device.
The initial configurations need to be completed before you can begin onboarding your
NGFW to your management system of choice.
The initial configurations for your NGFWs can be performed before you have
decided on the management style of choice and will need to be done before you
can proceed with onboarding.
For more information about what needs to be done before you can onboard to Strata
Cloud Manager or Panorama, see the cheat sheet here.
By default, the PA-Series NGFW has:
- An IP address of 192.168.1.1
- A username/password of admin/admin
For security reasons, you must change these settings before continuing with other
NGFW configuration tasks.
Perform the Initial Setup and Configuration for NGFWs (Non-Air Gapped)
Perform the initial setup and configuration for a non-air gapped NGFW.
- Install your NGFW and connect power to it.If your NGFW model has dual power supplies, connect the second power supply for redundancy. Refer to the hardware reference guide for your model for details.Gather the required information from your network administrator.
- IP address and netmask (if the MGT port will have a static address)
- Default gateway (if the MGT port will have a static default gateway address)
- DNS server address
Connect your computer to the NGFW.You can connect to the device in one of the following ways:- Connect a serial cable from your computer to the Console port and connect to the firewall using terminal emulation software (9600-8-N-1). Wait a few minutes for the boot-up sequence to complete; when the NGFW is ready, the prompt changes to the name of the firewall, for example PA-220 login.
- Connect an RJ-45 Ethernet cable from your computer to the MGT port on the NGFW. From a browser, go to https://192.168.1.1.
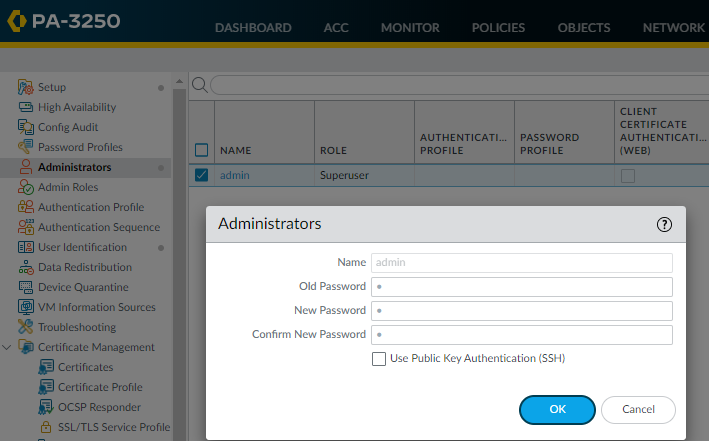
You may need to change the IP address on your computer to an address in the 192.168.1.0/24 network, such as 192.168.1.2, to access this URL.When prompted, log in to the NGFW.You must log in using the default username and password (admin/admin). The NGFW will begin to initialize.Set a secure username and password for the admin account.The predefined, default administrator password (admin) must be changed on the first login on a device. The new password must be a minimum of eight characters and include a minimum of one lowercase and one uppercase character, as well as one number or special character. Although you don’t have to configure a new username, it is a best practice to do so and to use unique usernames and passwords for each administrator. The login must include at least one alphabetical character or symbol (underscore, period, or hyphen, although a hyphen cannot be the first character in the username) and cannot be numbers only.Be sure to use the best practices for password strength to ensure a strict password and review the minimum password complexity.- Select .Select the admin role.Enter the current default password and the new password.
![]() Click OK to save your settings.Configure the MGT interface.
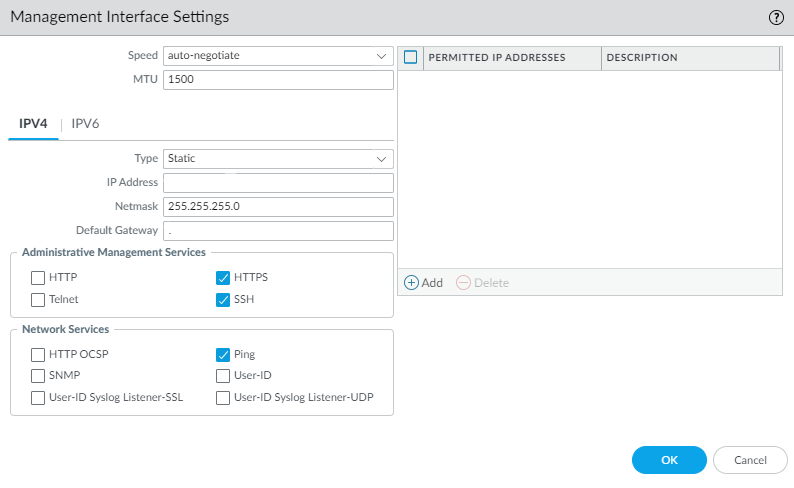
Click OK to save your settings.Configure the MGT interface.- Select and edit the Management interface.Set the Speed to auto-negotiate.Specify the MTU in bytes for packets sent on this interface.Select IPv4 or IPv6.To configure IPv4 address settings for the MGT interface, select an address Type:
- Static— Enter the IP Address, Netmask, and Default Gateway.
- DHCP Client—To configure dynamic address settings, you must Configure the Management Interface as a DHCP Client.
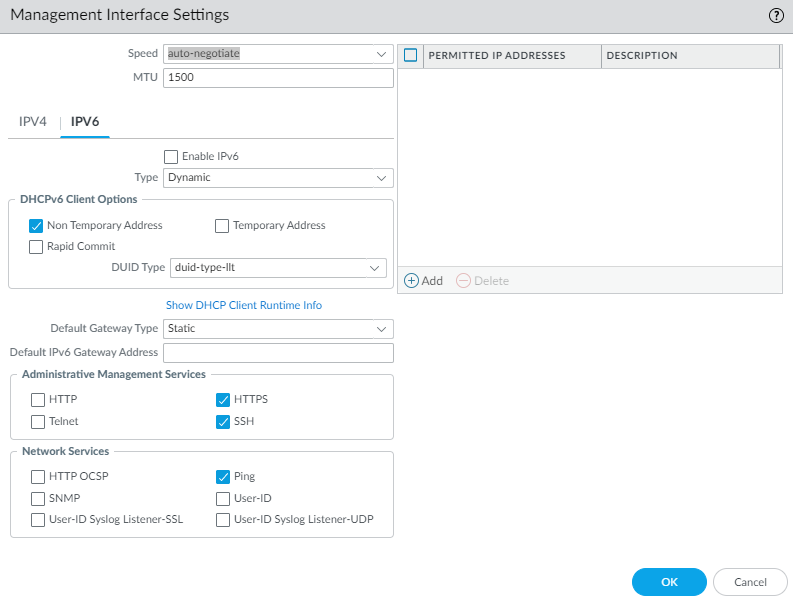
![]() To configure IPv6 address settings for the MGT interface, Enable IPv6 and select an address Type:
To configure IPv6 address settings for the MGT interface, Enable IPv6 and select an address Type:- Static— Enter the IPv6 Address/Prefix Length. Additionally, select a Default Gateway Type: Static (enter the Default IPv6 Gateway Address) or Dynamic (the NGFW learns the default gateway address from the Router Advertisement message that the router sent).
- DHCP Client—To configure dynamic IPv6 address settings, you must Configure the Management Interface for Dynamic IPv6 Address Assignment.
![]() To prevent unauthorized access to the management interface, it is a an administrative best practice to Add the Permitted IP Addresses from which an administrator can access the MGT interface.Select which management services to allow on the interface.Make sure Telnet and HTTP aren't selected because these services use plaintext and aren't as secure as the other services; they could compromise administrator credentials.Click OK.Specify the update server, and configure DNS settings and proxy server settings.You must manually configure at least one DNS server on the NGFW or it won't be able to resolve hostnames; it won't use DNS server settings from another source, such as an ISP.
To prevent unauthorized access to the management interface, it is a an administrative best practice to Add the Permitted IP Addresses from which an administrator can access the MGT interface.Select which management services to allow on the interface.Make sure Telnet and HTTP aren't selected because these services use plaintext and aren't as secure as the other services; they could compromise administrator credentials.Click OK.Specify the update server, and configure DNS settings and proxy server settings.You must manually configure at least one DNS server on the NGFW or it won't be able to resolve hostnames; it won't use DNS server settings from another source, such as an ISP.- Select .
- For multi-virtual system platforms, select Global and edit the Services section.
- For single virtual system platforms, edit the Services section.
On the Services tab, Update Server represents the IP address or host name of the server from which to download updates from Palo Alto Networks. The current value is updates.paloaltonetworks.com. Don't change this setting unless instructed by technical support.Select Verify Update Server Identity.It's a best practice to enable this option, which causes the firewall or Panorama to verify that the server from which the software or content package is downloaded has an SSL certificate signed by a trusted authority.For DNS, select the way for the MGT interface to get DNS services:- Servers—Enter the Primary DNS Server address and Secondary DNS Server address.
- DNS Proxy Object—From the drop-down, select the DNS Proxy that you want to use to configure global DNS services, or click DNS Proxy to configure a new DNS proxy object.Beginning with PAN-OS 11.2.1 and later releases, you can enable encrypted DNS on the MGT interface (whether the interface uses a DNS server or DNS proxy) by configuring DNS-over-HTTPS (DoH) or DNS-over-TLS (DoT).
- To configure encrypted DNS when the MGT interface uses DNS servers, refer to the Networking Administrator's Guide, Use Case 1: Firewall Requires DNS Resolution..
- To configure encrypted DNS when the MGT interface uses DNS proxy, refer to the Networking Administrator's Guide, Configure a DNS Proxy Object.
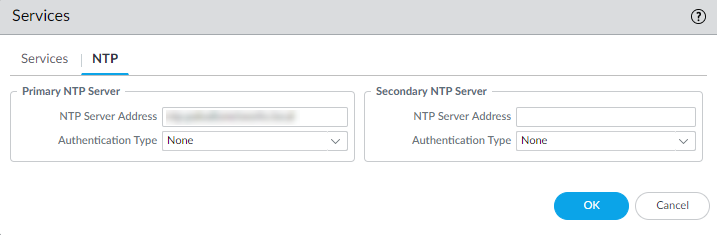
![]() Click OK.Configure date and time (NTP) settings.
Click OK.Configure date and time (NTP) settings.- Select .
- For multi-virtual system platforms, select Global and edit the Services section.
- For single virtual system platforms, edit the Services section.
On the NTP tab, to use the virtual cluster of time servers on the Internet, enter the hostname pool.ntp.org as the Primary NTP Server or enter the IP address of your primary NTP server.![]() (Optional) Enter a Secondary NTP Server address.(Optional) To authenticate time updates from the NTP server(s), for Authentication Type, select one of the following for each server:
(Optional) Enter a Secondary NTP Server address.(Optional) To authenticate time updates from the NTP server(s), for Authentication Type, select one of the following for each server:- None—(Default) Disables NTP authentication.
- Symmetric Key—NGFW uses symmetric key exchange (shared secrets) to authenticate time updates.
- Key ID—Enter the Key ID (1-65534).
- Algorithm—Select the algorithm to use in NTP authentication: MD5, SHA1, (PAN-OS 12.1.2 & later) SHA256, or SHA512.
- Autokey—NGFW uses autokey (public key cryptography) to authenticate time updates.
Click OK.(Optional) Configure general NGFW settings as needed.- Select and edit the General Settings.Enter a Hostname for the NGFW and enter your network Domain name. The domain name is just a label; it will not be used to join the domain.Enter Login Banner text that informs users who are about to log in that they require authorization to access the NGFW management functions.As a best practice, avoid using welcoming verbiage. Additionally, you should ask your legal department to review the banner message to ensure it adequately warns that unauthorized access is prohibited.Enter the Latitude and Longitude to enable accurate placement of the NGFW on the world map.Click OK.Commit your changes.When the configuration changes are saved, you lose connectivity to the web interface because the IP address has changed.Click Commit at the top right of the web interface. The NGFW can take up to 90 seconds to save your changes.Connect the NGFW to your network.
- Disconnect the NGFW from your computer.(All NGFWs except for the PA-5450) Connect the MGT port to a switch port on your management network using an RJ-45 Ethernet cable. Make sure that the switch port you cable the device to is configured for auto-negotiation.(PA-5450 only) Connect the MGT port to a switch port on your management network using a Palo Alto Networks certified SFP/SFP+ transceiver and cable.Open an SSH management session to the NGFW.Using a terminal emulation software, such as PuTTY, launch an SSH session to the firewall using the new IP address you assigned to it.Verify network access to external services required for NGFW management, such as the Palo Alto Networks Update Server.You can do this in one of the following ways:
- If you do not want to allow external network access to the MGT interface, you will need to set up a data port to retrieve required service updates. Continue to Set Up Network Access for External Services.
- If you do plan to allow external network access to the MGT interface, verify that you have connectivity and then proceed to Register the NGFW and Activate Subscription Licenses.
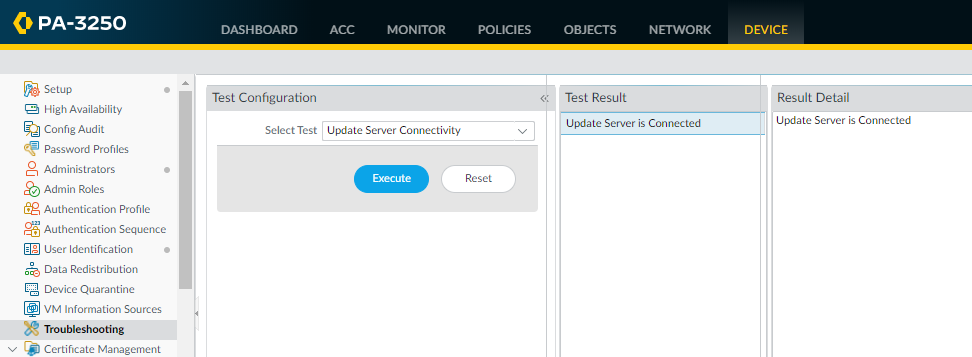
- Use update server connectivity test to verify network connectivity to the Palo Alto Networks Update server as shown in the following example:
- Select , and select Update Server Connectivity from the Select Test drop-down.
- Execute the update server connectivity test.
![]() Use the following CLI command to retrieve information on the support entitlement for the firewall from the Palo Alto Networks update server:
Use the following CLI command to retrieve information on the support entitlement for the firewall from the Palo Alto Networks update server:request support checkIf you have connectivity, the update server will respond with the support status for your NGFW. If your firewall is not yet registered, the update server returns the following message:Contact Us https://www.paloaltonetworks.com/company/contact-us.html Support Home https://www.paloaltonetworks.com/support/tabs/overview.html Device not found on this update server
Perform the Initial Setup and Configuration for NGFWs (Air Gapped)
Perform the initial setup and configuration for an air gapped NGFW.The air gapped NGFW cannot connect to the Palo Alto Networks update server because an outbound internet connection is required. To activate licenses, upgrade the PAN-OS software version, and install dynamic content updates you must upload the relevant files to the air gapped NGFW manually.- Gather the required information from your network administrator.
- Private IP address for the management (MGT) port
- Netmask
- Default gateway
- DNS server address
- NTP server address
Install and power on the NGFW.Review your NGFW hardware reference guide for details and best practices.Connect to the NGFW.You must log in using the default admin username. You are immediately prompted to change the default admin password before you can continue. The new password must be a minimum of eight characters and include a minimum of one lowercase and one uppercase character, as well as one number or special character.You can connect to the NGFW in one of the following ways:- Connect a serial cable from your computer to the Console port and connect to the device using terminal emulation software (9600-8-N-1). Wait a few minutes for the boot-up sequence to complete; when the NGFW is ready, the prompt changes to the name of the NGFW, for example PA-220 login.
- Log in to the NGFW web interface by connecting an RJ-45 Ethernet cable
from your computer to the MGT interface on the NGFW. From a browser, go
to https://192.168.1.1.You may need to change the IP address on your computer to an address in the 192.168.1.0/24 network, such as 192.168.1.2, to access this URL.
(Best Practices) Disable Zero Touch Provisioning (ZTP).ZTP can only be disabled from the firewall CLI. The NGFW reboots after you disable ZTP.Continue to the next steps after the NGFW has rebooted and you can log back in.- PA-5400 Series, PA-3400 Series, PA-1400 Series, and PA-400 Seriesadmin> set system ztp disable
- All Other NGFWsadmin> request disable-ztp
- Configure the network settings for the air gapped NGFW.The following commands set the interface IP allocation to static, configures the IP address for the MGT interface, the Domain Name Server (DNS), and Network Time Protocol (NTP) server.admin> configureadmin# set deviceconfig system type staticadmin# set deviceconfig system ip-address <IP-Address> netmask <Netmask-IP> default-gateway <Gateway-IP>admin# set deviceconfig system dns-settings servers primary <IP-Address> secondary <IP-Address>admin# set deviceconfig system ntp-servers primary-ntp-server ntp-server-address <IP-Address>admin# set deviceconfig system ntp-servers secondary-ntp-server ntp-server-address <IP-Address>Register the NGFW with the Palo Alto Networks Customer Support Portal (CSP).
- Log in to the Palo Alto Networks CSP.Click Register a Device.Select Register device using Serial Number and click Next.Enter the required Device Information.
- Enter the NGFW Serial Number.
- Check (enable) Device will be used offline.
- Select the PAN-OS OS Release running on the NGFW.
Enter the required Location Information.- Enter the City the NGFW is located in,
- Enter the Postal Code the NGFW is located in,
- Enter the Country the NGFW is located in.
Agree and Submit.Skip this step when prompted to generate the optional Day 1 Configuration config file.Download your NGFW license keys.The license key files are required to activate your NGFW licenses when air gapped.- Log in to the Palo Alto Networks CSP.Select and locate the NGFW you added.Download all license keys files from the download links available License column.You must download a license key file for each license you want to active on the NGFW.Activate the NGFW licenses.
- Log in to the firewall web interface.Select and Manually upload license key.Click Choose File to select the license key file you downloaded in the previous step and click OK.Repeat this step to uploaded and activate all licenses.(Optional) Configure general NGFW settings as needed.
- Select and edit the General Settings.Enter a Hostname for the NGFW and enter your network Domain name. The domain name is just a label; it will not be used to join the domain.Enter Login Banner text that informs users who are about to log in that they require authorization to access the NGFW management functions.As a best practice, avoid using welcoming verbiage. Additionally, you should ask your legal department to review the banner message to ensure it adequately warns that unauthorized access is prohibited.Enter the Latitude and Longitude to enable accurate placement of the device on the world map.Click OK.Commit your changes.Upgrade the NGFW PAN-OS and dynamic content versions.Review the PAN-OS Upgrade Guide and PAN-OS Release Notes for detailed information about your target PAN-OS upgrade version.
- Log in to the Palo Alto Networks CSP.Download dynamic content updates.
- Select .
- Select the dynamic Content type you want to install.
- Download the dynamic content update to your local device.
- Repeat this step to download all required dynamic content updates.
Download a PAN-OS software update.- Select .
- For the Content type, select the NGFW model. For the Release type, select All(default) or Preferred.
- In the Download column, click the PAN-OS version to download the software image to your local device.
Log in to the NGFW web interface.Select and Upload the dynamic content updates you downloaded.Repeat this step to Browse and select all the dynamic content release versions.Install the dynamic content updates.Select and Upload the PAN-OS software image you download.Install the PAN-OS software version.The device needs to restart to finish installing the PAN-OS software upgrade.Connect the NGFW to your network.- Disconnect the device from your computer.(All NGFWs except for the PA-5450) Connect the MGT port to a switch port on your management network using an RJ-45 Ethernet cable. Make sure that the switch port you cable the device to is configured for autonegotiation.(PA-5450 only) Connect the MGT port to a switch port on your management network using a Palo Alto Networks certified SFP/SFP+ transceiver and cable.Verify the air gapped NGFW connectivity.
- Log in to the NGFW web interface.Select .Verify the NGFW can reach required internal devices.
- For Select Test, select ping.
- For the Host, enter an internal IP address to verify the NGFW can reach a device in the air gapped network.
- Click Execute and wait for the test to
complete. Click the Test Result when displayed to review the Result Detail to confirm the firewall can successfully ping the internal device.
- Repeat this step to verify the NGFW can reach all required internal devices.
Verify the NGFW cannot reach devices outside of the air gapped network.- For Select Test, select ping.
- For the Host, enter an external IP address to verify the NGFW cannot reach devices outside of the air gapped network.
- Click Execute and wait for the test to
complete. Click the Test Result when displayed to review the Result Detail to confirm the NGFW cannot ping the external device.