Enterprise DLP
Modify a DLP Rule on Strata Cloud Manager
Table of Contents
Modify a DLP Rule on Strata Cloud Manager
Modify an Enterprise Data Loss Prevention (E-DLP) rule to enforce data security standards on Strata Cloud Manager.
On May 7, 2025, Palo Alto Networks is introducing new Evidence Storage and Syslog Forwarding service IP
addresses to improve performance and expand availability for these services
globally.
You must allow these new service IP addresses on your network
to avoid disruptions for these services. Review the Enterprise DLP
Release Notes for more
information.
| Where Can I Use This? | What Do I Need? |
|---|---|
|
Or any of the following licenses that include the Enterprise DLP license
|
Configure a DLP rule to define the type of traffic to inspect, the impacted file
types, action, and log severity for the data profile match criteria. Enterprise Data Loss Prevention (E-DLP) automatically creates a DLP rule when you create a new
data profile. After you configure the data
filtering profile, you must create a Profile Group containing the data filtering
profile and attached it to a Security policy rule so the NGFW or Prisma Access tenant can enforce your data security standards.
Enterprise DLP displays DLP rules only when you manage enforcement points from
Strata Cloud Manager. Enterprise DLP doesn't display the DLP rules if you
manage enforcement points from a Panorama® management server.
Modify a DLP Rule on Strata Cloud Manager
Configure the Enterprise Data Loss Prevention (E-DLP) DLP rule settings for a regular and nested
data profile on Strata Cloud Manager.
- Log in to Strata Cloud Manager.Create a data profile.Select and in the Actions column, Edit the DLP rule.Enterprise DLP assigns the DLP rule an identical name as the data profile from which it was automatically created. You can't change this name.(Optional) Enter a Description for the DLP rule.Modify the DLP rule Match Criteria.
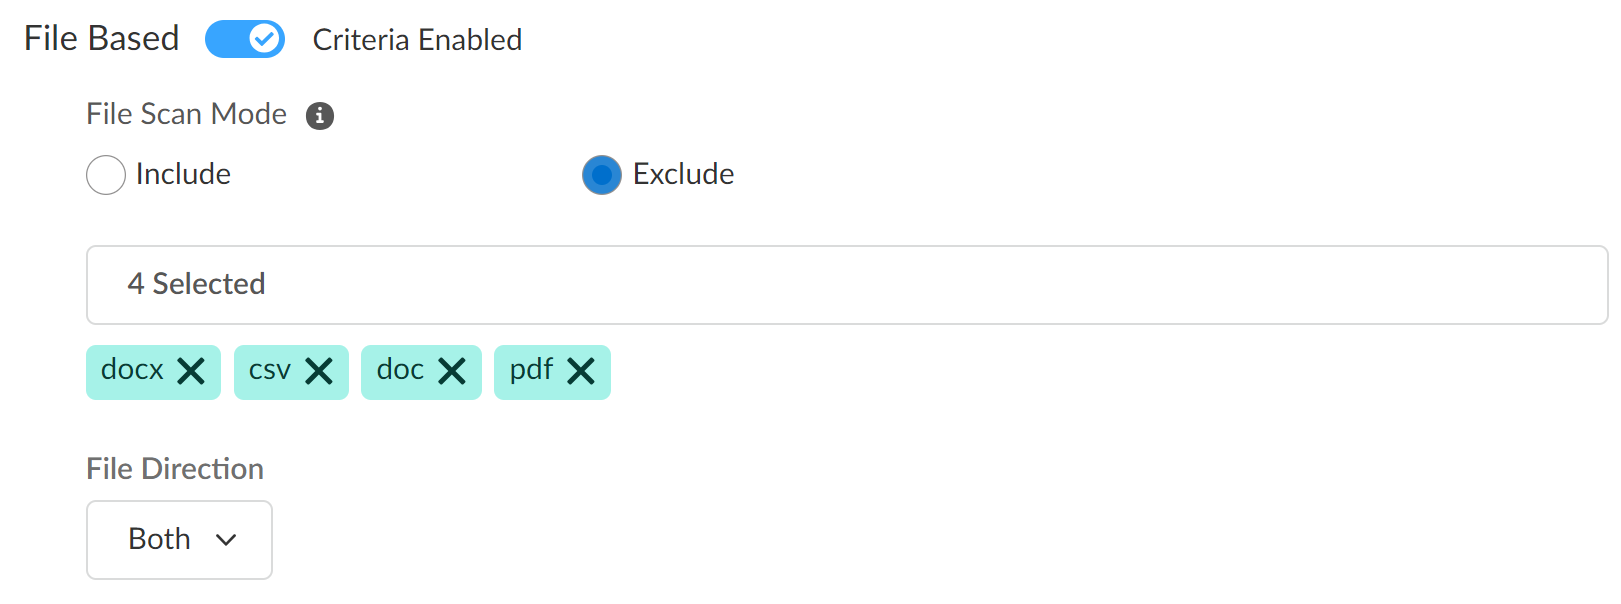
- File Based
- Enable DLP rule match criteria for file-based traffic.
- (Prisma Access 5.1 and later) Select the File Scan Mode to explicitly include or exclude specific file types.A DLP rule supports only one type of file mode. You can't configure a DLP rule to both include and exclude specific file types.
- Include—Enterprise DLP only inspects the selected file types. The NGFW or Prisma Access tenant ignores all other file types and does not forward them to Enterprise DLP for inspection and verdict rendering.
- Exclude—The NGFW or Prisma Access tenant excludes the selected file types and does not send them Enterprise DLP for inspection and verdict rendering. The NGFW or Prisma Access tenant forwards all other file types to Enterprise DLP but Enterprise DLP inspects and renders verdicts only on supported file types.
- Specify one or more supported file types to include in the match criteria.Enterprise DLP includes all supported file types in the match criteria by default.
- Specify the File Direction (Upload, Download, or Both).The default file direction is Upload. File direction support is dependent on the app. Review the list of supported apps to learn which file directions Enterprise DLP supports.
![]()
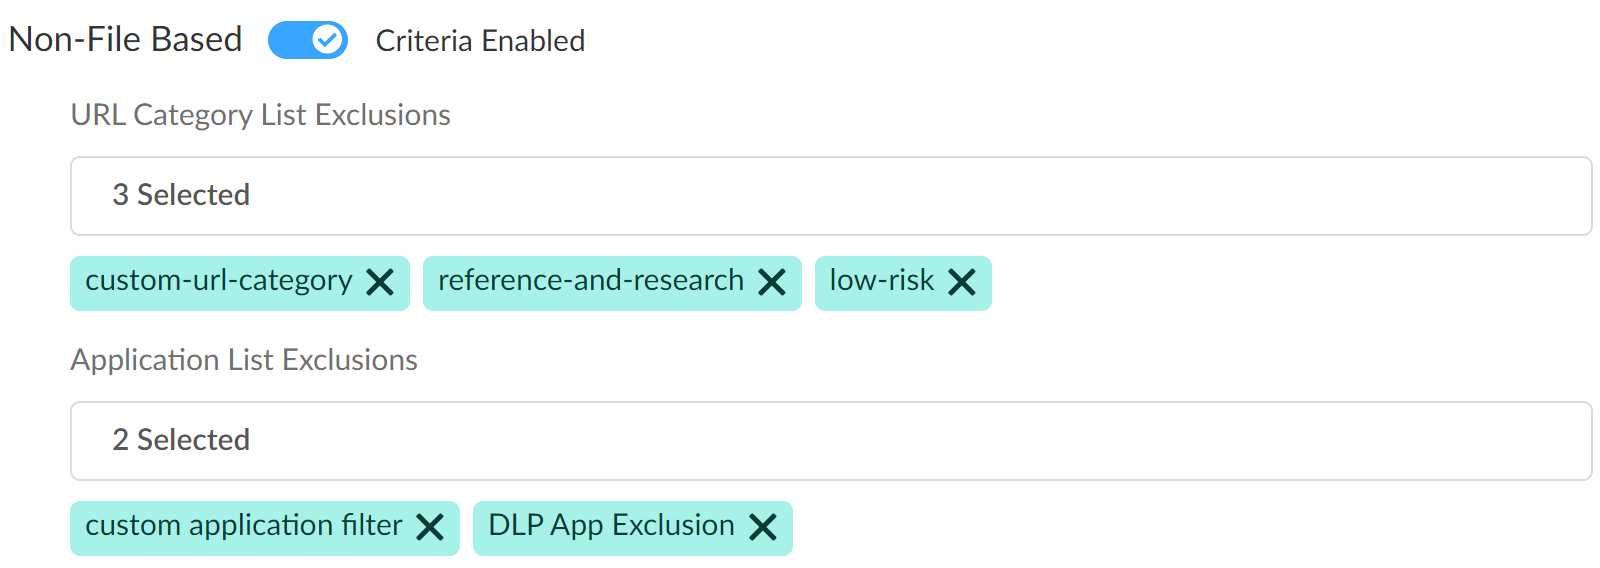
- Non-File Based
- Enable DLP rule match criteria for non-file based traffic.
- (Optional) Select the URL Category List Exclusions to exclude forwarding traffic from one or more specific URLs to Enterprise DLP.You can use a predefined URL category or create a custom URL category in the Global Configuration Scope. You can select multiple URL categories to exclude traffic from non-file inspection.
- (Required for Non-File Based Match Criteria) Select the Application List Exclusion to exclude forwarding traffic from one or more specific apps to Enterprise DLP.Enterprise DLP requires at least one Application Filter if you enable exclusions for non-file based traffic inspection. Palo Alto Networks recommends adding the predefined DLP App Exclusion application filter if you don't have a custom or predefined application filter you want to add. Alternatively, you can create a custom application filter in the Global Configuration Scope. You can select multiple application filters to exclude app traffic from non-file inspection.
![]()
Configure the Action & Log settings.- Select the Action (Alert, or Block) taken when Enterprise DLP detects sensitive data.The default action is Alert.Set the Log Severity when Enterprise DLP detects traffic that matches the DLP rule.The default severity is Low.(Best Practices for File Based Inspection) Create a File Blocking profile and create a Block Rule to block the file types you don't explicitly forward to Enterprise DLP.Palo Alto Networks recommends creating this File Blocking profile to ensure sensitive data can't be exfiltrated in file types Enterprise DLP does not support.Create a Shared Profile Group for the Enterprise DLP data filtering profile.
- Select and Add Profile Group.Enter a descriptive Name for the Profile Group.(Best Practices for File Based Inspection) For the File Blocking Profile, select the File Blocking profile you created in the previous step.For the Data Loss Prevention Profile, select the Enterprise DLP data profile.Add any other additional profiles as needed.Save the profile group.Create a Security policy rule and attached the Profile Group.
- Select and Add Rule.You can also update an existing Security policy to attach a Profile Group for Enterprise DLP filtering.Configure the Security policy as needed.Navigate to the Action and Advanced Inspection section, and select the Profile Group you created in the previous step.Save the Security policy.Push Config and push your configuration changes.
Modify a DLP Rule on Strata Cloud Manager for a Granular Data Profile
Modify a granular Enterprise Data Loss Prevention (E-DLP) data profile rule to enforce data security standards on Strata Cloud Manager.- Log in to Strata Cloud Manager.Create a Granular Data Profile on Strata Cloud Manager.Select and in the Actions column, Edit the DLP rule.Enterprise DLP assigns the DLP rule an identical name as the data profile from which it was automatically created. You can't change this name.Define the Basic Information for the granular data profile.
- Select the File Mode to explicitly include or exclude specific file types from Enterprise DLP inspection.
- Include—Enterprise DLP only inspects the selected file types configured in the data profiles added to the granular data profile. The enforcement point ignores all other file types and does not send them Enterprise DLP for inspection and verdict rendering.
- Exclude—The NGFW or Prisma Access tenant ignores the selected File Types and does not send them Enterprise DLP for inspection and verdict rendering. The NGFW or Prisma Access tenant forwards all other file types to Enterprise DLP.
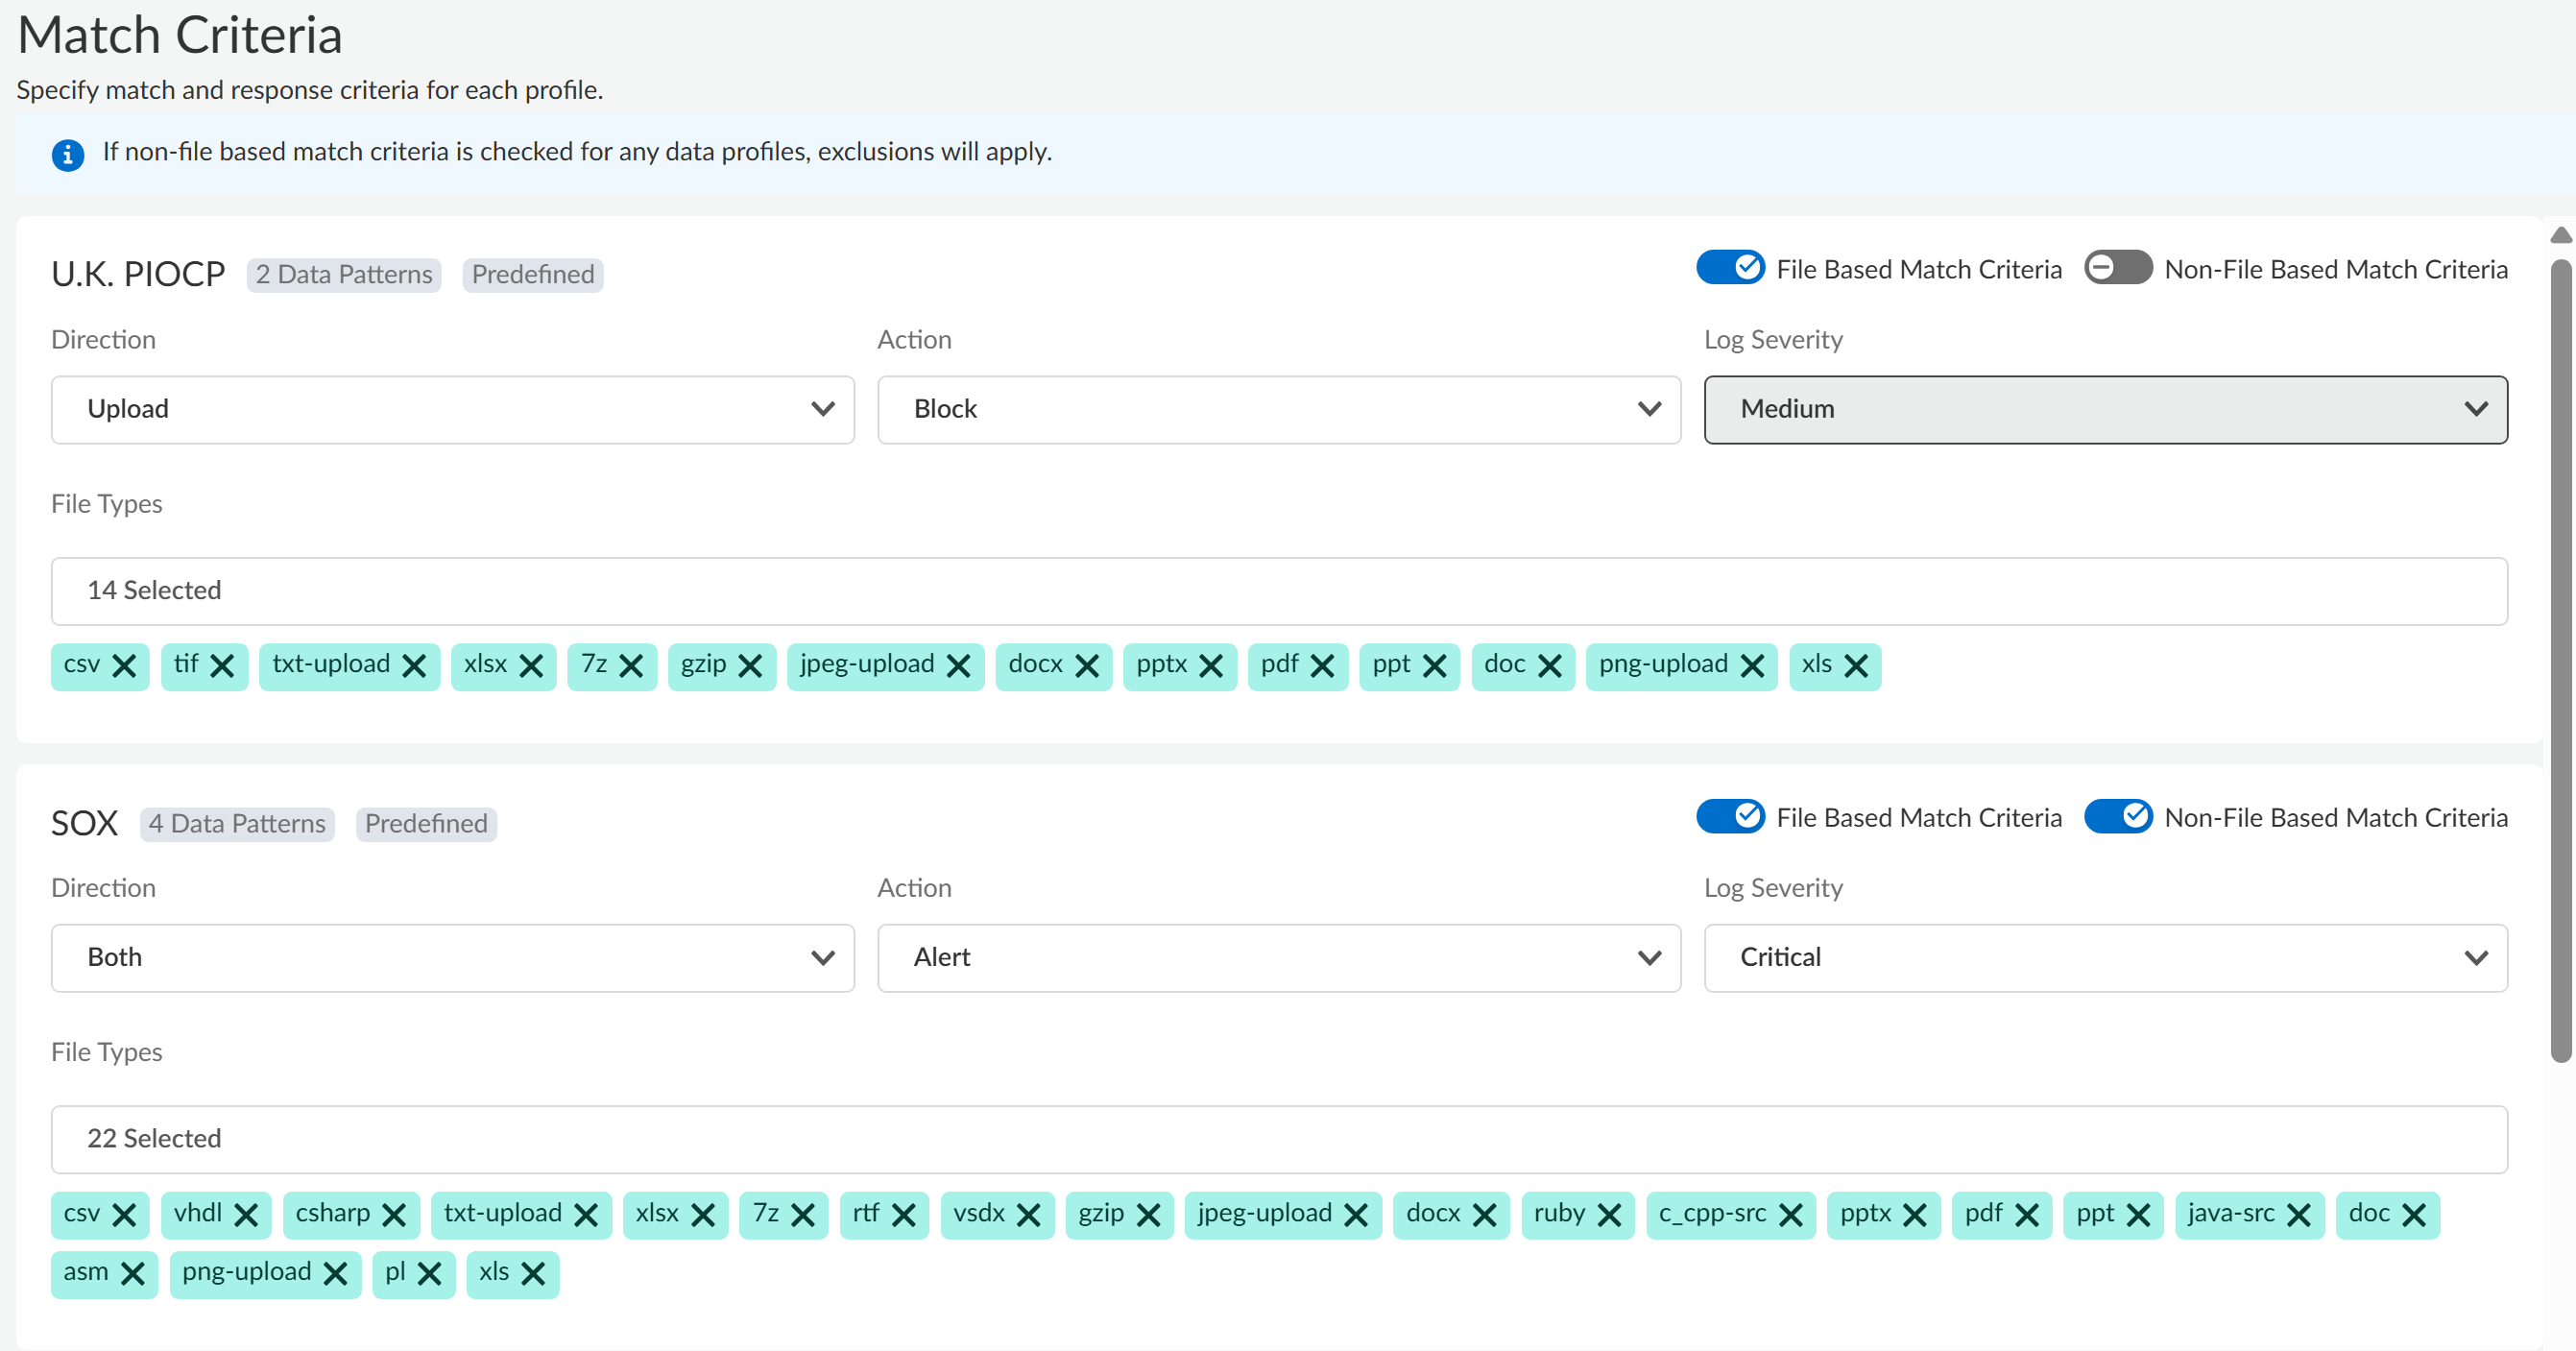
(Optional) Enter a Description for the DLP rule.Click Next to continue.Define the granular data profile Match Criteria.Define the match criteria for each data profile added to the granular data profile.- Enable file inspection, non-file inspection, or both.Review the supported file types and apps that support file and non-file based traffic inspection.
- File Based Match Criteria—Forwards file-based traffic to Enterprise DLP.
- Non-File Based Match Criteria—Forwards non-file based traffic to Enterprise DLP.
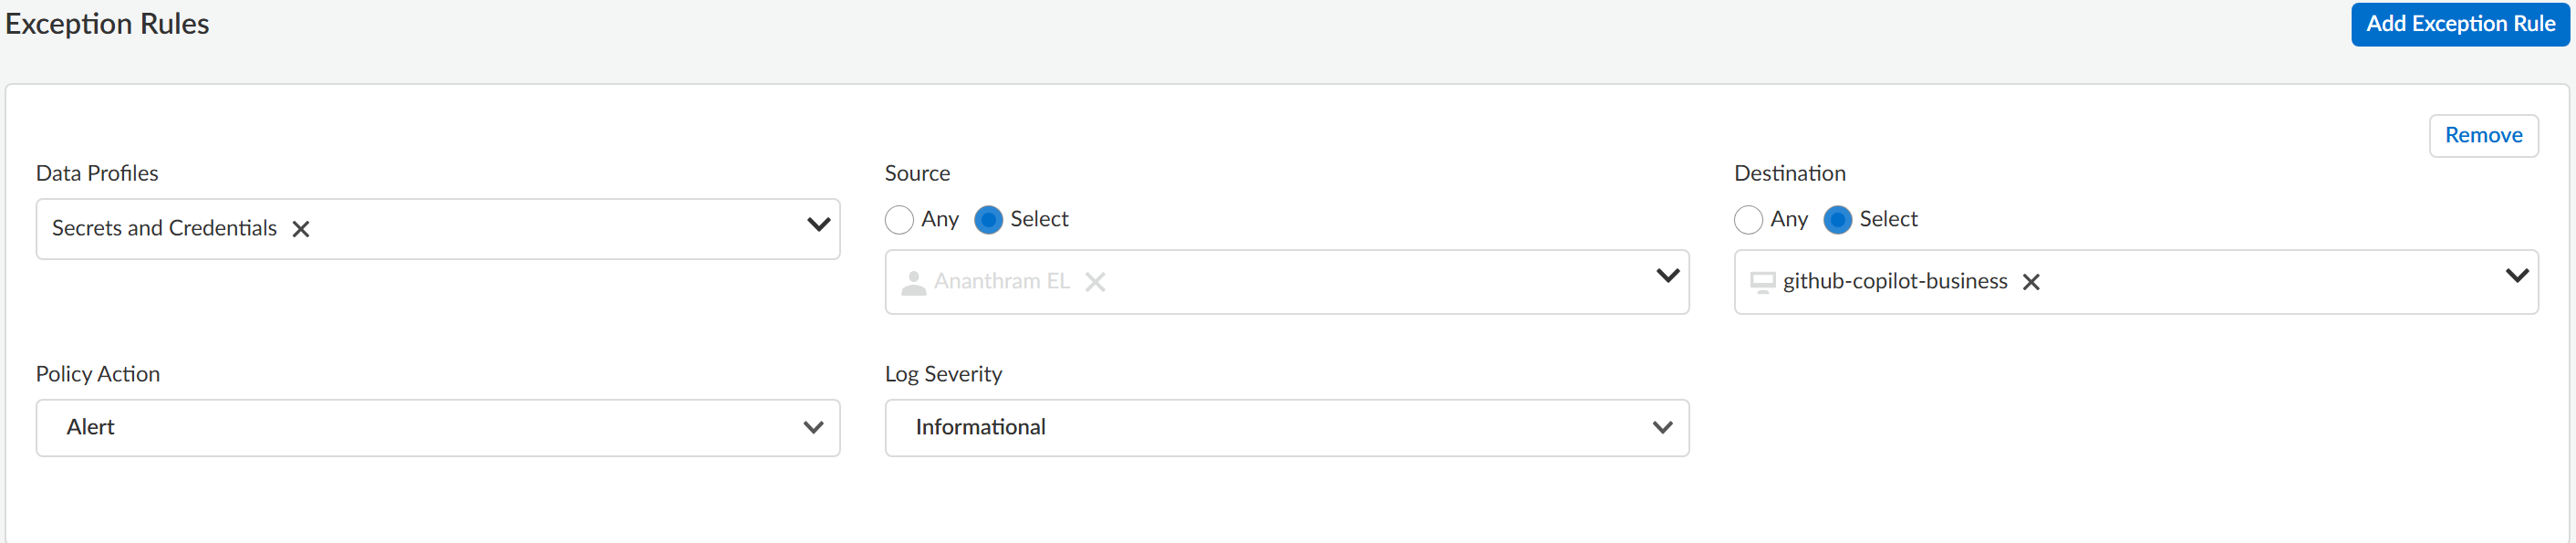
Select the File Direction you want to inspect.You can select Upload (default), Download, or Both.Select the Action Enterprise DLP takes if inspected traffic contains sensitive data.You can select Alert (default) or Block.Set the Log Severity for the DLP incident when Enterprise DLP detects sensitive data that matches this data profile.You can select Critical, High, Medium, Low, or Informational (default).(File Based Match Criteria only) Select the File Type you want to forward to Enterprise DLP. Click Modify to add one or more supported file types.Add at least one file type to forward to Enterprise DLP. Skip this step if you disabled File Based Match Criteria in the previous step.Click Next to continue.![]() (Optional) Create an Exception Rule.Exception rules give data security administrators the flexibility to create rules that apply to specific users, groups, and destinations. These rules can override the default block or alert actions with different actions, such as allowing otherwise blocked traffic without creating an incident. While the Allow action is always available, the block action is only an option if there is a block action in the default rules.For example, you created a granular profile that includes the U.K POPCP, SOX, and Secrets and Credentials data profiles. However, you want to allow a specific user to upload files that match the Secrets and Credentials data profile to your corporate GitHub Copilot Business. Additionally, you want this traffic to generate an Informational DLP incident. In this case, you would add an exception rule with the following configuration:
(Optional) Create an Exception Rule.Exception rules give data security administrators the flexibility to create rules that apply to specific users, groups, and destinations. These rules can override the default block or alert actions with different actions, such as allowing otherwise blocked traffic without creating an incident. While the Allow action is always available, the block action is only an option if there is a block action in the default rules.For example, you created a granular profile that includes the U.K POPCP, SOX, and Secrets and Credentials data profiles. However, you want to allow a specific user to upload files that match the Secrets and Credentials data profile to your corporate GitHub Copilot Business. Additionally, you want this traffic to generate an Informational DLP incident. In this case, you would add an exception rule with the following configuration:- Data Profiles—Secrets and Credentials
- Source—Specific user traffic you want to allow
- Destination—github-copilot-business
- Policy Action—Alert
- Log Severity—Informational
- Add Exception Rule.Remove any data profiles that you don't want traffic from the user or user group inspected against.Enterprise DLP supports only removing data profiles added to the granular profile, and does not support adding new data profiles.Select the traffic Source.User Groups and User data requires integration with Cloud Identity Engine (CIE) to display.
- Any—Exception rule applies to all User Group or User traffic sources.
- Select—Select one or more User Groups or Users to which the exception rule applies.
Select the traffic Destination.Enterprise DLP supports writing exception rules for supported GenAI apps delivered through App-ID Cloud Engine (ACE).- Any—Exception rule applies to all app or URL destinations.
- Select—Select one or more Applications, or add any URL to which the exception rule applies.
- URL Exception Rule Using Ant-Style Pattern MatchingEnterprise DLP supports Ant-style pattern matching URL exception rules. This approach uses wildcards to allow for flexible URL pattern matching rather than using full regular expressions.Ant-style pattern matching doesn't support regular expression features such as Anchors (^, $), Quantifiers (.*, +, {n,m}), and Character Classes ([a-z], \d).
- Single Wildcard (*)—Matches zero or more characters with in a single part of a URL.
- Double Wildcard (**)—Matches zero or more path segments. Used for matching across nested directories.
- Single Character (?)—Matches exactly one character.
SampleDescriptionExample Matcheshttps://example.com/data/*Matches a single path segment directly under /data/ on example.comhttps://example.com/data/reporthttps://example.com/data/imagehttps://example.com/**/*.pdfMatches any PDF file anywhere under example.com, across multiple path segments.https://example.com/docs/file.pdfhttps://example.com/archive/2023/report.pdfhttps://example.com/users/?/profileMatches profiles for user IDs consisting of exactly one character.https://example.com/users/a/profilehttps://example.com/users/1/profilehttps://example.com/assets/**Matches all assets on example.com, including nested directorieshttps://example.com/assets/css/style.csshttps://example.com/assets/images/logo.png**/login Matches any URL ending with /login (applied to any domain or path).https://app.com/loginhttps://secure.example.org/login
Select the Policy Action (Alert or Block) Enterprise DLP when traffic matches the exception rule.Select the Log Severity of the DLP incident generated when traffic matches the exception rule.Add Exception Rule to add any additional exceptions as needed.A granular data profile supports multiple exception rules.Click Next to continue.![]() Configure the URL Category and Application Exclusion lists.
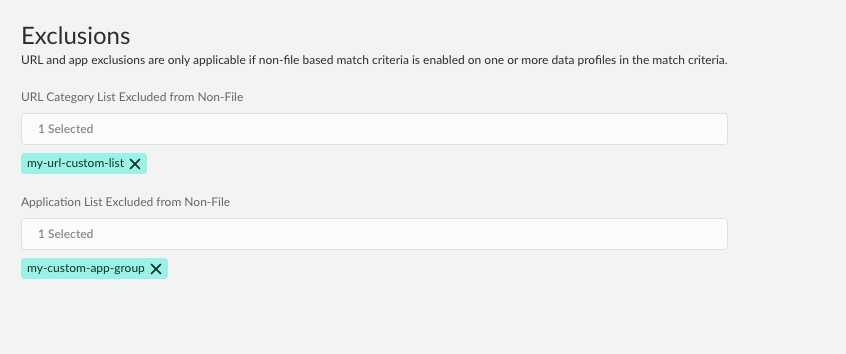
Configure the URL Category and Application Exclusion lists.- (Optional) URL Category List —Exclude forwarding traffic from one or more specific URLs to Enterprise DLP.You can use a predefined URL category or create a custom URL category in the Global Configuration Scope. You can select multiple URL categories to exclude traffic from non-file inspection.
- (Required for Non-File Based Match Criteria) Application List Exclusion—Exclude forwarding traffic from one or more specific apps to Enterprise DLP.Enterprise DLP requires at least one Application Filter if you enable exclusions for non-file based traffic inspection. Palo Alto Networks recommends adding the predefined DLP App Exclusion application filter if you don't have a custom or predefined application filter you want to add. Alternatively, you can create a custom application filter in the Global Configuration Scope. You can select multiple application filters to exclude app traffic from non-file inspection.
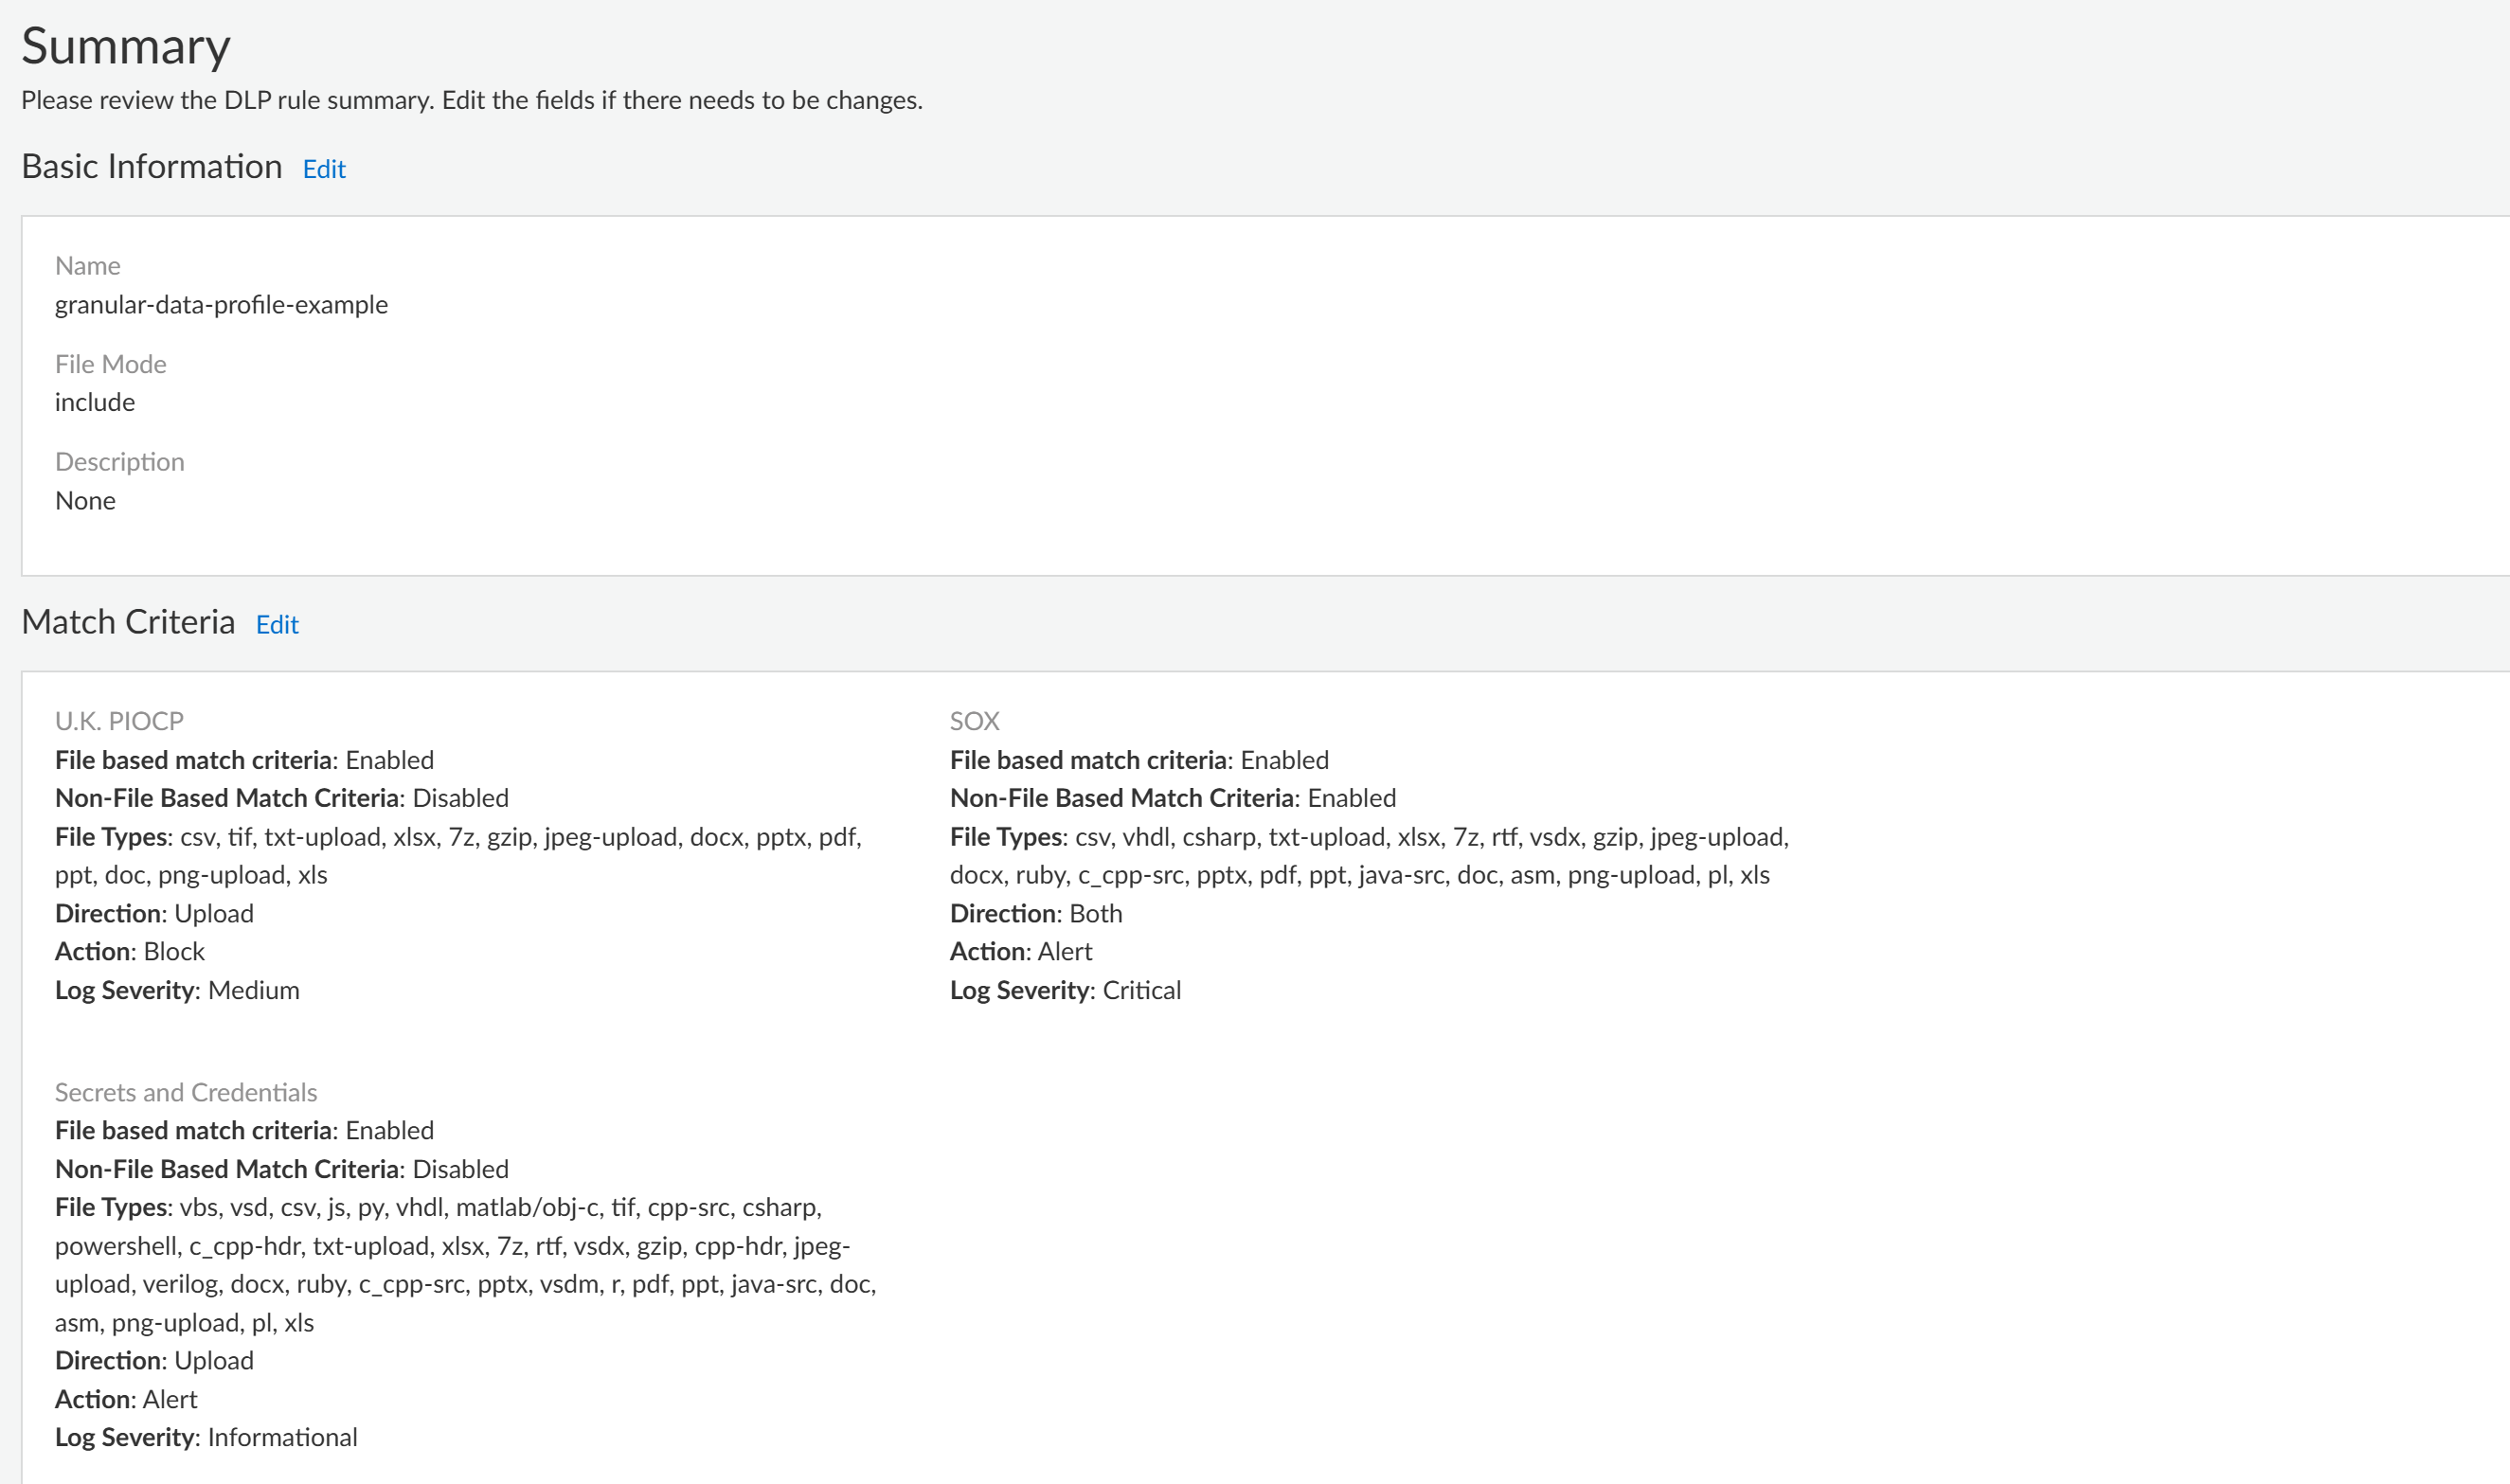
Click Next to continue.![]() Review the Summary of the granular data profile.Edit the Basic Information, Match Criteria, Exclusions or Exception Rules to modify the granular data profile configuration if needed.Save the granular data profile if you don’t need to make any further edits.
Review the Summary of the granular data profile.Edit the Basic Information, Match Criteria, Exclusions or Exception Rules to modify the granular data profile configuration if needed.Save the granular data profile if you don’t need to make any further edits.![]() (Best Practices for File Based Inspection) Create a File Blocking profile and create a Block Rule to block the file types you don't explicitly forward to Enterprise DLP.Palo Alto Networks recommends creating this File Blocking profile to ensure sensitive data can't be exfiltrated in file types Enterprise DLP does not support.Create a Shared Profile Group for the Enterprise DLP data filtering profile.
(Best Practices for File Based Inspection) Create a File Blocking profile and create a Block Rule to block the file types you don't explicitly forward to Enterprise DLP.Palo Alto Networks recommends creating this File Blocking profile to ensure sensitive data can't be exfiltrated in file types Enterprise DLP does not support.Create a Shared Profile Group for the Enterprise DLP data filtering profile.- Select and Add Profile Group.Enter a descriptive Name for the Profile Group.(Best Practices for File Based Inspection) For the File Blocking Profile, select the File Blocking profile you created in the previous step.For the Data Loss Prevention Profile, select the Enterprise DLP data profile.Add any other additional profiles as needed.Save the profile group.Create a Security policy rule and attached the Profile Group.
- Select and Add Rule.You can also update an existing Security policy to attach a Profile Group for Enterprise DLP filtering.Configure the Security policy as needed.Navigate to the Action and Advanced Inspection section, and select the Profile Group you created in the previous step.Save the Security policy.Push Config and push your configuration changes.