SD-WAN
Upgrade Panorama High Availability Pair (Active/Passive) Leveraging SD-WAN Plugin
Table of Contents
Expand All
|
Collapse All
SD-WAN Docs
-
-
-
-
- 3.4
- 3.3
- 3.2
- 3.1
- 3.0
- 2.2
- 2.1
- 2.0
- 1.0
-
Upgrade Panorama High Availability Pair (Active/Passive) Leveraging SD-WAN Plugin
Upgrade path and step-by-step procedure for the SD-WAN plugin version
that your Panorama HA pair is running.
| Where Can I Use This? | What Do I Need? |
|---|
Follow the upgrade path based on the SD-WAN plugin version that your
Panorama management server is running.
| Panorama Running SD-WAN Plugin Version | Follow the Steps |
|---|
Panorama HA Pair: Upgrade SD-WAN Plugin 1.0.4 to 2.2.7 Version
When your Panorama is installed with any of the SD-WAN
plugin versions between 1.0.x to 2.2.x, and if you want to upgrade the SD-WAN plugin version, you must upgrade to SD-WAN
plugin version 2.2.7 first (and not any intermediate version). Because the SD-WAN 2.2.7 version contains the new features, bug fixes,
performance improvements, and enhancements.
It's recommended to always ensure that the Panorama software version is
higher than the PAN-OS version. For example, if your Panorama version is 10.1.9,
then your PAN-OS version can be any of the earlier PAN-OS 10.1.9 releases.
Read the important considerations for
upgrading Panorama before you start the upgrade process.
Use the following workflow in the same order to upgrade your Panorama
HA pair with SD-WAN 2.2.7 plugin version.
- Upgrade your Panorama management server version.
- From Panorama 9.1.x, download and install Panorama 10.0.7-h3 on both active and passive Panorama.
- From Panorama 10.0.7-h3, download and install the latest Panorama 10.1 release on both active and passive Panorama.
- After the Panorama is upgraded to the latest 10.1 release, check if
the active Panorama remains as active and the passive Panorama
remains as passive. If there is no change in the HA states, then the
upgrade is successful. Otherwise, you need to perform a force switch
over to maintain the state of the HA pairs that it was before the
upgrade. To perform the force switchover, execute the following CLI commands in the same order from the current active HA peer.
admin > request high-availbility state suspendadmin > request high-availbility state functional![]()
Monitor the configd logs.(In administrator mode) Before upgrading the SD-WAN plugin to 2.2.7, start monitoring the configd log on both the Panorama HA pairs.admin> tail follow yes mp-log configd.logIf you see the below error message on executing tail follow yes mp-log configd.log command, the Mongo DB of the active and passive Panorama has become out of sync.![]() To resolve this issue:
To resolve this issue:- (In administrator mode) Drop the whole database
pan_oplog on both the active and passive
Panorama.
admin > debug mongo drop database pan_oplog instance mdb - (In administrator mode) Restart configd on both the
active and passive
Panorama.
admin > debug software restart process configd
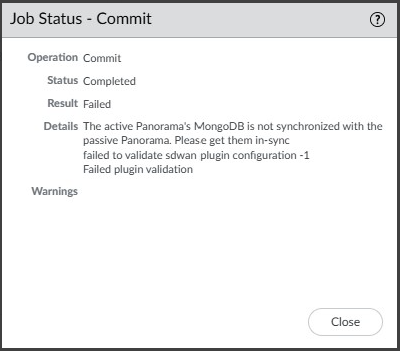
![]() Once the configd is restarted, refresh the respective web interface and command line interface. After restart, you won't be seeing the mongo pan_oplog error on any of the commit processes.We recommend you to monitor the configd logs during the whole upgrade process.Download and install the SD-WAN plugin version 2.2.7 on both active and passive Panorama.(Mandatory) (In configuration mode) Commit the changes from the active Panorama.Monitor the HA synchronization job on the passive Panorama HA peer. If you encounter the following error message, then execute debug plugins sd_wan mongo-db sync-db-to-peer CLI command from the active Panorama HA peer manually.
Once the configd is restarted, refresh the respective web interface and command line interface. After restart, you won't be seeing the mongo pan_oplog error on any of the commit processes.We recommend you to monitor the configd logs during the whole upgrade process.Download and install the SD-WAN plugin version 2.2.7 on both active and passive Panorama.(Mandatory) (In configuration mode) Commit the changes from the active Panorama.Monitor the HA synchronization job on the passive Panorama HA peer. If you encounter the following error message, then execute debug plugins sd_wan mongo-db sync-db-to-peer CLI command from the active Panorama HA peer manually.![]() If you encounter the following error message, then add a new VPN address pool.
If you encounter the following error message, then add a new VPN address pool.IP address from vpn address pool subnet/subnets are exhausted.
Perform HA synchronization job from active Panorama HA peer:- By executing request high-availability sync-to-remote running-config CLI command, or
- In the Panorama Dashboard (under High Availability), select Sync Now for the Running config.
Check the following after Panorama HA upgrade.- Perform a selective push to branch devices first, followed by the hub devices from active Panorama.
- Select PanoramaManaged DevicesSummary and verify if the device group and templates are in synchronization on both active and passive Panorama under the devices summary page.
- Verify if the SD-WAN configurations such as, Tunnel,
BGP, Key ID, and traffic are as expected.After successful upgrade of the Panorama HA pair, the Key ID, PSK, IP cache, IPSec tunnel cache, and subnet cache will be refreshed which will not affect the functionalities of SD-WAN.
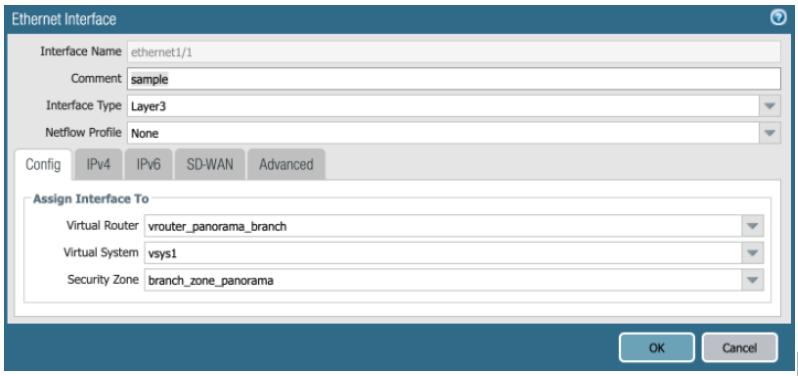
(Recommended) Upgrade the connected firewalls.Once the Panorama HA pair upgrade is successful, the connected hub and branch devices can be upgraded one-by-one starting with the branch firewalls followed by hub firewalls (the branch and hub firewalls can be standalone firewalls or HA pairs).We recommend you to check the SD-WAN configuration and functionality after upgrading each firewall.- Introduce a minor change on all the templates by modifying or adding
the comment for an interface on the template, followed by a
Commit and Push to
Devices. This is just a verification activity to
ensure that the configuration is good and the upgrade is
working.
![]()
- Check the SD-WAN configuration and functionalities.
- Upgrade the branch firewall one-by-one till all the branches are upgraded.
- Follow the below steps for branch firewalls first.
- Start upgrading a pair of branch HA or standalone devices from Panorama version 9.1.x to 10.0.7-h3, and then to the latest Panorama 10.1 release.
- Introduce a minor change in the comment of an interface from the particular firewall template from the active Panorama where the upgrade was performed, Commit, and Push to Devices. Once the Commit All is completed, check the SD-WAN configurations and functionalities. This is just a verification activity to ensure that the configuration is good and the upgrade is working after the firewall is upgraded.
- Follow the below steps for the hub firewalls. It's important that
you complete the upgrade of the branch firewalls and then start the
upgrade of the hub firewalls.
- Start upgrading a pair of hub HA or standalone devices from Panorama version 9.1.x to 10.0.7-h3, and then to the latest Panorama 10.1 release.
- Introduce a minor change in the comment of an interface from
the particular firewall template from the active Panorama
where the upgrade was performed,
Commit, and Push to
Devices. Once the Commit
All is completed, check the SD-WAN configurations and functionalities.
This is just a verification activity to ensure that the configuration is good and the upgrade is working after the firewall is upgraded.
- Select PanoramaManaged DevicesSummary and verify if the device group and templates are in synchronization on both active and passive Panorama under the devices summary page.
- After the upgrade is complete, verify the changes after the upgrade.
Panorama HA Pair: Upgrade SD-WAN Plugin 2.1.x to 2.2.7 Version
When your Panorama is installed with SD-WAN plugin version 2.1.x, and if you want to upgrade the SD-WAN plugin version, you must upgrade to SD-WAN plugin version 2.2.7 first (and not any intermediate version). Because the SD-WAN 2.2.7 version contains the new features, bug fixes, performance improvements, and enhancements.It's recommended to always ensure that the Panorama software version is higher than the PAN-OS version. For example, if your Panorama version is 10.1.9, then your PAN-OS version can be any of the earlier PAN-OS 10.1.9 releases.Read the important considerations for upgrading Panorama before you start the upgrade process.Use the following workflow in the same order to upgrade your Panorama HA pair with the SD-WAN 2.2.7 plugin version.- Upgrade your Panorama management server version.
- Download and install the latest Panorama 10.1 release on both active and passive Panorama.
- After the Panorama is upgraded to the latest 10.1 release, check if
the active Panorama remains as active and the passive Panorama
remains as passive. If there is no change in the HA states, then the
upgrade is successful. Otherwise, you need to perform a force switch
over to maintain the state of the HA pairs that it was before the
upgrade. To perform the force switchover, execute the following CLI commands in the same order from the current active HA peer.
admin > request high-availbility state suspendadmin > request high-availbility state functional![]()
Monitor the configd logs.(In administrator mode) Before upgrading the SD-WAN plugin to 2.2.7, start monitoring the configd log on both the Panorama HA pairs.admin> tail follow yes mp-log configd.logIf you see the below error message on executing admin > tail follow yes mp-log configd.log command, the mongo DB of the active and passive Panorama has become out of sync.![]() To resolve this issue:
To resolve this issue:- (In administrator mode) Drop the whole database
pan_oplog on both the active and passive
Panorama.
admin > debug mongo drop database pan_oplog instance mdb - (In administrator mode) Restart configd on both the
active and passive
Panorama.
admin > debug software restart process configd
![]() Once the configd is restarted, refresh the respective web interface and command line interface. After restart, you won't be seeing the mongo pan_oplog error on any of the commit processes.We recommend you to monitor the configd logs during the whole upgrade process.Download and install the SD-WAN plugin version 2.2.7 on both active and passive Panorama.(Mandatory) (In configuration mode) Commit the changes from the active Panorama.Monitor the HA synchronization job on the passive Panorama HA peer. If you encounter the following error message, then execute debug plugins sd_wan mongo-db sync-db-to-peer CLI command from the active Panorama HA peer manually.
Once the configd is restarted, refresh the respective web interface and command line interface. After restart, you won't be seeing the mongo pan_oplog error on any of the commit processes.We recommend you to monitor the configd logs during the whole upgrade process.Download and install the SD-WAN plugin version 2.2.7 on both active and passive Panorama.(Mandatory) (In configuration mode) Commit the changes from the active Panorama.Monitor the HA synchronization job on the passive Panorama HA peer. If you encounter the following error message, then execute debug plugins sd_wan mongo-db sync-db-to-peer CLI command from the active Panorama HA peer manually.![]() If you encounter the following error message, then add a new VPN address pool.
If you encounter the following error message, then add a new VPN address pool.IP address from vpn address pool subnet/subnets are exhausted.
Perform HA synchronization job from active Panorama HA peer:- By executing request high-availability sync-to-remote running-config CLI command, or
- In the Panorama Dashboard (under High Availability), select Sync Now for the Running config.
Check the following after Panorama HA upgrade.- Perform a selective push to branch devices first, followed by the hub devices from active Panorama.
- Select PanoramaManaged DevicesSummary and verify if the device group and templates are in synchronization on both active and passive Panorama under the devices summary page.
- Verify if the SD-WAN configurations such as, tunnel,
BGP, Key ID, and traffic are as expected.After successful upgrade of the Panorama HA pair, the Key ID, PSK, IP cache, IPSec tunnel cache, and subnet cache will be refreshed which will not affect the functionalities of SD-WAN.
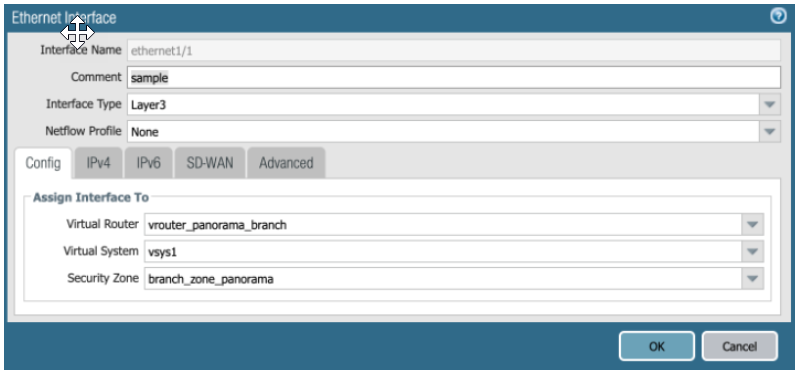
(Recommended) Upgrade the connected firewalls.Once the Panorama HA pair upgrade is successful, the connected hub and branch devices can be upgraded one-by-one starting with the branch firewalls followed by hub firewalls (the branch and hub firewalls can be standalone firewalls or HA pairs).We recommend you to check the SD-WAN configuration and functionality after upgrading each firewall.- Introduce a minor change on all the templates by modifying or adding
the comment for an interface on the template, followed by a
Commit and Push to
Devices. This is just a verification activity to
ensure that the configuration is good and the upgrade is
working.
![]()
- Check the SD-WAN configuration and functionalities.
- Upgrade the branch firewall one-by-one till all the branches are upgraded.
- Follow the below steps for branch firewalls first.
- Start upgrading a pair of branch HA or standalone devices from Panorama version 9.1.x to 10.0.7-h3, and then to the latest Panorama 10.1 release.
- Introduce a minor change in the comment of an interface from the particular firewall template from the active Panorama where the upgrade was performed, Commit, and Push to Devices. Once the Commit All is completed, check the SD-WAN configurations and functionalities. This is just a verification activity to ensure that the configuration is good and the upgrade is working after the firewall is upgraded.
- Follow the below steps for the hub firewalls. It's important that
you complete the upgrade of the branch firewalls and then start the
upgrade of the hub firewalls.
- Start upgrading a pair of hub HA or standalone devices from Panorama version 9.1.x to 10.0.7-h3, and then to the latest Panorama 10.1 release.
- Introduce a minor change in the comment of an interface from
the particular firewall template from the active Panorama
where the upgrade was performed,
Commit, and Push to
Devices. Once the Commit
All is completed, check the SD-WAN configurations and functionalities.
This is just a verification activity to ensure that the configuration is good and the upgrade is working after the firewall is upgraded.
- Select PanoramaManaged DevicesSummary and verify if the device group and templates are in synchronization on both active and passive Panorama under the devices summary page.
- After the upgrade is complete, verify the changes after the upgrade.
Panorama HA Pair: Upgrade SD-WAN Plugin 2.2.7 to Supported SD-WAN Plugin Version
It's recommended to always ensure that the Panorama software version is higher than the PAN-OS version. For example, if your Panorama version is 10.1.9, then your PAN-OS version can be any of the earlier PAN-OS 10.1.9 releases.Refer the supported upgraded paths for SD-WAN plugin 2.2.7 version.Read the important considerations for upgrading Panorama before you start the upgrade process.- Download the supported SD-WAN plugin version and delete all the other SD-WAN plugin versions downloaded on both the Panorama HA pairs except SD-WAN plugin version 2.2.7.Upgrade the Panorama 10.1 version to a version that is compatible with the SD-WAN plugin version to be upgraded (for example, SD-WAN plugin version 3.0.8 is compatible with Panorama version 10.2). After a successful upgrade, the compatible SD-WAN plugin will be installed automatically.To verify if the correct SD-WAN plugin version is installed on your Panorama, check the General Information in the Panorama Dashboard.Once the upgrade is complete, check if the SD-WAN configurations and its functionalities are as expected.Perform a commit force through the CLI command (in the configuration mode) on the Palo Alto Networks device. If you perform commit all instead of commit force, then you will lose all the SD-WAN configurations on that device.(Recommended) Upgrade the connected devices one-by-one starting with the branch pairs followed by hub pairs.Once the devices are upgraded, check for SD-WAN configurations and its functionalities.After the upgrade is complete, verify the changes after the upgrade.


