Advanced LSVPN Configuration with Dynamic Routing
Table of Contents
Expand All
|
Collapse All
Next-Generation Firewall Docs
-
-
- Cloud Management of NGFWs
- PAN-OS 10.0 (EoL)
- PAN-OS 10.1
- PAN-OS 10.2
- PAN-OS 11.0 (EoL)
- PAN-OS 11.1 & Later
- PAN-OS 9.1 (EoL)
-
- PAN-OS 10.1
- PAN-OS 10.2
- PAN-OS 11.0 (EoL)
- PAN-OS 11.1 & Later
-
-
- Cloud Management and AIOps for NGFW
- PAN-OS 10.0 (EoL)
- PAN-OS 10.1
- PAN-OS 10.2
- PAN-OS 11.0 (EoL)
- PAN-OS 11.1
- PAN-OS 11.2
- PAN-OS 8.1 (EoL)
- PAN-OS 9.0 (EoL)
- PAN-OS 9.1 (EoL)
Advanced LSVPN Configuration with Dynamic Routing
In larger LSVPN deployments with multiple
gateways and many satellites, investing a little more time in the
initial configuration to set up dynamic routing will simplify the
maintenance of gateway configurations because access routes will
update dynamically. The following example configuration shows how
to extend the basic LSVPN configuration to configure OSPF as the
dynamic routing protocol.
Setting up an LSVPN to use OSPF
for dynamic routing requires the following additional steps on the
gateways and the satellites:
- Manual assignment of IP addresses to tunnel interfaces on all gateways and satellites.
- Configuration of OSPF point-to-multipoint (P2MP) on the virtual router on all gateways and satellites. In addition, as part of the OSPF configuration on each gateway, you must manually define the tunnel IP address of each satellite as an OSPF neighbor. Similarly, on each satellite, you must manually define the tunnel IP address of each gateway as an OSPF neighbor.
Although dynamic
routing requires additional setup during the initial configuration
of the LSVPN, it reduces the maintenance tasks associated with keeping
routes up to date as topology changes occur on your network.
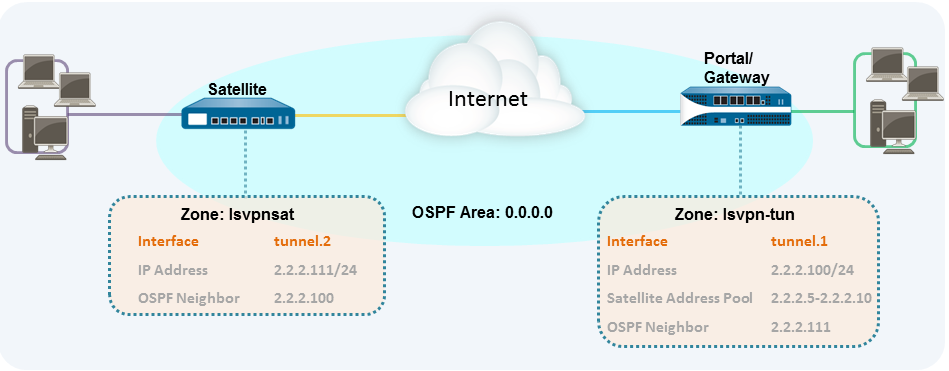
The
following figure shows an LSVPN dynamic routing configuration. This
example shows how to configure OSPF as the dynamic routing protocol
for the VPN.

For
a basic setup of a LSVPN, follow the steps in Basic
LSVPN Configuration with Static Routing. You can then complete
the steps in the following workflow to extend the configuration
to use dynamic routing rather than static routing.
- Add an IP address to the tunnel interface configuration on each gateway and each satellite.Complete the following steps on each gateway and each satellite:
- Select NetworkInterfacesTunnel and select the tunnel configuration you created for the LSVPN to open the Tunnel Interface dialog.If you haven’t yet created the tunnel interface, see step 2 in Create Interfaces and Zones for the LSVPN.On the IPv4 tab, click Add and then enter an IP address and subnet mask. For example, to add an IP address for the gateway tunnel interface you would enter 2.2.2.100/24.Click OK to save the configuration.Configure the dynamic routing protocol on the gateway.To configure OSPF on the gateway:
- Select NetworkVirtual Routers and select the virtual router associated with your VPN interfaces.On the Areas tab, click Add to create the backbone area, or, if it’s already configured, click on the area ID to edit it.If you’re creating a new area, enter an Area ID on the Type tab.On the Interface tab, click Add and select the tunnel Interface you created for the LSVPN.Select p2mp as the Link Type.Click Add in the Neighbors section and enter the IP address of the tunnel interface of each satellite, for example 2.2.2.111.Click OK twice to save the virtual router configuration and then Commit the changes on the gateway.Repeat this step each time you add a new satellite to the LSVPN.Configure the dynamic routing protocol on the satellite.To configure OSPF on the satellite:
- Select NetworkVirtual Routers and select the virtual router associated with your VPN interfaces.On the Areas tab, click Add to create the backbone area, or, if it’s already configured, click on the area ID to edit it.If you’re creating a new area, enter an Area ID on the Type tab.On the Interface tab, click Add and select the tunnel Interface you created for the LSVPN.Select p2mp as the Link Type.Click Add in the Neighbors section and enter the IP address of the tunnel interface of each GlobalProtect gateway, for example 2.2.2.100.Click OK twice to save the virtual router configuration and then Commit the changes on the gateway.Repeat this step each time you add a new gateway.Verify that the gateways and satellites are able to form router adjacencies.
- On each satellite and each gateway, confirm that peer adjacencies have formed and that routing table entries have been created for the peers (that is, the satellites have routes to the gateways and the gateways have routes to the satellites). Select NetworkVirtual Router and click the More Runtime Stats link for the virtual router you’re using for the LSVPN. On the Routing tab, verify that the LSVPN peer has a route.
- On the OSPFInterface tab, verify that the Type is p2mp.
- On the OSPFNeighbor tab, verify that the firewalls hosting your gateways have established router adjacencies with the firewalls hosting your satellites and vice versa. Also verify that the Status is Full, indicating that full adjacencies have been established.
