Configure Server Monitoring Using WinRM
Table of Contents
Configure Server Monitoring Using WinRM
To map users to IP addresses based on login/logout events,
you can configure the PAN-OS integrated User-ID agent to monitor
servers using WinRM.
You can configure the PAN-OS
integrated User-ID agent to monitor servers using Windows
Remote Management (WinRM). Using the WinRM protocol improves speed,
efficiency, and security when monitoring server events to map user
events to IP addresses. The PAN-OS integrated User-ID agent supports the
WinRM protocol on Windows Server 2008 Active Directory and Microsoft
Exchange Server 2008 or later versions of both.
There are
three ways to configure server monitoring using WinRM:
- Configure WinRM over HTTPS with Basic Authentication—The firewall authenticates to the monitored server using the username and password of the service account for the User-ID agent and the firewall authenticates the monitored server using the User-ID certificate profile.
- Configure WinRM over HTTP with Kerberos—The firewall and the monitored servers use Kerberos for mutual authentication and the monitored server encrypts the communication with the firewall using a negotiated Kerberos session key.
- Configure WinRM over HTTPS with Kerberos—The firewall and the monitored server use HTTPS to communicate and use Kerberos for mutual authentication.
Configure WinRM over HTTPS with Basic Authentication
When you configure WinRM to use HTTPS with
basic authentication, the firewall transfers the credentials for
the service account in a secure tunnel using SSL.
- Configure the service account with Remote Management User and CIMV2 privileges for the server you want to monitor.On the Windows server you are monitoring, obtain the thumbprint from the certificate for the Windows server to use with WinRM and enable WinRM.Ensure that you use an account with administrator privileges to configure WinRM on the server you want to monitor. As a best practice for security, this account should not be the same account as the service account in Step 1.
- Verify the certificate is installed in the Local Computer certificate store ().If you do not see the Local Computer certificate store, launch the Microsoft Management Console () and add the Certificates snap-in ().Open the certificate and select .Select the Thumbprint and copy it.To enable the firewall to connect to the Windows server using WinRM, enter the following command: winrm quickconfig.Enter y to confirm the changes and then confirm the output displays WinRM service started.If WinRM is enabled, the output displays WinRM service is already running on this machine. You will be prompted to confirm any additional required configuration changes.To verify that WinRM is communicating using HTTPS, enter the following command: winrm enumerate winrm/config/listener and confirm that the output displays Transport = HTTPS.By default, WinRM/HTTPS uses port 5986.From the Windows server command prompt, enter the following command: winrm create winrm/config/Listener?Address=*+Transport=HTTPS @{Hostname=”<hostname>";CertificateThumbprint=”Certificate Thumbprint"}, where hostname is the hostname of the Windows server and Certificate Thumbprint is the value you copied from the certificate.Use the command prompt (not Powershell) and remove any spaces in the Certificate Thumbprint to ensure that WinRM can validate the certificate.From the Windows server command prompt, enter the following command:
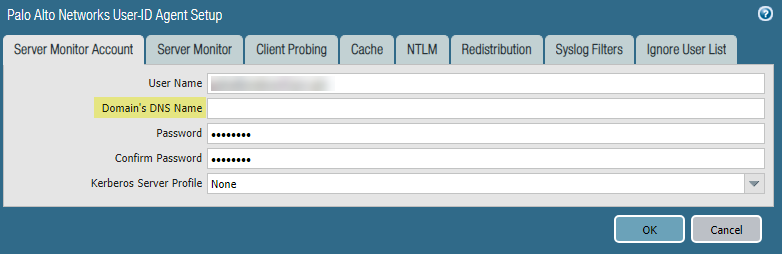
c:\> winrm set winrm/config/client/auth @{Basic="true"}Enter the following command: winrm get winrm/config/service/Auth and confirm that Basic = true.Enable Basic Authentication between the PAN-OS integrated User-ID agent and the monitored servers.- Select .In domain\username format, enter the User Name for the service account that the User-ID agent will use to monitor servers.Enter the Domain’s DNS Name of the server monitor account.Enter the Password and Confirm Password for the service account.
![]() Click OKConfigure server monitoring for the PAN-OS integrated User-ID agent.
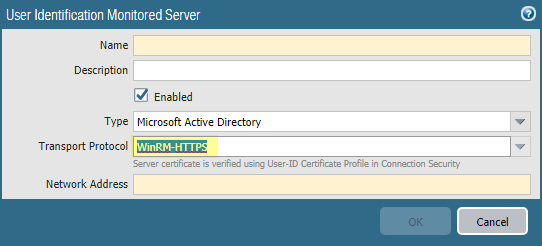
Click OKConfigure server monitoring for the PAN-OS integrated User-ID agent.- Select the Microsoft server Type (Microsoft Active Directory or Microsoft Exchange).Select Win-RM-HTTPS as the Transport Protocol to use Windows Remote Management (WinRM) over HTTPS to monitor the server security logs and session information.Enter the IP address or FQDN Network Address of the server.
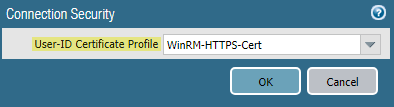
![]() To enable the PAN-OS integrated User-ID agent to communicate with the monitored servers using WinRM-HTTPS, verify that you successfully imported the root certificate for the service certificates that the Windows server uses for WinRM on to the firewall and associate the certificate with the User-ID Certificate Profile.
To enable the PAN-OS integrated User-ID agent to communicate with the monitored servers using WinRM-HTTPS, verify that you successfully imported the root certificate for the service certificates that the Windows server uses for WinRM on to the firewall and associate the certificate with the User-ID Certificate Profile.- Select .Click Edit.Select the Windows server certificate to use for the User-ID Certificate Profile.
![]() Click OK.Commit your changes.Verify that the status of each monitored server is Connected ().
Click OK.Commit your changes.Verify that the status of each monitored server is Connected ().Configure WinRM over HTTP with Kerberos
When you configure WinRM over HTTP with Kerberos, the firewall and the monitored servers use Kerberos for mutual authentication and the monitored server encrypts the communication with the firewall using a negotiated Kerberos session key.- Configure the service account with Remote Management User and CIMV2 privileges for the server you want to monitor.Confirm that WinRM is enabled on the Windows server you are monitoring.Ensure that you use an account with administrator privileges to configure WinRM on the server you want to monitor. As a best practice for security, this account should not be the same account as the service account in Step 1.
- To enable the firewall to connect to the Windows server using WinRM, enter the following command: winrm quickconfig.Enter y to confirm the changes and then confirm the output displays WinRM service started.If WinRM is enabled, the output displays WinRM service is already running on this machine. You will be prompted to confirm any additional required configuration changes.To verify that WinRM is communicating using HTTP, enter the following command: winrm enumerate winrm/config/listener and confirm that the output displays Transport = HTTP.By default, WinRM/HTTP uses port 5985.Enter the following command: winrm get winrm/config/service/Auth and confirm that Kerberos = true.Enable the PAN-OS integrated User-ID agent and the monitored servers to authenticate using Kerberos.
- If you did not do so during the initial configuration, configure date and time (NTP) settings to ensure successful Kerberos negotiation.Configure a Kerberos server profile on the firewall to authenticate with the server to monitor the security logs and session information.Select .In domain\username format, enter the User Name for the service account that the User-ID agent will use to monitor servers.Enter the Domain’s DNS Name of the server monitor account.Kerberos uses the domain name to locate the service account.Enter the Password and Confirm Password for the service account.Select the Kerberos Server Profile you configured in Step 3.2.
![]() Click OK.Configure server monitoring for the PAN-OS integrated User-ID agent.
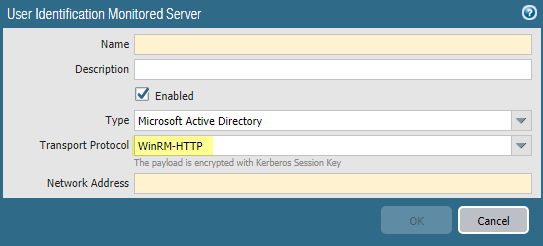
Click OK.Configure server monitoring for the PAN-OS integrated User-ID agent.- Configure the Microsoft server type (Microsoft Active Directory or Microsoft Exchange).Select WinRM-HTTP as the Transport Protocol to use Windows Remote Management (WinRM) over HTTP to monitor the server security logs and session information.Enter the FQDN Network Address of the server.If you are using Kerberos, the network address must be a fully qualified domain name (FDQN).
![]() Commit your changes.Verify that the status of each monitored server is Connected ().
Commit your changes.Verify that the status of each monitored server is Connected ().Configure WinRM over HTTPS with Kerberos
When you configure WinRM over HTTPS with Kerberos, the firewall and the monitored server use HTTPS to communicate and use Kerberos for mutual authentication. - Configure the service account with Remote Management User and CIMV2 privileges for the server you want to monitor.On the Windows server you are monitoring, obtain the thumbprint from the certificate for the Windows server to use with WinRM and enable WinRM.Ensure that you use an account with administrator privileges to configure WinRM on the server you want to monitor. As a best practice for security, this account should not be the same account as the service account in Step 1.
- Verify the certificate is installed in the Local Computer certificate store ().If you do not see the Local Computer certificate store, launch the Microsoft Management Console () and add the Certificates snap-in ().Open the certificate and select .Select the Thumbprint and copy it.To enable the firewall to connect to the Windows server using WinRM, enter the following command: winrm quickconfig.Enter y to confirm the changes and then confirm the output displays WinRM service started.If WinRM is enabled, the output displays WinRM service is already running on this machine. You will be prompted to confirm any additional required configuration changes.To verify that WinRM is communicating using HTTPS, enter the following command: winrm enumerate winrm/config/listener. Then confirm that the output displays Transport = HTTPS.By default, WinRM/HTTPS uses 5986.From the Windows server command prompt, enter the following command: winrm create winrm/config/Listener?Address=*+Transport=HTTPS @{Hostname=”<hostname>";CertificateThumbprint=”Certificate Thumbprint"}, where hostname is the hostname of the Windows server and Certificate Thumbprint is the value you copied from the certificate.Use the command prompt (not Powershell) and remove any spaces in the Certificate Thumbprint to ensure that WinRM can validate the certificate.Enter the following command: winrm get winrm/config/service/Auth and confirm that Basic = false and Kerberos= true.Enable the PAN-OS integrated User-ID agent and the monitored servers to authenticate using Kerberos.
- If you did not do so during the initial configuration, configure date and time (NTP) settings to ensure successful Kerberos negotiation.Configure a Kerberos server profile on the firewall to authenticate with the server to monitor the security logs and session information.Select .In domain\username format, enter the User Name for the service account that the User-ID agent will use to monitor servers.Enter the Domain’s DNS Name of the server monitor account.Kerberos uses the domain name to locate the service account.Enter the Password and Confirm Password for the service account.Select the Kerberos Server Profile you created in Step 3.2.
![]() Click OK.Configure server monitoring for the PAN-OS integrated User-ID agent.
Click OK.Configure server monitoring for the PAN-OS integrated User-ID agent.- Configure the Microsoft server type (Microsoft Active Directory or Microsoft Exchange).Select Win-RM-HTTPS as the Transport Protocol to use Windows Remote Management (WinRM) over HTTPS to monitor the server security logs and session information.Enter the FQDN Network Address of the server.If you are using Kerberos, the network address must be a fully qualified domain name (FDQN).
![]() To enable the PAN-OS integrated User-ID agent to communicate with the monitored servers using WinRM-HTTPS, verify that you successfully imported the root certificate for the service certificates that the Windows server uses for WinRM on to the firewall and associate the certificate with the User-ID Certificate Profile.The firewall uses the same certificate to authenticate with all monitored servers.
To enable the PAN-OS integrated User-ID agent to communicate with the monitored servers using WinRM-HTTPS, verify that you successfully imported the root certificate for the service certificates that the Windows server uses for WinRM on to the firewall and associate the certificate with the User-ID Certificate Profile.The firewall uses the same certificate to authenticate with all monitored servers.- Select .Click Edit.Select the Windows server certificate to use for the User-ID Certificate Profile.
![]() Click OK.Commit your changes.Verify that the status of each monitored server is Connected ().
Click OK.Commit your changes.Verify that the status of each monitored server is Connected ().