Upgrade an HA Firewall Pair to PAN-OS 9.1
Table of Contents
Upgrade an HA Firewall Pair to PAN-OS 9.1
Follow these steps to upgrade an HA firewall pair to
PAN-OS 9.1.
Review the PAN-OS 9.1 Release Notes and
then use the following procedure to upgrade a pair of firewalls
in a high availability (HA) configuration. This procedure applies
to both active/passive and active/active configurations.
To
avoid downtime when upgrading firewalls that are in a high availability
(HA) configuration, update one HA peer at a time: For active/active
firewalls, it doesn’t matter which peer you upgrade first (though
for simplicity, this procedure shows you how to upgrade the active-primary
peer first). For active/passive firewalls, you must suspend (fail
over) and upgrade the active (primary) peer first. After you upgrade the
primary peer, you must unsuspend the primary peer to return it to
a functional state (passive). Next, you must suspend the passive
(secondary) peer to make the primary peer active again. After the
primary peer is active and the secondary peer is suspended, you
can continue the upgrade. To prevent failover during the upgrade of
the HA peers, you must make sure preemption is disabled before proceeding
with the upgrade. You only need to disable preemption on one peer
in the pair.
When upgrading HA firewalls across multiple feature
PAN-OS releases, you must upgrade each HA peer to the same feature
PAN-OS release on your upgrade path before continuing. For example,
you are upgrading HA peers from PAN-OS 8.1 to PAN-OS 9.1. You must
upgrade both HA peers to PAN-OS 9.0 before you can continue upgrading
to the target PAN-OS 9.1 release. When HA peers are two or more
feature releases apart, the firewall with the older release installed
enters a suspended state with the message Peer version too old.
To avoid impacting traffic, plan to upgrade
within the outage window. Ensure the firewalls are connected to
a reliable power source. A loss of power during an upgrade can make
firewalls unusable.
- Save a backup of the current configuration file.Although the firewall automatically creates a backup of the configuration, it is a best practice to create and externally store a backup before you upgrade.Perform these steps on each firewall in the pair:
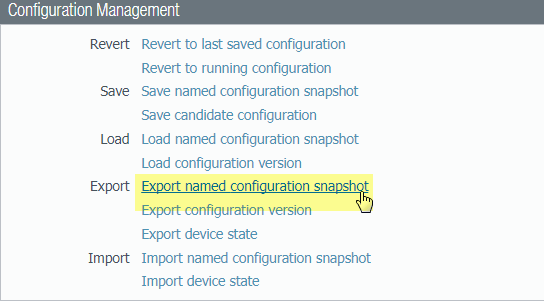
- Select and
click Export named configuration snapshot.
![]()
- Select the XML file that contains your running configuration
(for example, running-config.xml) and click OK to
export the configuration file.
![]()
- Save the exported file to a location external to the firewall. You can use this backup to restore the configuration if you have problems with the upgrade.
- Select and
click Export named configuration snapshot.
- Select and Generate
Tech Support File.Click Yes when prompted to generate the tech support file.
- If you have enabled User-ID, after you upgrade, the firewall
clears the current IP address-to-username and group mappings so
that they can be repopulated with the attributes from the User-ID
sources. To estimate the time required for your environment to repopulate
the mappings, run the following CLI commands on the firewall.
- For IP address-to-username mappings:
- show user user-id-agent state all
- show user server-monitor state all
- For group mappings: show user group-mapping statistics
- Ensure that each firewall in the HA pair is running the
latest content release version.Refer to the release notes for the minimum content release version you must install for a PAN-OS 9.1 release. Make sure to follow the Best Practices for Application and Threat Updates.
- Select and check which Applications or Applications
and Threats to determine which update is Currently Installed.
![]()
- If the firewalls are not running the minimum required content release version or a later version required for PAN-OS 9.1, Check Now to retrieve a list of available updates.
- Locate and Download the desired
content release version.After you successfully download a content update file, the link in the Action column changes from Download to Install for that content release version.
- Install the update. You must install the update on both peers.
- Select and check which Applications or Applications
and Threats to determine which update is Currently Installed.
- Determine the Upgrade Path to PAN-OS 9.1You cannot skip installation of any feature release versions in the path from the currently running PAN-OS version to PAN-OS 9.1.0.Review the known issues and changes to default behavior in the Release Notes and upgrade/downgrade considerations in the New Features Guide for each release through which you pass as part of your upgrade path.
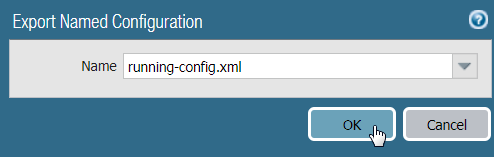
- Disable preemption on the first peer in each pair. You
only need to disable this setting on one firewall in the HA pair
but ensure that the commit is successful before you proceed with
the upgrade.
- Select and edit the Election Settings.
- If enabled, disable (clear) the Preemptive setting
and click OK.
![]()
- Commit the change.
- Suspend the primary HA peer to force a failover.(Active/passive firewalls) For firewalls in an active/passive HA configuration, suspend and upgrade the active HA peer first.(Active/active firewalls) For firewalls in an active/active HA configuration, suspend and upgrade the active-primary HA peer first.
- Select and Suspend local device for high availability.
- In the bottom-right corner, verify that the state
is suspended.The resulting failover should cause the secondary HA peer to transition to active state.The resulting failover verifies that HA failover is functioning properly before you upgrade.
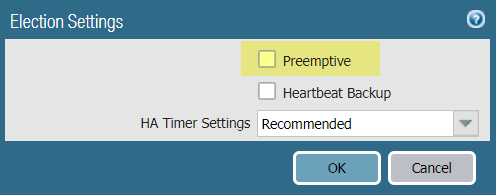
- Install
PAN-OS 9.1 on the suspended peer.
- On the first peer, select and click Check Now for the latest updates.
- Locate and Download PAN-OS
9.1.0.If your firewall does not have internet access from the management port, you can download the software image from the Palo Alto Networks Support Portal and then manually Upload it to your firewall.
- After you download the image (or, for a manual upgrade,
after you upload the image), Install the
image.
![]()
- After the installation completes successfully, reboot
using one of the following methods:
- If you are prompted to reboot, click Yes.
- If you are not prompted to reboot, select and Reboot Device.
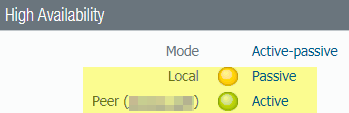
- After
the device finishes rebooting, view the High Availability widget
on the Dashboard and verify that the device
you just upgraded is in sync with the peer.
![]()
- Restore HA functionality to the primary HA peer.
- Select and Make local device functional for high availability.
- In the bottom-right corner, verify that the state is Passive. For firewalls in an active/active configuration, verify that the state is Active.
- Wait for the HA peer running configuration to synchronize.In the Dasbhoard, monitor the Running Config status in the High Availability widget.
- On the secondary HA peer, suspend the HA peer.
- Select and Suspend local device for high availability.
- In the bottom-right corner, verify that the state
is suspended.The resulting failover should cause the primary HA peer to transition to Active state.
- Install
PAN-OS 9.1 on the secondary HA peer.
- On the second peer, select and click Check Now for the latest updates.
- Locate and Download PAN-OS 9.1.0.
- After you download the image, Install it.
- After the installation completes successfully, reboot
using one of the following methods:
- If you are prompted to reboot, click Yes.
- If you are not prompted to reboot, select and Reboot Device.
- Restore HA functionality to the secondary HA peer.If your HA firewalls have local policy rules configured, upon upgrade to PAN-OS 9.1, each peer independently assigns UUIDs for each rule. Because of this, the peers will show as out of sync until you sync the configuration ().
- Select and Make local device functional for high availability.
- In the bottom-right corner, verify that the state is Passive. For firewalls in an active/active configuration, verify that the state is Active.
- Wait for the HA peer running configuration to synchronize.In the Dasbhoard, monitor the Running Config status High Availability widget.
- Re-enable preemption on the HA peer where it was disabled
in the previous step.
- Select and edit the Election Settings.
- Enable (check) the Preemptive setting and click OK.
- Commit the change.
- Verify that both peers are passing traffic as expected.In an active/passive configuration, only the active peer should be passing traffic; both peers should be passing traffic in an active/active configuration.Run the following CLI commands to confirm that the upgrade succeeded:
- (Active peers only) To verify that active peers are passing traffic, run the show session all command.
- To verify session synchronization, run the show high-availability interface ha2 command
and make sure that the Hardware Interface counters on the CPU table
are increasing as follows:
- In an active/passive configuration, only the active peer shows packets transmitted; the passive peer will show only packets received.If you enabled HA2 keep-alive, the hardware interface counters on the passive peer will show both transmit and receive packets. This occurs because HA2 keep-alive is bi-directional, which means that both peers transmit HA2 keep-alive packets.
- In an active/active configuration, you will see packets received and packets transmitted on both peers.