Configure Appliance-to-Appliance Encryption Using Custom Certificates Centrally on Panorama
Table of Contents
Expand all | Collapse all
-
- Determine Panorama Log Storage Requirements
-
- Setup Prerequisites for the Panorama Virtual Appliance
- Perform Initial Configuration of the Panorama Virtual Appliance
- Set Up The Panorama Virtual Appliance as a Log Collector
- Set Up the Panorama Virtual Appliance with Local Log Collector
- Set up a Panorama Virtual Appliance in Panorama Mode
- Set up a Panorama Virtual Appliance in Management Only Mode
-
- Preserve Existing Logs When Adding Storage on Panorama Virtual Appliance in Legacy Mode
- Add a Virtual Disk to Panorama on an ESXi Server
- Add a Virtual Disk to Panorama on vCloud Air
- Add a Virtual Disk to Panorama on Alibaba Cloud
- Add a Virtual Disk to Panorama on AWS
- Add a Virtual Disk to Panorama on Azure
- Add a Virtual Disk to Panorama on Google Cloud Platform
- Add a Virtual Disk to Panorama on KVM
- Add a Virtual Disk to Panorama on Hyper-V
- Add a Virtual Disk to Panorama on Oracle Cloud Infrastructure (OCI)
- Mount the Panorama ESXi Server to an NFS Datastore
-
- Increase CPUs and Memory for Panorama on an ESXi Server
- Increase CPUs and Memory for Panorama on vCloud Air
- Increase CPUs and Memory for Panorama on Alibaba Cloud
- Increase CPUs and Memory for Panorama on AWS
- Increase CPUs and Memory for Panorama on Azure
- Increase CPUs and Memory for Panorama on Google Cloud Platform
- Increase CPUs and Memory for Panorama on KVM
- Increase CPUs and Memory for Panorama on Hyper-V
- Increase the CPUs and Memory for Panorama on Oracle Cloud Infrastructure (OCI)
- Complete the Panorama Virtual Appliance Setup
-
- Convert Your Evaluation Panorama to a Production Panorama with Local Log Collector
- Convert Your Evaluation Panorama to a Production Panorama without Local Log Collector
- Convert Your Evaluation Panorama to VM-Flex Licensing with Local Log Collector
- Convert Your Evaluation Panorama to VM-Flex Licensing without Local Log Collector
- Convert Your Production Panorama to an ELA Panorama
-
- Register Panorama
- Activate a Panorama Support License
- Activate/Retrieve a Firewall Management License when the Panorama Virtual Appliance is Internet-connected
- Activate/Retrieve a Firewall Management License when the Panorama Virtual Appliance is not Internet-connected
- Activate/Retrieve a Firewall Management License on the M-Series Appliance
- Install the Panorama Device Certificate
- Install the Device Certificate for a Dedicated Log Collector
-
- Migrate from a Panorama Virtual Appliance to an M-Series Appliance
- Migrate a Panorama Virtual Appliance to a Different Hypervisor
- Migrate from an M-Series Appliance to a Panorama Virtual Appliance
- Migrate from an M-500 Appliance to an M-700 Appliance
- Migrate from an M-600 Appliance to an M-700 Appliance
- Migrate from an M-100 Appliance to an M-500 Appliance
- Migrate from an M-100 or M-500 Appliance to an M-200 or M-600 Appliance
-
- Configure an Admin Role Profile
- Configure an Admin Role Profile for Selective Push to Managed Firewalls
- Configure an Access Domain
-
- Configure a Panorama Administrator Account
- Configure Local or External Authentication for Panorama Administrators
- Configure a Panorama Administrator with Certificate-Based Authentication for the Web Interface
- Configure an Administrator with SSH Key-Based Authentication for the CLI
- Configure RADIUS Authentication for Panorama Administrators
- Configure TACACS+ Authentication for Panorama Administrators
- Configure SAML Authentication for Panorama Administrators
- Configure Tracking of Administrator Activity
-
- Add a Firewall as a Managed Device
-
- Add a Device Group
- Create a Device Group Hierarchy
- Create Objects for Use in Shared or Device Group Policy
- Revert to Inherited Object Values
- Manage Unused Shared Objects
- Manage Precedence of Inherited Objects
- Move or Clone a Policy Rule or Object to a Different Device Group
- Push a Policy Rule to a Subset of Firewalls
- Device Group Push to a Multi-VSYS Firewall
- Manage the Rule Hierarchy
- Manage the Master Key from Panorama
- Schedule a Configuration Push to Managed Firewalls
- Redistribute Data to Managed Firewalls
-
- Plan the Transition to Panorama Management
- Migrate a Firewall to Panorama Management and Reuse Existing Configuration
- Migrate a Firewall to Panorama Management and Push a New Configuration
- Migrate a Firewall HA Pair to Panorama Management and Reuse Existing Configuration
- Migrate a Firewall HA Pair to Panorama Management and Push a New Configuration
- Load a Partial Firewall Configuration into Panorama
- Localize a Panorama Pushed Configuration on a Managed Firewall
-
- Configure a Managed Collector
- Monitor Managed Collector Health Status
- Configure Log Forwarding to Panorama
- Configure Syslog Forwarding to External Destinations
- Forward Logs to Strata Logging Service
- Verify Log Forwarding to Panorama
- Modify Log Forwarding and Buffering Defaults
- Configure Log Forwarding from Panorama to External Destinations
-
- Add Standalone WildFire Appliances to Manage with Panorama
- Remove a WildFire Appliance from Panorama Management
-
-
- Configure a Cluster and Add Nodes on Panorama
- Configure General Cluster Settings on Panorama
- Remove a Cluster from Panorama Management
- Configure Appliance-to-Appliance Encryption Using Predefined Certificates Centrally on Panorama
- Configure Appliance-to-Appliance Encryption Using Custom Certificates Centrally on Panorama
- View WildFire Cluster Status Using Panorama
-
-
- Preview, Validate, or Commit Configuration Changes
- Commit Selective Configuration Changes for Managed Devices
- Push Selective Configuration Changes to Managed Devices
- Enable Automated Commit Recovery
- Compare Changes in Panorama Configurations
- Manage Locks for Restricting Configuration Changes
- Add Custom Logos to Panorama
- Use the Panorama Task Manager
- Reboot or Shut Down Panorama
- Configure Panorama Password Profiles and Complexity
-
-
- Verify Panorama Port Usage
- Resolve Zero Log Storage for a Collector Group
- Replace a Failed Disk on an M-Series Appliance
- Replace the Virtual Disk on an ESXi Server
- Replace the Virtual Disk on vCloud Air
- Migrate Logs to a New M-Series Appliance in Log Collector Mode
- Migrate Logs to a New M-Series Appliance in Panorama Mode
- Migrate Logs to a New M-Series Appliance Model in Panorama Mode in High Availability
- Migrate Logs to the Same M-Series Appliance Model in Panorama Mode in High Availability
- Migrate Log Collectors after Failure/RMA of Non-HA Panorama
- Regenerate Metadata for M-Series Appliance RAID Pairs
- View Log Query Jobs
- Troubleshoot Registration or Serial Number Errors
- Troubleshoot Reporting Errors
- Troubleshoot Device Management License Errors
- Troubleshoot Automatically Reverted Firewall Configurations
- View Task Success or Failure Status
- Generate a Stats Dump File for a Managed Firewall
- Recover Managed Device Connectivity to Panorama
- Restore an Expired Device Certificate
Configure Appliance-to-Appliance Encryption Using Custom Certificates Centrally on Panorama
- Upgrade each managed WildFire appliance to PAN-OS 8.1.x. All managed appliances must be running PAN-OS 8.1 or later to enable appliance-to-appliance encryption.Verify that your WildFire appliance cluster has been properly configured and is operating in a healthy state.Review your existing WildFire secure communications configuration. Keep in mind, if you previously configured the WildFire appliance and the firewall for secure communications using a custom certificate, you can also use that custom certificate for secure communications between WildFire appliances.
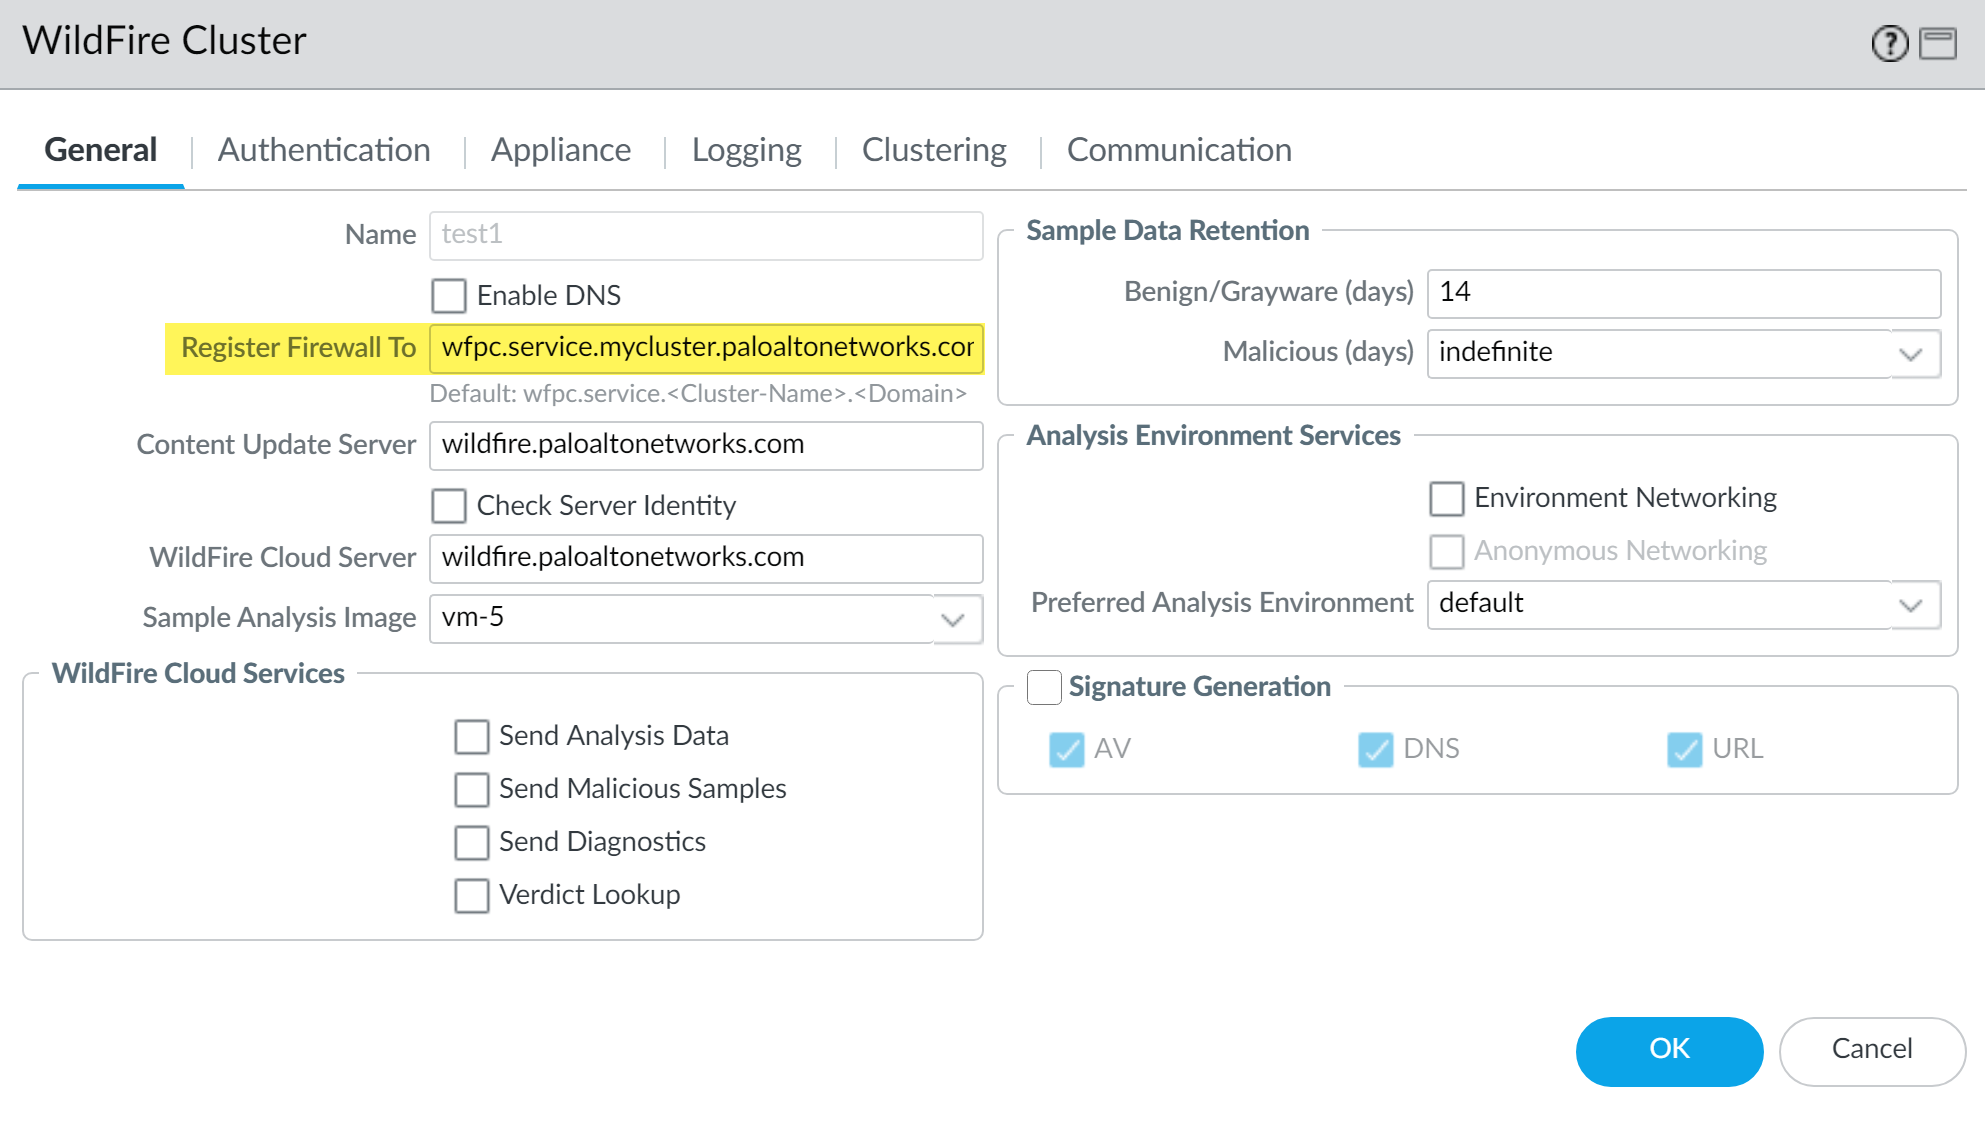
- Select Panorama >Managed WildFire Clusters> WF_cluster_name> Communication.If Customize Secure Server Communication has been enabled and you would like to use that certificate, identify the details of the custom certificate being used. Otherwise proceed to Step 5 to begin the process of installing a new custom certificate.Determine the custom certificate FQDN (DNS name) that will be used to define the firewall registration address in Step 4.Make sure to note the custom certificate name and the associated FQDN. These are referenced several times during the configuration process.Configure the firewall registration address on Panorama.
- On Panorama, select Panorama >Managed WildFire Clusters> WF_cluster_name> General.In the Register Firewall To field, specify the DNS name used for authentication found in the custom certificate (typically the SubjectName or the SubjectAltName). For example, the default domain name is wfpc.service.mycluster.paloaltonetworks.com
![]() Configure WildFire Secure Server Communication settings on Panorama. If you already configured secure communications between the firewall and the WildFire cluster and are using the existing custom certificate, proceed to Step 4 below.
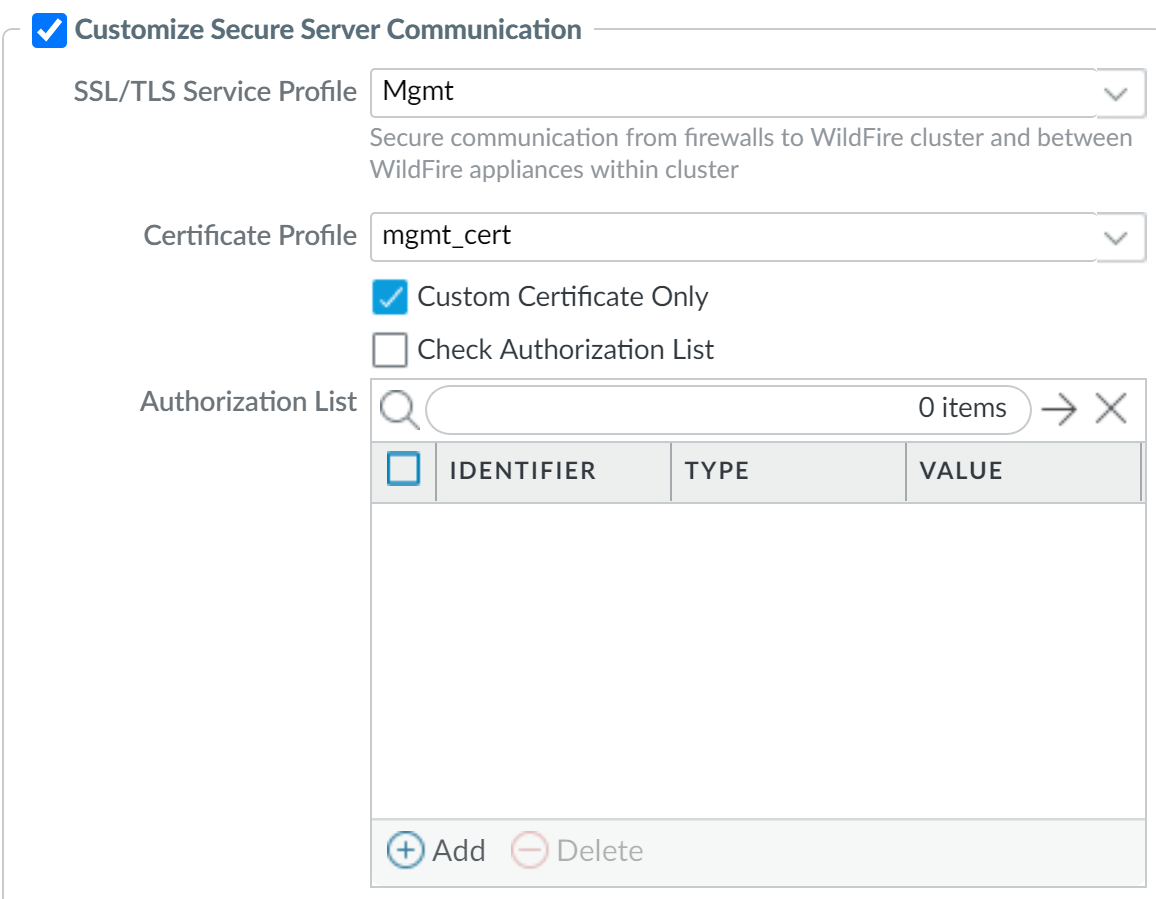
Configure WildFire Secure Server Communication settings on Panorama. If you already configured secure communications between the firewall and the WildFire cluster and are using the existing custom certificate, proceed to Step 4 below.- On Panorama, select Panorama> Managed WildFire Clusters> WF_cluster_name> Communication.Click Customize Secure Server Communication.Configure and deploy custom certificates used by the WildFire appliances and the associated firewall. The SSL/TLS service profile defines the custom certificate used by WildFire appliances to communicate with WildFire appliance peers and to the firewall. You must also configure the custom certificate settings on the firewall associated with the WildFire appliance cluster. This is configured later in Step 9.
- Open the SSL/TLS Service Profile drop-down and click SSL/TLS Service Profile. Configure an SSL/TLS service profile with the custom certificate that you want to use. After you configure the SSL/TLS service profile, click OK and select the newly created SSL/TLS Service profile.
- Open the Certificate Profile drop-down and click Certificate Profile. Configure a Certificate Profile that identifies the custom certificate used to establish secure connections between the firewall and WildFire appliances, as well as between peer WildFire appliances. After you configure the Certificate Profile, click OK and select the newly created profile.
Select the Custom Certificate Only check box. This allows you to use the custom certificates that you configured instead of the default preconfigured certificates.(Optional) Configure an authorization list. The authorization list checks the custom certificate Subject or Subject Alt Name; if the Subject or Subject Alt Name presented with the custom certificate does not match an identifier on the authorization list, authentication is denied.- Add an Authorization List.
- Select the Subject or Subject Alt Name configured in the custom certificate profile as the Identifier type.
- Enter the Common Name if the identifier is Subject or and IP address, hostname or email if the identifier is Subject Alt Name.
- Click OK.
- Select Check Authorization List to enforce the authorization list.
Click OK.![]() Enable Secure Cluster Communication.(Recommended) Enable HA Traffic Encryption. This optional setting encrypts the HA traffic between the HA pair and is a Palo Alto Networks recommended best practice.HA Traffic Encryption cannot be disabled when operating in FIPS/CC mode.Click OK to save the WildFire Cluster settings.Configure the firewall Secure Communication Settings on Panorama to associate the WildFire appliance cluster with the firewall custom certificate. This provides a secure communications channel between the firewall and WildFire appliance cluster. If you already configured secure communications between the firewall and the WildFire appliance cluster and are using the existing custom certificate, proceed to the next step.
Enable Secure Cluster Communication.(Recommended) Enable HA Traffic Encryption. This optional setting encrypts the HA traffic between the HA pair and is a Palo Alto Networks recommended best practice.HA Traffic Encryption cannot be disabled when operating in FIPS/CC mode.Click OK to save the WildFire Cluster settings.Configure the firewall Secure Communication Settings on Panorama to associate the WildFire appliance cluster with the firewall custom certificate. This provides a secure communications channel between the firewall and WildFire appliance cluster. If you already configured secure communications between the firewall and the WildFire appliance cluster and are using the existing custom certificate, proceed to the next step.- Select DeviceSetupManagement > Secure Communication Settings and click the Edit icon in Secure Communication Settings to configure the firewall custom certificate settings.Select the Certificate Type, Certificate, and Certificate Profile from the respective drop-downs and configure them to use the custom certificate.Under Customize Communication, select WildFire Communication.Click OK.Commit your changes.


