Set Up the Panorama Interconnect Plugin
Table of Contents
Expand all | Collapse all
Set Up the Panorama Interconnect Plugin
How to install the Panorama™ Interconnect plugin on the
Panorama Controller and Panorama Nodes.
Centralize the template stack and device group
management of large scale firewall deployments using Panorama™ Interconnect
to push replicated configurations from a Panorama Controller to
Panorama Nodes to ensure consistency of firewall configurations
and security policies. Panorama Interconnect allows you to establish
a Panorama Controller with which to manage the Panorama Nodes, who
manage the firewalls and push configurations. This allows you to
manage the configuration of large scale firewall deployments from
a single location, reducing the time you need to spend configuring
multiple Panorama management servers, and reducing your security
vulnerability in the event of a misconfiguration. Before setting
up the Panorama Interconnect plugin on your Panorama management
servers, review the Panorama Interconnect system and certificate requirements.
See Upgrade the Panorama Interconnect Plugin to upgrade
the Panorama Interconnect plugin on the Panorama Controller and
Panorama Nodes.
If your Panorama Node is in a high availability
(HA) configuration, you must set up the Panorama Interconnect plugin
on both Panorama HA peers.
- Configure the device groups and template stacks you want to push the Panorama Node.
- Log in to the Panorama web interface of the Panorama Controller.Add a device group. Repeat this step to create as many device groups as required.Configure a template stack. Repeat this step to create as many template stacks as required.Install the Panorama Interconnect plugin. You must install the plugin on the Panorama Controller, and all Panorama Nodes.
- Log in to the Panorama web interface.Select PanoramaPlugins and search for Interconnect.Download and Install the Panorama Interconnect plugin.Click CommitCommit to Panorama to finish installing the Panorama Interconnect plugin.Enable authentication between the Panorama Controller and Nodes to secure authentication between the Panorama Controller and Panorama Nodes.
- Obtain the CA Certificate for the Panorama Controller.Generate the Panorama Node Certificate.Create a Certificate Profile for Authenticating Panorama Nodes.Set up the plugin on the Panorama Controller. Repeat this step on the high availability peer if the Panorama Controller is in an HA configuration.Once the Panorama has been configured as the Panorama Controller, you cannot reconfigure the Panorama Controller as a Panorama Node. Verify that you are configuring the correct Panorama management server as the Panorama Controller before continuing.
- Select PanoramaInterconnectSetup and edit the Interconnect Plugin Setup:In the Server Mode field, select Yes.Select the Certificate Profile you created in the previous step.Click OK to save the settings.
![]() Click Commit and Commit to Panorama.Set up the plugin on the Panorama Node. Repeat this step for all Panorama Nodes.If your Panorama Node is in a high availability (HA) configuration, you must select the Panorama Node certificate you imported to each Panorama Node HA peer when setting up the Panorama Interconnect plugin on each peer.
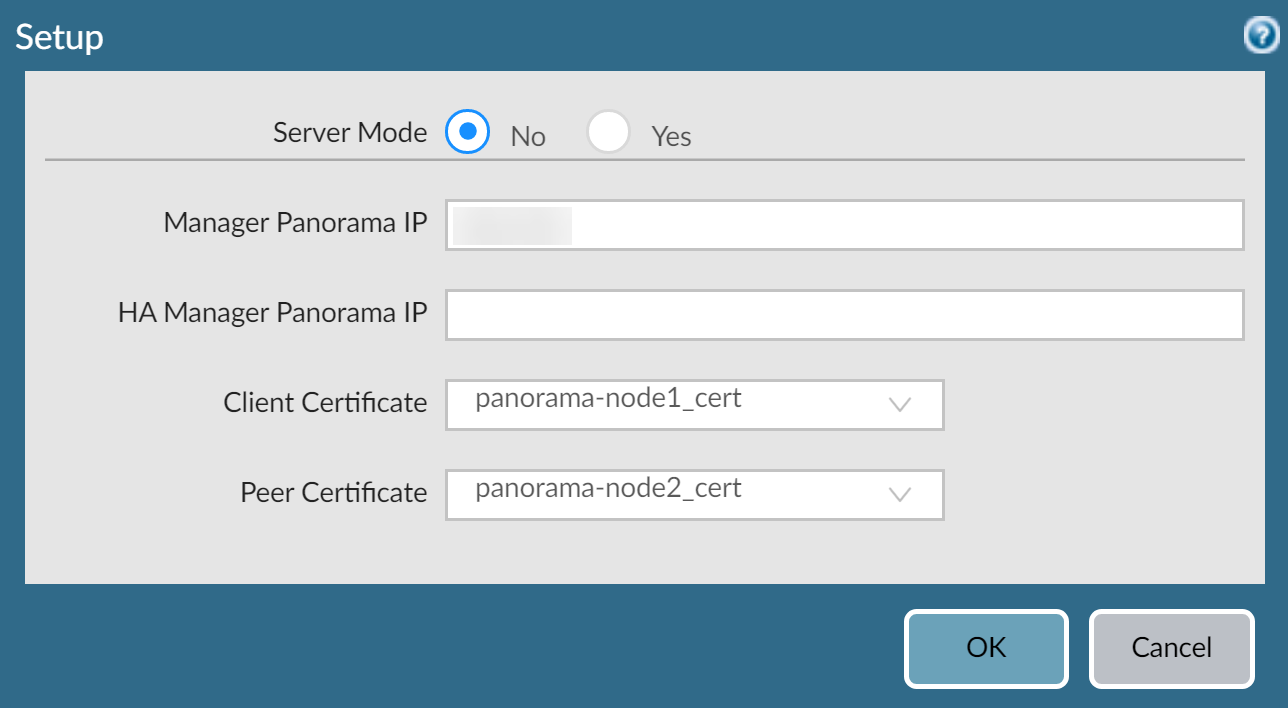
Click Commit and Commit to Panorama.Set up the plugin on the Panorama Node. Repeat this step for all Panorama Nodes.If your Panorama Node is in a high availability (HA) configuration, you must select the Panorama Node certificate you imported to each Panorama Node HA peer when setting up the Panorama Interconnect plugin on each peer.- Select PanoramaInterconnectSetup and edit the Interconnect Plugin Setup:
- In the Server Mode field, select No.
- Manager Panorama IP—Enter the management IP address of the Panorama Controller.
- HA Manager IP—If the Panorama Controller is in a High Availability configuration, enter the management IP address of the HA Panorama Controller peer.
- Select the Panorama Node certificate you imported in the previous step.
- (HA only) Select the peer Panorama Node certificate you imported in the previous step.
Click OK to save the settings.![]() Click Commit and Commit to Panorama to finish setting up the plugin on the Panorama Node.Add the Panorama Nodes to the Panorama Controller.
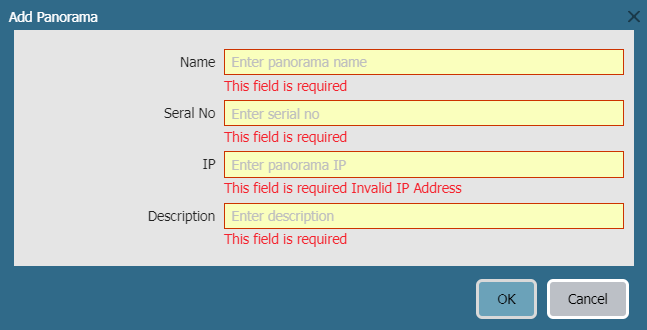
Click Commit and Commit to Panorama to finish setting up the plugin on the Panorama Node.Add the Panorama Nodes to the Panorama Controller.- Select PanoramaInterconnectPanorama Nodes and Add the Panorama Node.
- Enter a Name for the Panorama Node. This does not need to match Device Name set on the Panorama management server.A period (.) in the Panorama Node Name is not supported.
- Enter the Serial No of the Panorama Node.
- Enter the IP address of the Panorama Node. The IP address must be accessible to the Panorama Controller.
- Enter a Description of the Panorama Node.
Click OK to add the Panorama Node.![]() Click Commit and Commit to Panorama to finish adding the Panorama Node.Verify that the newly added Panorama Node is Connected.
Click Commit and Commit to Panorama to finish adding the Panorama Node.Verify that the newly added Panorama Node is Connected.- Select PanoramaInterconnectPanorama Nodes.Find the Panorama Node you added, and verify that the Connection Status column displays Connected.
![]() Once the plugin has been successfully installed on the Panorama Controller and Panorama Nodes, perform the next steps to complete setting up Panorama Interconnect:
Once the plugin has been successfully installed on the Panorama Controller and Panorama Nodes, perform the next steps to complete setting up Panorama Interconnect:


