Obtain the CA Certificate for the Panorama Controller
Table of Contents
Obtain the CA Certificate for the Panorama Controller
Obtain the Certificate Authority on the Panorama™ Controller
to secure communication with the Panorama Nodes.
Create a trusted Certificate Authority (CA)
responsible for issuing certificates to Panorama™ Nodes to secure
connections to the internet. A trusted CA is required when setting
up Panorama for large scale firewall deployments.
- Log in to the Panorama web interface of the Panorama Controller.Create the Certificate Authority certificate.
- Generate a new CA certificate
- Select and Generate a new certificate.
- For the Certificate Type, select Local.SCEP is not supported.
- Enter a Certificate Name. The name is case-sensitive and can have up to 31 characters. It must be unique and use only letters, numbers, hyphens, and underscores.
- In the Common Name field, enter the serial number of the Panorama Controller.
- Leave the Signed By field blank to designate the certificate as self-signed.
- Select the Certificate Authority check box.
- Generate the CA certificate.
![]()
- Import an existing CA certificate
- Select and Import the CA certificate.
- For the Certificate Type, select Local.SCEP is not supported.
- Enter a Certificate Name. The name is case-sensitive and can have up to 31 characters. It must be unique and use only letters, numbers, hyphens, and underscores.
- Browse to find the Certificate File.
- Select a File Format:
- Base64 Encoded Certificate (PEM)—You must import the key separately from the certificate. Select the Import Private Key check box, and Browse for the Key File.
- Encrypted Private Key and Certificate (PKCS12)— Common format in which the key and certificate are in a single container (Certificate File).
- Enter and re-enter (confirm) the Passphrase used to encrypt the certificate.
- Click OK. The Certificates page now displays the imported CA certificate.
![]()
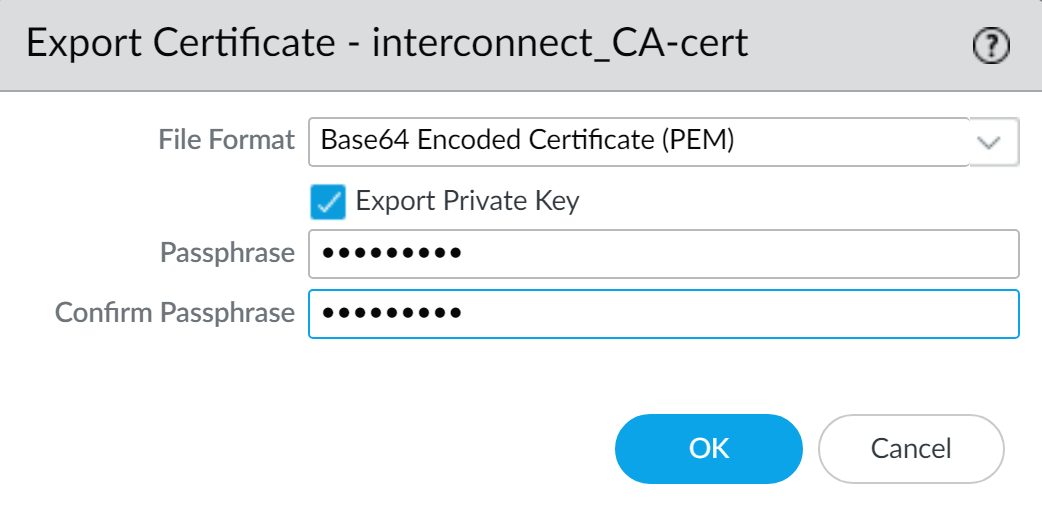
Click Commit and Commit to Panorama.Export the Panorama Controller CA certificate.- Select , select the CA certificate, and Export Certificate.Select the File Format:
- Base64 Encoded Certificate (PEM)—Allows you to export the certificate and private key separately. If you want the exported file to include the private key, select the Export Private Key check box.
- Encrypted Private Key and Certificate (PKCS12)— Export the certificate and private in a single file.
Check (enable) Export Private Key.Enter a Passphrase and Confirm Passphrase to encrypt the CA certificate. This passphrase is required when importing the CA certificate to the Panorama Nodes.Click OK and save the encrypted certificate in .pem format to your local device.![]() Enter a descriptive file name for the certificate so that you can easily identify the Panorama Node it needs to be imported to, and Save the certificate.Import the Panorama Controller CA certificate in to each Panorama Node.
Enter a descriptive file name for the certificate so that you can easily identify the Panorama Node it needs to be imported to, and Save the certificate.Import the Panorama Controller CA certificate in to each Panorama Node.- Log in to the Panorama web interface of the Panorama Node.Select , and Import a certificate.
- For the Certificate Type, select Local.SCEP is currently not supported.
- Enter the same Certificate Name.The name is case-sensitive and can have up to 31 characters. It must be unique and use only letters, numbers, hyphens, and underscores.
- Browse for the CA certificate you exported in the previous step.
- Check the Import private key box.
- Enter the Passphrase and Confirm Passphrase used to encrypt the CA certificate.
- Click OK to import the certificate.
![]() Click Commit and Commit to Panorama.
Click Commit and Commit to Panorama.