Prisma Access Agent
Create and Manage HIP Profiles for the Prisma Access Agent
Table of Contents
Create and Manage HIP Profiles for the Prisma Access Agent
Learn how to create a collection of HIP objects that are evaluated
together, either for monitoring or for security policy enforcement.
| Where Can I Use This? | What Do I Need? |
|---|---|
|
|
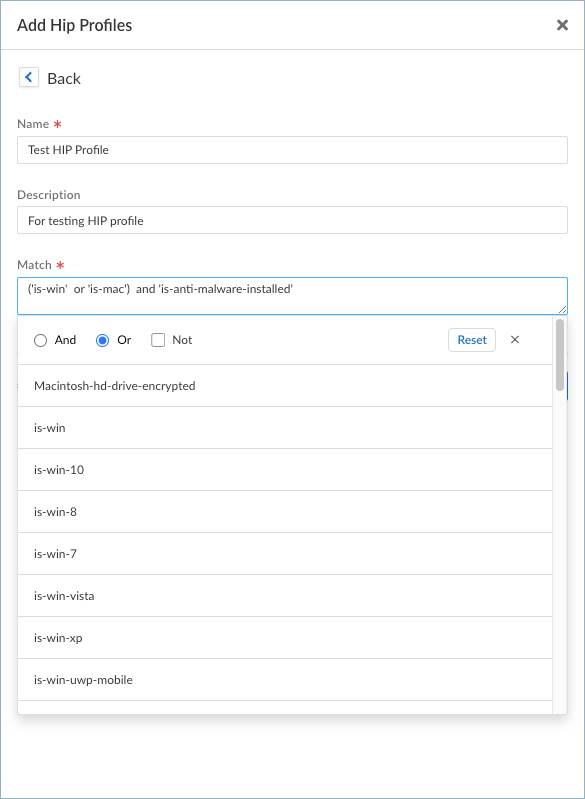
- You can configure HIP Profiles from ConfigurationNGFW and Prisma AccessObjectsHIPHIP Profiles.Click Add HIP Profile.Enter a Name and Description to identify the profile.Click within the Match field to open the HIP Profile builder.
- Select the HIP object or profile that you want to use as match criteria from the list.Select a Boolean operator (And, And). If you want the HIP Profile to evaluate the object as a match only when the criteria in the object are not true for a flow, select the Not check box before adding the object.Select another HIP object or profile to evaluate against the first HIP object.Continue adding match criteria for the profile that you're building, making sure to select the appropriate Boolean operator radio button (And or Or) between each addition, and using the Not check box when appropriate. The HIP Profile can contain up to 2,048 characters in length.When creating a complex Boolean expression, you must manually add the parenthesis in the proper places in the Match text box to ensure that the HIP Profile is evaluated using the logic you intend.
![]() Save and Add your HIP Profile.To manage your HIP Profiles, you can select an existing profile from the HIP Notifications table or click Add in the Edit Global Agent Settings page to open the HIP Notifications window.From there, click Manage HIP Profile to view the list of HIP Profiles that you have configured. You can select a HIP Profile and Delete, Clone, or Move it. You can also Add a HIP Profile from here.
Save and Add your HIP Profile.To manage your HIP Profiles, you can select an existing profile from the HIP Notifications table or click Add in the Edit Global Agent Settings page to open the HIP Notifications window.From there, click Manage HIP Profile to view the list of HIP Profiles that you have configured. You can select a HIP Profile and Delete, Clone, or Move it. You can also Add a HIP Profile from here.Create HIP-Enabled Security Rules on Your Gateways
As a best practice, you should create your security rules and test that they match the expected flows (based on the source and destination criteria) before adding your HIP profiles. By doing this, you can better determine the proper placement of the HIP-enabled rules within the policy.- On the firewall that's hosting your gateway, select PoliciesSecurity, and then select the rule to which you want to add a HIP profile.On the Source tab, make sure the Source Zone is a zone for which you enabled User-ID.On the Source tab under Source Device, Add the HIP Profiles used to identify devices (you can add up to 63 HIP profiles to a rule).Click OK to save the rule.Commit the changes.

