Prisma Browser
Enforcing Prisma Access Browser Mobile Access on Managed Devices Using MDM App Configuration
Table of Contents
Expand All
|
Collapse All
Prisma Browser Docs
Enforcing Prisma Access Browser Mobile Access on Managed Devices Using MDM App Configuration
Enforcing PAB Mobile Access on Managed Devices Using MDM App
Configuration
| Where Can I Use This? | What Do I Need? |
|---|---|
|
|
Overview
This feature allows you to ensure that only MDM-managed mobile devices can sign in to
Prisma Access Browser (PAB) Mobile. By integrating with your existing MDM (Mobile
Device Management) solution, you can enforce PAB sign-in policies based on device
management status and reuse existing MDM compliance rules.
Key Benefits
- Secure Access: Enforce that only MDM-enrolled, compliant devices can access PAB.
- Reuse Compliance Rules: No need to redefine device posture separately in PAB—leverage what’s already set in your MDM.
- MDM-Agnostic: Works with all major MDM vendors (e.g., Intune, Jamf, Workspace ONE) via standard AppConfig.
Deployment Considerations
To implement this feature, ensure that your MDM solution is configured to enforce the
necessary compliance checks and that Prisma Access Browser Mobile is deployed with
AppConfig support enabled. Review your organization's compliance policies and verify
that they align with your access requirements.
This
feature is MDM-agnostic. For the purposes of this article, the examples are made
using Microsoft Intune.
How to Configure the Feature
Configure the MDM for iOS Browsers
You can configure Microsoft Intune as the MDM that will be used to enforce
Prisma Access Browser Mobile access on iOS-devices. Configure Microsoft Intune as
follows:
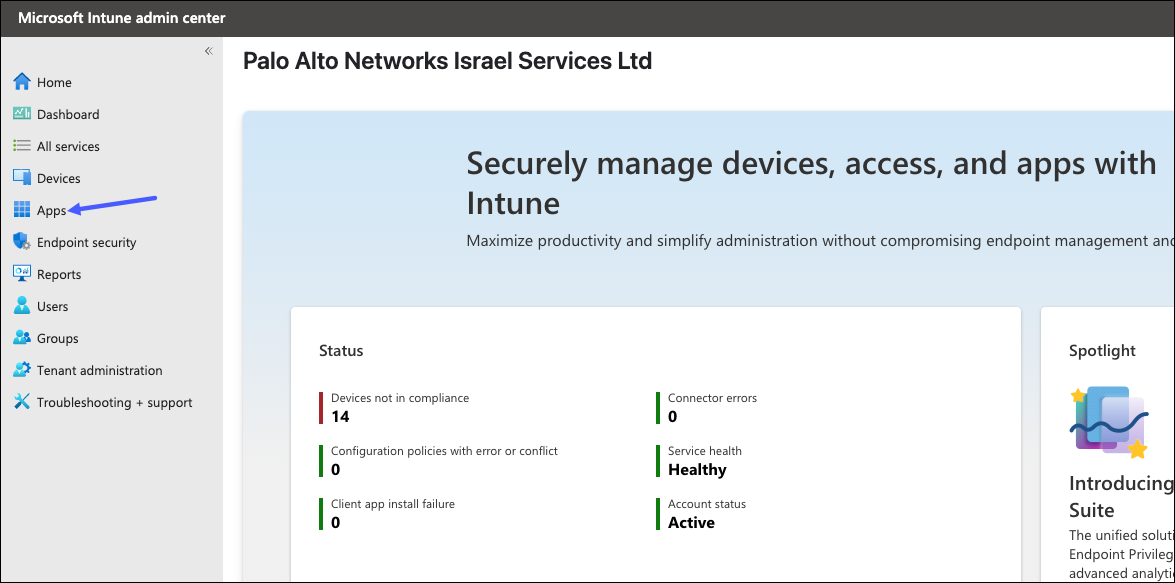
- Log into the Intune application.and click Add from
the menu.
![]()
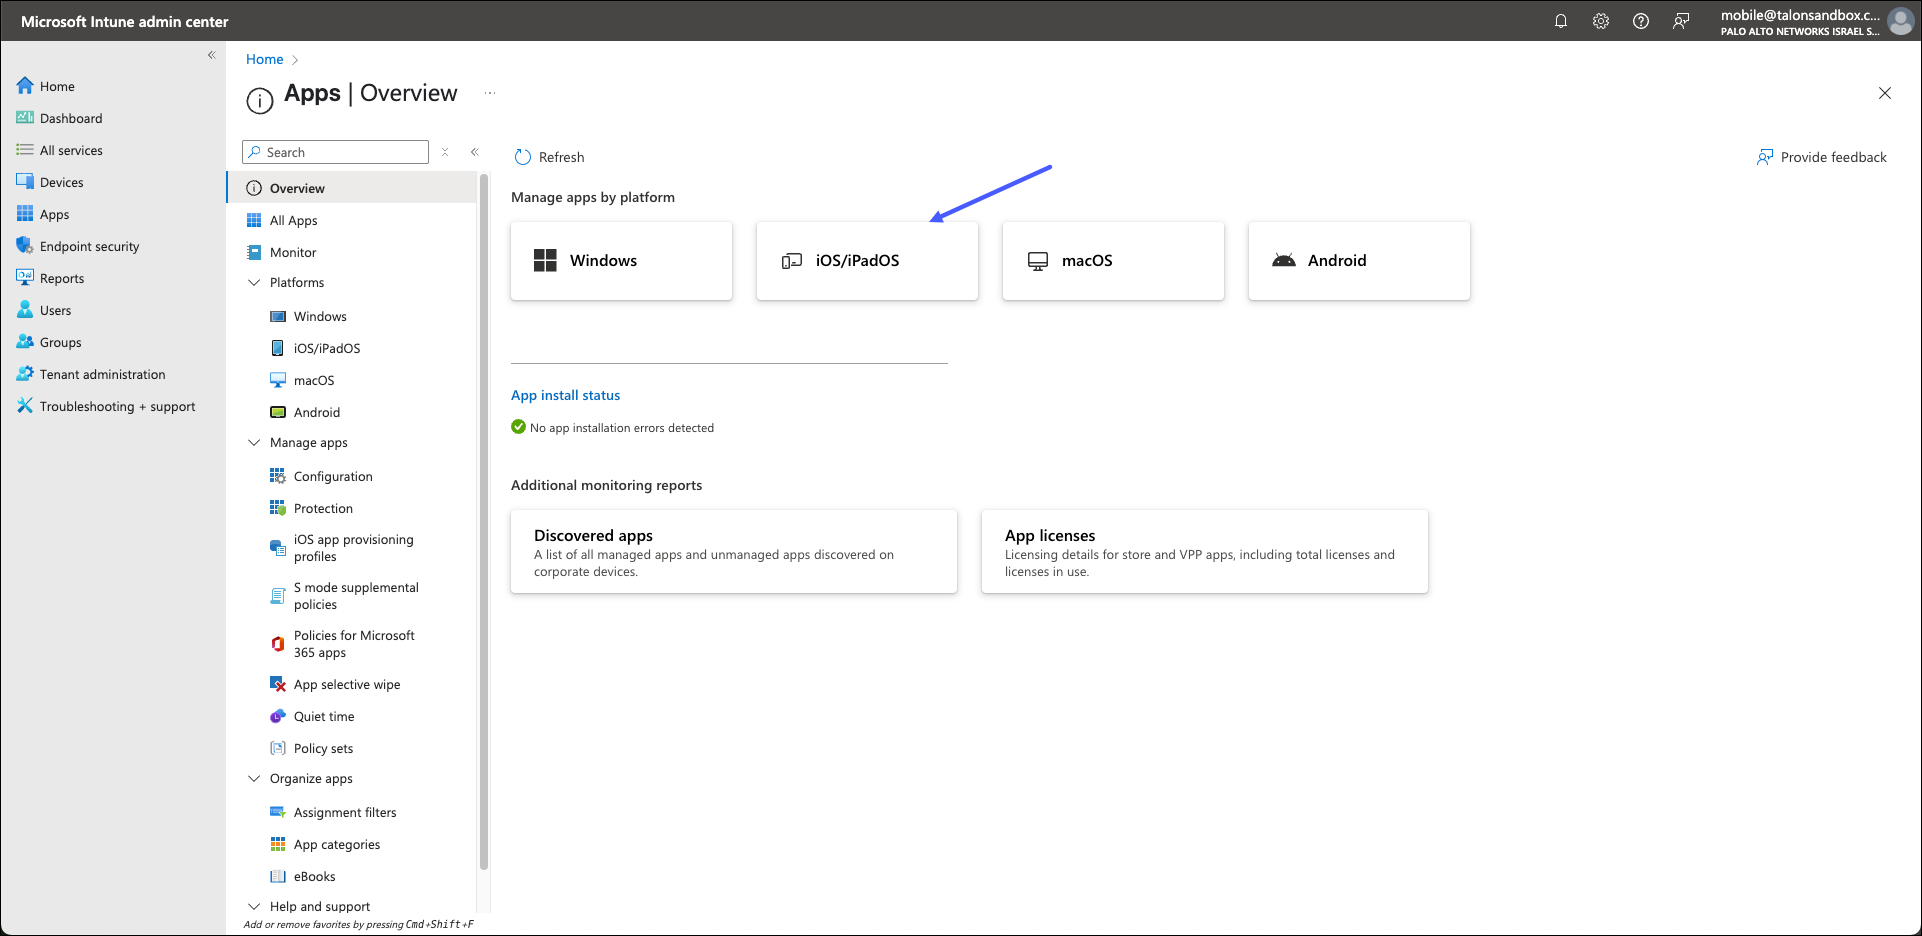
- On te Overview page, select the platform that you need. If you are using iOS or
iPadOS, click iOS/iPadOS.
![]()
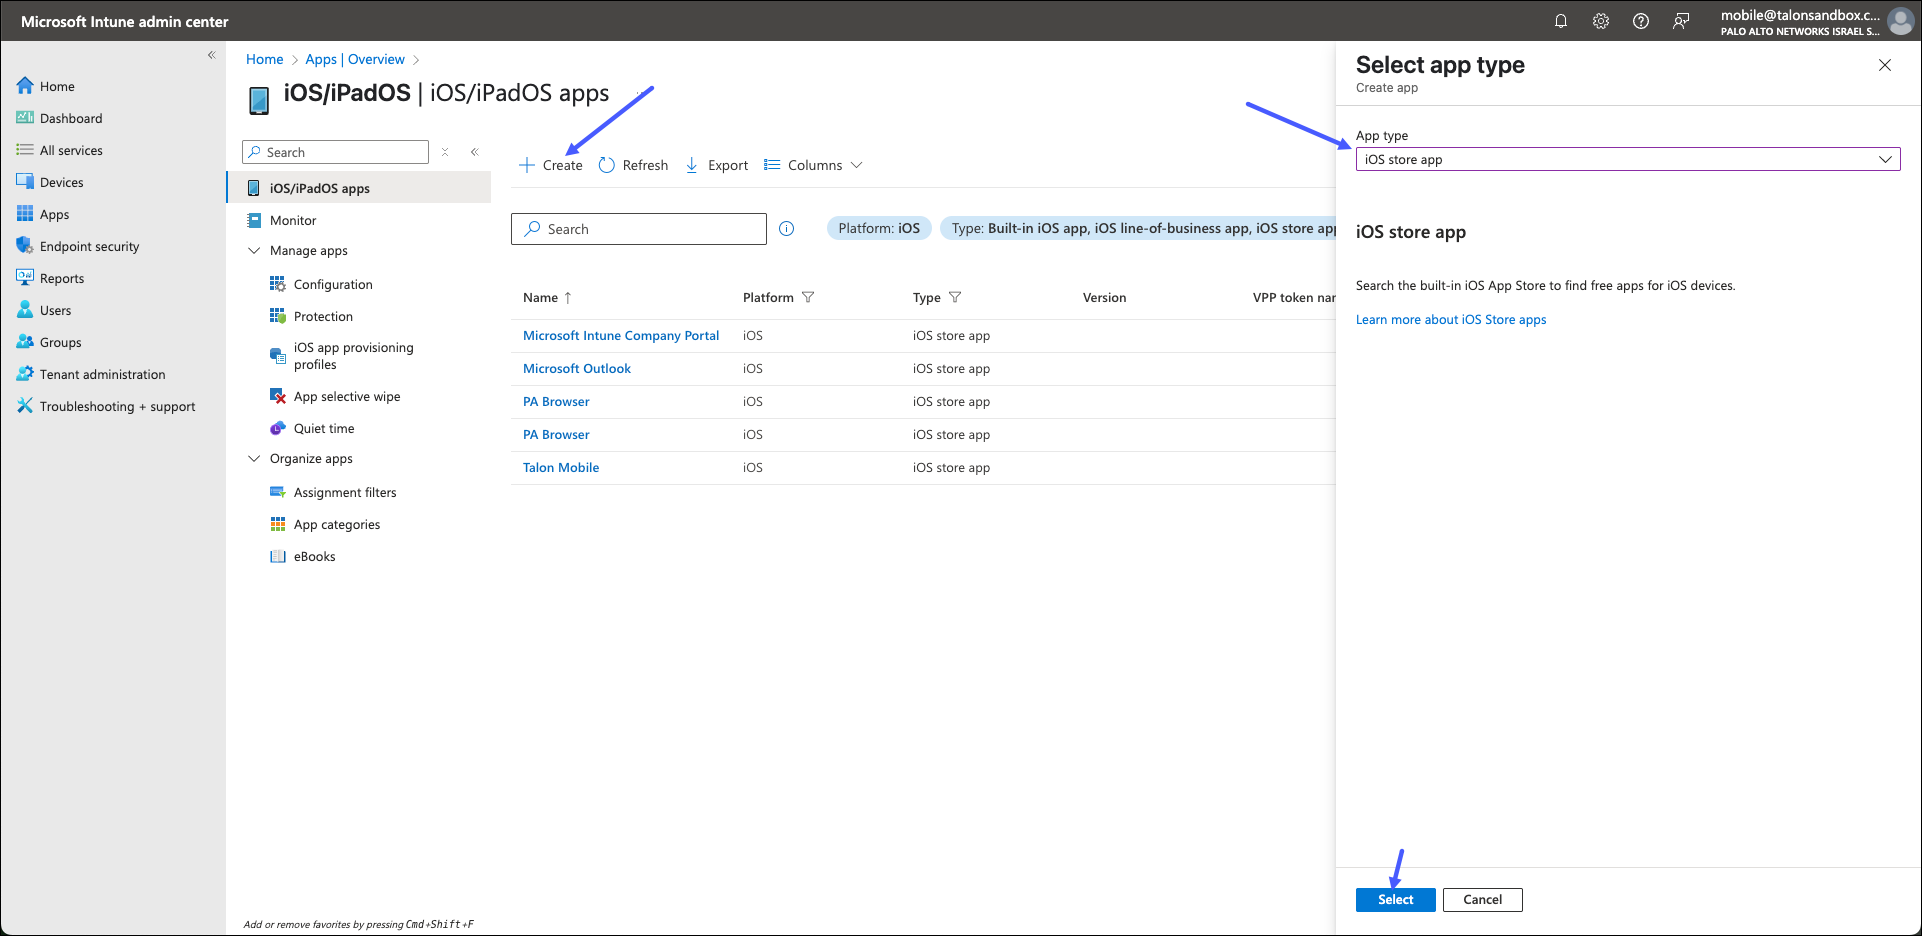
- On the iOS/iPadOD apps page, do the following:
- Click Create.
- In the Select app type drawer, locate the App type list, and select iOS store app.
- Click Select.
![]()
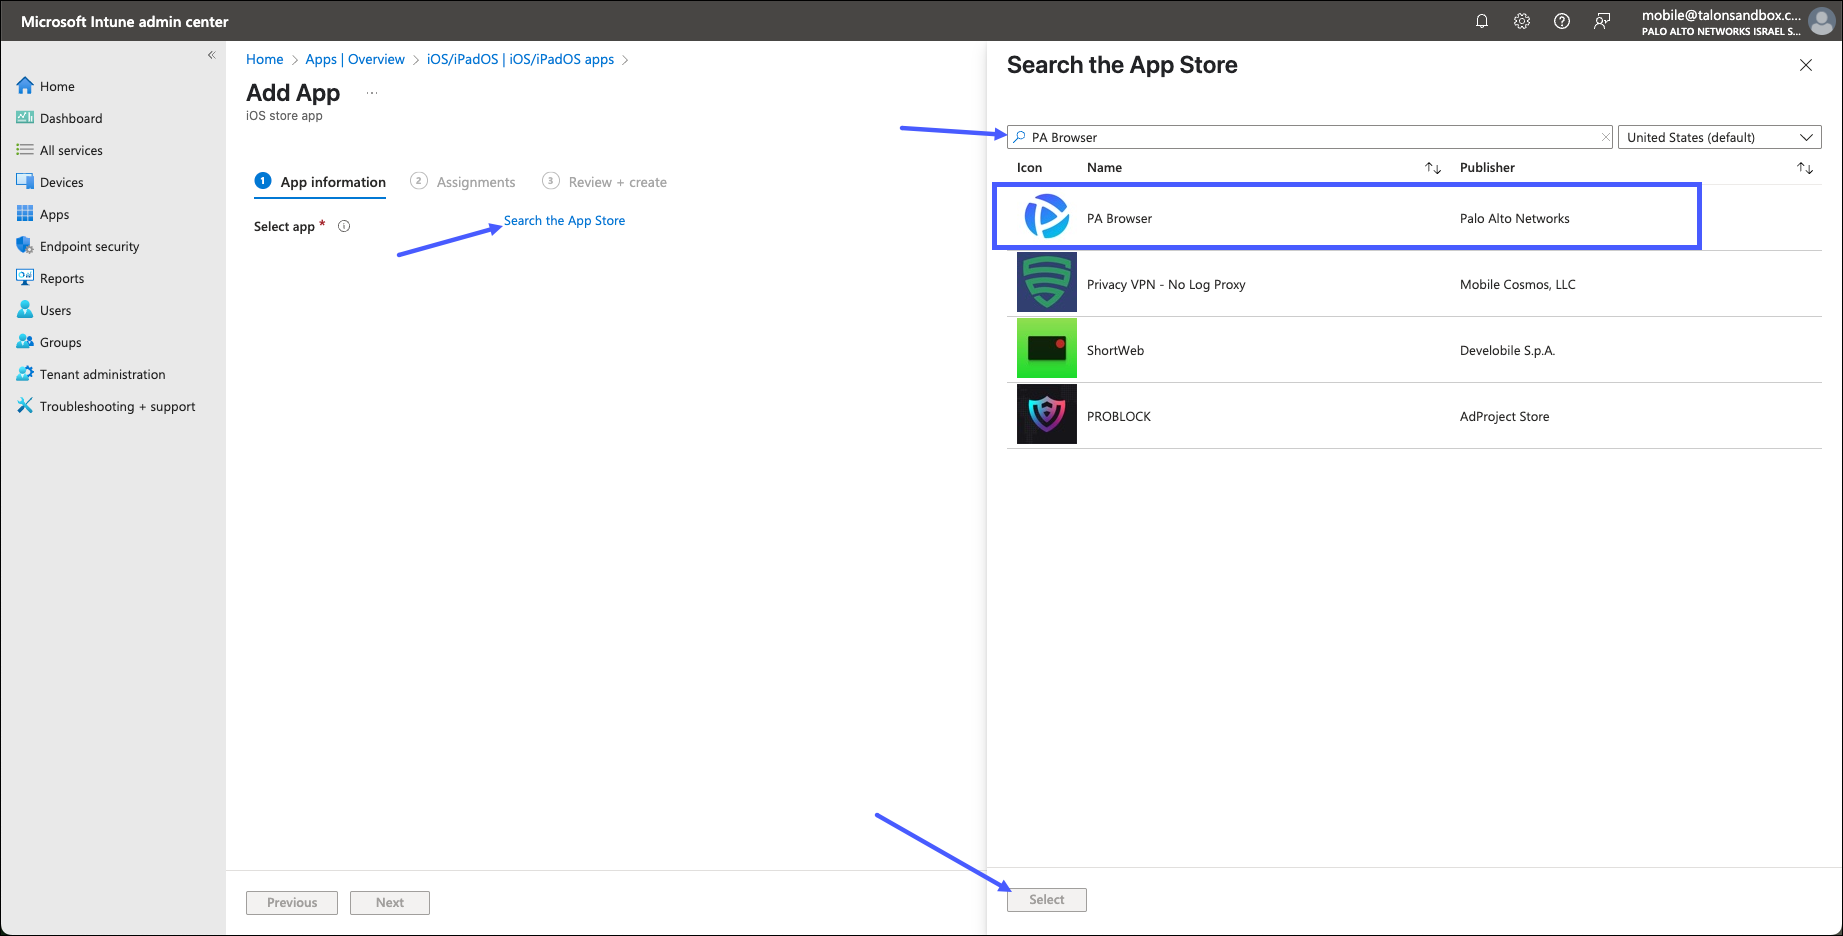
- In the Add App page, click Search the App Store.
- In the Search the App Store window, begin typing the name of the
application, PA Browser, and click Search. When it appears in the
list, click PA Browser, the click Next.
![]()
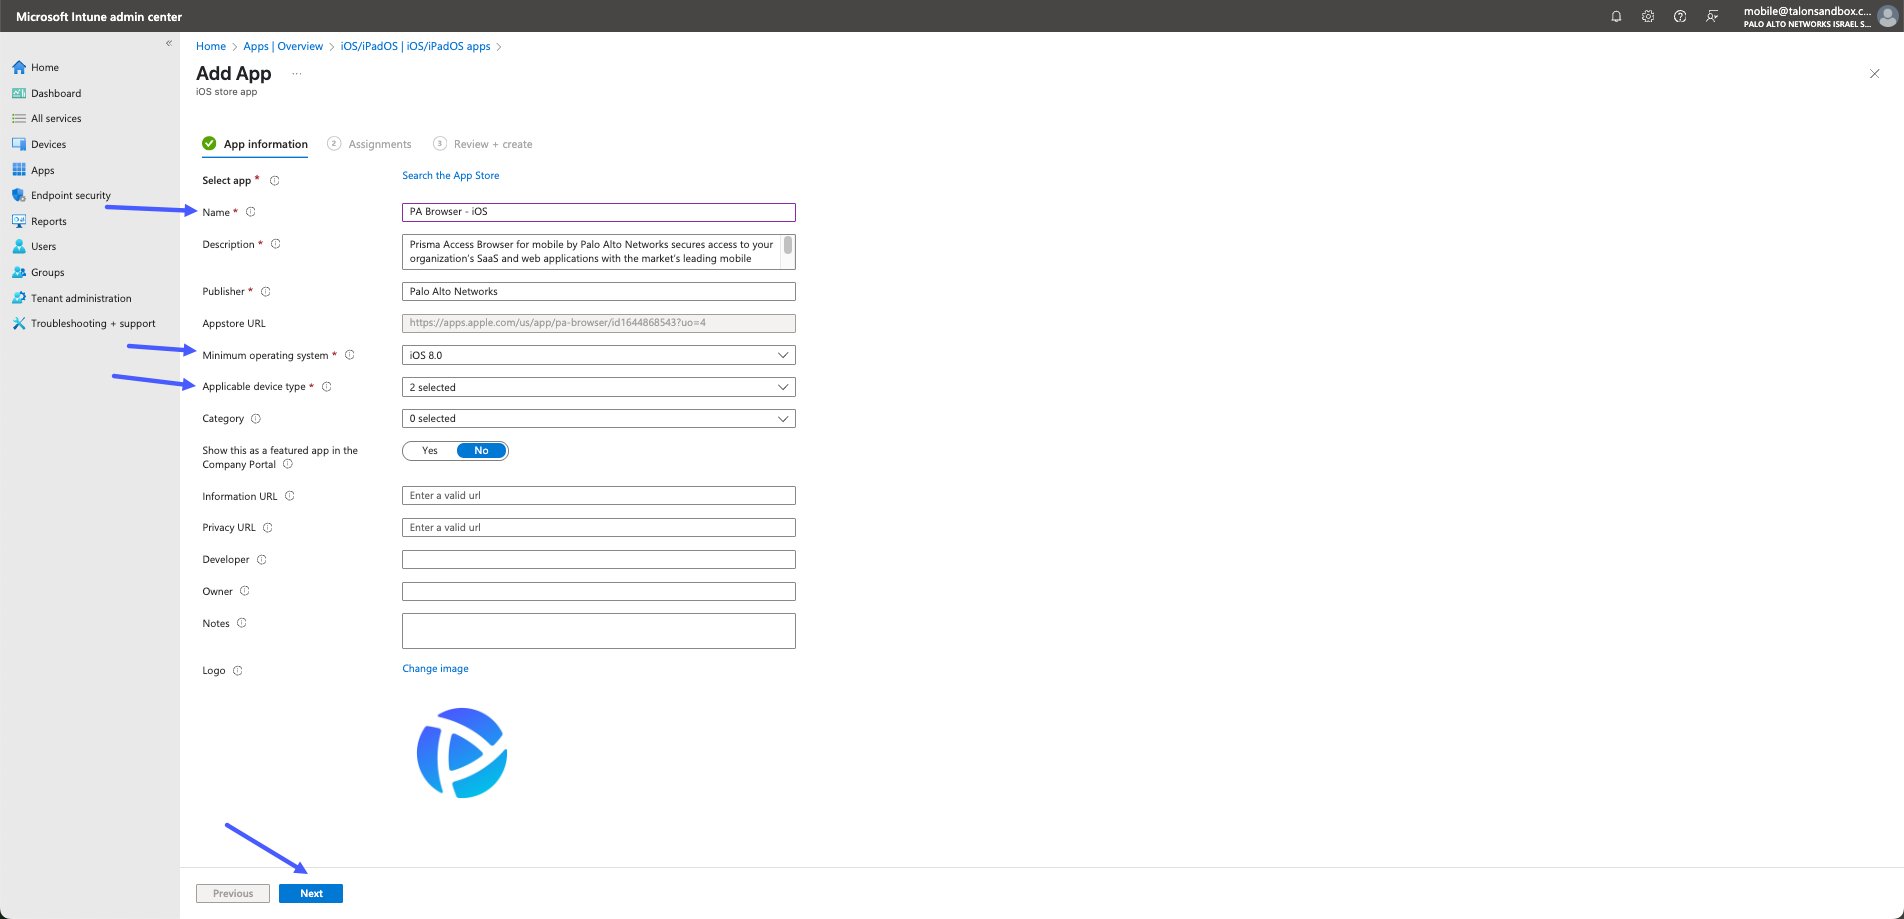
- On the Add App - App Information page, verify the following information:
- Name: The name of the app. This name will be visible in the Intune apps list and to users in the Company Portal.. We recommend that you use the default - PA Browser, although you can change it if needed.
- Description: Help your device users understand what the app is and/or what they can do in the app. This description will be visible to them in the Company Portal. We recommend that you use the default text.
- Minimum operating system: Select the earliest operating system version on which the app can be installed. If you assign the app to a device with an earlier operating system, it will not be installed.
- Applicable device types: Select the device types that can install
the app. - the options are:
- iPad
- iPhone and iPod You can select or remove either of the selections as needed. For example, if you do not want your users to install on iPad devices, clear the field.
- The rest of the fields can be left blank, or left with the default data.
- Click Next.
![]()
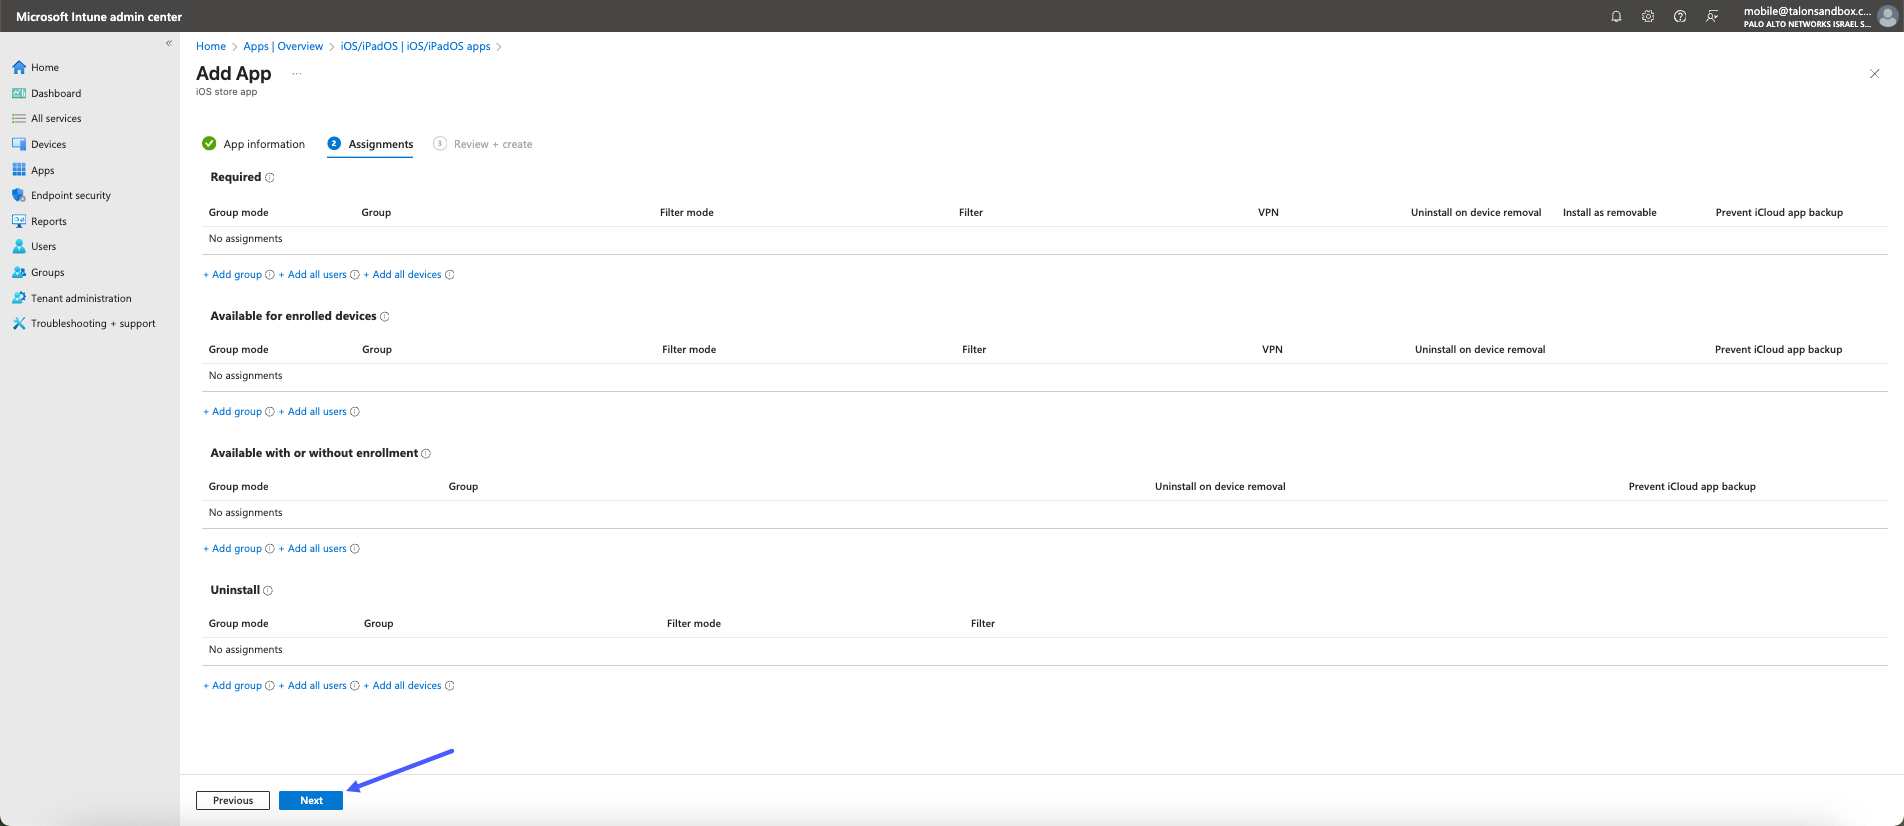
- On the Add App - Assignments page, you can set any specific assignments
that you need. There are 4 assignment types:
- Required
Select the user groups for which this app should be required. When an app is marked as required, the system automatically installs it on all devices enrolled under those selected groups.This automation ensures that users receive the app without needing to manually install it, helping maintain consistency and compliance across the organization.Be aware that some device platforms (such as iOS or Android) may display system-level prompts to the user before the installation begins. These prompts can include installation consent, permission requests, or security warnings that must be acknowledged before the app is fully installed.Available Assignments:
- Add group: Select an Microsoft Entra group to assign the application to a group containing licensed users or managed devices.
- Add all users: Selecting “Add all users” creates an assignment for all Intune licensed users in your organization. You can only use “All users” for one type of assignment. Additionally “All users” can not be excluded.
- Add All devices: Choosing 'Add all devices' assigns
the app to every device enrolled in Intune. You can apply
this option to only one assignment type—such as Required,
Available, or Uninstall. All devices cannot be excluded from any assignment configuration.
- Available for enrolled devices
When configuring app assignments in Intune, you can choose to make the app available rather than required. This option gives users the flexibility to install the app from the Company Portal app or website on their enrolled devices, based on their individual needs.To do this, select the appropriate user groups that should have access to the app. Members of these groups will see the app listed in their Company Portal but will not have it automatically installed. This approach is ideal for non-critical apps, productivity tools, or department-specific software that may not be relevant to all users.The ‘Available for enrolled devices’ assignment only supports User Groups. You cannot assign apps in this mode to Device Groups. If you attempt to assign to a Device Group, the app will not appear in the Company Portal for users.Available Assignments
- Add group: Select an Microsoft Entra group to assign the application to a group containing licensed users or managed devices.
- Add all users: Selecting “Add all users” creates an assignment for all Intune licensed users in your organization. You can only use “All users” for one type of assignment. Additionally “All users” can not be excluded.
- Available with or without enrollment When configuring app availability in Intune, you have the option to offer an app to users with or without requiring device enrollment. This setting provides flexibility for organizations that want to enable app access without enforcing full device management—particularly useful in BYOD (Bring Your Own Device) scenarios or for users accessing services on personally owned devices.Available Assignments
- Add group: Select an Microsoft Entra group to assign the application to a group containing licensed users or managed devices.
- Add all users: Selecting “Add all users” creates an assignment for all Intune licensed users in your organization. You can only use “All users” for one type of assignment. Additionally “All users” can not be excluded.
- Uninstall
Choose the user groups from which you want to remove the app. Intune will uninstall the app from managed devices in these groups—provided the app was initially installed via a 'Required' or 'Available for enrolled devices' assignment within the same deployment.Available Assignments:
- Add group: Select an Microsoft Entra group to assign the application to a group containing licensed users or managed devices.
- Add all users: Selecting “Add all users” creates an assignment for all Intune licensed users in your organization. You can only use “All users” for one type of assignment. Additionally “All users” can not be excluded.
- Add All devices: Choosing 'Add all devices' assigns
the app to every device enrolled in Intune. You can apply
this option to only one assignment type—such as Required,
Available, or Uninstall. All devices cannot be excluded from any assignment configuration.
- Click Next.
![]()
- Required
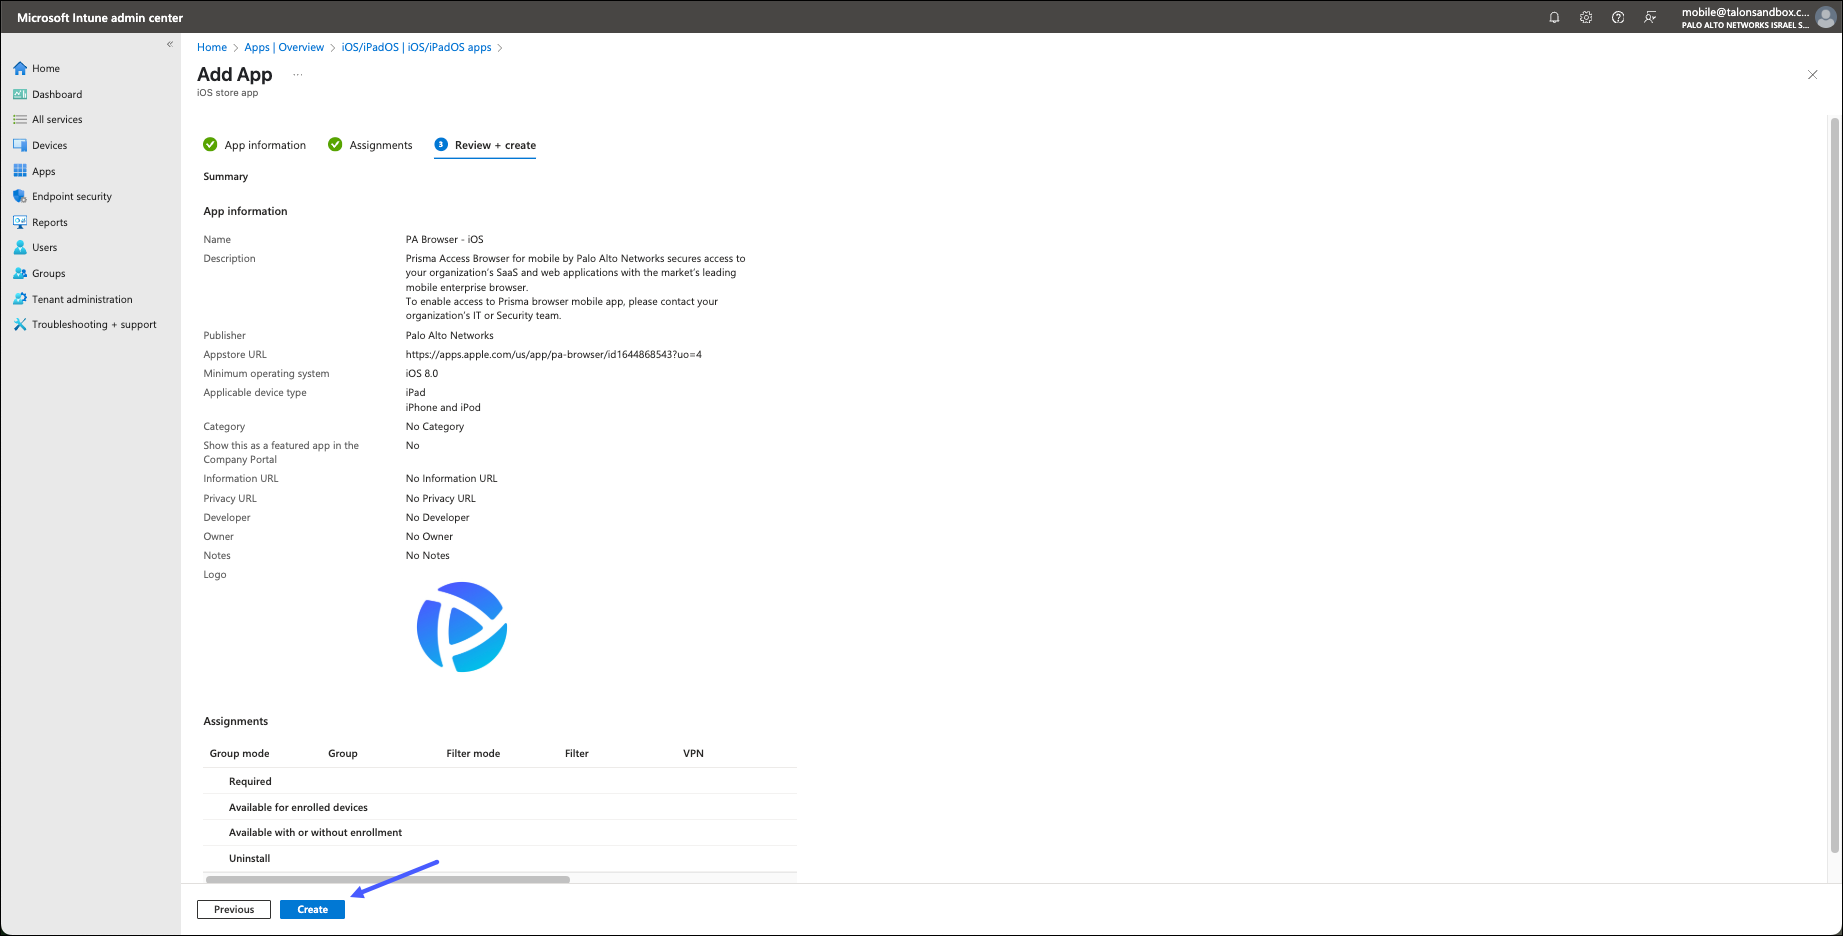
- On the Add App - Review + create carefully review the information for the
app and make sure that it is correct. When you are certain that the information
is correct, click Create.
![]()
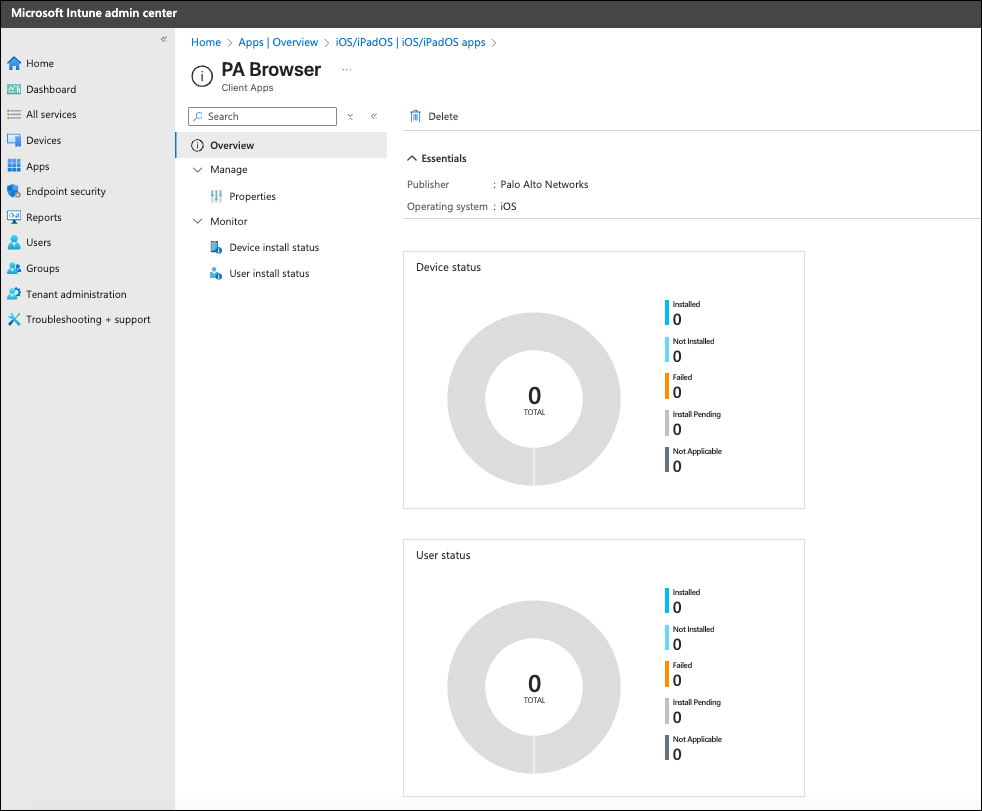
- The application dashboards are displayed.
![]()
Configure the MDM for Android Browsers
You can configure Microsoft Intune as the MDM that will be used to enforce Prisma
Access Browser Mobile access on Android devices. The method is very similar to the
method for iOS, with a few changes. This section will cover the differences.
Configure Microsoft Intune as follows:
- Log into the Intune application.and click Add from
the menu.
![]()
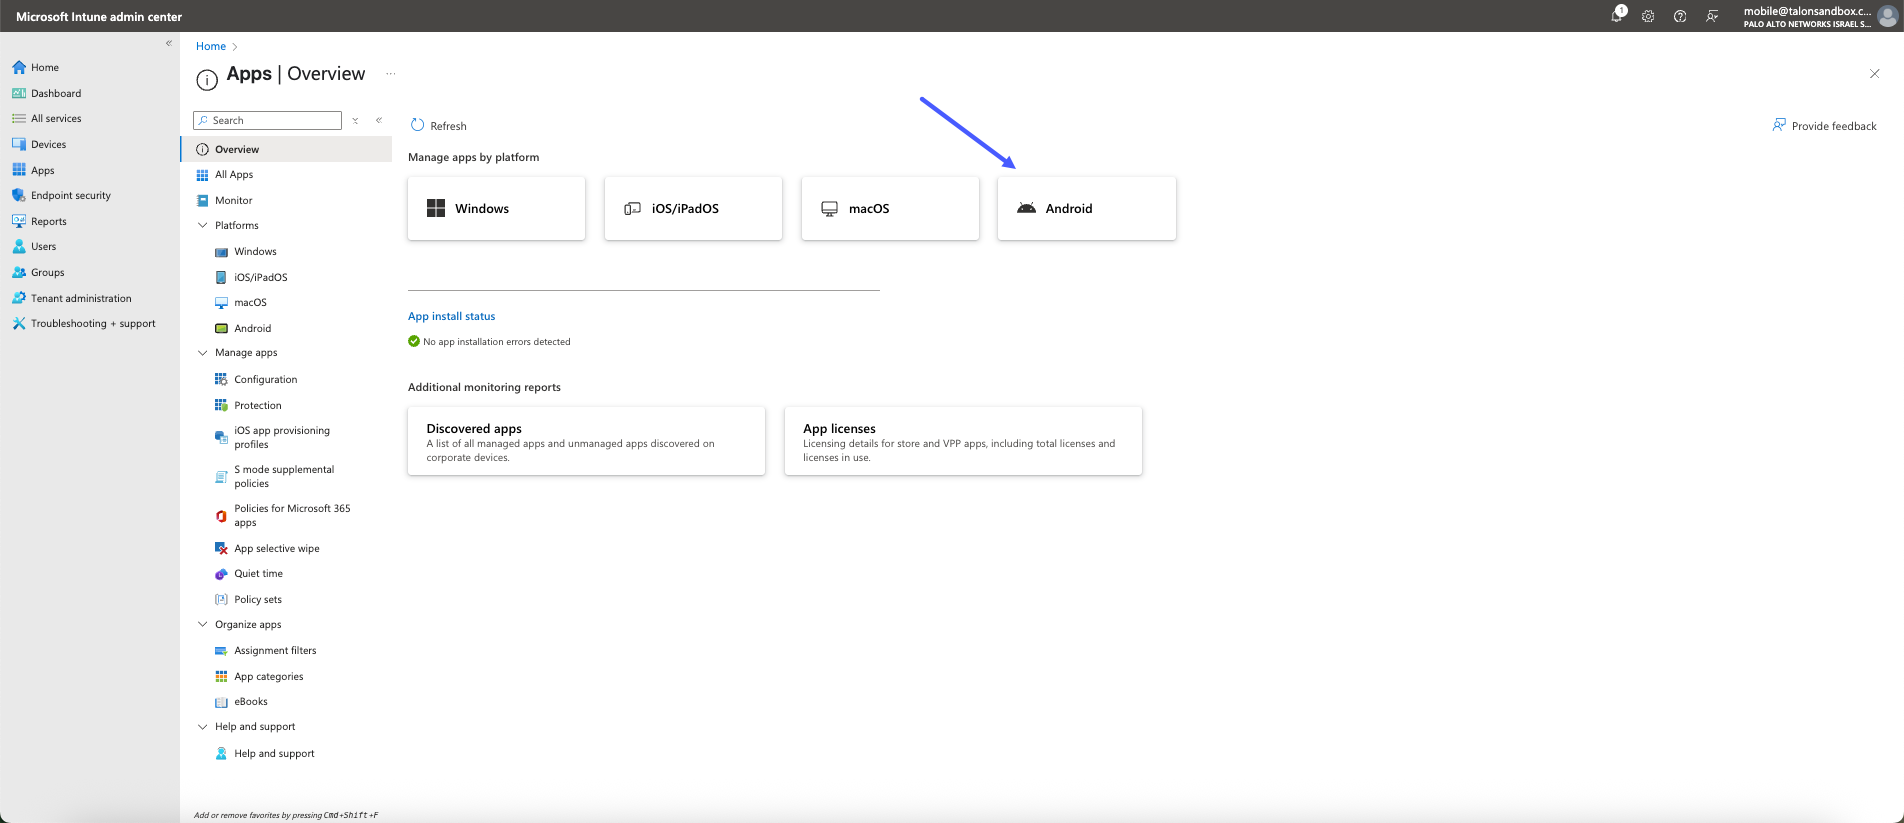
- On the Overview page, select the platform that you need. If you are using
Android devices, click Android.
![]()
- On the Android apps page, do the following:
- Click Create.
- In the Select app type drawer, locate the App type list, and select the Android store app
- Click Select.
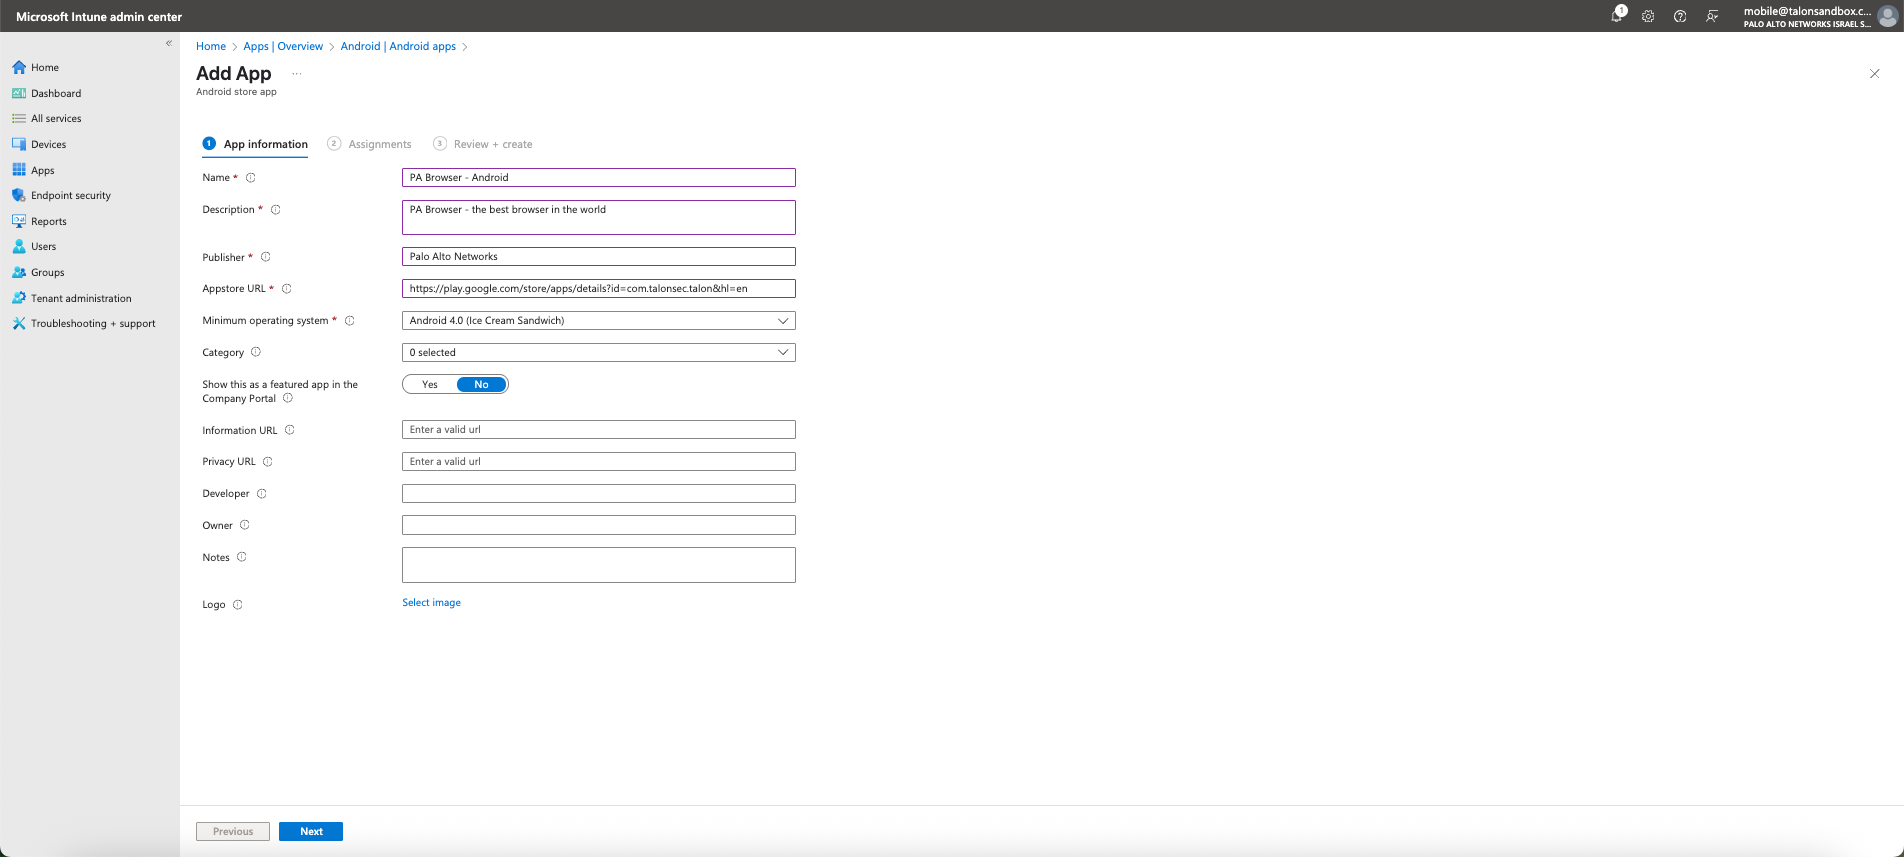
- In a separate browser window, open the Google Play store, and search for the P A Browser, and copy the URL (currently https://play.google.com/store/apps/details?id=com.talonsec.talon&hl=en).
- On the Add App - App Information page, you need to enter the following
information:
- Name: Add a name for the app. This name will be visible in the Intune apps list and to users in the Company Portal.. We recommend that you use PA Browser.
- Description: Help your device users understand what the app is and/or what they can do in the app. Add a short description that will be visible to them in the Company Portal.
- Application URL: Paste the URL from the Google Play Store. This is the URL from step 4 above.
- Minimum operating system: Select the earliest operating system version on which the app can be installed. If you assign the app to a device with an earlier operating system, it will not be installed.
- The rest of the information can be left blank.
- Click Next.
![]()
- On the Add App - Assignments page, you can set any specific assignments that you need. See above for more information.
- On the Add App - Review + create carefully review the information for the app and make sure that it is correct.
When you are certain that the information is correct, click Create.
Configure the Prisma Access Browser
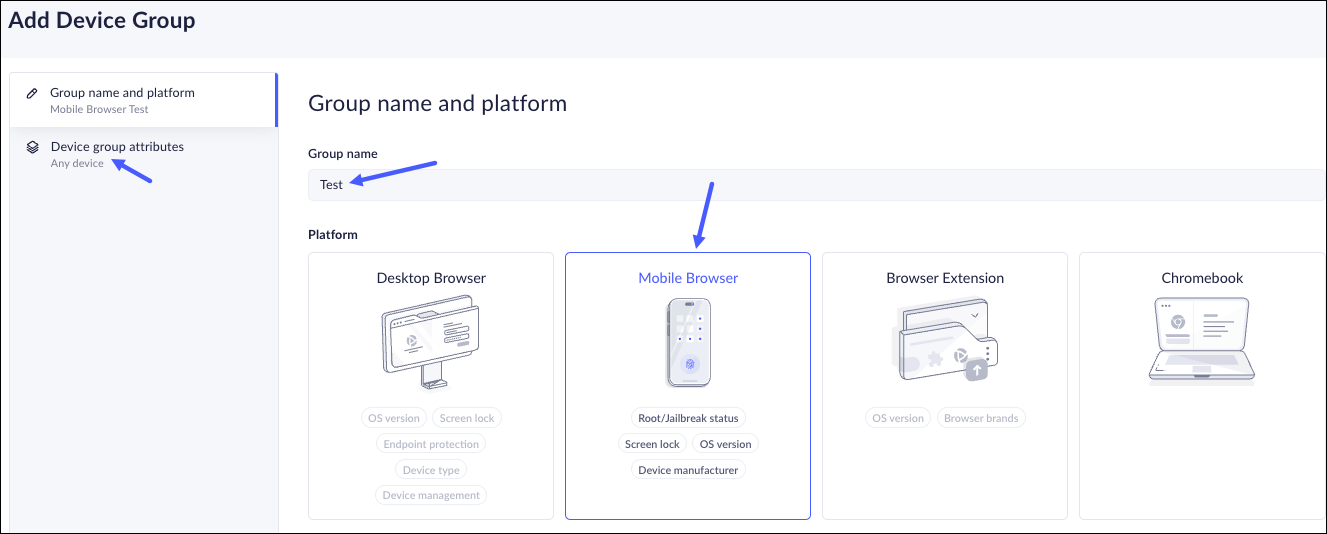
1. Create a Device group with MDM Posture
- In the Prisma Access Browser, navigate to Directories → Devices.
- Click the Device Groups tab.
- Click Add device group.
- In the Group name and platform, enter a name for the group and click Mobile Browser.
- Click Device group attributes.
![]()
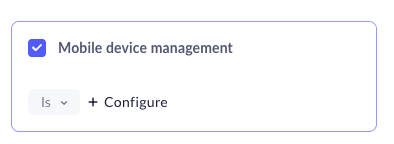
- In the Device group attribute page, select Mobile Device Management
and click Configure.
![]()
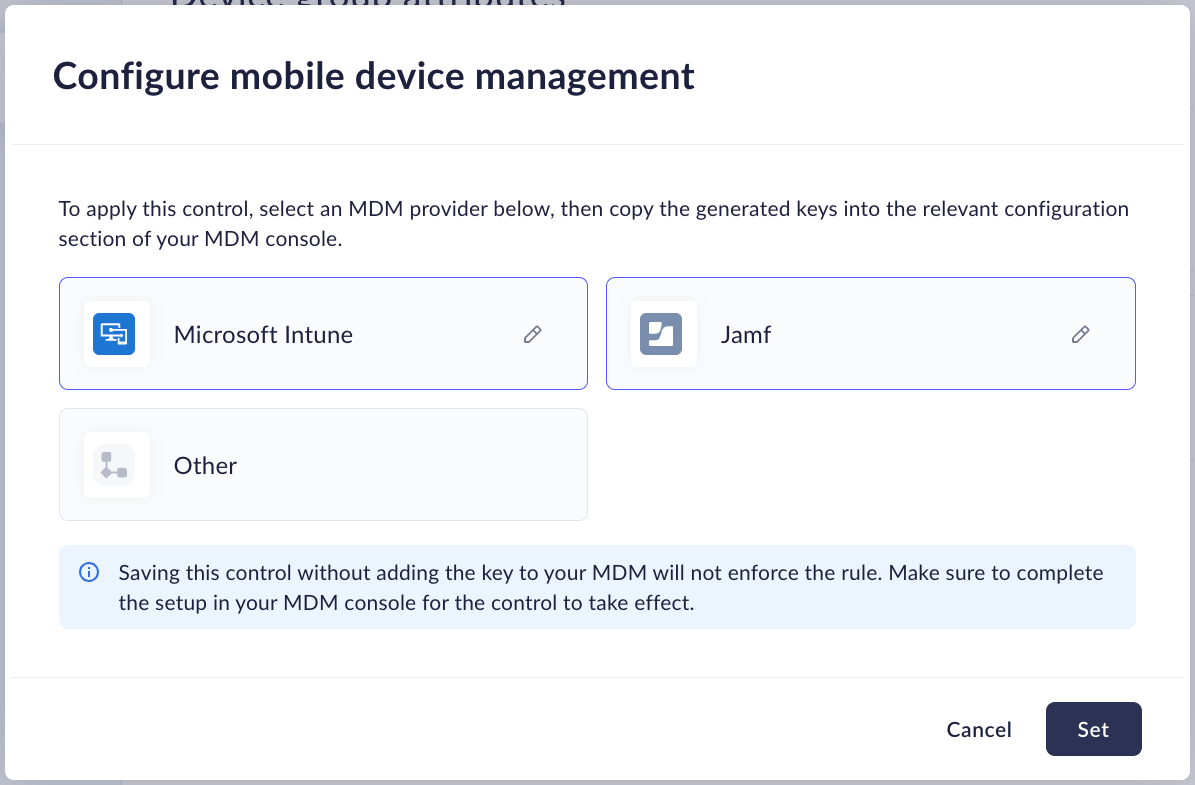
- Select the mobile device management vendor that is relevant for your
organization and click Set.
![]()
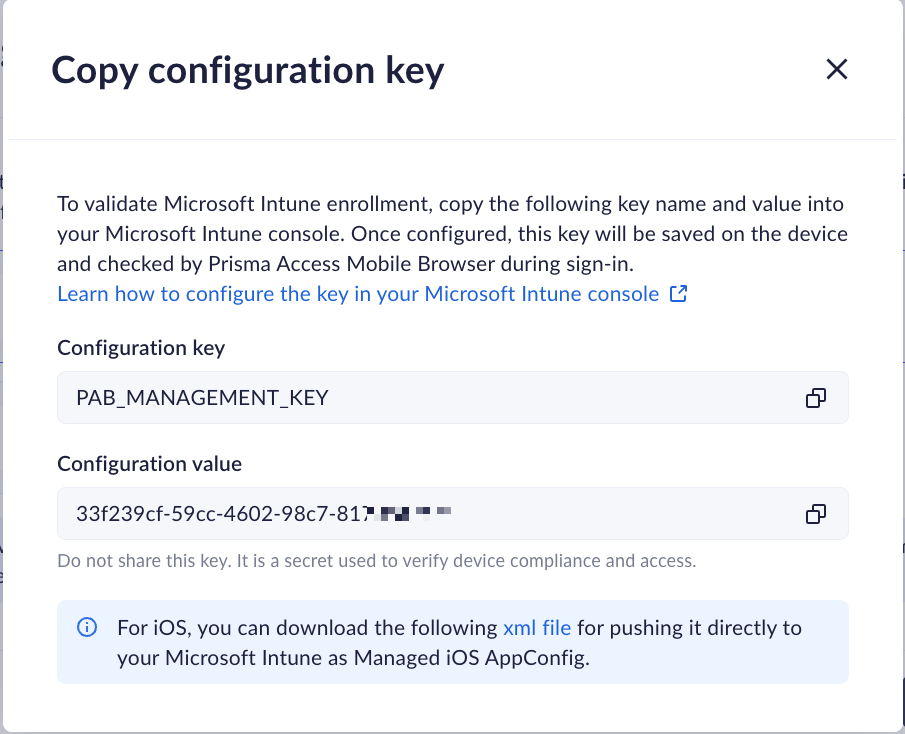
- The system will generate a unique management key (Configuration value) for
each selected MDM vendor.
![]()
- Copy the Configuration value.
- Click the Copy icon to copy the configuration value. The configuration value is the management key that must be passed to the Prisma Access Mobile Browser application via the MDM AppConfig.
2. Open the MDM Console
Use the following process to push the management key to the Prisma Access mobile
Browser via AppConfig.
- Search and add the PA Browser to your Managed Apps.
![]()
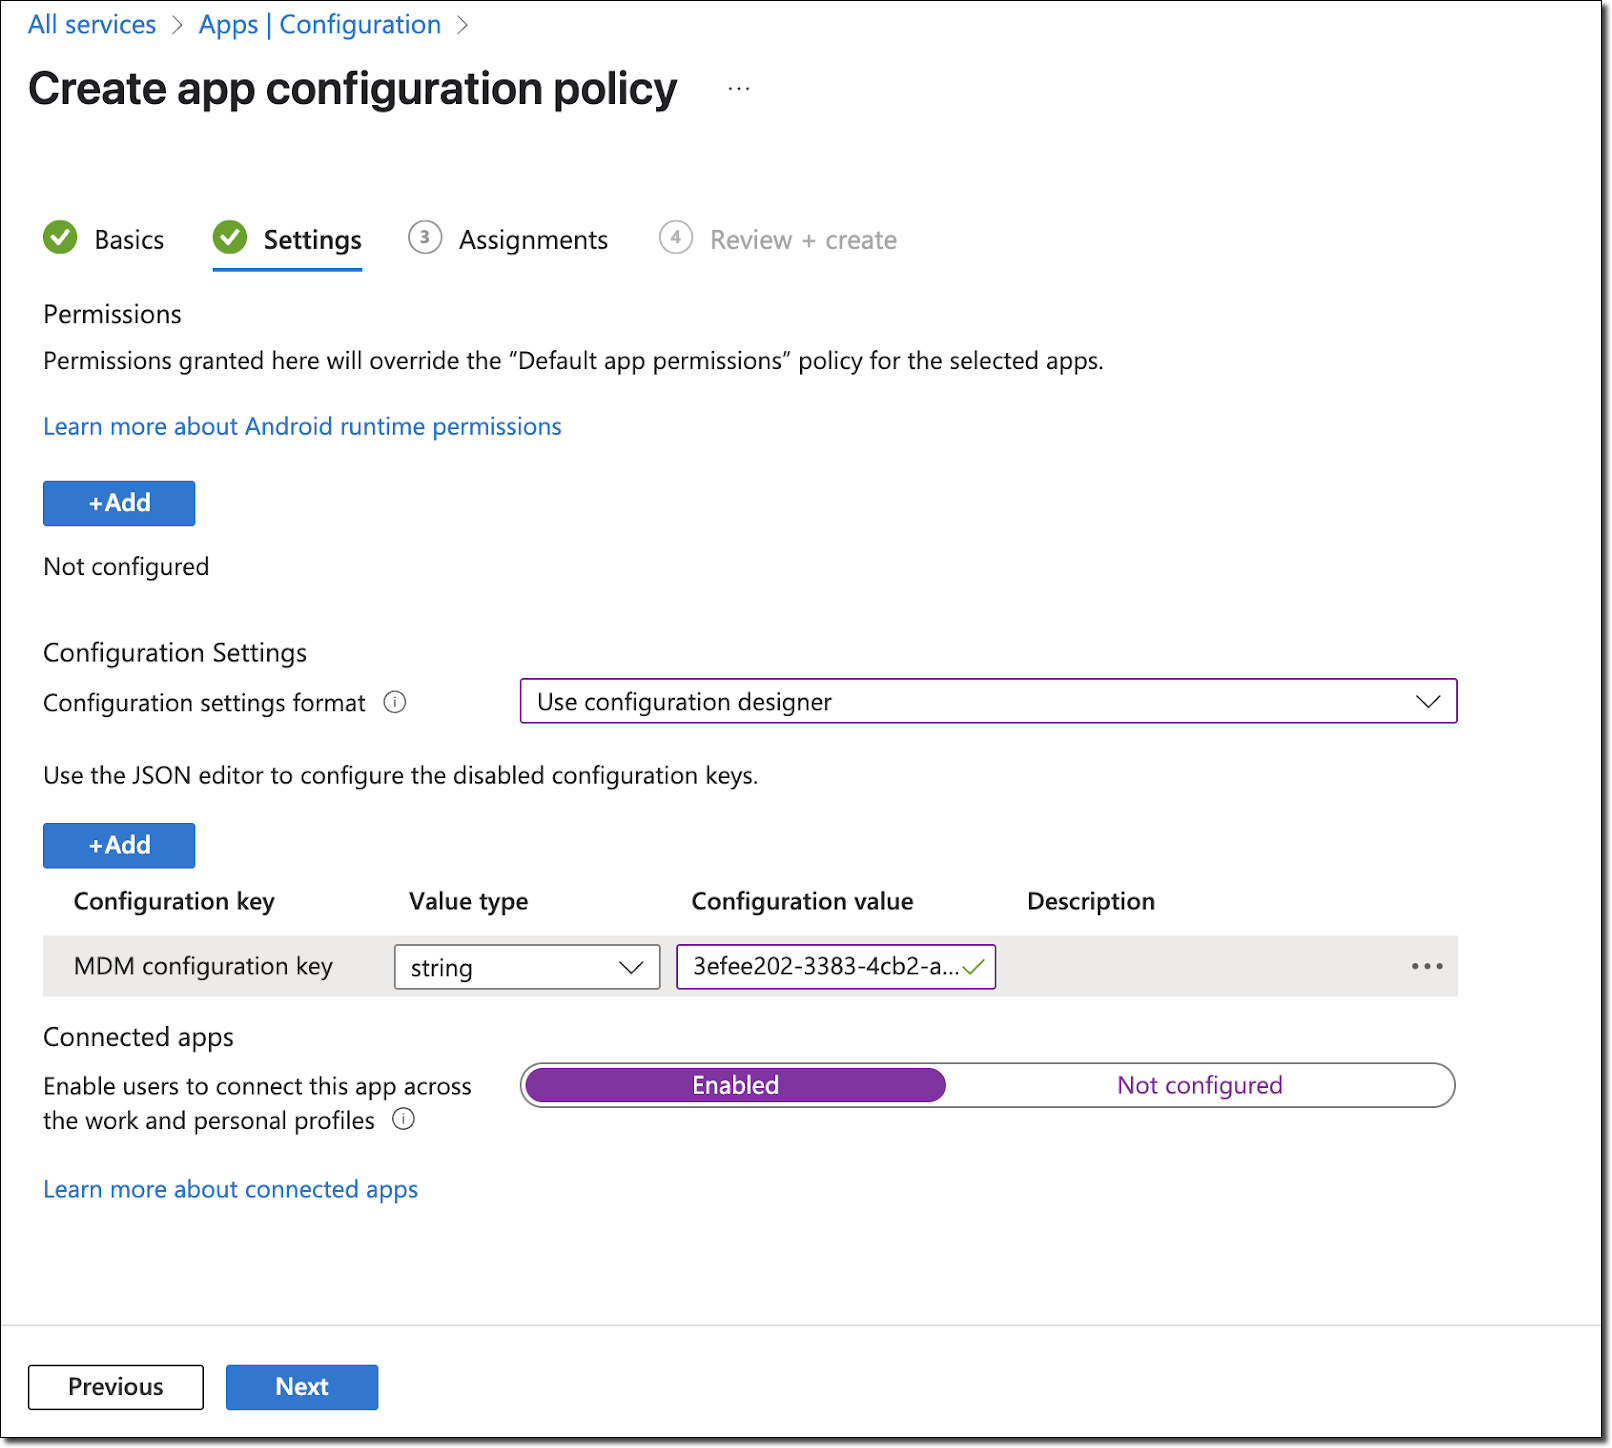
- Configure the App configuration policy.
- In the MDM, go to Apps → Configuration → Create → Managed device.
- Select the appropriate platform, either iOS or Android.
- Target the PA Browser app.
- Under the Configuration settings format, select Use configuration designer.
- Click Add → Select MDM configuration key → OK.
- Define the App Configuration Settings. This is where you will add the
key-value pair in the configuration:
- Value: Enter the Configuration value from the Prisma Access
Browser console. To avoid accidentally mistyping this value, we recommend that you copy the value and paste.
![]()
- Click Next.
Ensure that this configuration is only applied to devices that meet your compliance criteria, - Value: Enter the Configuration value from the Prisma Access
Browser console.
For other MDMs, such as Jamf or Workspace ONE, the
process is similar—create an AppConfig with the pab_management_key and assign it
to relevant devices/groups.
What Happens on the Device
- On startup, the PAB app reads the configuration value using platform-native AppConfig APIs.
- The key is matched against SHA256 hashes of valid configuration value from the console.
- If there's a match, the device is allowed into the relevant device group, and sign-in proceeds according to your policy.
- If there's no match, access is denied.
Platform Notes
-iOS
- Uses com.apple.configuration.managed via UserDefaults.
- Requires no entitlements or special permissions.
- Works as long as the app is managed and installed via MDM.
-Android
- Requires defining res/xml/managed_configurations.xml in the app and referencing it in AndroidManifest.xml.
- MDM will use this definition to show editable keys.
- The PAB app reads the configuration from the RestrictionsManager system service.
Security Considerations
- Only managed apps can read the managed key.
- End users and other apps cannot access the key unless the device is rooted or jailbroken.
- Keys can be rotated anytime in the MDM and PAB console.
- Security is at least equivalent to PAB Desktop/Mac MDM detection.

