Prisma Browser
Integrate Prisma Browser aand Okta with the Device Posture Provider
Table of Contents
Expand All
|
Collapse All
Prisma Browser Docs
Integrate Prisma Browser aand Okta with the Device Posture Provider
Describes the integration between PB/Okta and DPP
By integrating Okta with Prisma Access Browser, you can use device posture data from Prisma Access Browser to
configure detailed device assurance and app sign-in policies. This integration helps you
enforce stronger security requirements and ensure that only compliant devices can access
Okta-protected resources.
The Device Posture Provider feature uses a SAML-based integration for secure
communication. Okta sends a SAML request to PAB, and PAB responds with a SAML assertion
containing device posture attributes. These attributes allow you to create granular
sign-in policies based on your organization’s security standards.
Prerequisites
You need to enable the following features from the Okta Admin Console:
![]()
- Device Posture Claims Mapping
- Device Posture Provider

Configure the Device Posture IdP in Okta
Open the Prisma Access Browser Onboarding screen
From the Strata Cloud Manager, select Configuration Onboarding
- Navigate to the Enforce SSO Applications step.
- Copy the Issuer URI and Single Sign-On URL.
- Download the Prisma Access Browser certificate.
![]()
In the Okta Admin Console, go to SecurityIdentity Providers.
- Click Add Identity Provider.
- Select SAML 2.0
- Configure the Prisma Access Browser as an IdP. For more information, refer to
Add a SAML Identity
Provider.
![]()
- IdP Usage: Select Device Posture Provider.
- IdP Issuer URI: Paste the Issuer URI from the Prisma Access Browser.
- IdP Single Sign-On URL: Enter the sign-on URL from Prisma Access Browser.
- IdP Signature Certificate: Upload the certificate from Prisma Access Browser.
- Destination: Paste the Single Sign-On URL path that you copied from Prisma Access Browser.
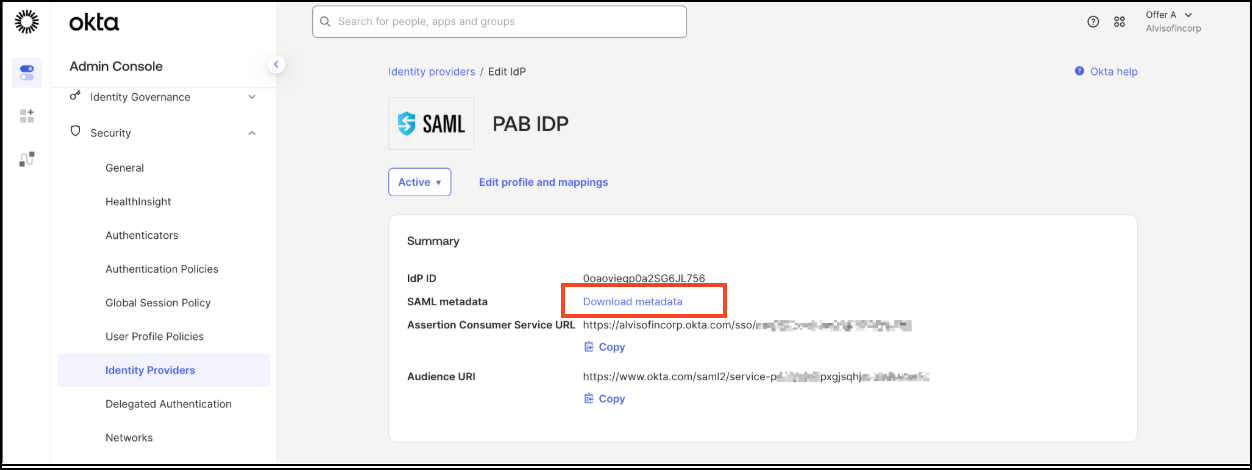
- Click Save.
- From the Summary screen, download the SAML Metadata.
![]()
- Return to the Prisma Access Browser Onboarding screen and upload the SAML
Metadata file.
![]()
- Enable the Integration
Enable the Device Posture IdP as Provider for Device Assurance
You can create or modify the device assurance policies to incorporate additional
signals from your IdP due to its integration with the Device Posture Provider. See
Add a device assurance policy.
- In the Okta Admin Console, go to SecurityDevice integration.
- On the Endpoint Security tab, click Add endpoint integration.
- Select Device posture provider.
- Select the Platform.
- Save the configuration.
![]()
Configure a Device Assurance Policy
- Go to SecurityDevice Assurance Policy.
- Click Add Policy.
- Click Create Policy.
- Define a Policy Name.
- Select the Platform.
- In the Device attribute provider(s) section, select: Device Posture Provider.
- In Device management, select Device must be managed. see note below
- Click Save.
![]()
![]()
Device must be Managed - Okta defines Managed as
follows: The device is under the organization's IT or security team's control and
oversight, as indicated by installed management agents or software.
Integrate the Policy into an App Sign-in Policy
After you create a device assurance policy, integrate it into an app sign-in policy
to ensure enforcement before users access protected resources. For detailed steps,
see Add device assurance to an app sign-in
policy.
If the global session policy requires a password, the Okta Sign-In Widget
prompts users to enter their username and password before redirecting them to the
device posture Identity Provider (IdP).
To verify compliance first, configure the app sign-in policy rule that requires
device posture claims with the highest priority. You can also apply conditions such
as Group, Platform, or Network Zone to target specific
users.
Configure an Authentication Policy to use Device Posture IdP Signals
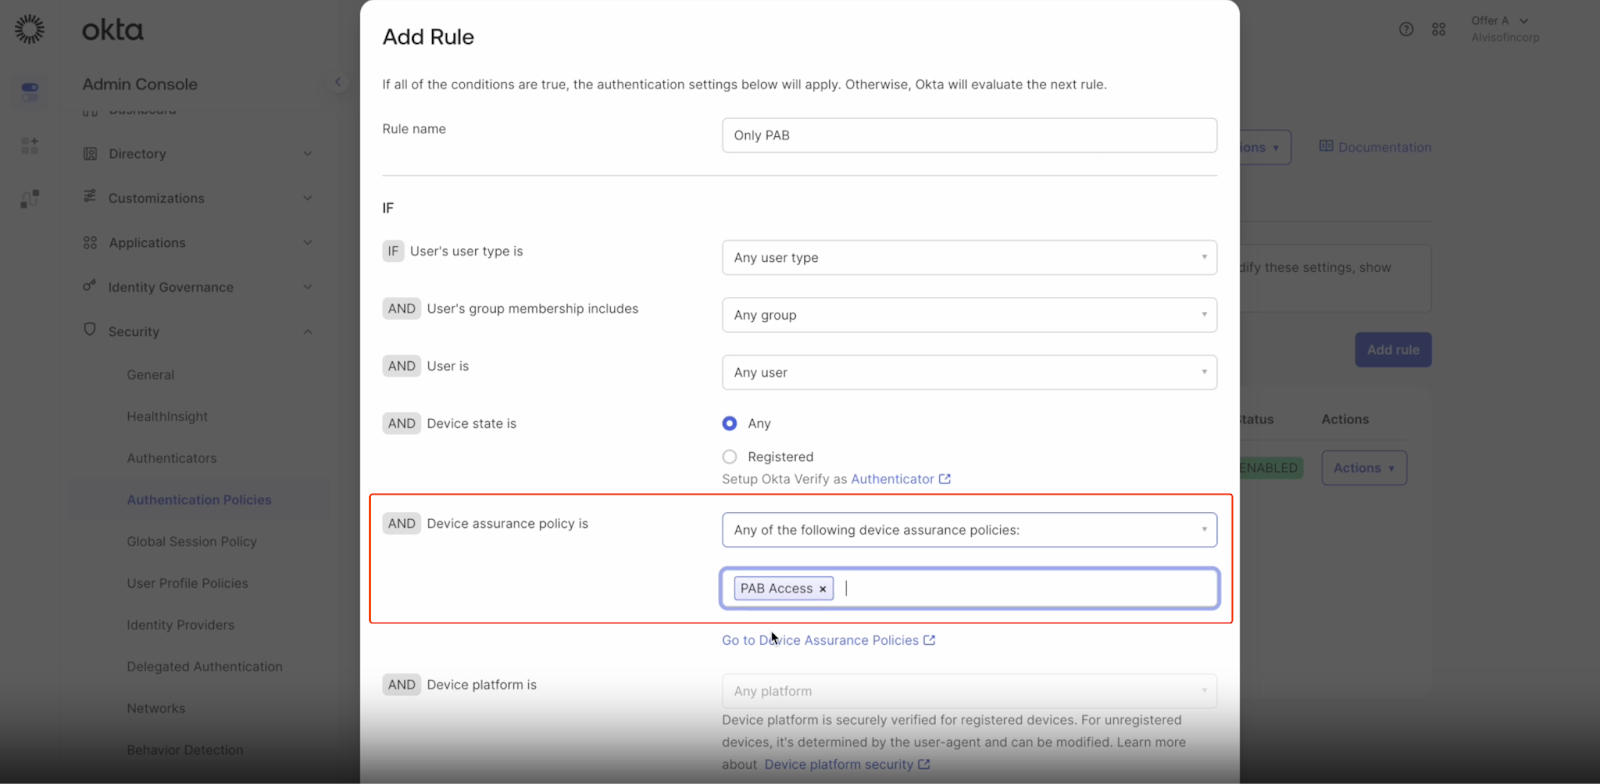
- Go to SecurityAuthentication Policies sectionApp sign-in
- Click Add Rule
- Define a Policy Name.
- In the Device Assurance policy is, select Any of the following device assurance policies.
- Select the Device Assurance policy you created in the previous step.
- Click ∫Save.

Modify the Catch-All Rule, and Set it to Deny All
- Go to SecurityAuthentication Policies sectionApp sign-in
- Find the Catch-All rule.
- Click ActionsEdit.
- At the bottom, set the rule to Deny All.
![]()


