Prisma Access
Onboarding Workflow for Prisma Access Service Connections
Table of Contents
Expand All
|
Collapse All
Prisma Access Docs
-
- 6.1 Preferred and Innovation
- 6.0 Preferred and Innovation
- 5.2 Preferred and Innovation
- 5.1 Preferred and Innovation
- 5.0 Preferred and Innovation
- 4.2 Preferred
- 4.1 Preferred
- 4.0 Preferred
- 3.2 Preferred and Innovation
- 3.1 Preferred and Innovation
- 3.0 Preferred and Innovation
- 2.2 Preferred
-
-
- 4.0 & Later
- Prisma Access China
-
-
Onboarding Workflow for Prisma Access Service Connections
Learn how to set up Prisma Access service connections for the first time.
Service connections provide access to your
internal resources (for example, resources at a data center or HQ). If your license
includes it, service connections also act as an interconnect between the internal
resources in your network, agent-based mobile users, and users at branch
sites.
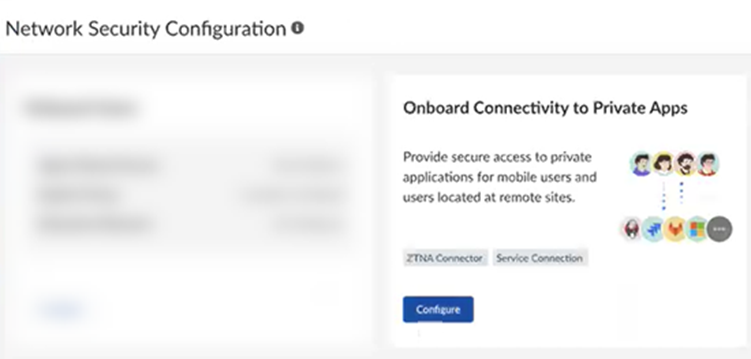
To secure private apps using service connections, complete the following task. - Go to ConfigurationOnboarding.Configure connectivity to private apps.
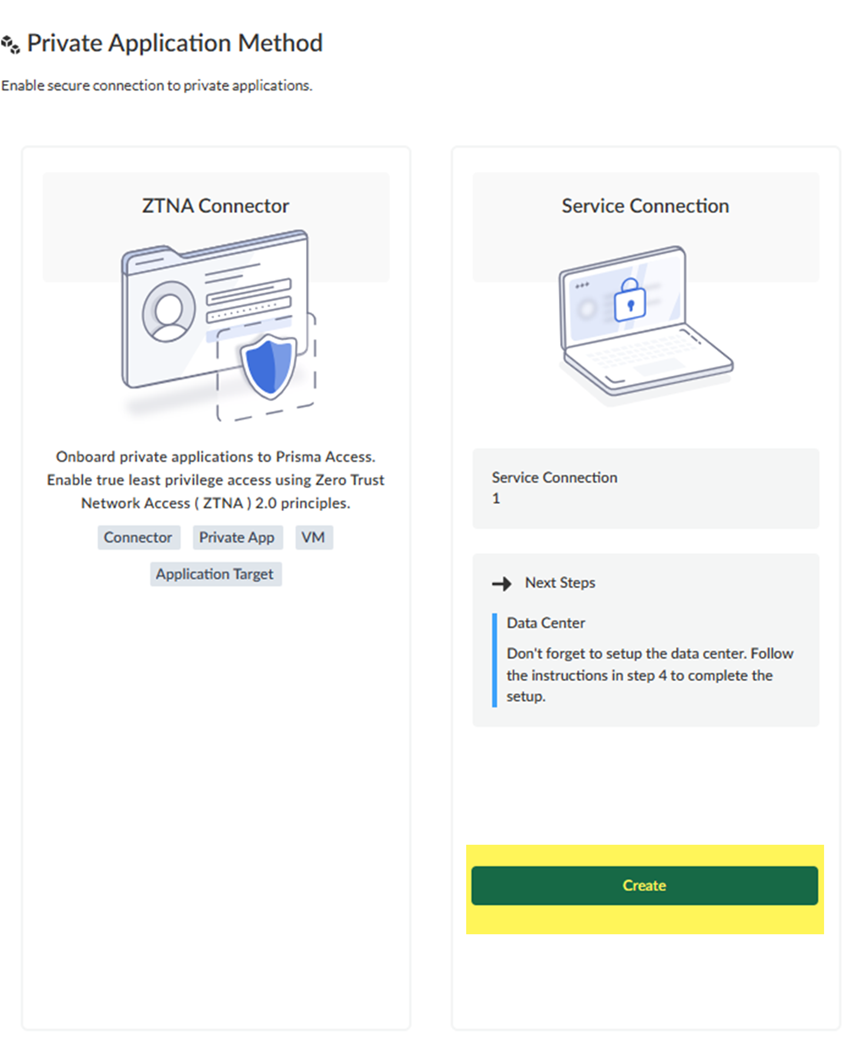
![]() Create a service connection.
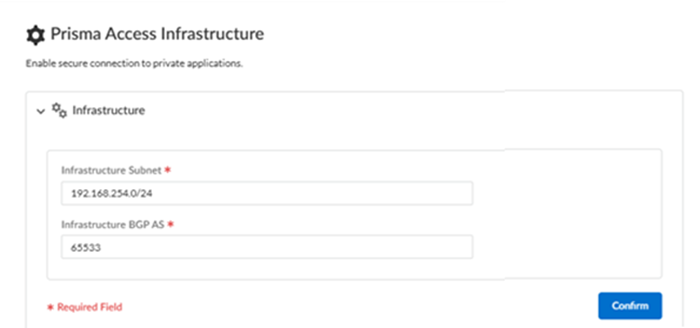
Create a service connection.![]() Enter infrastructure and DNS settings.If your license includes it, Prisma Access uses the infrastructure subnet to create the network backbone for communication between your branch sites, mobile users and the Prisma Access security infrastructure, as well as with the HQ and data center networks you plan to connect to Prisma Access over service connections.If you have already added an infrastructure subnet or DNS information as part of another Prisma Access onboarding, skip this step and go to the Next screen.
Enter infrastructure and DNS settings.If your license includes it, Prisma Access uses the infrastructure subnet to create the network backbone for communication between your branch sites, mobile users and the Prisma Access security infrastructure, as well as with the HQ and data center networks you plan to connect to Prisma Access over service connections.If you have already added an infrastructure subnet or DNS information as part of another Prisma Access onboarding, skip this step and go to the Next screen.- Enter an Infrastructure Subnet.Prisma Access provides you with a default Infrastructure Subnet of 192.168.255.0/24. If you want to create a custom infrastructure subnet:
- Use an RFC 1918-compliant subnet. While the use of non-RFC 1918-compliant (public) IP addresses is supported, we don't recommend it because of possible conflicts with the internet public IP address space.
- Don’t specify any subnets that overlap with the 169.254.0.0/16 and 100.64.0.0/10 subnet range because Prisma Access reserves those IP addresses and subnets for its internal use.
- This subnetwork is an extension to your existing network and therefore, can’t overlap with any IP subnets that you use within your corporate network or with the IP address pools that you assign for Prisma Access for users or Prisma Access for networks.
- Because the service infrastructure requires a large number of IP addresses, you must designate a /24 subnetwork (for example, 172.16.55.0/24).
- Enter an RFC 6996-compliant Infrastructure BGP AS.The BGP Private AS number is the autonomous system (AS) number that identifies the routes through which BGP can send traffic. If you don’t supply an AS number, Prisma Access uses the default AS number (65534).
![]()
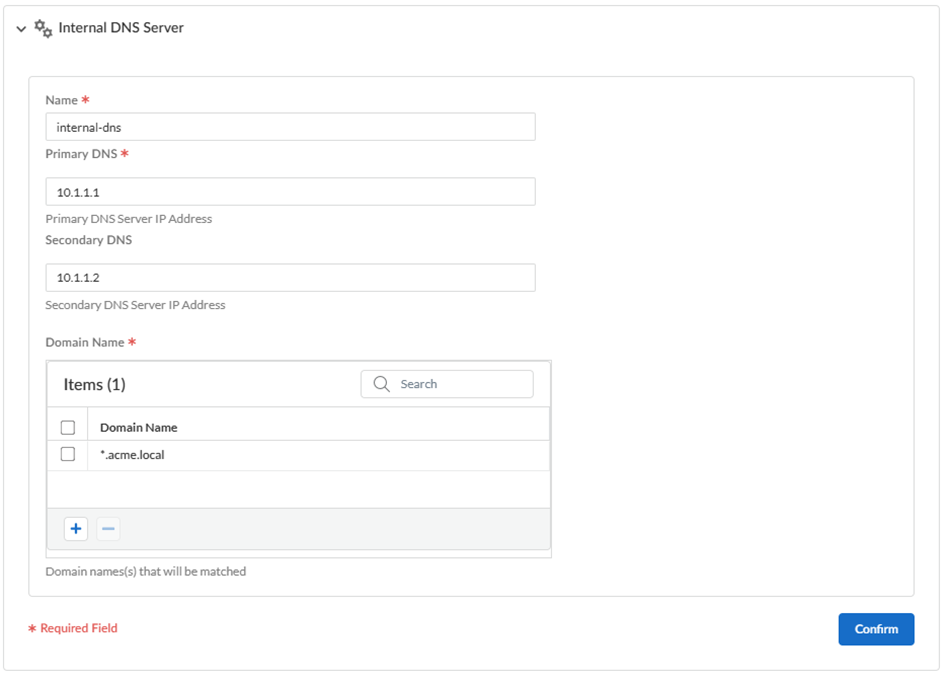
- (Optional) If you have a DNS server that can access your
internal domains, enter Internal DNS Server
information to have your internal resources use an alternative DNS
server.
- Specify the Primary DNS and, optionally, Secondary DNS server IP addresses.
- If you want your internal DNS server to only resolve the domains
you specify, enter the domains to resolve in the Domain
Name. You can specify an asterisk in front of the
domain; for example, *.acme.local or *.acme.com. Prisma Access uses the DNS servers you have specified to resolve the
domains you add here.
![]()
- Go to the Next step when complete.
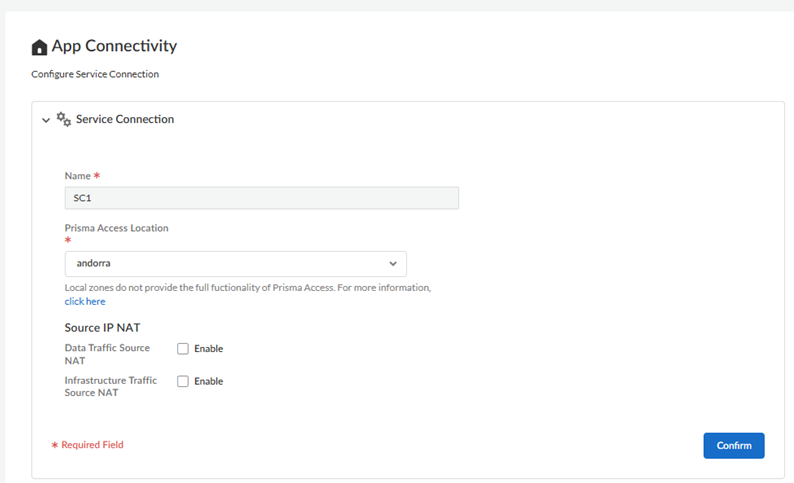
Create service connections.- Enter a unique Name for the service connection.
- Enter a Prisma Access Location for the service
connection. Select a location closest to where the internal resources are located.
- (Optional) Enable source NAT for agent-based access IP address
pools, IP addresses in the infrastructure subnet, or
both.
- Enable Data Traffic source NAT—Performs NAT on Mobile User IP address pool addresses so that they are not advertised to the data center, and only the subnets you specify at the service connections are advertised and routed in the data center.
- Enable Infrastructure Traffic source NAT—Performs NAT on addresses from the Infrastructure subnet so that they are not advertised to the data center, and only those subnets you specify at the service connections are advertised and routed in the data center.
- Confirm your changes when done.
![]()
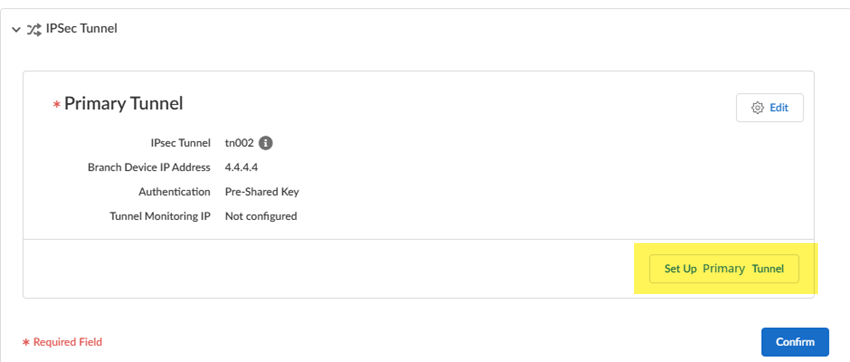
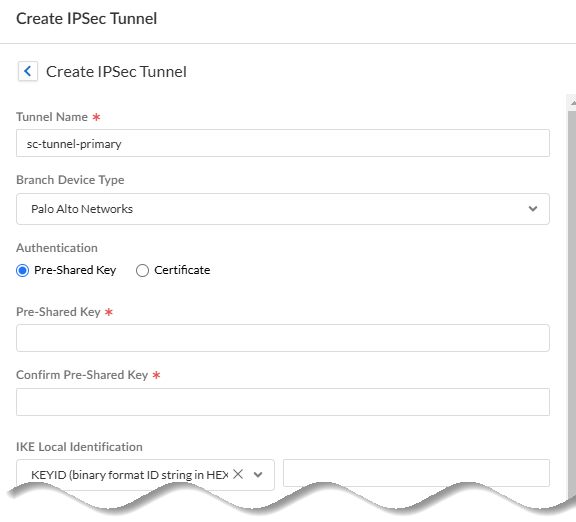
In the IPSec Tunnel area, Set Up Primary Tunnel for the service connection![]()
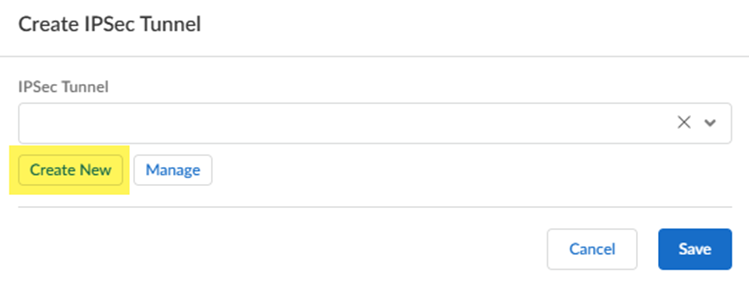
- Select an existing tunnel or Create New.
![]() Enter IPSec tunnel settings for the site.Make a note of these settings; you specify the same settings in the CPE (such as a next-generation firewall or router) at your data center or HQ.
Enter IPSec tunnel settings for the site.Make a note of these settings; you specify the same settings in the CPE (such as a next-generation firewall or router) at your data center or HQ.- Enter a unique Tunnel Name.
- Enter a Branch Device Type.Prisma Access includes predefined IPSec templates for common third-party IPSec and SD-WAN devices. These profiles expedite and simplify the onboarding of service connections and remote network connections that use one of these devices to terminate the connection.
- Specify the Authentication Type.
- If you specify Pre-Shared Key, enter and confirm the Pre-Shared Key.
- If you specify a Certificate, enter the Local Certificate to use. This certificate must already exist in Strata Cloud Manager.
- Specify the IKE Local Identification (either IP Address, KEYID (binary format ID string in hex), User FQDN (email address), or FQDN (hostname).
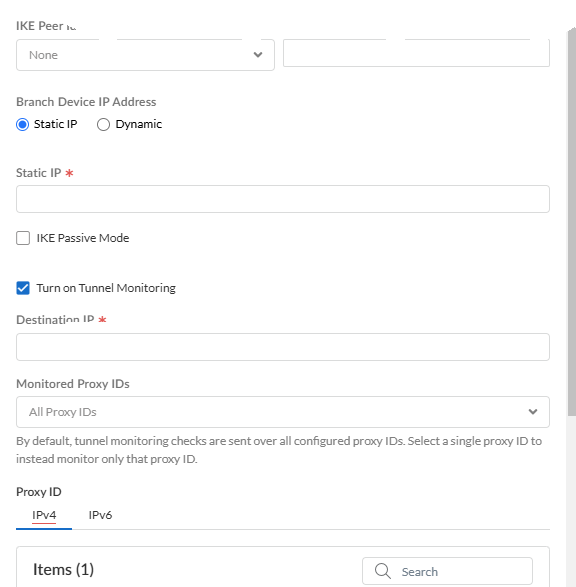
- Specify the IKE Peer Identification (either IP Address, KEYID (binary format ID string in hex), User FQDN (email address), or FQDN (hostname).
- Specify the type of Branch Device IP
Address (either Static IP
or Dynamic).
- If you set the Branch Device IP Address to Static, enter the address of the CPE at the branch or HQ location (the peer device IP address).
- If you set the Branch Device IP Address to Dynamic, you must also add the IKE ID for the HQ or data center (IKE Local Identification) or for Prisma Access (IKE Peer Identification) to enable the IPSec peers to authenticate.Because you don't have the values to use for the Prisma Access IKE ID (IKE Peer Identification) until the service connection is fully deployed, you would typically want to set the IKE ID for the HQ or data center (IKE Local Identification) rather than the Prisma Access IKE ID.
- (Optional) Enable IKE Passive Mode so that Prisma Access only response to IKE connections and does not initiate them.
- (Optional) Turn on Tunnel
Monitoring.Enter a tunnel monitoring Destination IP address on the HQ or data center network for Prisma Access to determine whether the tunnel is up. If your branch IPSec device uses policy-based VPN, enter one or more associated Monitored Proxy IDs. The IP address you enter is automatically added to the list of branch subnetworks.
- (Optional) If you need a proxy ID:
- Add Proxy ID and enter the Proxy ID.
- (Optional) Enter the Local Proxy ID and Remote Proxy ID.
- Enter the Protocol to use for the proxy ID.
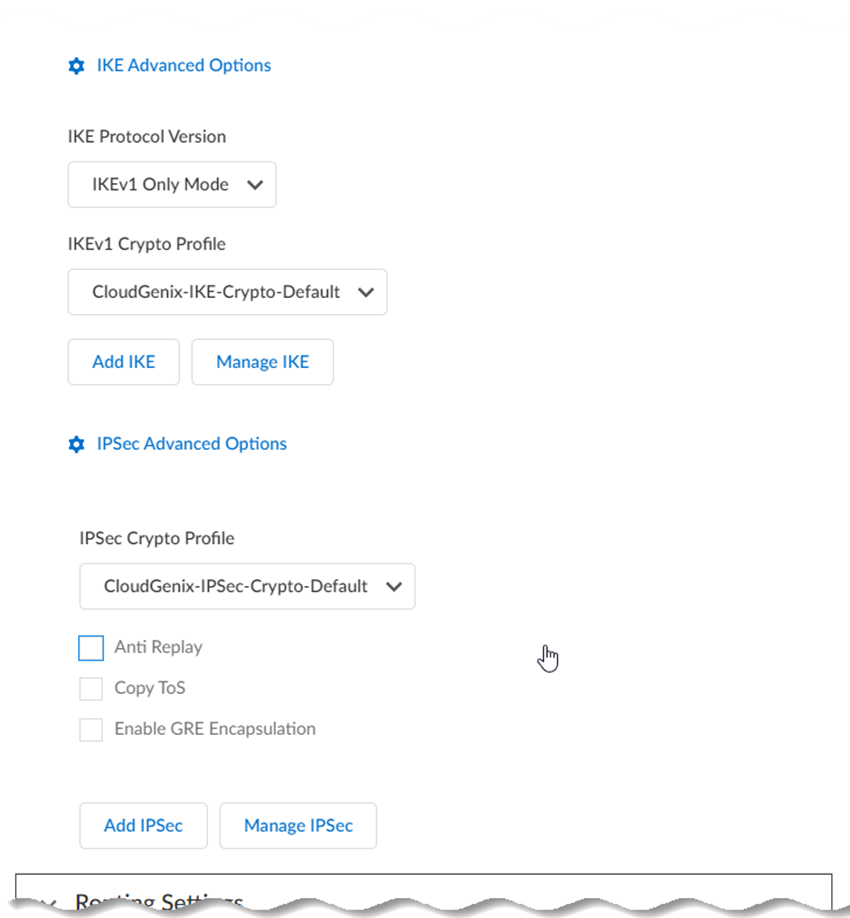
- (Optional) Specify IKE Advanced
Options.
- Select an IKE Protocol Version.
- Select an IKEv1 Crypto
Profile.To add a crypto profile, Add IKE. To manage an existing IKE profile, Manage IKE and select the profile to edit.
- Select an IKEv2 Crypto
Profile.To add a crypto profile, Add IKE. To manage an existing IKE profile, Manage IKE and select the profile to edit.
- (Optional) Specify IPSec Advanced
Options.
- Select an IPSec Crypto
Profile.To add a crypto profile, Add IPSec. To manage an existing IPSec profile, Manage IPSec and select the profile to edit.
![]()
- Select an IPSec Crypto
Profile.
Optionally, Set Up Secondary Tunnel to create a backup tunnel for the service connection.If you specify a secondary location, Prisma Access autopopulates the values from the primary tunnel to the secondary tunnel; to edit the secondary tunnel, select that tunnel and Edit the settings.Save your changes when done.![]()
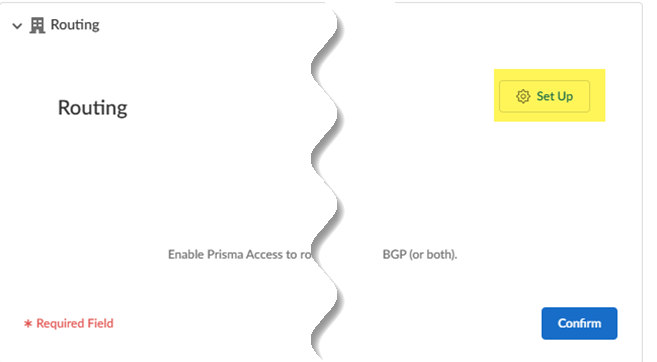
![]() Set Up routing to enable communication to your internal resources.
Set Up routing to enable communication to your internal resources.![]()
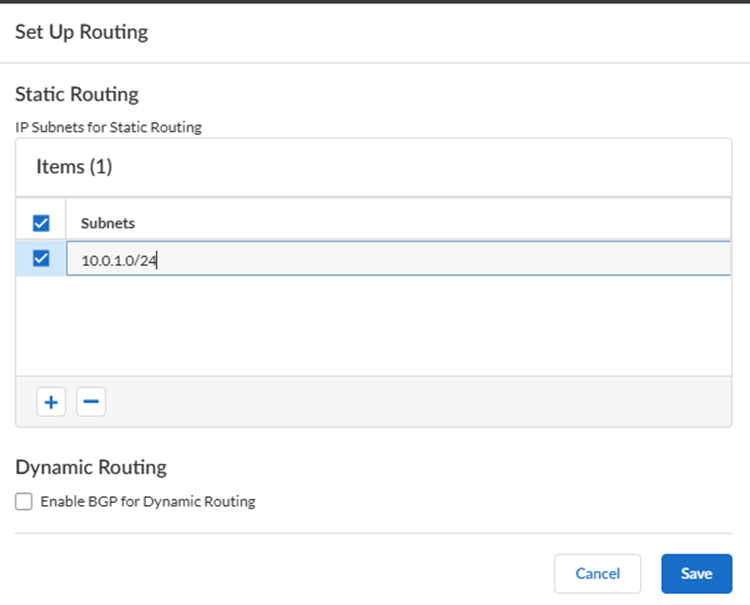
- If you're using static routing to route traffic to and from your
internal resources, add IP Subnets for Static
Routing.
![]()
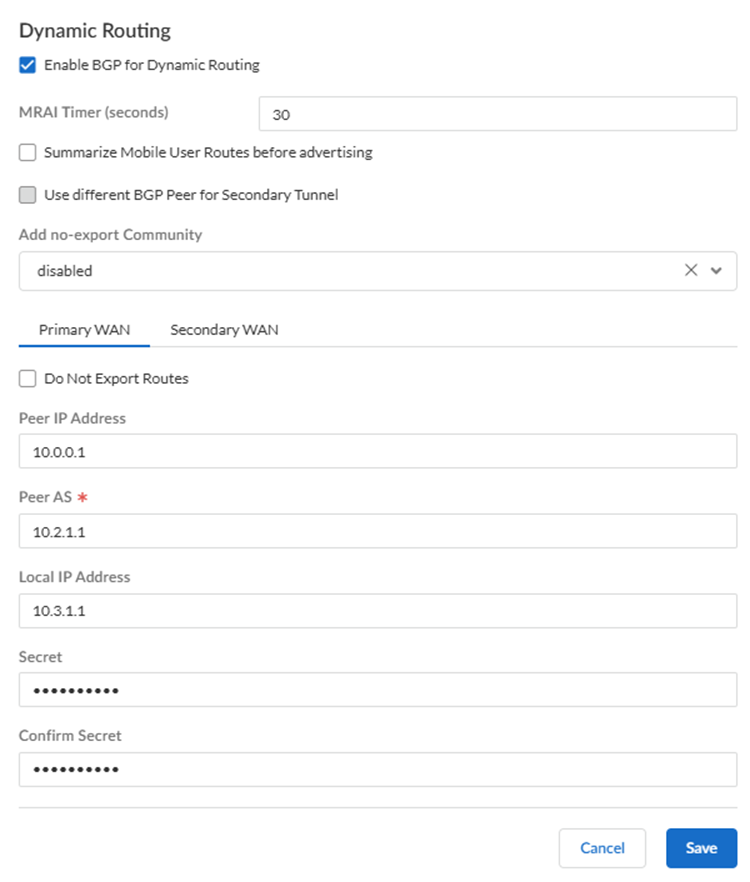
- If you're using dynamic (BGP) routing to advertise subnets to your
private resources, Enable BGP for Dynamic Routing
and select BGP options.Prisma Access does not honor the Multi-Exit Discriminator (MED) attributes advertised by the CPE. This caveat applies if you use multiple BGP peers on either remote network connections or service connections and whether or not you select a secondary (backup) connection.
- (Optional) Select an MRAI Timer
value. BGP routing offers a timer you can use to tailor BGP routing convergence in your network called the Minimum Route Advertisement Interval (MRAI). MRAI acts to rate-limit updates on a per-destination basis, and the BGP routers wait for at least the configured MRAI time before sending an advertisement for the same prefix. A smaller number gives you faster convergence time but creates more advertisements in your network. A larger number decreases the number of advertisements that can be sent, but can also make routing convergence slower. You decide the number to put in your network for the best balance between faster routing convergence and fewer advertisements.Configure an MRAI range of between 1 and 600 seconds, with a default value of 30 seconds.
- To reduce the number of mobile user IP subnet advertisements
over BGP to your customer premises equipment (CPE), specify Prisma Access to summarize the subnets before it advertises
them by selecting Summarize Mobile User Routes before
advertising.By default, Prisma Access advertises the mobile users IP address pools in blocks of /24 subnets; if you summarize them, Prisma Access advertises the pool based on the subnet you specified. For example, Prisma Access advertises a public user mobile IP pool of 10.8.0.0/20 using the /20 subnet, rather than dividing the pool into subnets of 10.8.1.0/24, 10.8.2.0/24, 10.8.3.0/24, and so on, before advertising them. Summarizing these advertisements can reduce the number of routes stored in CPE routing tables. For example, use IP pool summarization with cloud VPN gateways (Virtual Private Gateways (VGWs) or Transit Gateways (TGWs)) that can accept a limited number of routes.
- (Optional) If you configured a secondary WAN and you need to change the peer address for the secondary (backup) BGP peer, select Use different BGP Peer for Secondary Tunnel and enter a unique Peer and, optionally, Local IP address for the secondary WAN.
- Enter the Peer IP Address assigned as the Router ID of the eBGP router on the HQ or data center network.
- To add a community from service connections to the outbound
prefixes from the eBGP peers at the customer premises equipment
(CPE), set Add no-export community to
Enabled Out. This capability is
disabled by default. Don’t select Enabled In or Enabled Both as these choices are not supported.
- (Optional) Select Don’t Export
Routes to prevent Prisma Access from
forwarding routes into the HQ or data center.By default, Prisma Access advertises all BGP routing information, including local routes and all prefixes it receives from other service connections, remote networks, and mobile user subnets. Select this check box to prevent Prisma Access from sending any BGP advertisements, but still use the BGP information it receives to learn routes from other BGP neighbors.Because Prisma Access does not send BGP advertisements, if you select this option you must configure static routes on your on-premises equipment to establish routes back to Prisma Access.
- Enter the Peer IP Address assigned as the Router ID of the eBGP router on the HQ or data center network.
- Enter the Peer AS, the autonomous system
(AS) for your network.Use and RFC 6996-compliant BGP Private AS number.
- Enter the Local IP Address that Prisma Access uses as its Local IP address for BGP.A local address is only required if your HQ or data center device requires it for BGP peering to be successful. Make sure the address you specify does not conflict or overlap with IP addresses in the infrastructure subnet or subnets in the remote network.
- Enter a Secret password and Confirm Secret to authenticate BGP peer communications.
- (Optional) Select an MRAI Timer
value.
- Save your changes when done.
![]()
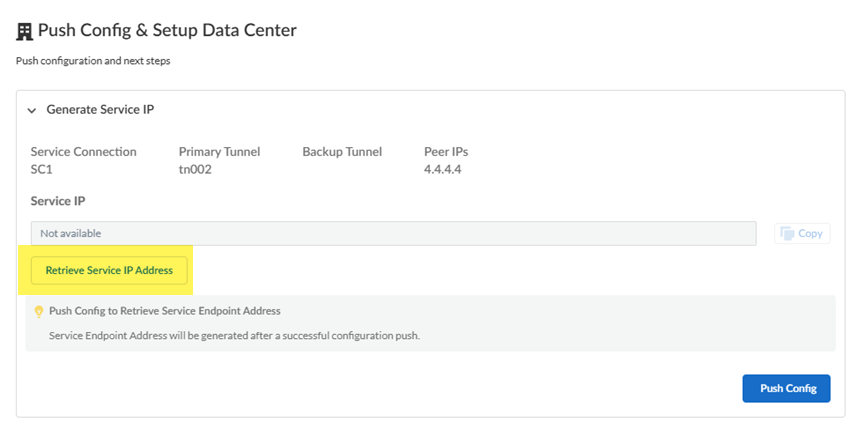
Push your configuration changes and set up routing in the data center.- To retrieve the Service IP address (either an IP address or FQDN), Retrieve Service IP Address.Use this address as the peer IP address for your CPE when you set up the IPSec tunnel for the remote network connection.
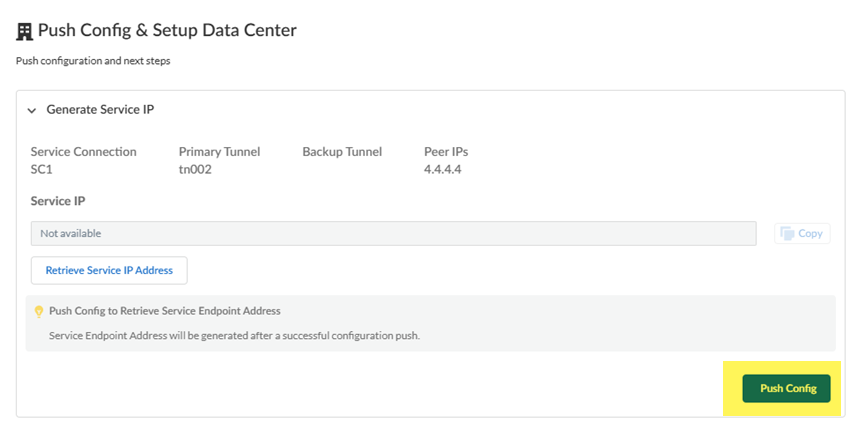
![]() Push Config to save your configuration changes.
Push Config to save your configuration changes.![]() Set up your data center or HQ to complete the service connection.
Set up your data center or HQ to complete the service connection.- Copy the Service IP Address and configure the tunnel or tunnels from your CPE on your corporate network back to Prisma Access.Commit the changes on your CPE.Verify your connection by going to ConfigurationPrisma Access SetupService Connections.
![]()

