- Home
- Prisma Access
- Prisma Access Administration
- Configure Dynamic Privilege Access Settings
- Set Up the Prisma Access Agent for Dynamic Privilege Access
- Configure HIP Notifications for the Dynamic Privilege Access Prisma Access Agent
- Create a HIP Notification for the Dynamic Privilege Access Prisma Access Agent
Prisma Access
Create a HIP Notification for the Dynamic Privilege Access Prisma Access Agent
Table of Contents
Expand All
|
Collapse All
Prisma Access Docs
-
- 6.1 Preferred and Innovation
- 6.0 Preferred and Innovation
- 5.2 Preferred and Innovation
- 5.1 Preferred and Innovation
- 5.0 Preferred and Innovation
- 4.2 Preferred
- 4.1 Preferred
- 4.0 Preferred
- 3.2 Preferred and Innovation
- 3.1 Preferred and Innovation
- 3.0 Preferred and Innovation
- 2.2 Preferred
-
-
- 4.0 & Later
- Prisma Access China
-
-
Create a HIP Notification for the Dynamic Privilege Access Prisma Access Agent
Learn how to define the notification messages that your end users see when a security
rule with a HIP Profile is enforced.
| Where Can I Use This? | What Do I Need? |
|---|---|
|
|
When the HIP report matches the HIP profile or object, a corresponding
HIP notification is sent. You can define the notification messages that end users
see.
Deciding whether to display a notification message when the user's
configuration matches or does not match a HIP Profile in the policy depends largely
on your policy and what a HIP match (or nonmatch) means for the user.
That
is, does a match mean they are granted full access to your network resources, or
does it mean they have limited access due to a noncompliance issue?
For example, suppose you create a HIP Profile that matches if the
required corporate antivirus and antispyware software patches are not installed. You
could create a HIP notification message for users who match the HIP Profile,
informing them that they need to install the patches. Alternatively, if your HIP
Profile matches when those same patches are installed, you might want to create the
message for users who do not match the profile.
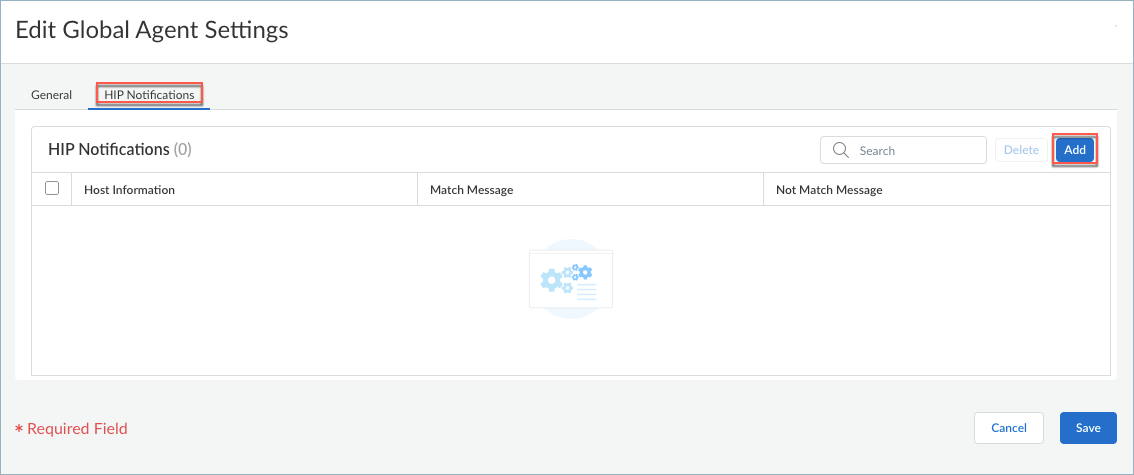
- From Strata Cloud Manager, select ConfigurationNGFW and Prisma AccessConfiguration ScopeAccess AgentSetupPrisma Access Agent.Edit the Global Agent Settings.
![]() Select HIP Notifications and click Add.
Select HIP Notifications and click Add.![]() Select the HIP Profile to which this message applies from the Host Information drop-down.
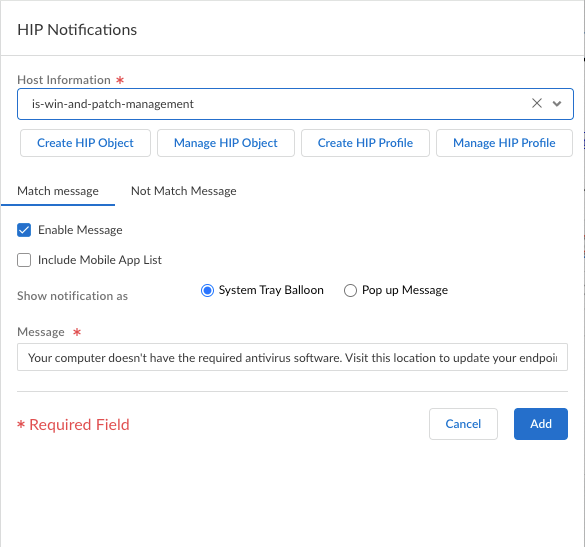
Select the HIP Profile to which this message applies from the Host Information drop-down.![]() If there are no HIP Profiles, you need to create a HIP Profile.Depending on whether you want to display the message when the corresponding HIP Profile is matched or not matched, select Match Message or Not Match Message. In some cases, you might want to create messages for both a match and a nonmatch, depending on what objects you are matching and what your objectives are for the policy.Select Enable Message, and then select whether you want to display the message as a System Tray Balloon or a Pop Up Message.Enter your Message text and then click Add.Repeat this procedure for each message that you want to define.
If there are no HIP Profiles, you need to create a HIP Profile.Depending on whether you want to display the message when the corresponding HIP Profile is matched or not matched, select Match Message or Not Match Message. In some cases, you might want to create messages for both a match and a nonmatch, depending on what objects you are matching and what your objectives are for the policy.Select Enable Message, and then select whether you want to display the message as a System Tray Balloon or a Pop Up Message.Enter your Message text and then click Add.Repeat this procedure for each message that you want to define.


