Prisma Access
Create a Hypervisor Resource Profile
Table of Contents
Expand All
|
Collapse All
Prisma Access Docs
-
- 6.1 Preferred and Innovation
- 6.0 Preferred and Innovation
- 5.2 Preferred and Innovation
- 5.1 Preferred and Innovation
- 5.0 Preferred and Innovation
- 4.2 Preferred
- 4.1 Preferred
- 4.0 Preferred
- 3.2 Preferred and Innovation
- 3.1 Preferred and Innovation
- 3.0 Preferred and Innovation
- 2.2 Preferred
-
-
- 4.0 & Later
- Prisma Access China
-
-
Create a Hypervisor Resource Profile
Create a hypervisor resource profile for SASE Private location.
| Where Can I Use This? | What Do I Need? |
|---|---|
|
To activate SASE Private Location, reach out to your Palo Alto
Networks account representative, who will contact the Site
Reliability Engineering (SRE) team and submit a request.
|
You must create a hypervisor resource profile to use with the ESXi instance you created to create an environment for SASE
Private Location. Configure the profile by using one of the following workflows,
depending on how your Prisma Access deployment is managed.
Configure a Hypervisor Resource Profile (Strata Cloud Manager)
- From Strata Cloud Manager, go to ConfigurationNGFW and Prisma Access and select the Prisma Access configuration scope.Configure the Prisma Access Infrastructure.Create a new hypervisor resource profile using one of the following methods.
- Select the hypervisor Resource Profiles tab and Add
Hypervisor Resource Profile.
![]()
- Click the gear to configure the Prisma Access Private
Locations settings and either Add Private
Location or select an existing location to edit; then,
under Mobile Users Settings, Create
New Hypervisor Resource Profile.
![]()
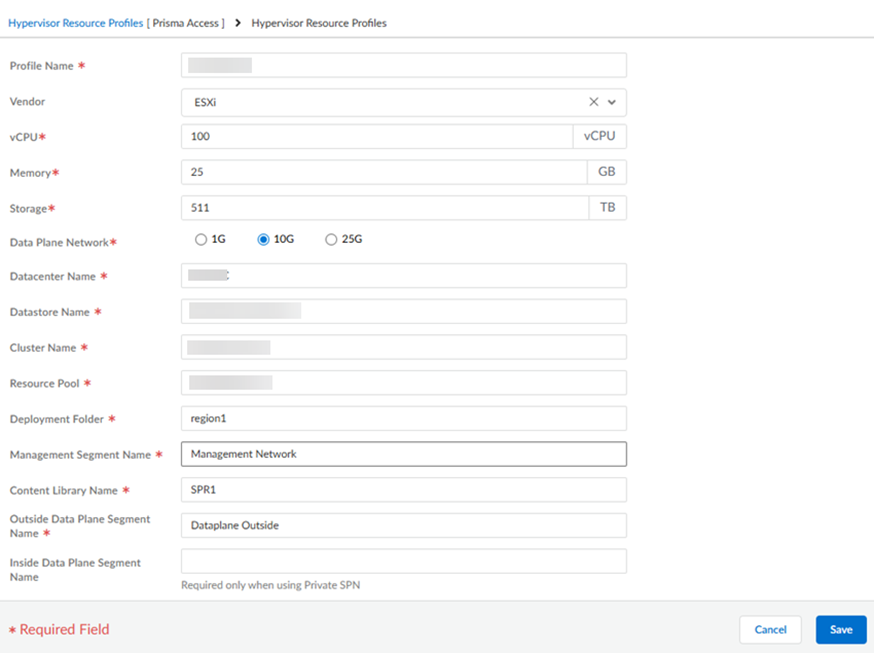
Create the hypervisor resource profile.- Enter a unique Profile Name.
- Specify a Vendor of ESXi.
- Enter the hypervisor's vCPU capacity (minimum of 48 required).
- Enter the Memory used by the hypervisor in GB (minimum 192 GB required).
- Enter the hypervisor's Storage capacity in TB (minimum 720 GB required).
- Enter the amount of Data Plane Network bandwidth available for the resource profile (either 1 GB, 10 GB, or 25 GB).
- Enter the Datacenter Name for the hypervisor profile.
- Enter the Datastore Name for the hypervisor profile.
- Enter the hypervisor profile's Cluster Name.
- Enter the Resource Pool used for the hypervisor profile.
- Enter the hypervisor profile's Deployment Folder.
- Enter the Management Segment Name used for the hypervisor profile.
- Enter the hypervisor profile's Content Library Name.
- Enter the Outside Data Plane Segment Name.
- (Optional) Enter the Inside Data Plane Segment
Name. This setting is required only when you're using Private SPN.
Save your changes when complete.![]()
Configure a Hypervisor Resource Profile (Panorama)
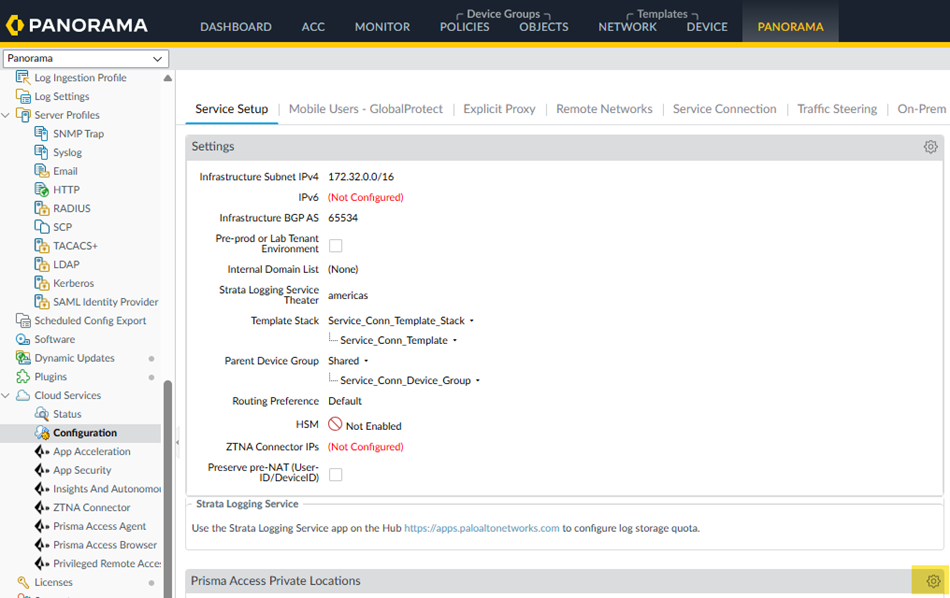
To create a hypervisor resource profile for Prisma Access (Managed by Panorama), complete the following steps. - From Panorama, go to PanoramaCloud ServicesConfigurationService SetupPrisma Access Private Locations and click the gear to edit the settings.
![]() Select the hypervisor Resource Profiles tab and Add a hypervisor resource profile.
Select the hypervisor Resource Profiles tab and Add a hypervisor resource profile.![]() Create the hypervisor resource profile.
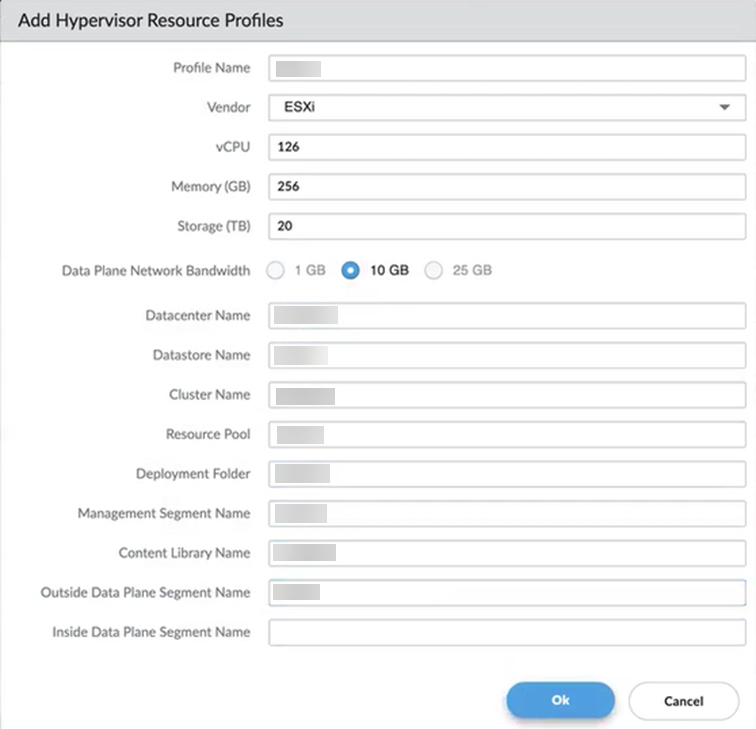
Create the hypervisor resource profile.- Enter a unique Profile Name.
- Specify a Vendor of ESXi.
- Enter the hypervisor's vCPU capacity (minimum of 48 required).
- Enter the Memory used by the hypervisor in GB (minimum 192 GB required).
- Enter the hypervisor's Storage capacity in TB (minimum 720 GB required).
- Enter the amount of Data Plane Network bandwidth available for the resource profile (either 1 GB, 10 GB, or 25 GB).
- Select the Data Plane Network to use (either 1G, 10G, or 25G).
- Enter the Datacenter Name for the hypervisor profile.
- Enter the Datastore Name for the hypervisor profile.
- Enter the hypervisor profile's Cluster Name.
- Enter the hypervisor profile's Resource Pool.
- Enter the hypervisor profile's Deployment Folder.
- Enter the hypervisor profile's Management Segment Name.
- Enter the hypervisor profile's Content Library Name.
- Enter the Outside Data Plane Segment Name.
- (Optional) Enter the Inside Data Plane Segment
Name. This setting is required only when you're using Private SPN.
Click OK to save your changes when complete.![]()


