Prisma Access
Onboard an AWS Virtual Private Cloud
Table of Contents
Expand All
|
Collapse All
Prisma Access Docs
-
- 6.1 Preferred and Innovation
- 6.0 Preferred and Innovation
- 5.2 Preferred and Innovation
- 5.1 Preferred and Innovation
- 5.0 Preferred and Innovation
- 4.2 Preferred
- 4.1 Preferred
- 4.0 Preferred
- 3.2 Preferred and Innovation
- 3.1 Preferred and Innovation
- 3.0 Preferred and Innovation
- 2.2 Preferred
-
-
- 4.0 & Later
- Prisma Access China
-
-
Onboard an AWS Virtual Private Cloud
Onboard an AWS VPC to Prisma Access and secure access
as a remote network.
| Where Can I Use This? | What Do I Need? |
|---|---|
|
|
When your organization deploys workloads as
AWS EC2 instances and you need to secure access to these workloads,
you create internet key exchange (IKE) and IPSec profiles and then
onboard the AWS virtual private cloud (VPC) as a remote network to Prisma
Access. The remote network connection secures the workloads deployed
in the VPC and ensures that your mobile users and remote networks
have secure access to these workloads.
You can use static route, default route,
or BGP routing to onboard
the AWS VPC with Prisma Access. The following diagram shows a sample
VPC with static routing and two VPN connections, one primary and
one backup. The IP addresses in this diagram are used in the static routing
configuration examples.

The
following tasks show how to secure an AWS VPC with Prisma Access, including
how to deploy a VPN gateway and establish an IPSec VPN tunnel between the
AWS VPC and Prisma Access:
Begin Configuration of the VPN in Panorama
To onboard the AWS VPC, you need to enable
secure communication between the AWS VPC and Prisma Access using
a VPN gateway (VGW). The following workflow begins the configuration
of the VPN tunnel.
AWS requires a static, routable IP address before you can configure the customer gateway in AWS.
Therefore, you must first create configuration on the Prisma Access side of the
connection to retrieve the Service IP Address for the
remote network connection and enter that information in AWS when you configure the
VPN connection in AWS. The initial Prisma Access configuration
requires that you set placeholder values in Panorama for the IKE gateway and
tunnel monitor values. After you configure the VPC in AWS, you then complete the
Prisma Access configuration in Panorama by changing the placeholder
values you specified.
Start this process by defining a dynamic
IPSec tunnel in Prisma Access.
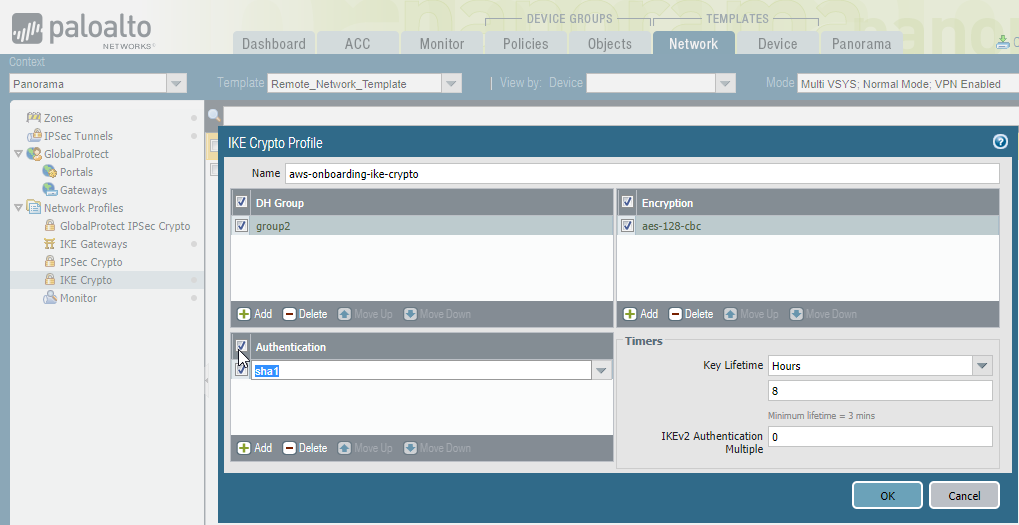
- In Panorama, select Remote_Network_Template from the Template drop-down.Select NetworkNetwork ProfilesIKE Crypto and Add an IKE crypto profile for the gateway.These settings must match the settings you configure on AWS. To change the AWS settings, see the AWS documentation.The following sample configuration uses these settings:
- DH Group: group2
- Encryption: aes-128-cbc
- Authentication: sha1
- Key Lifetime: 8 Hours
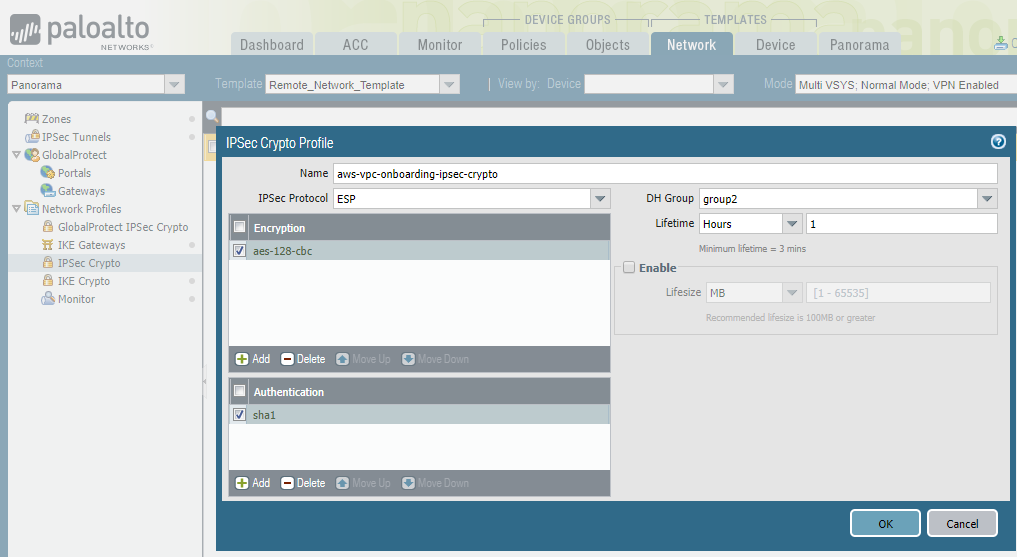
![]() Select NetworkNetwork ProfilesIPSec Crypto and Add an IPSec crypto profile for the IPSec tunnel configuration.These settings must match the settings you configure on AWS. To change the AWS settings, see the AWS documentation.The following sample configuration uses these settings:
Select NetworkNetwork ProfilesIPSec Crypto and Add an IPSec crypto profile for the IPSec tunnel configuration.These settings must match the settings you configure on AWS. To change the AWS settings, see the AWS documentation.The following sample configuration uses these settings:- IPSec Protocol: ESP
- DH Group: group2
- Lifetime: 1 Hour
- Encryption: aes-128-cbc
- Authentication: sha1
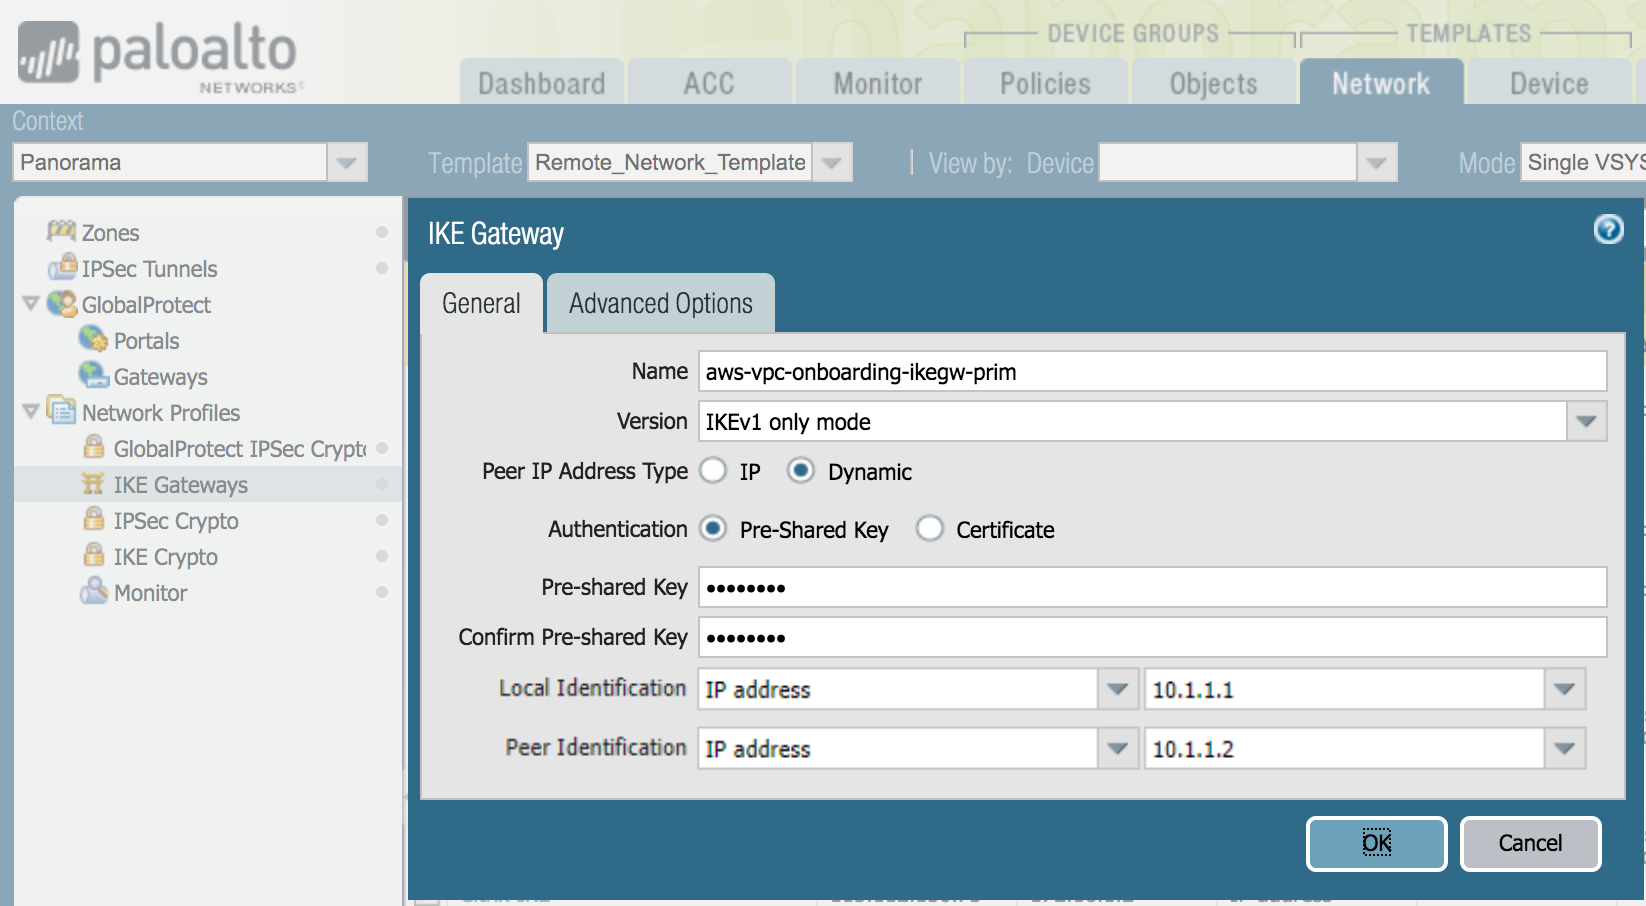
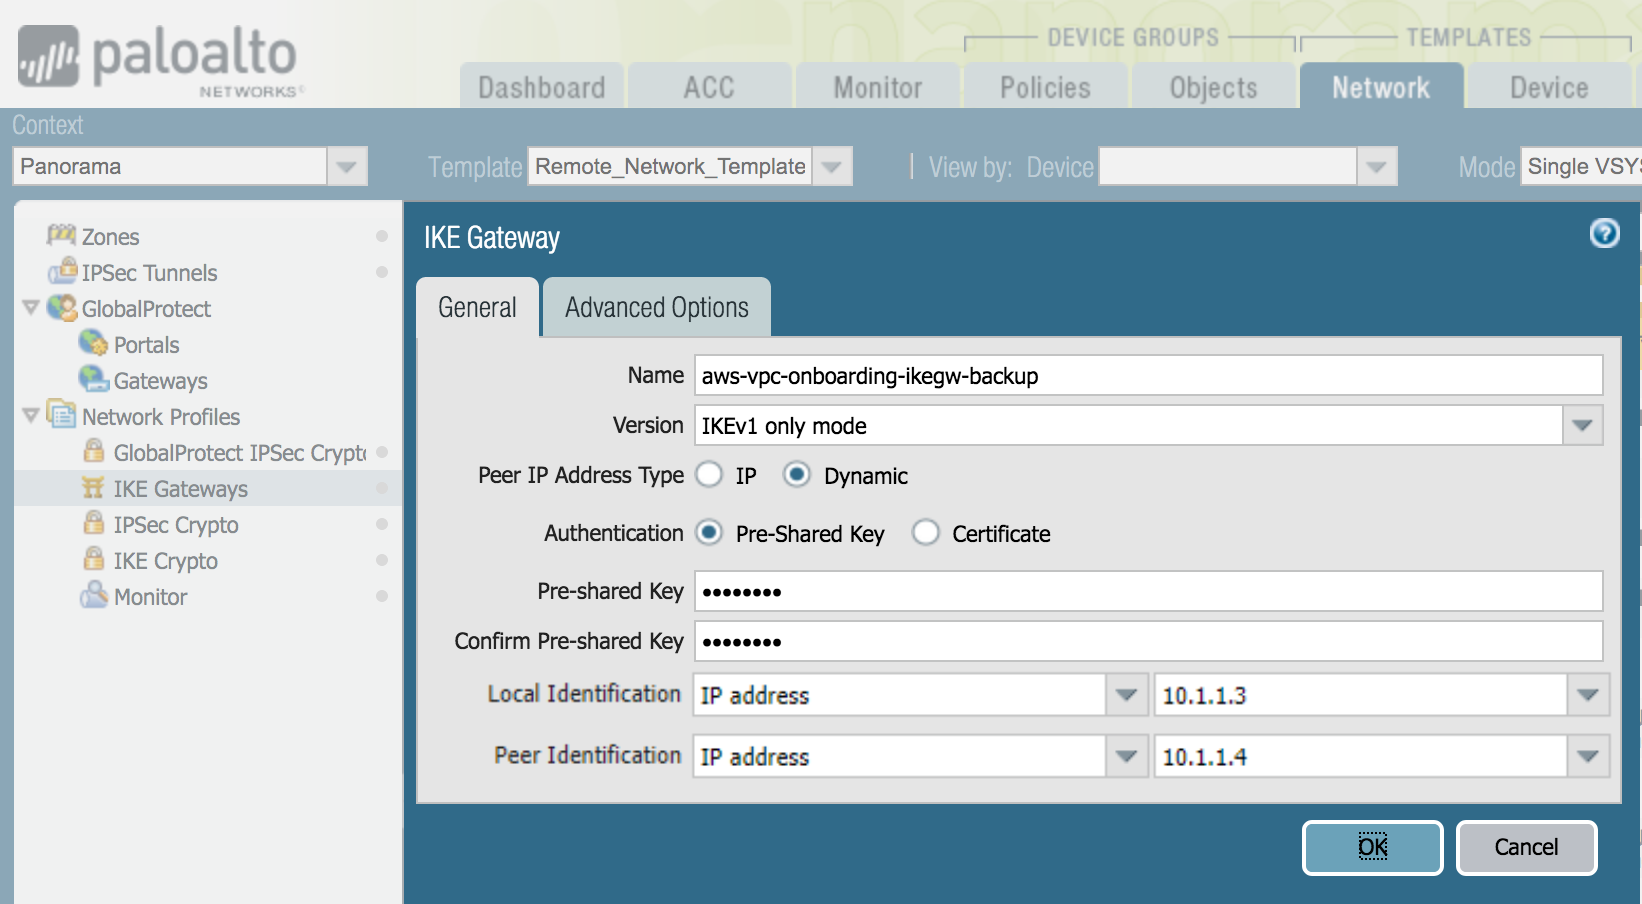
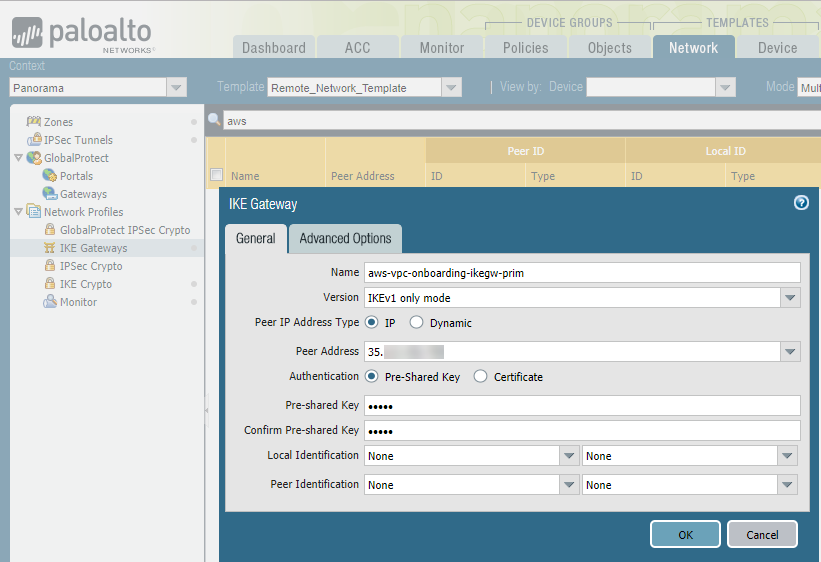
![]() Select NetworkNetwork ProfilesIKE Gateways and Add an IKE gateway for each AWS primary and secondary VPN connection.Specify the following IKE gateway parameters:
Select NetworkNetwork ProfilesIKE Gateways and Add an IKE gateway for each AWS primary and secondary VPN connection.Specify the following IKE gateway parameters:- For Peer IP Address Type, select Dynamic.This setting is temporary. When you set up the IPSec tunnel in Prisma Access, you change the peer type to static (IP) and add an IP address.
- Configure a Pre-shared key.Make a note of this key. You use it when you configure the AWS VPN connection.
- Enter a placeholder value in the Local Identification and Peer
Identification fields. This value is temporary; you remove it when you complete the configuration in Prisma Access after you configure the AWS VPC.
![]()
![]()
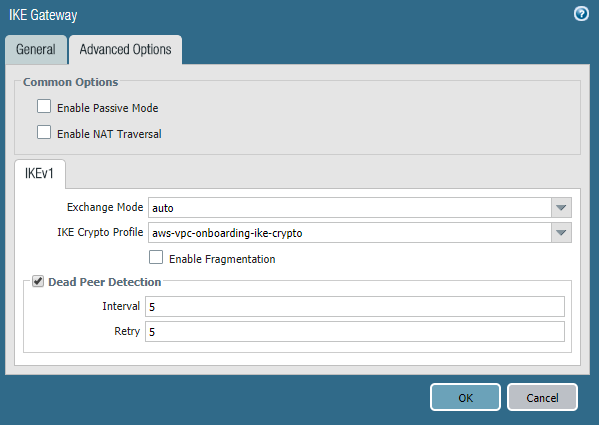
- Select Advanced Options and specify the IKE crypto profile that you created in Step 2.
![]()
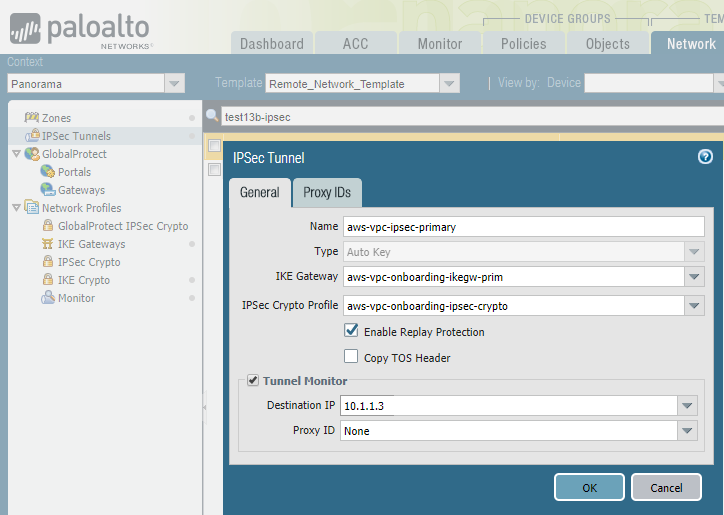
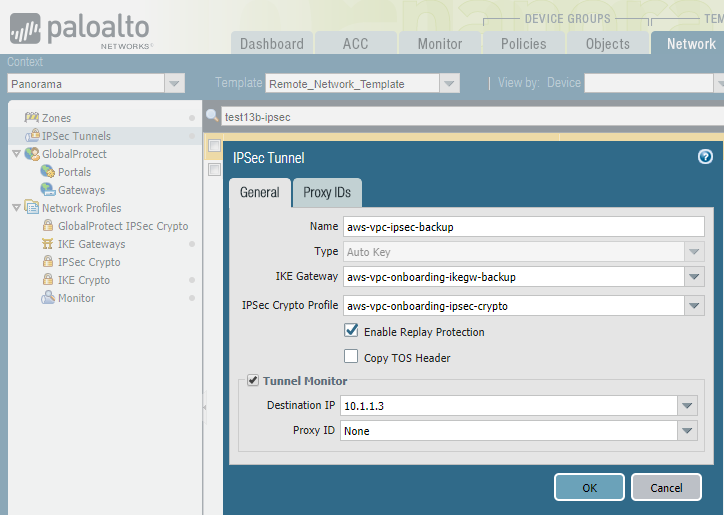
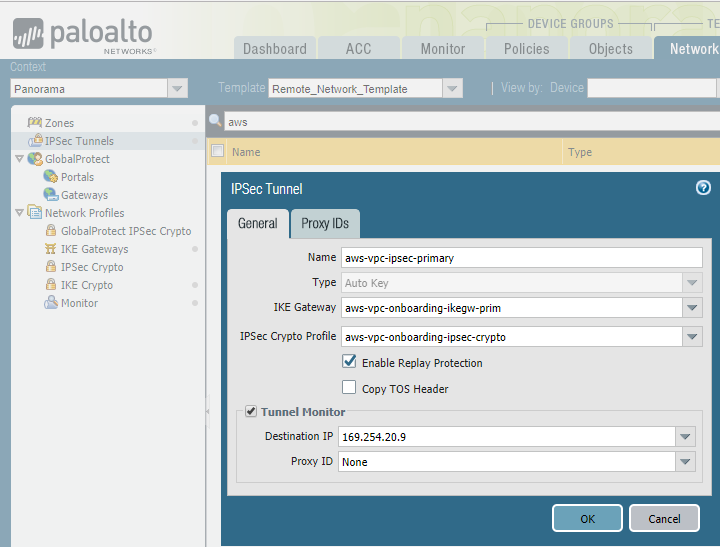
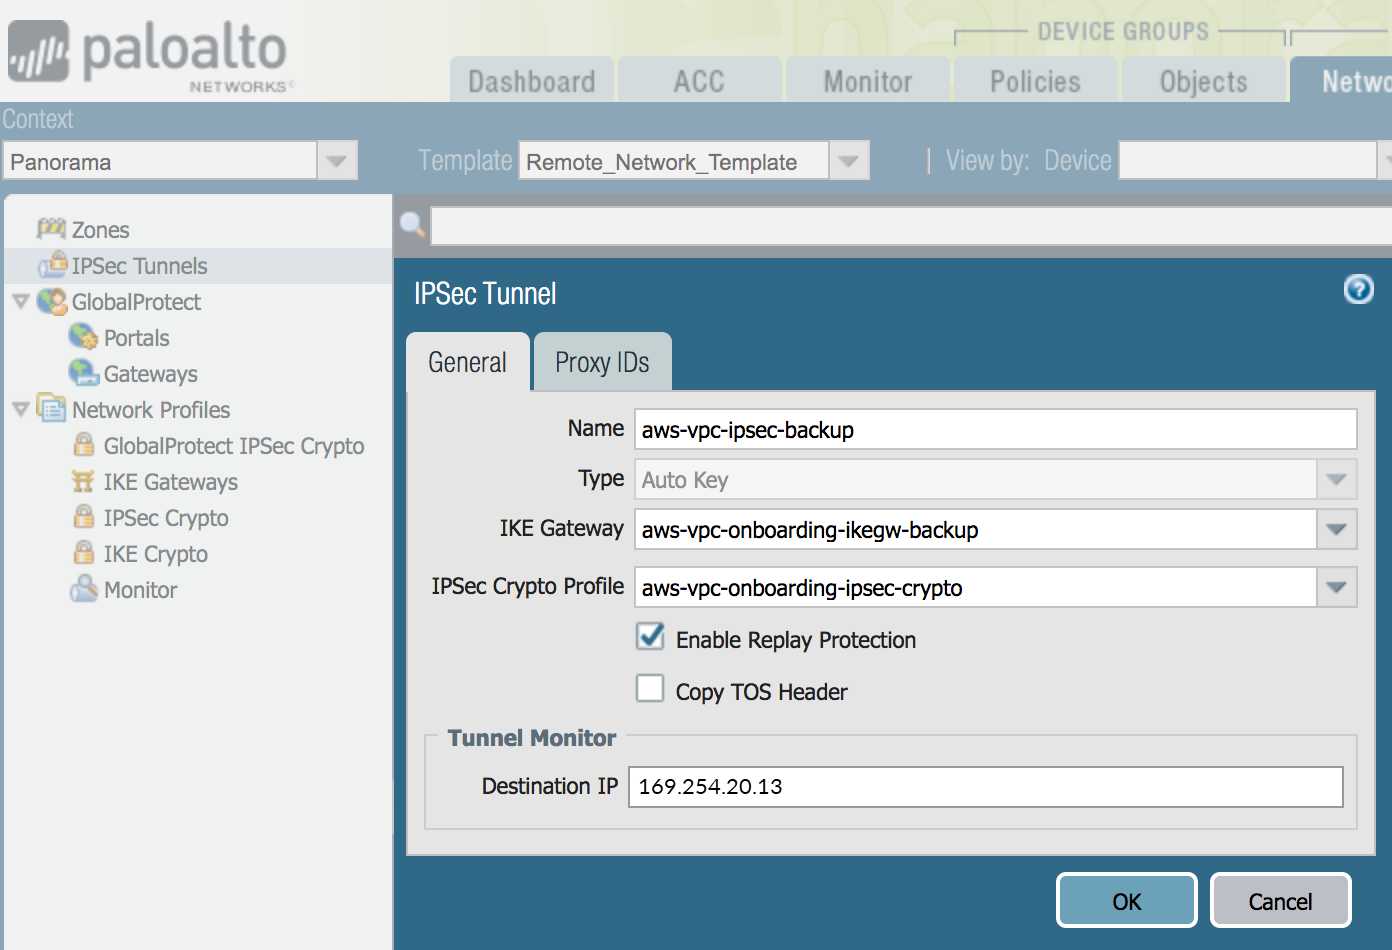
Select NetworkIPSec Tunnels and Add an IPSec tunnel for the AWS primary and secondary VPN connection.Specify the following tunnel parameters:- Specify the IKE gateway and IPSec Crypto Profile that you created earlier in this task.
- Select Tunnel Monitor and specify a placeholder IP address.This IP address setting is temporary. After you configure the VPN gateway in AWS, you change this value when you complete the configuration in Prisma Access.
![]()
![]()
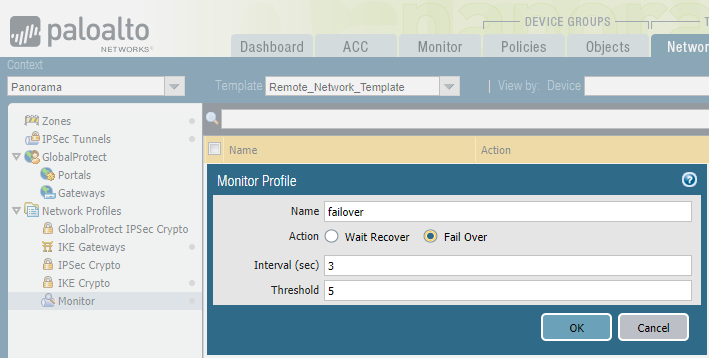
Select NetworkNetwork ProfilesMonitor and Add a tunnel monitor profile for the AWS VPN tunnels that lets traffic Fail Over to the other tunnel in case of a tunnel failure.![]() Select PanoramaCloud ServicesConfigurationRemote Networks and Add the AWS VPC as a remote network.Specify the following values:
Select PanoramaCloud ServicesConfigurationRemote Networks and Add the AWS VPC as a remote network.Specify the following values:- Select a Location that is closest to your AWS VPC.
- Select a Bandwidth based on the amount of traffic that Prisma Access can receive from the AWS VPC.
- Specify the IPSec primary tunnel that you created in Step 5 in the IPSec Tunnel field.
- Specify either static or BGP routing.
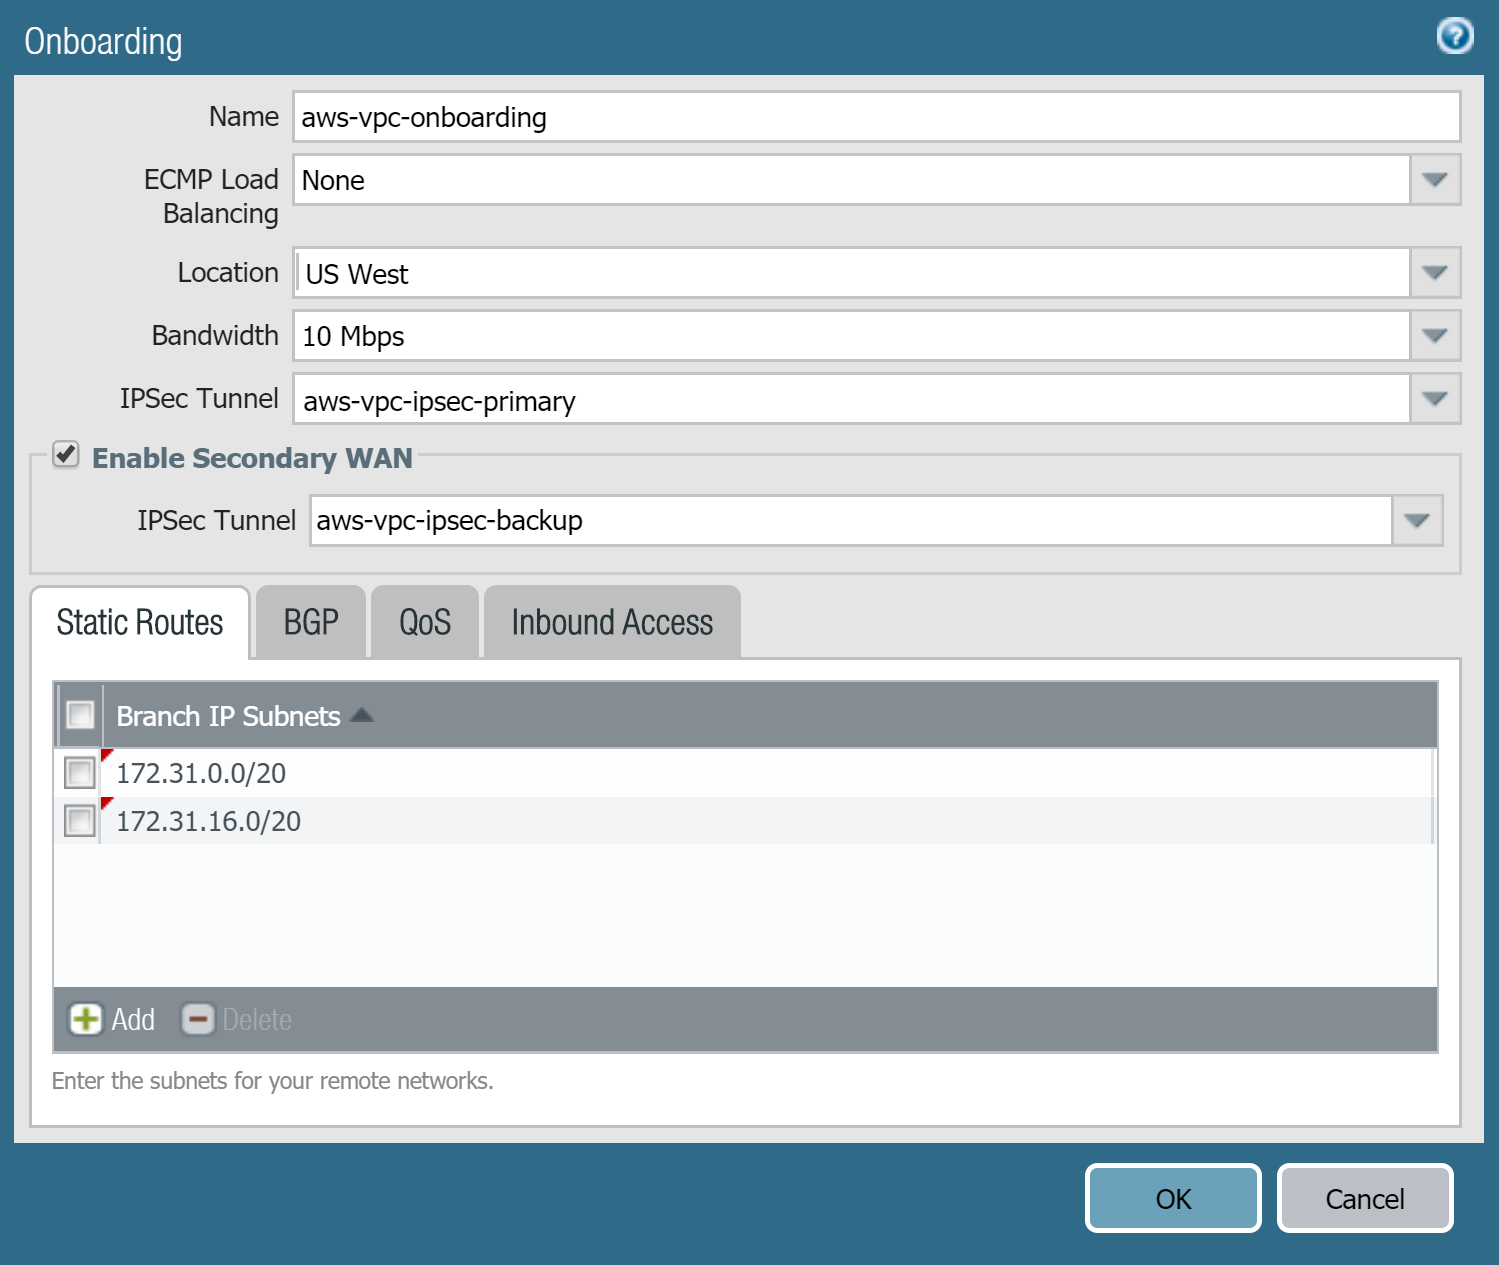
- To configure static routing, click the Static Routes tab, then enter the Branch IP Subnets that correspond to the specific or summary subnets of your AWS VPC.If you created a backup tunnel (secondary WAN), select Enable Secondary WAN and specify the secondary IPSec tunnel that you created in Step 5.
![]()
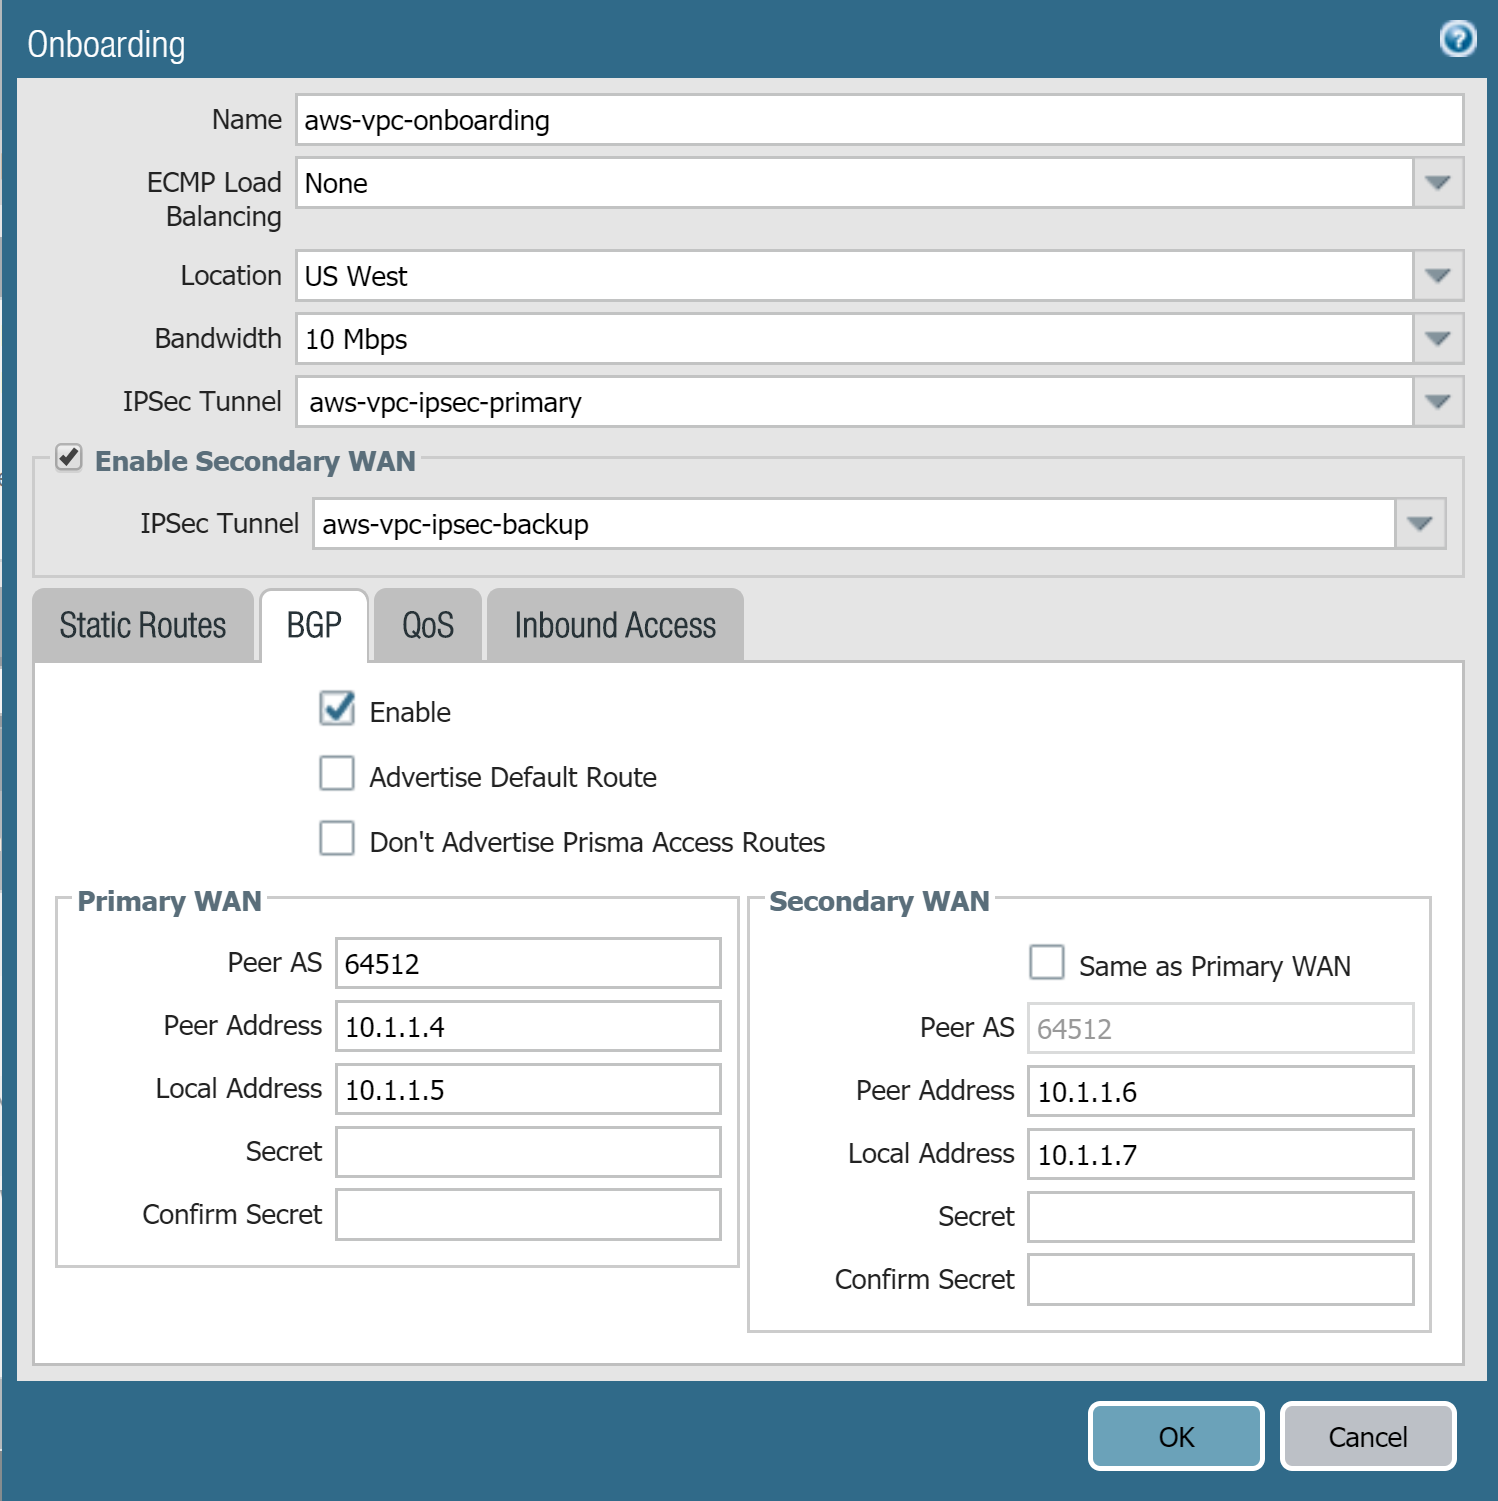
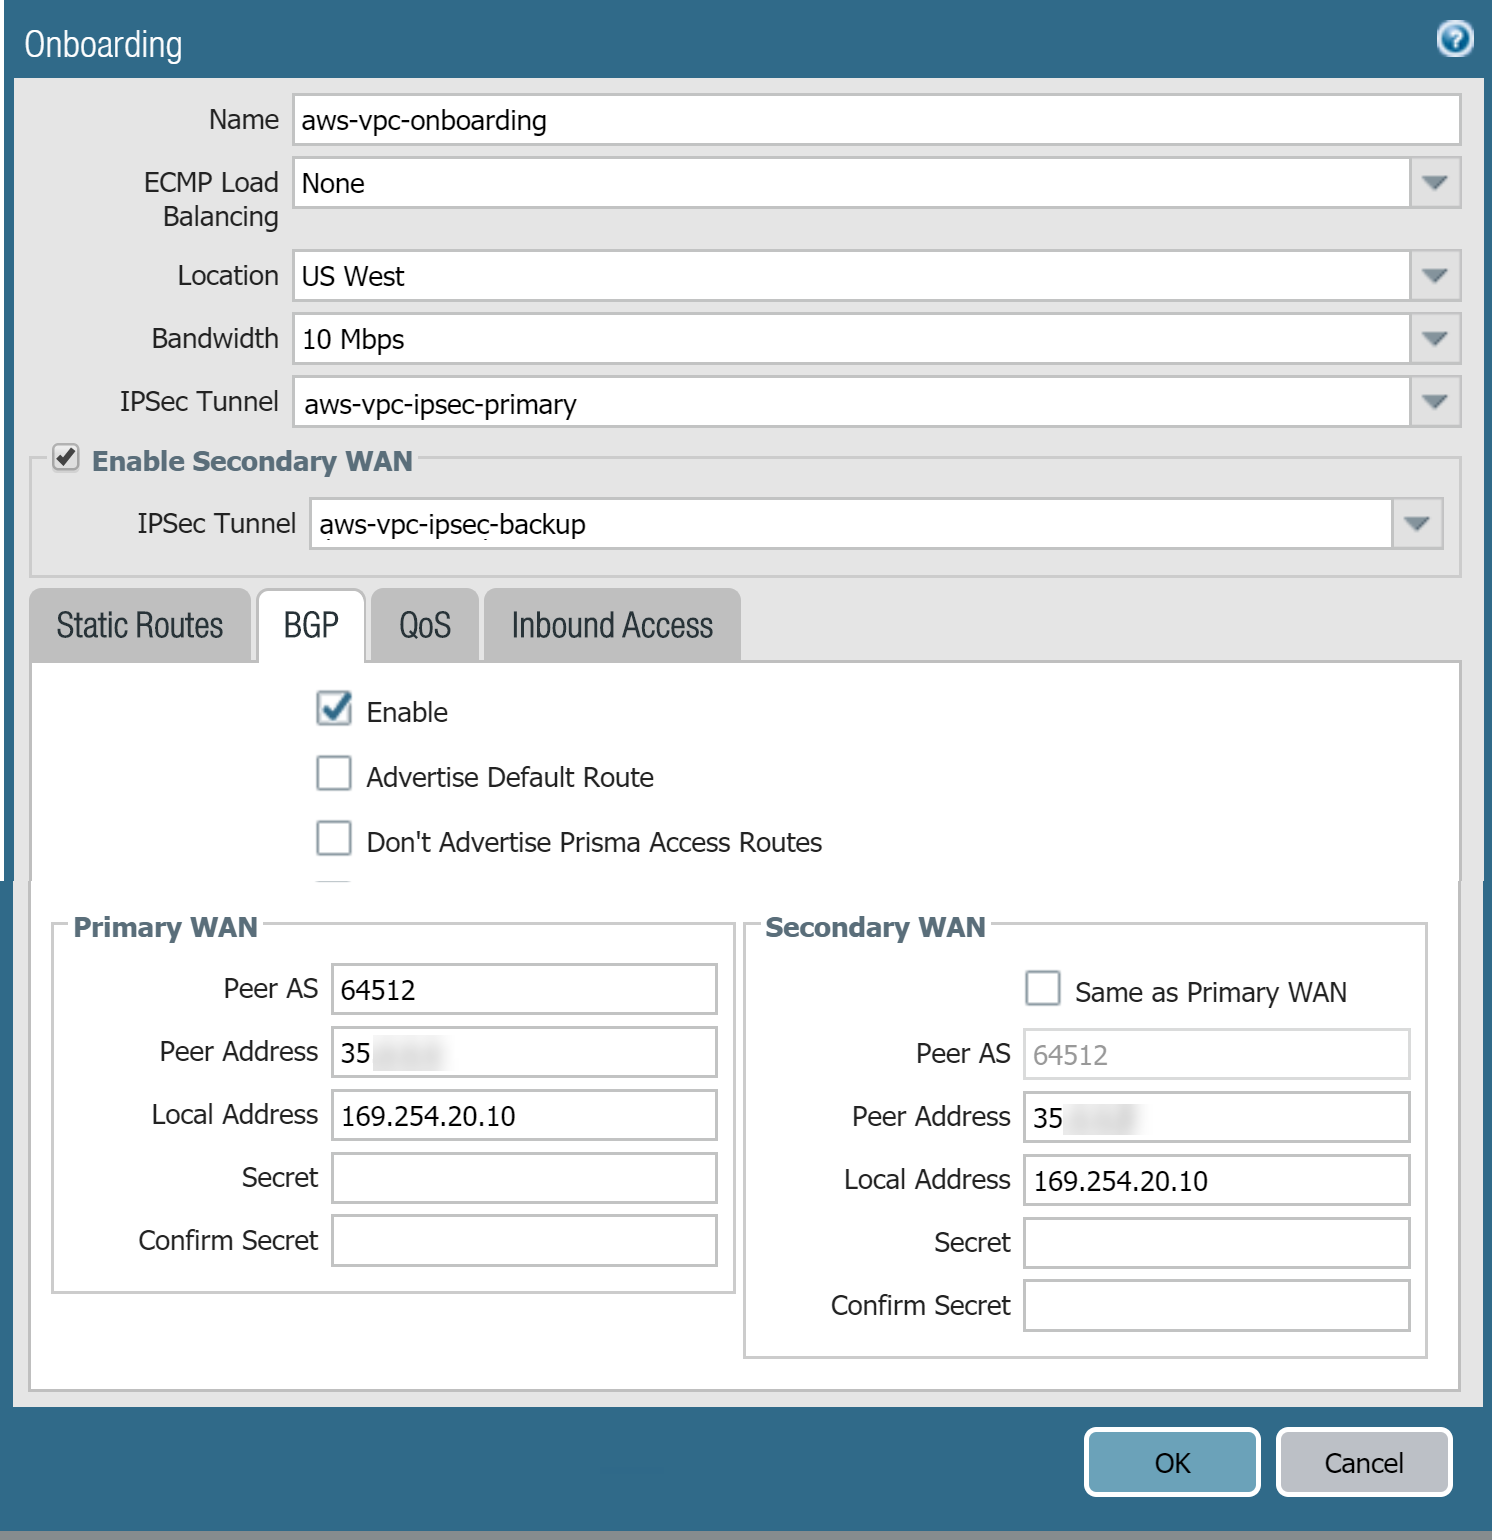
- To configure BGP routing, click the BGP tab, Enable BGP, then enter a Peer AS and placeholder values for the Peer Address and Local Address in the Primary WAN area.If you created a backup tunnel (Secondary WAN), select Enable Secondary WAN and specify the secondary IPSec tunnel that you created in Step 5; then, deselect Same as Primary WAN and enter placeholder values for the Peer Address and Local Address in the Secondary WAN area.The Peer Address and Local Address you specify are temporary values. After you configure additional settings on AWS, you change these addresses when you complete the configuration in Prisma Access.Make a note of the Peer AS, this number must match the one you enter when you Configure Routing in AWS; alternatively, use the default autonomous system (AS) number used by AWS, which is 64512.
![]()
Commit your changes to Panorama and push the configuration changes to Prisma Access.- Click CommitCommit to Panorama.Click CommitPush to Devices and click Edit Selections.On the Prisma Access tab, make sure you select Prisma Access for service setup and then click OK.Wait until Prisma Access adds the AWS VPC as a remote network.This process takes a few minutes. Select PanoramaCloud ServicesStatusNetwork Details to view the remote network status.Make a note of the Service IP Address that displays in the Network Details area. This service IP address is a public, routable IP address and you use it as the customer gateway IP address when you configure the VPC on AWS.
![]() Continue to the next task to configure the VPN connection on AWS.
Continue to the next task to configure the VPN connection on AWS.Configure the AWS VPN Connection
After you configure the VPN tunnel in Prisma Access, you begin the tunnel configuration on AWS by creating a customer gateway, a virtual private gateway, and a VPN connection.From the AWS perspective, you configure the Prisma Access side of the VPC as a customer gateway, and configure the AWS side as a VGW. For more information about AWS configuration, see the AWS documentation- Log in to the AWS console and make sure that the AWS VPC is configured in the AWS region that you specified for the tunnels in Prisma Access.The following examples use the default VPC.
![]()
![]()
![]() Create a customer gateway.
Create a customer gateway.- Open the Amazon VPC console.Select VPN ConnectionsCustomer Gateways.Click Create Customer Gateway.Enter the following information in the screen that displays.
- Enter a Name for the customer gateway.Use a meaningful name such as prisma-access-gateway.
- Configure either static or BGP routing.
- To configure static routing, click Static in the Routing area, then copy the IP address from the Service IP Address field in Prisma Access in Step 10 and paste that address into the IP Address field on AWS.
![]()
- To configure dynamic routing, click Dynamic (requires BGP).
![]()
Click Create Customer Gateway.AWS displays a notification that the customer gateway was created.Make a note of the Customer Gateway ID; you use this value when you create the VPN connection in a later step.![]() Create a virtual private gateway and attach it to the VPC.A virtual private gateway is the VPN concentrator on the Amazon side of the VPN connection. See the AWS documentation for more information.
Create a virtual private gateway and attach it to the VPC.A virtual private gateway is the VPN concentrator on the Amazon side of the VPN connection. See the AWS documentation for more information.- In the VPC console, select VPN ConnectionsVirtual Private Gateways.Click Create Virtual Private Gateway.Enter a Name tag for the virtual private gateway.Click Create Virtual Private Gateway.Right-click the gateway name to open the context menu and select Attach to VPC.
![]() BGP routing deployments only—Select either Amazon Default ASN, or select Custom ASN and enter an ASN.The default ASN for Amazon is 64512. This default value must match the Peer AS you specify for the remote network connection when you configure the VPN gateway in Prisma Access.
BGP routing deployments only—Select either Amazon Default ASN, or select Custom ASN and enter an ASN.The default ASN for Amazon is 64512. This default value must match the Peer AS you specify for the remote network connection when you configure the VPN gateway in Prisma Access.![]() AWS displays a notification that the virtual private gateway was created.
AWS displays a notification that the virtual private gateway was created.![]() Enter the VPC ID.Use the existing VPC or a VPC that you created. This example uses the default VPC.
Enter the VPC ID.Use the existing VPC or a VPC that you created. This example uses the default VPC.![]() The AWS console shows the VPC with a State of attached.
The AWS console shows the VPC with a State of attached.![]() Create a VPN connection.
Create a VPN connection.- In the VPC console, select VPN ConnectionsVPN Connections.Click Create VPN Connection.Enter the following information in the screen that displays:
- Enter a Name tag for the VPN connection.
- Select Existing in the Customer Gateway area and choose the name of the customer gateway you created in Step 2.
- Enter the Customer Gateway ID of the customer gateway you created.
- Configure either a static connection or, if you use BGP, configure a dynamic connection.
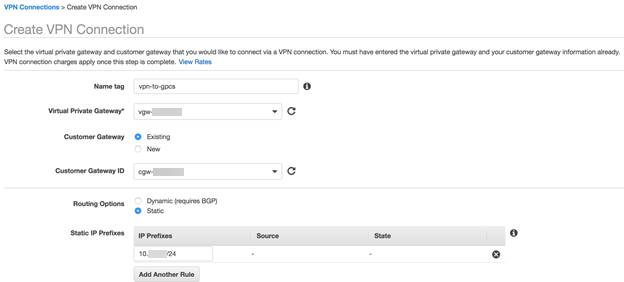
- To configure a static connection, choose Static in the Routing Options area and enter the static IP prefixes for all networks that require access from the AWS VPC through Prisma Access in the IP Prefixes area.Optionally, enter a default route (0.0.0.0/0) to allow access to all routes from the AWS VPC to Prisma Access.These entries include any IP subnets that Prisma Access uses for remote network connections or service connections or that require access to the VPC.
![]()
- To configure a connection that uses BGP, choose Dynamic (requires BGP).
![]()
In the Tunnel Options area, specify the following tunnel options:- Enter a /30 CIDR block from the 169.254.0.0/16 subnet for the inside tunnel IP address.If you do not provide a subnet, AWS automatically provides a /30 CIDR block from the 169.254.0.0/16 subnet.
- Enter the IKE pre-shared key (PSK).Use the same IKE PSKs that you used when you configured the IKE gateway in Prisma Access.
![]() Click Yes, then click Create.Verify that the VPN is available to complete the Prisma Access connection.
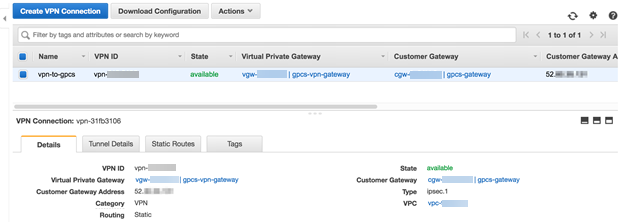
Click Yes, then click Create.Verify that the VPN is available to complete the Prisma Access connection.- Click the name of the VPN you just created and click the Details tab.The Status should show as available.
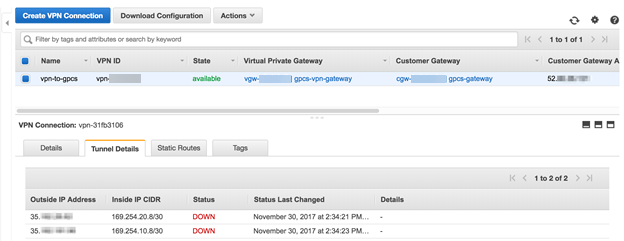
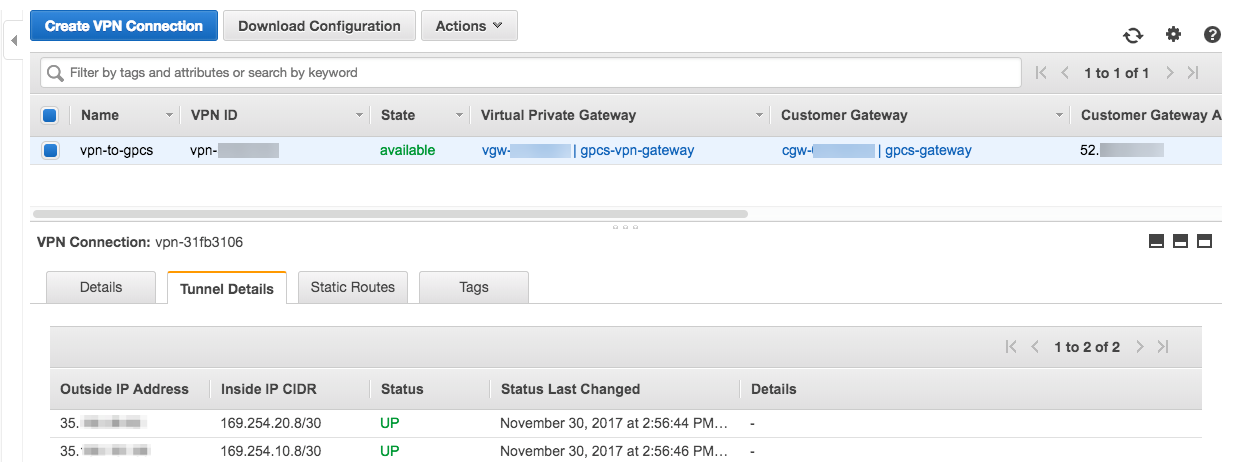
![]() Click the Tunnel Details tab.Two outside public IP addresses (one for the primary and one for the secondary IPSec tunnel) and two inside IP CIDR subnets display in the fields.A Status of Down is normal, because you have not yet configured Prisma Access with the outside IP addresses.
Click the Tunnel Details tab.Two outside public IP addresses (one for the primary and one for the secondary IPSec tunnel) and two inside IP CIDR subnets display in the fields.A Status of Down is normal, because you have not yet configured Prisma Access with the outside IP addresses.![]() Make a note of the addresses that display in the Outside IP Address field and the subnet that displays in the Inside IP CIDR field.You use these addresses when you set up the IPSec tunnel in Prisma Access.Continue to configure the routing on AWS to configure either default, static, or dynamic routing for the VPN connection.
Make a note of the addresses that display in the Outside IP Address field and the subnet that displays in the Inside IP CIDR field.You use these addresses when you set up the IPSec tunnel in Prisma Access.Continue to configure the routing on AWS to configure either default, static, or dynamic routing for the VPN connection.Configure Routing in AWS
You can use one of two methods to configure routing on AWS:- If you configured static routing, use one of the following methods to configure routing on AWS:
- Create static routes to reach the service connection and remote network subnets for Prisma Access over the VPN connection. We recommend using static routes if you want to keep using existing routes to the internet or other corporate resources.VPC traffic to destinations that are not defined by new static routes are not protected by Prisma Access. To secure all traffic, create a default route.
- Create a default route that routes all traffic over the VPN tunnel to Prisma Access. Creating a default route ensures that Prisma Access secures all traffic including internet traffic.Using a VPN gateway as the default route might result in loss of connectivity to other VPC instances over the internet. Make sure that you have another method (for example, a bastion host) in place to connect to other VPC instances.
- Configure BGP routing by configuring dynamic routing in AWS.
Create Static Routes for the VPN Connection
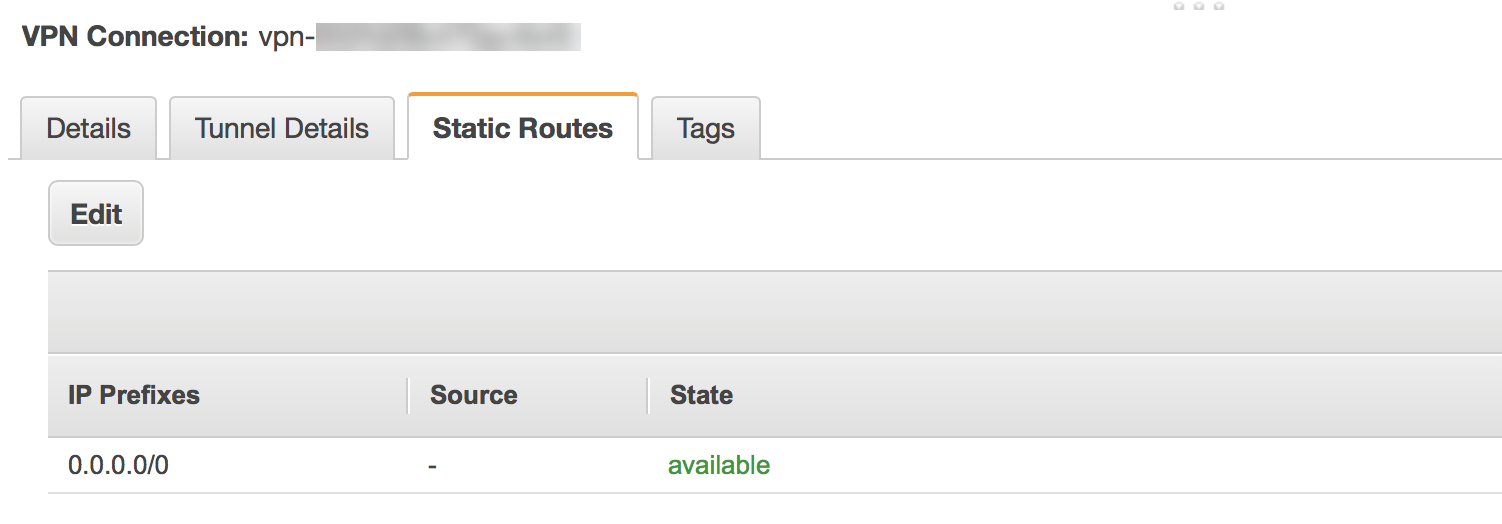
To create static routes for the VPN connection, complete the following steps:- In Panorama, find the Static Subnets used in Prisma Access for your remote network connection.To find the subnets, select PanoramaCloud ServicesStatusNetwork DetailsRemote NetworksStatic Subnet.In AWS, select the VPN connection you created in Step 4 and click the Static routes tab.Click Edit and add the static routes as IP prefixes for your remote network connection.
![]() Click Add Another Route and add the static routes for the subnets in the AWS VPN connection and VPC route tables, then click Save.Verify that the State of the route is available.
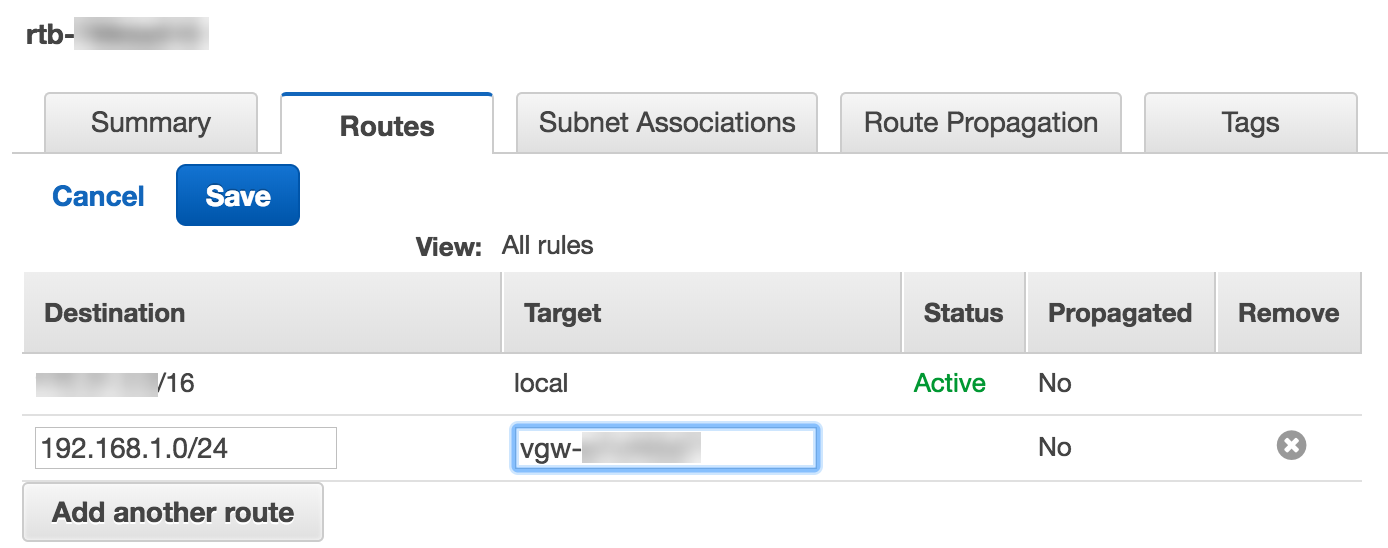
Click Add Another Route and add the static routes for the subnets in the AWS VPN connection and VPC route tables, then click Save.Verify that the State of the route is available.![]() Select VPCRoute tables.Click Edit and add a new route to the route table.
Select VPCRoute tables.Click Edit and add a new route to the route table.![]() Choose the VPN Gateway you created as a Target to reach the IP address subnet allocated for your headquarters or branch office.
Choose the VPN Gateway you created as a Target to reach the IP address subnet allocated for your headquarters or branch office.![]()
Create a Default Route for the VPN Connection
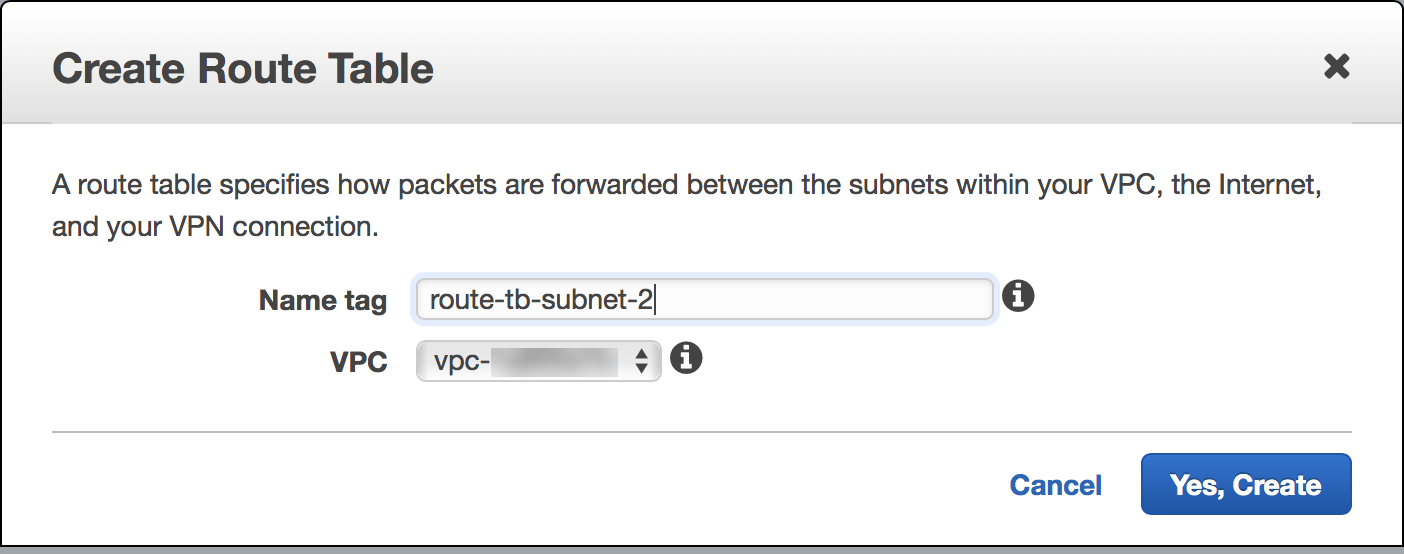
To create a default route for the VPN connection, complete the following steps.Using a VPN gateway as the default route might result in loss of connectivity to other VPC instances over the internet. Make sure that you have another method (for example, a bastion host) in place to connect to other VPC instances.- Select VPCRoute TablesCreate Route Table.Provide a name for the table and click Yes, Create.
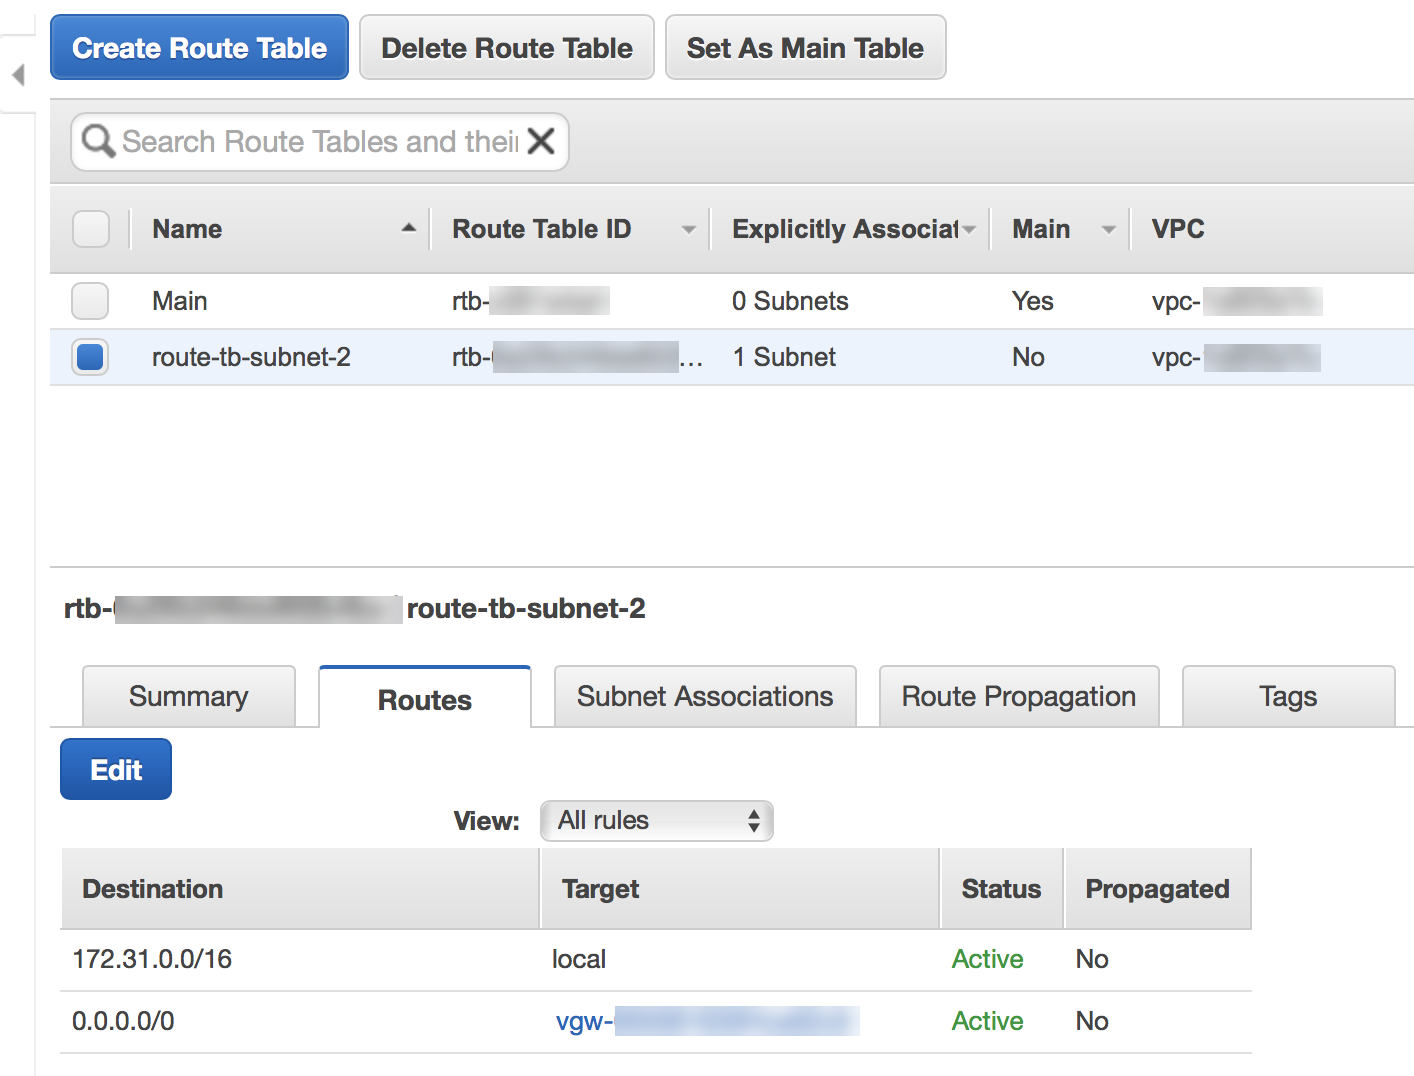
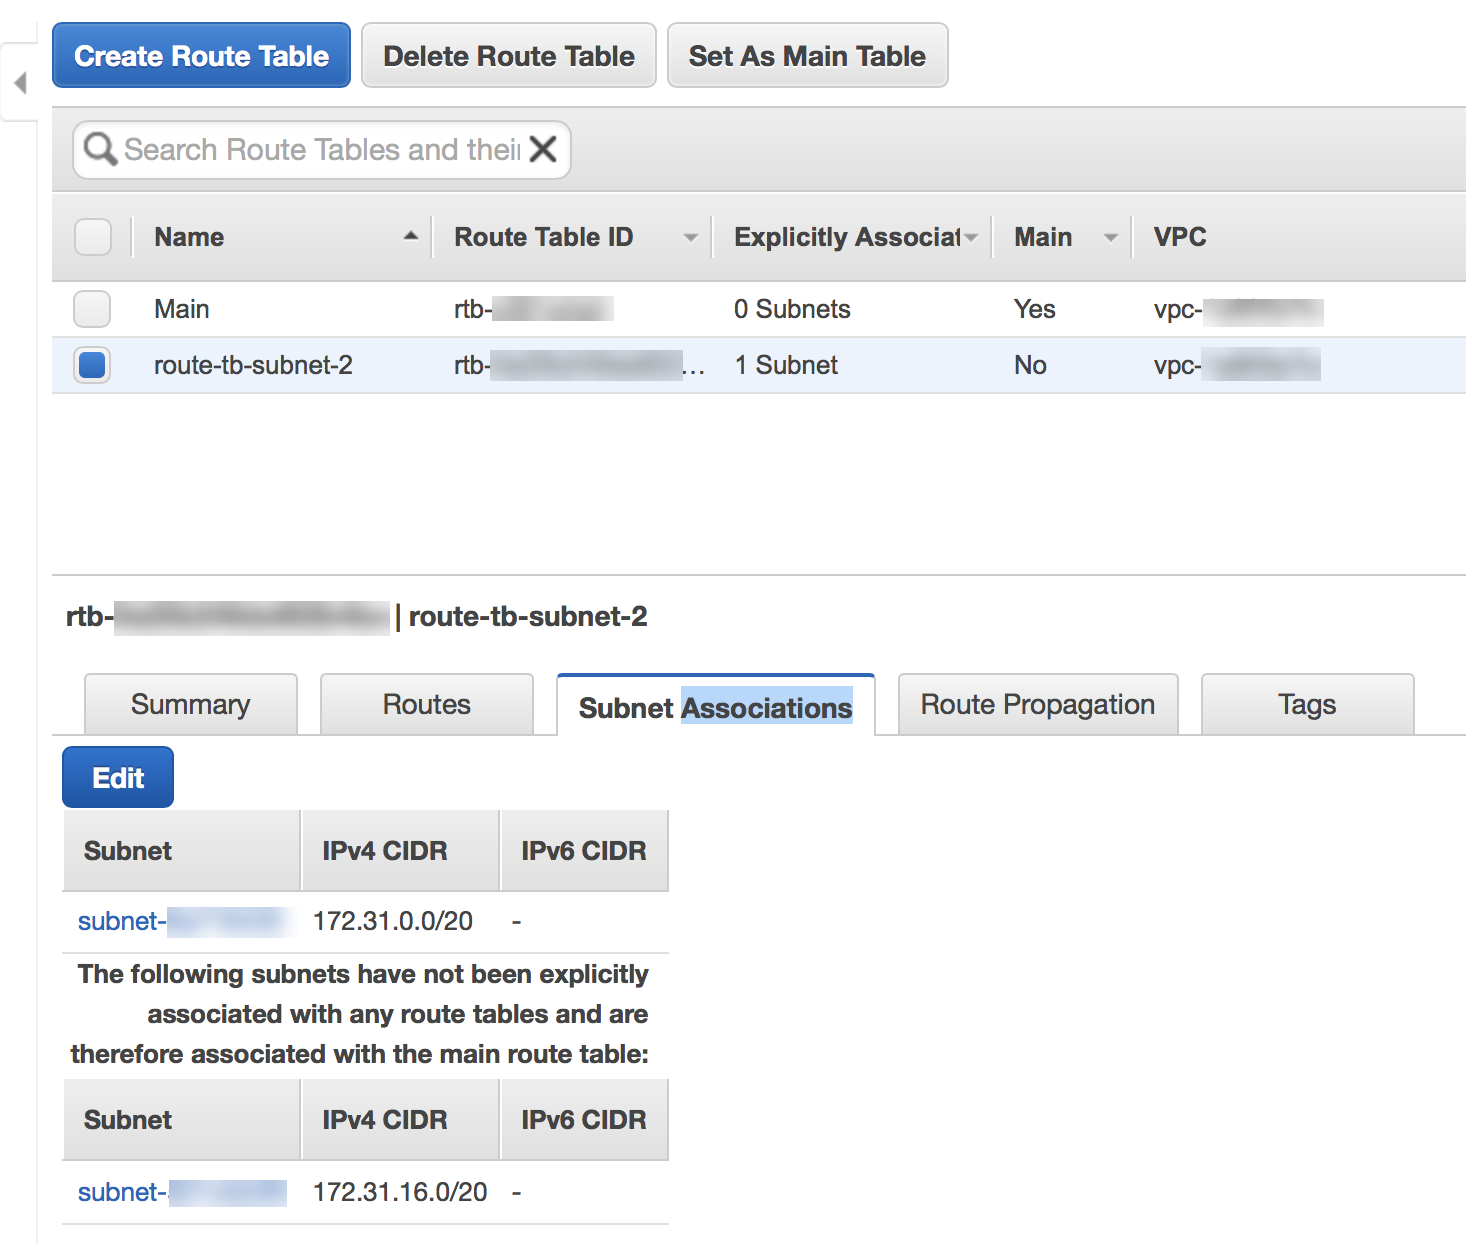
![]() Create a default route to the VPC subnet by clicking Routes and adding the default route. Specify the Target using the ID of the virtual private gateway you created Step 3.
Create a default route to the VPC subnet by clicking Routes and adding the default route. Specify the Target using the ID of the virtual private gateway you created Step 3.![]() Associate the VPC subnet to the route table you created.
Associate the VPC subnet to the route table you created.![]() Add the default route you created to the new route table.
Add the default route you created to the new route table.![]()
Create Dynamic Routing for the VPN Connection
To create dynamic routing for the VPN connection, complete the following steps:- Select the VPN connection you created in Step 4 and click the Static routes tab.Find the subnets used in Prisma Access for your remote network connection.To find the subnets, select PanoramaCloud ServicesStatusNetwork DetailsRemote Networks.Click Edit and add the static routes as IP prefixes for your remote network connection.
![]() Click Add Another Route and add the static routes for the subnets in the AWS VPN connection and VPC route tables, then click Save.Verify that the State of the route is available.
Click Add Another Route and add the static routes for the subnets in the AWS VPN connection and VPC route tables, then click Save.Verify that the State of the route is available.![]() Select VPCRoute tables.Click Edit and add a new route to the route table.
Select VPCRoute tables.Click Edit and add a new route to the route table.![]() Choose the VPN Gateway you created as a Target to reach the IP address subnet allocated for your headquarters or branch office.
Choose the VPN Gateway you created as a Target to reach the IP address subnet allocated for your headquarters or branch office.![]() Enable route propagation by selecting the Route Propagation tab, clicking Edit Route Propagation, and changing Propagate to Yes.
Enable route propagation by selecting the Route Propagation tab, clicking Edit Route Propagation, and changing Propagate to Yes.![]()
Complete Configuration of the IPSec Tunnel in Prisma Access
To finish the configuration of the IPSec tunnel in Prisma Access, perform following steps in Panorama.- Make sure that you have configured security policies between the AWS VPC and the service connection to allow communication between AWS VPC and the HQ/data center location.In Panorama, select NetworkNetwork ProfilesIKE Gateways.Select the IKE gateway that is used for the primary IPSec tunnel.Change the Peer IP Address Type from Dynamic to IP.Enter the Peer Address, specifying the first Outside IP Address that displayed in the Tunnel Details tab of AWS in Step 5.c.Change the Local Identification and Peer Identification values to None and click OK.
![]() Select the IKE gateway for the secondary IPSec tunnel and repeat Step 4 through Step 6 to configure the secondary IKE gateway, substituting the first Outside IP Address that displayed in the Tunnel Details tab of AWS with the second Outside IP Address.Select NetworkZonesIPSec Tunnels and open the primary IPSec tunnel.Select the Tunnel Monitor check box and enter the Destination IP address, specifying the first host of the first Inside IP CIDR subnet that displayed in the Tunnel Details tab of AWS in Step 5.c; then, click OK.For example, if the first Inside IP CIDR address subnet is 169.254.20.8/30, specify a destination IP address of 169.254.20.9.
Select the IKE gateway for the secondary IPSec tunnel and repeat Step 4 through Step 6 to configure the secondary IKE gateway, substituting the first Outside IP Address that displayed in the Tunnel Details tab of AWS with the second Outside IP Address.Select NetworkZonesIPSec Tunnels and open the primary IPSec tunnel.Select the Tunnel Monitor check box and enter the Destination IP address, specifying the first host of the first Inside IP CIDR subnet that displayed in the Tunnel Details tab of AWS in Step 5.c; then, click OK.For example, if the first Inside IP CIDR address subnet is 169.254.20.8/30, specify a destination IP address of 169.254.20.9.![]() Select the backup IPSec tunnel and repeat Step 8 through Step 9, using the first host of the second Inside IP CIDR subnet that displayed in the Tunnel Details tab of AWS.For example, if the second Inside IP CIDR address subnet is 169.254.20.12/30, specify a destination IP address of 169.254.20.13.
Select the backup IPSec tunnel and repeat Step 8 through Step 9, using the first host of the second Inside IP CIDR subnet that displayed in the Tunnel Details tab of AWS.For example, if the second Inside IP CIDR address subnet is 169.254.20.12/30, specify a destination IP address of 169.254.20.13.![]() BGP routing deployments only—Select PanoramaCloud ServicesConfigurationRemote Networks, select the BGP tab, then change the following values:
BGP routing deployments only—Select PanoramaCloud ServicesConfigurationRemote Networks, select the BGP tab, then change the following values:- Change the Peer Address to the first host of the first Inside IP CIDR subnet that displayed in the Tunnel Details tab of AWS in Step 5.c.
- Change the Local Address to the last host of the second Inside IP CIDR subnet that displayed in the Tunnel Details tab of AWS.For example, if the second Inside IP CIDR address subnet is 169.254.20.12/30, specify a destination IP address of 169.254.20.14.
- If you specified a backup tunnel (secondary WAN), change the Peer Address to the last host of the first Inside IP CIDR subnet that displayed in the Tunnel Details tab of AWS in Step 5.c, and change the Local Address to the last host of the second Inside IP CIDR subnet that displayed in the Tunnel Details tab of AWS.
![]()
Commit and Push the configuration.Verify Connectivity Between the AWS VPC and Prisma Access
Verify that the IPSec tunnel is up and that your workloads in the AWS VPC are accessible to the remote networks and mobile users who use Prisma Access by completing the following task.- 1. Check the IPSec tunnel status on Panorama and on the AWS management console.
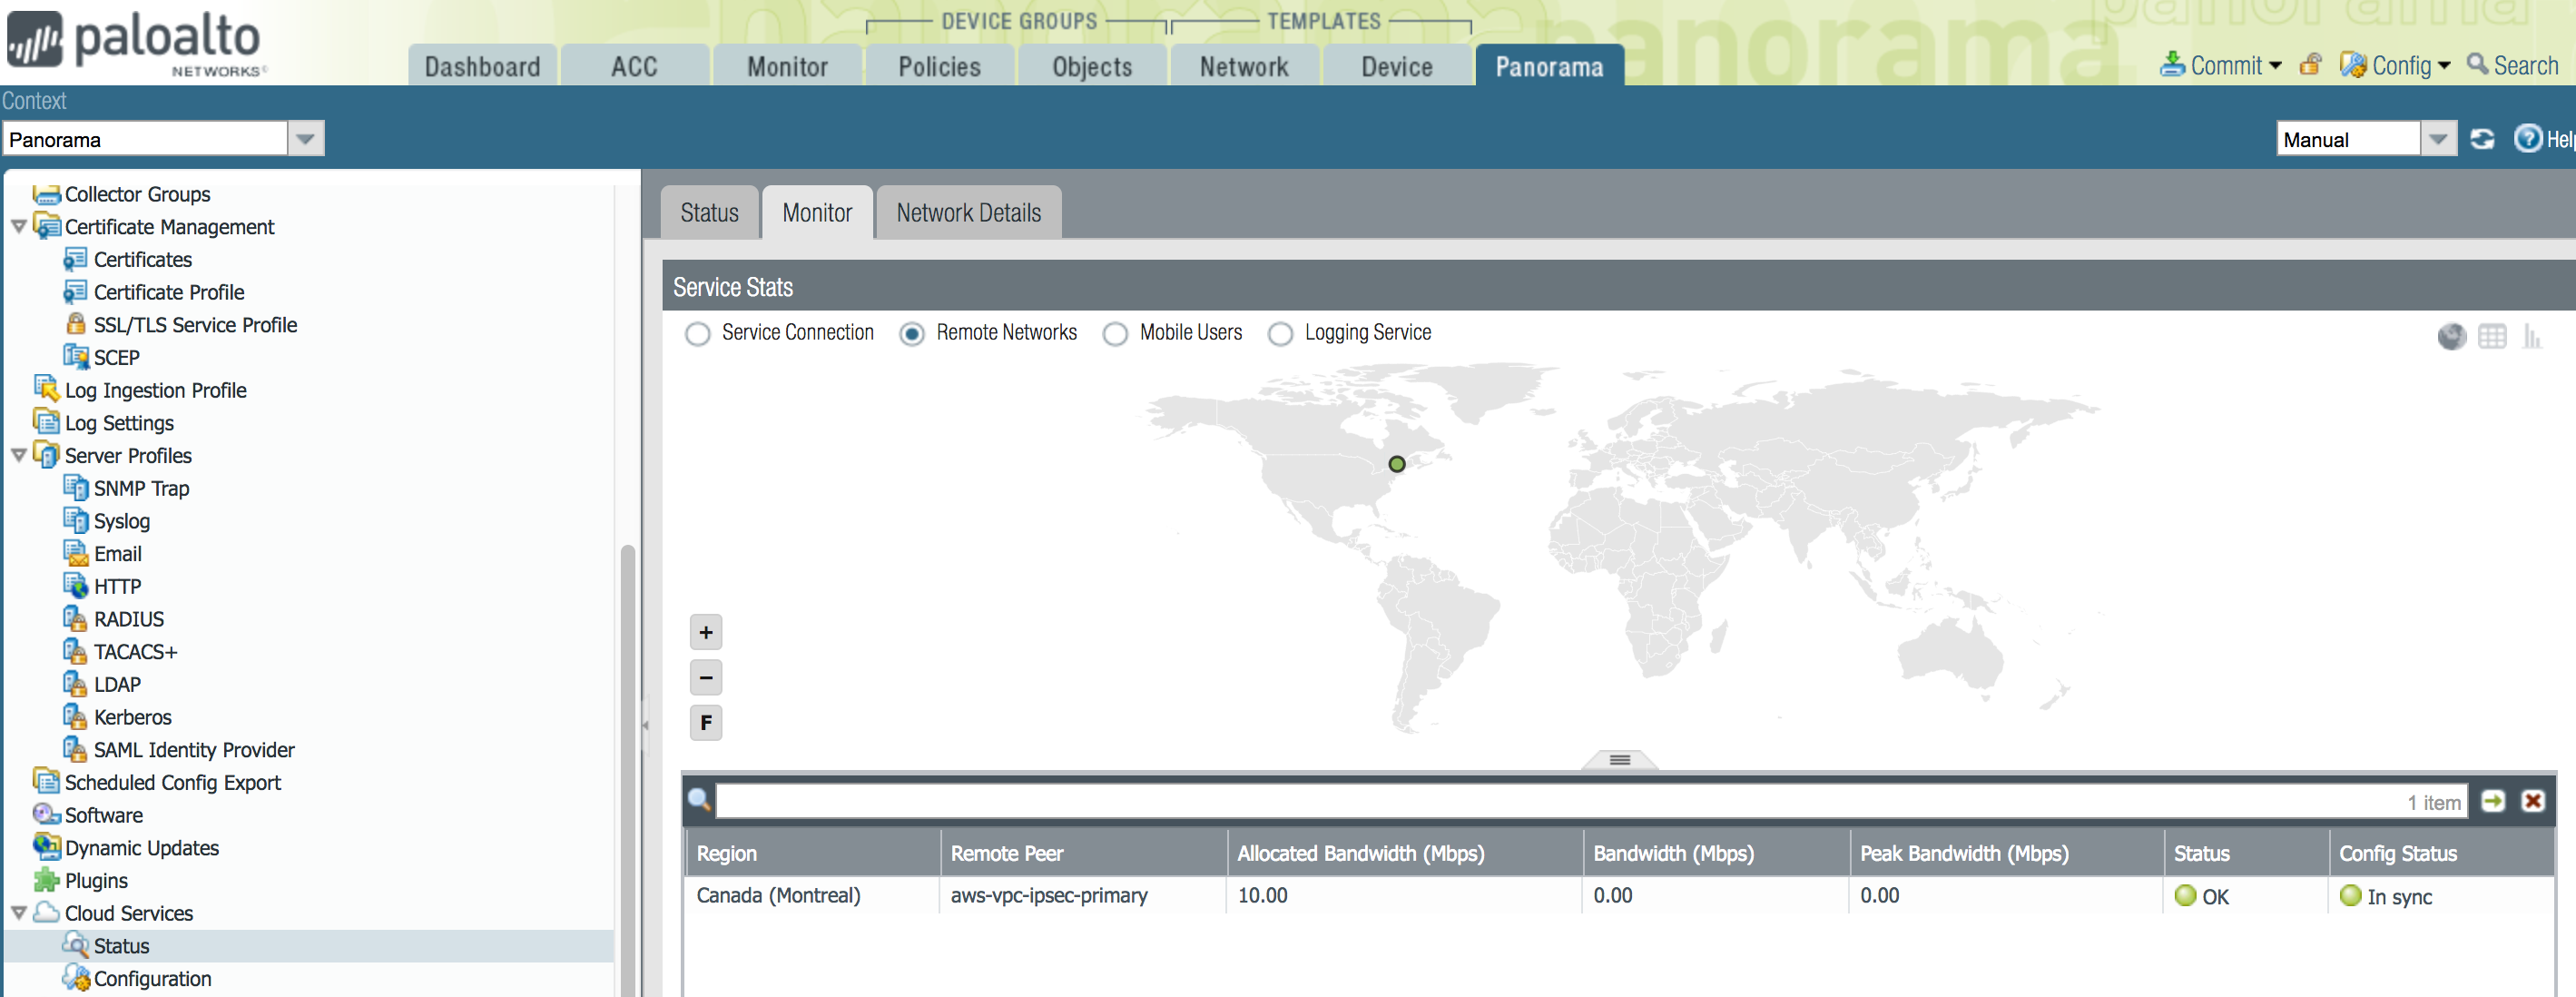
- In Panorama, select PanoramaCloud ServicesStatusMonitor.Click Remote Networks.The status should show as OK and In sync.
![]() On the AWS management console, select VPN connection.The status should show as UP.
On the AWS management console, select VPN connection.The status should show as UP.![]()
Troubleshoot VPN Connection Issues
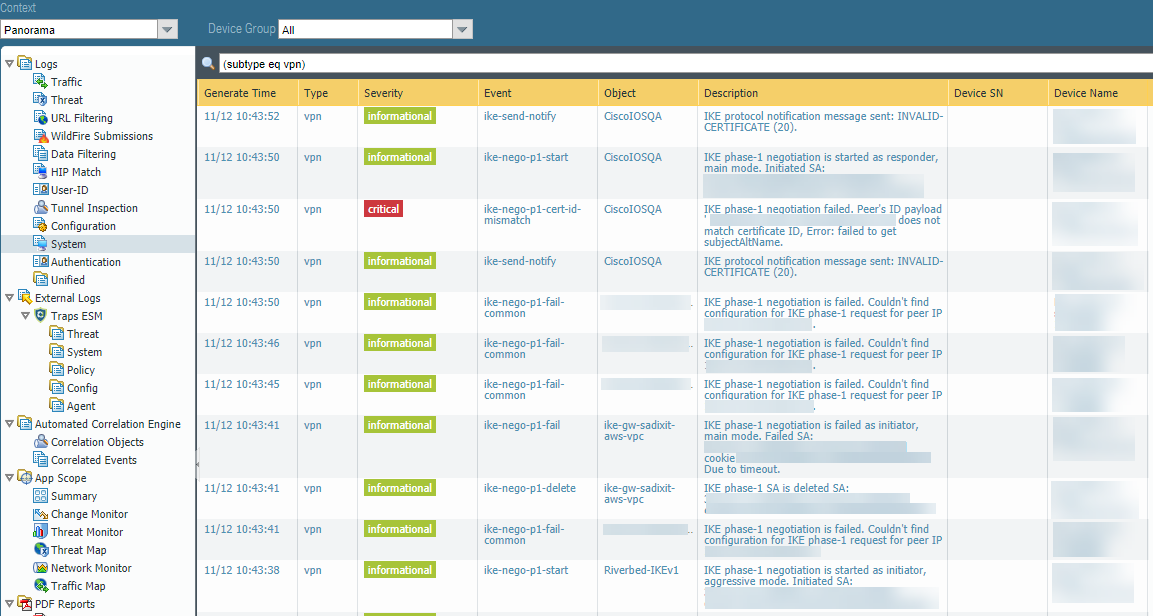
Use the procedures in this section to troubleshoot any issues you have with tunnel creation.- To troubleshoot the site-to-site connection in Prisma Access, log in to Panorama and select LogsSystem, then enter (subtype eq vpn) in the Filter field to view messages related to VPN tunnel creation.
![]()
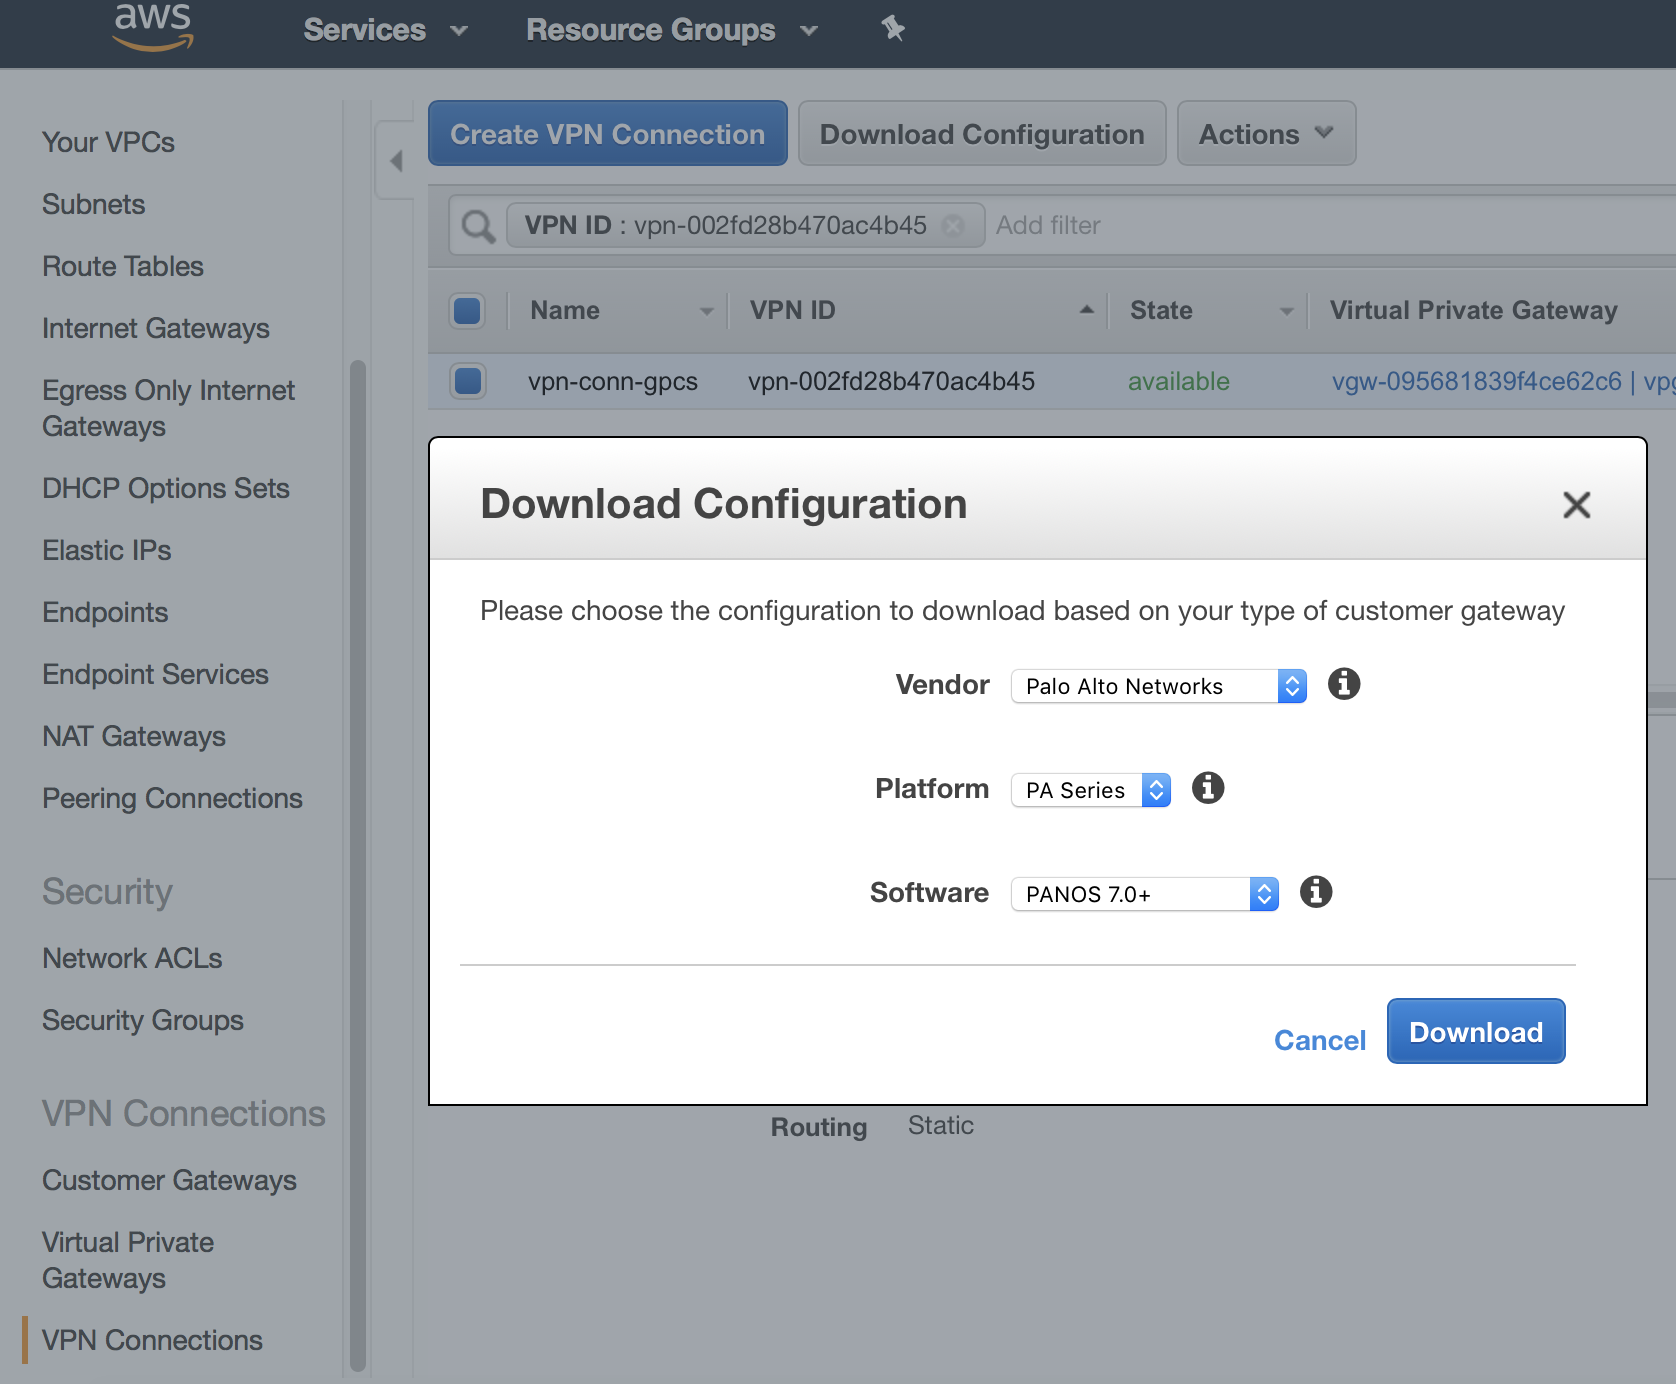
- To troubleshoot the site-to-site connection in AWS, log in to AWS. If the AWS does not have a status of UP after you configure it, double-check the IKE and IPSec parameters you configured in Prisma Access and make sure that they match the VPN configuration on AWS. To download the configuration on AWS, select the VPN connection you created and click Download Configuration.
![]()

