Prisma SD-WAN
Configure a Loopback Interface
Table of Contents
Configure a Loopback Interface
Let us learn to configure a loopback interface.
| Where Can I Use This? | What Do I Need? |
|---|---|
|
|
Loopback is a logical, virtual interface used
to emulate a WAN port to provide LAN functionality. You can free up
a physical port previously used for LAN/WAN configuration by designating
a loopback interface. You can configure a maximum of four loopback
interfaces per device.
ION devices on versions 4.5.3 or
later at a site, support loopback interface. A loopback interface
can only be used as a WAN port on interfaces with no hardware bypass
circuitry. Interfaces with no hardware bypass circuitry per device
are as follows:
- ION 1000—All ports.
- ION 1200—All ports.
- ION 2000—Ports 1–3.
- ION 7000—Ports 1–4, 9–14.
- Virtual IONs—All non-controller ports.
A loopback
interface may be brought up or down administratively and may not
contain any sub-interfaces or IP configurations.
- You can update or delete a loopback interface. However, you cannot delete if it is part of a bypass pair.
- Decouple a port coupled with another port before a loopback interface can be coupled to create a bypass pair.
- The only valid option in the Use These Ports For drop-down is Private Layer 2 for a bypass pair that is made up of a physical LAN port and a loopback interface as the WAN port.
- The network policy rules assigned to such a site must not have any rules using the Direct on private WAN path. Valid paths are Direct on public or VPN on public. Traffic is dropped if a direct on private path is used.
Prisma SD-WAN supports layer 2 and layer 3 loopback interfaces:
Configure a Layer 2 Loopback Interface
- Select , select the device you want to configure.On the device's interface configuration page, select the to add icon to add a loopback interface.In the General section, select L2 as the Loopback Interface.
- Enter a Nameand Description. Next, select a port to be configured with a loopback interface.For Admin Up, select Yes or No to administratively bring the interface up or down. The default is Yes.In the Network Setting section,
- Select Bypass Pair as the Interface Type.From the Pair With drop-down, select the Loopback Interface.A confirmation message displays.Select Done to create a bypass pair with the loopback interface successfully.A confirmation message displays the port's successful creation and the loopback interface.For Use These Ports For, select Private L2 from the drop-down.This is the only valid option for a bypass pair that is made of a physical LAN port and a loopback interface for the WAN port.For Security Zone, select a device to bind.Choose a Circuit Label.(Optional) If you choose Copy Settings from Another Port, select the bypass pair to copy the settings. If not, you may leave it blank.Similar to configuring bypass pairs, for Attached Networks, enter a VLAN ID, IP Address at Router, optional Network Context, and toggle the scope tp Local or Global scope.Save Bypass Pair.The system assigns a default loopback ID to the interface. A confirmation message displays that the loopback interface is successfully created.The port and the loopback interface are displayed under Interfaces.
Configure a Layer 3 Loopback Interface
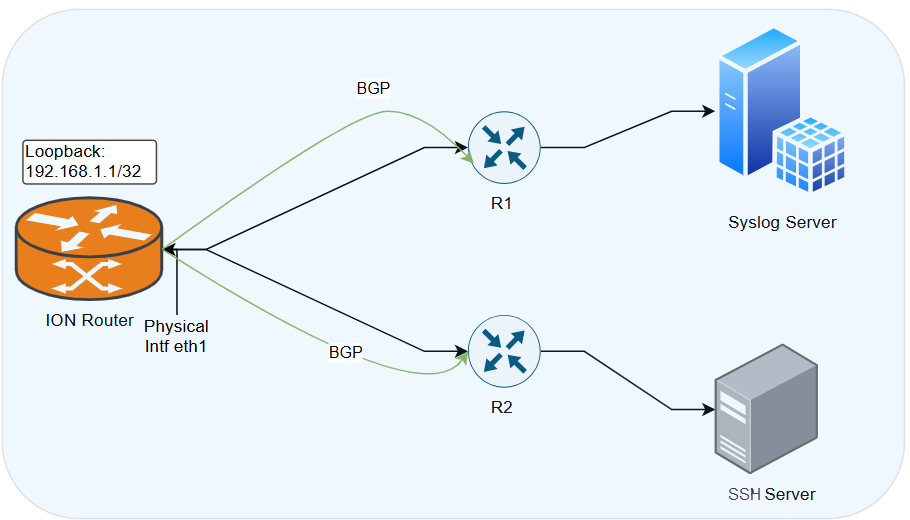
Prisma SD-WAN supports layer 3 capabilities on loopback interfaces for SSH and Syslog services on branch and data center ION devices.The layer 3 capabilities on loopback interfaces are supported from the device release 6.5.2 and above.Prisma SD-WAN supports a maximum of 12 loopback interfaces per ION device on all ION devices and virtual ION platforms.L3 Loopback Interfaces for Management and TroubleshootingService Providers use L3 loopback interfaces on managed network devices for troubleshooting tasks and management operations. As an example a loopback IP interface can be used for SSH to the device or for Syslog services. An L3 loopback interface on the ION device allows management operations via the overlay. As a result, you do not have to rely on LAN interfaces, which are part of the infrastructure, or on WAN interfaces which involve using the underlay leading to potential security considerations.![]()
- The ION loopback interface is configured with the IP address 192.168.1.1/32.
- BGP sessions are running between ION eth1 and R1 and ION eth1 and R2. Both the BGP sessions advertise the loopback interface IP address to the routers R1 and R2.
- Users can configure the loopback interface as a source interface in services such as Syslog.
- The Syslog packet generated in the ION device will use the loopback IP address which will go out through eth1 to R1 and then to the Syslog server.
- Using a loopback interface masks the physical interface IP address and status.
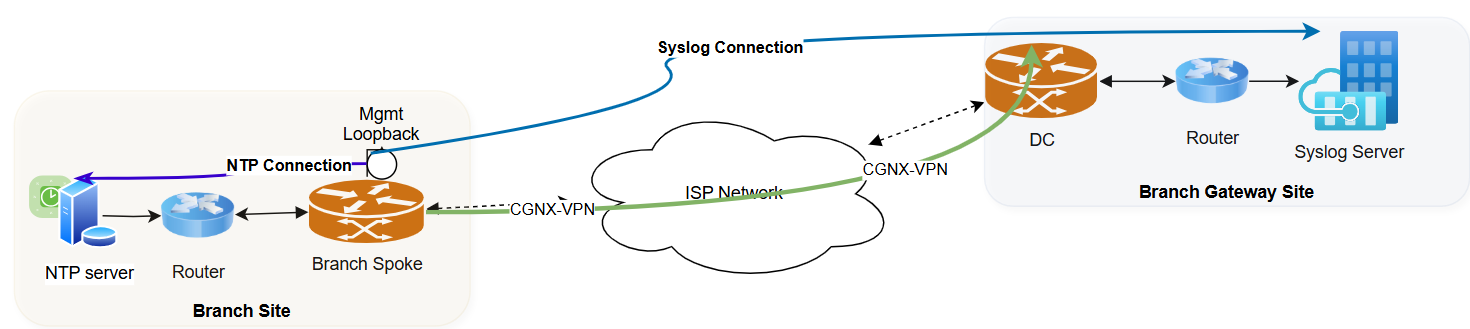
Loopback Interface for establishing VPN TunnelsYou can establish Prisma SD-WAN tunnels using the loopback interface when the MPLS WAN IP interfaces cannot be routed through the network.![]() In the example above, the Internet Service Provider (ISP) has provided an IP address to an interface (the associate interface) and the Prisma SD-WAN VPN tunnel is formed over the loopback interface.
In the example above, the Internet Service Provider (ISP) has provided an IP address to an interface (the associate interface) and the Prisma SD-WAN VPN tunnel is formed over the loopback interface.- You can configure an L3 Loopback interface with used for = public or private for branch ION devices, and used for = public and peer with network for data center ION devices.
- To associate the interface, see the steps for configuring a Layer 3 loopback interface.
- The VPN is formed over the loopback interface IP address.
- The peer should be able to reach the loopback IP address via the associated interface to form a VPN tunnel.
- You cannot use a loopback Interface to establish a Standard VPN tunnel.
Configure a Layer 3 Loopback Interface- Select , select the device you want to configure.On the device's interface configuration page, select the to add icon to add a loopback interface.In the General section, select L3 as the Loopback Interface.
- Enter a Nameand Description. Next, select a port to be configured with a loopback interface.For Admin Up, select Yes or No to administratively bring the interface up or down. The default is Yes.In the Network Setting section,
- Select either Internet, Private WAN, or LAN for Use this port for.For Data Center ION devices, select Public as Use this port for.Attach a Circuit Label.For Associate Interface, enter the interface through which the loopback interface can send traffic.Note that:
- You can use a port or a sub-interface as an Associate interface.
- You can use an interface as an Associate Interface only if it does not have a circuit label already attached.
- Ensure that you advertise the loopback IP Address only on the Associate Interface.
- VPN tunnels will be established only over the Associate Interface on the underlay.
- If NAT is configured on the associated interface, the loopback IP address will be NATted to the associated interface IP address.
Set Scope to Global for advertising the Loopback Interface IP address to BGP peers.When configured as global, the loopback prefix will be advertised to all BGP peers.For IP Address Mask, enter the /32 IP address.- Loopback supports only the /32 subnet mask.
- Loopback does not support IPv6.
Click Create loopback.Advertise L3 Loopback IP Address to BGP Peers
You can configure the L3 Loopback IP Address for advertising to BGP Peers. - Advertise L3 Loopback IP address to BGP Peers for branch ION devices.
- Set Scope to Global for advertising the loopback interface prefix to BGP peers and to the fabric.Note that VPN tunnels will be established only over the Associate Interface on the underlay.Advertise L3 Loopback IP address to BGP Peers for data center ION devices.For Core, Edge, and Classic Peers
- Create a new route map based on default route map and attach the loopback IP prefix list.
- For edge peers, allow only the loopback IP prefix list.
- For core peers, allow the loopback IP prefix list along with the existing prefix list.
- For classic peers, advertisement happens by default if Scope is set to Global.
Related CLIs
- config interface
- ping
- ping6
- debug bounce interface
- debug bw test src interface
- ssh interface
- tcp dump
- tcp ping
- trace route
- inspect interface stats
- inspect wan paths
- dump cgnx infra status
- dump cgnx infra status live
- dump cgnx infra status store
- dump interface config
- dump interface status
- dump interface status interface details
- dump interface status interface module
- dump wan interface config
- dump wan interface summary