Cloud NGFW for Azure
Cloud NGFW Credit Distribution and Management
Table of Contents
Expand All
|
Collapse All
Cloud NGFW for Azure Docs
Cloud NGFW Credit Distribution and Management
Interchange and allocate credits among your Cloud NGFW resources regardless of the
Cloud deployment method.
| Where Can I Use This? | What Do I Need? |
|---|---|
|
|
You can procure and associate Cloud NGFW credits to your Cloud NGFW tenants by paying
an upfront cost for a long-term contract of one, two, or three years. You can
procure these credits directly from Palo Alto Networks and its partners. Your Palo
Alto Networks sales teams and its partners can send these credits to you directly or
by using the Cloud provider marketplace private offers. These private offers (also
referred to as Azure Private Offers, or Azure Multiparty Private
Offers) allow you to take advantage of Cloud Marketplace benefits such as
consolidated billing, and their spend commitments (Azure MACC).
Cloud NGFW credits allow you to consume Cloud NGFW resources in your tenant
at a lower cost than PAYG rates, up to a specific capacity until your contract
expires and automated or configurable renewals. Cloud NGFW credits fund your
consumption of Cloud NGFW resources and their related usage of CDSS and centralized
management (Panorama, Strata Cloud Manager, and Strata Logging Service).
Consider the following when using Cloud NGFW credits:
- Cloud NGFW credits are term-based. Terms can be defined for any amount of time between one and five years. Both allocated and unallocated credits expire at the end of the agreed-upon term.
- If your monthly average consumption exceeds the purchased credits, overages are charged at PAYG rates.
- If you add Cloud NGFW credits during a free-trial period, your contract starts immediately and overrides the free trial.
- Use the Cloud NGFW pricing estimator to help you determine pricing for your Cloud NGFW tenant.
- You can procure credits for Cloud NGFW and all the CDSS services you intend to use for Cloud NGFW.
Start Using Cloud NGFW Credits
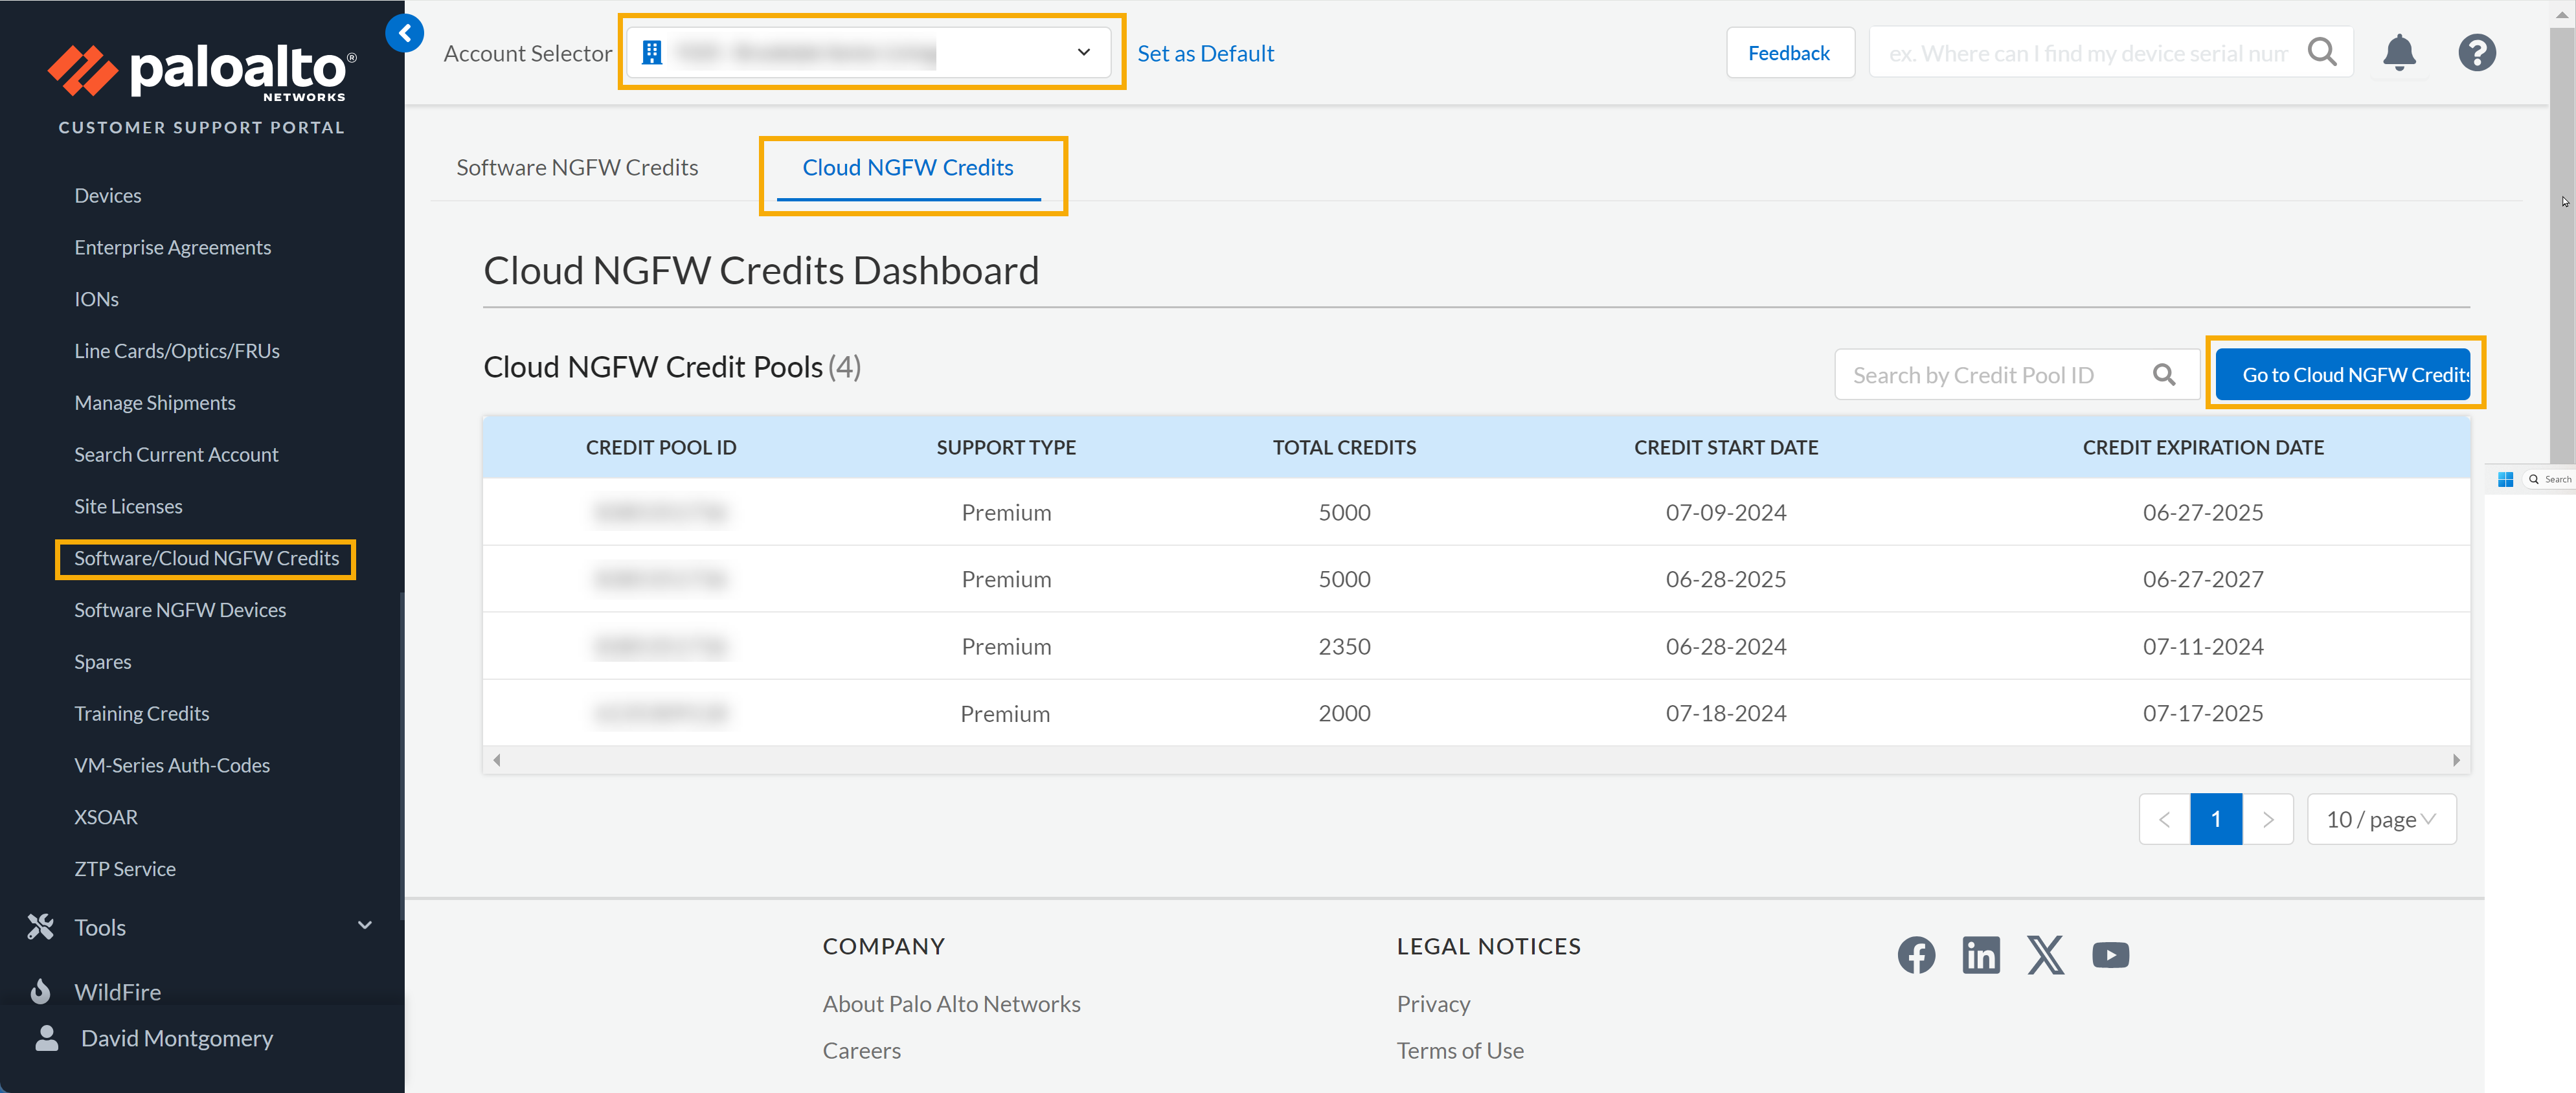
Once you book the order for credits, they become active immediately, and an email
is sent to enable you to start using your credits; for example, if you purchased
credits for a one year term on September 6, 2024, the credits are active that
day while the term lasts, in the case of this example, until September 5, 2025.
The person listed as the administrative contact in the quote receives the
activation email. The email provides details about the subscription, the credit
pool ID, the subscription start and end date, the number of credits purchased,
and the description of the default credit pool. You can use these details to
activate credits in your Customer Support Portal (CSP) account.
Palo Alto Networks recommends retaining this email to
access information related to your account.
Cloud NGFW will
only begin consuming credits AFTER the DP is associated.
Failure to do so will result in continued PAYG
billing.
You will select one of your CSP accounts for the credit pool during activation.
Once your credit pool is active, you can manage and allocate the credits to your
Cloud NGFW tenants using the Credit Management Application described below.
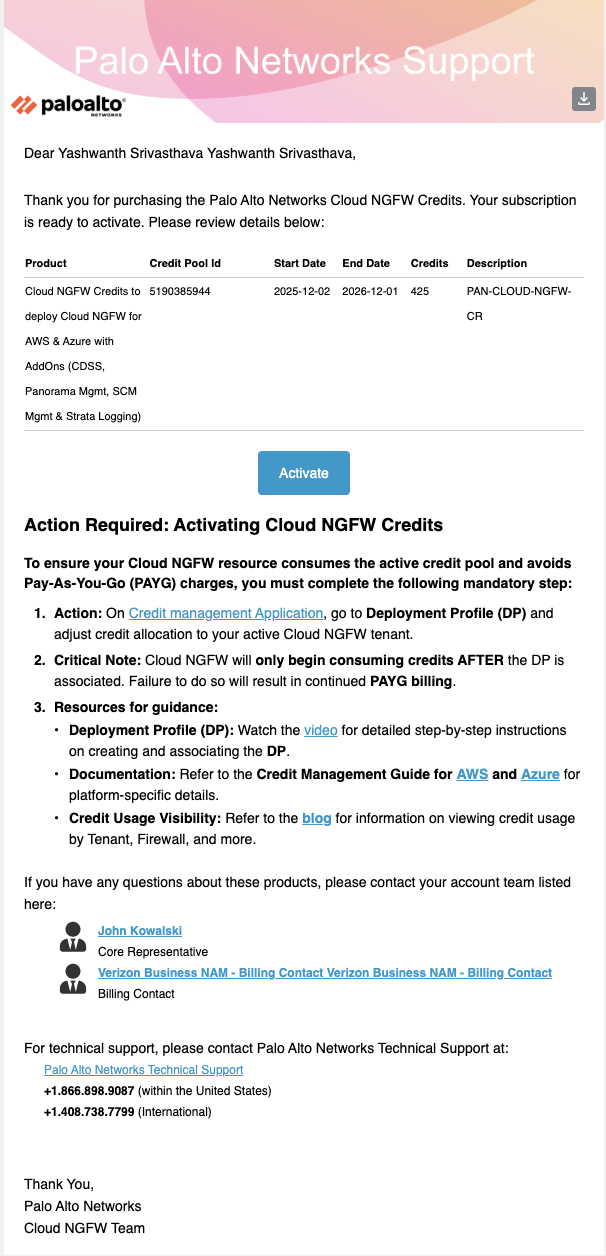
- In the email, click Activate.
![]() After clicking Activate, you’re redirected to the CSP. Select the CSP account in which you want to activate the credits.Select Start Activation to start using your credits by depositing them into the CSP and allocating the credits.
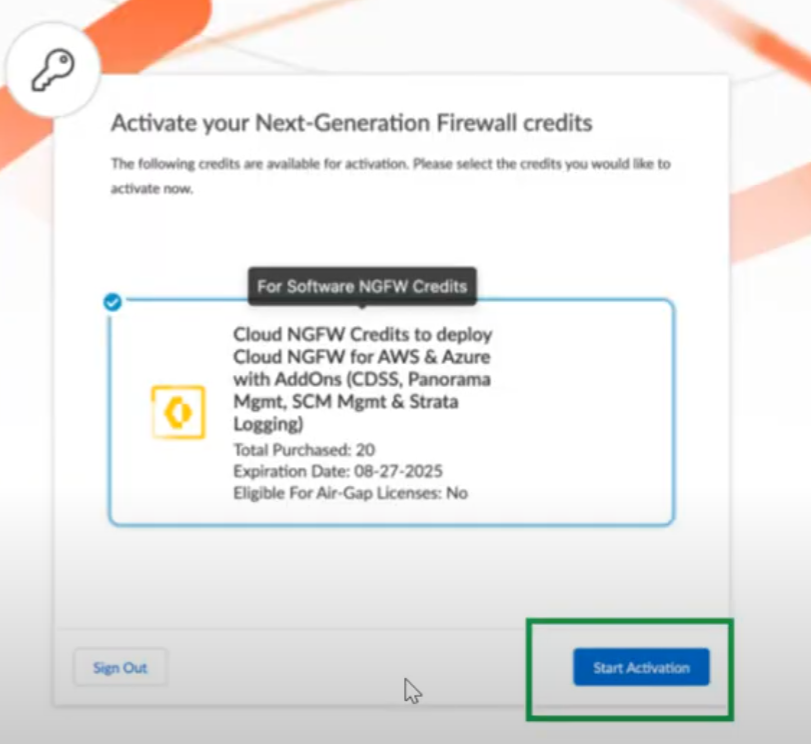
After clicking Activate, you’re redirected to the CSP. Select the CSP account in which you want to activate the credits.Select Start Activation to start using your credits by depositing them into the CSP and allocating the credits.![]() Select the Palo Alto Networks Customer Support portal account (you can search by account number or name) where you want to deposit the credits and clickDeposit Credits:
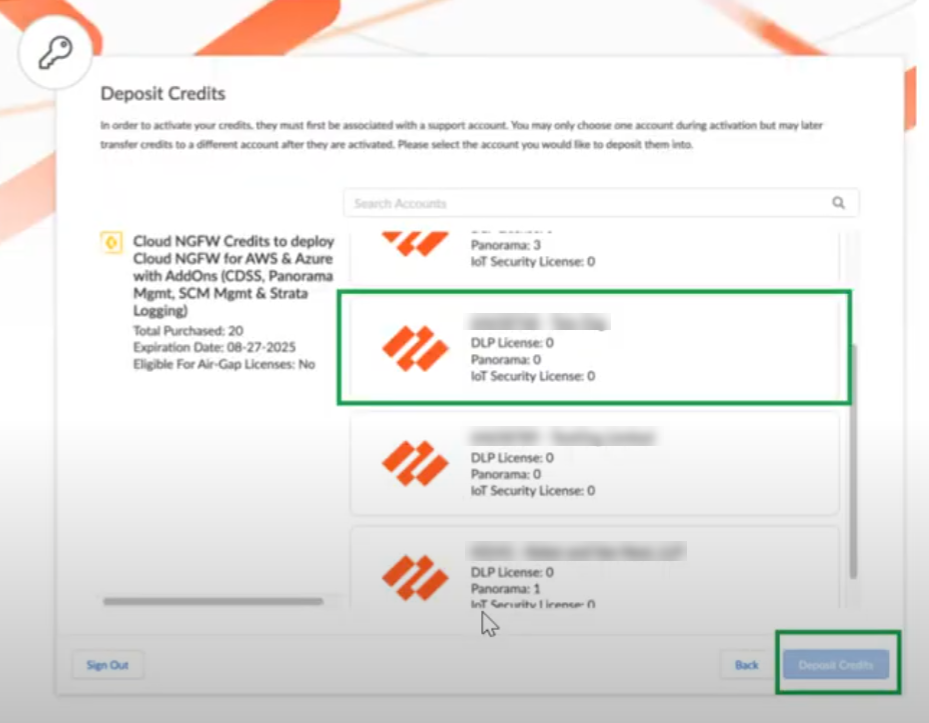
Select the Palo Alto Networks Customer Support portal account (you can search by account number or name) where you want to deposit the credits and clickDeposit Credits:![]() You can view your deposited credits in the customer support portal (CSP):
You can view your deposited credits in the customer support portal (CSP):- In the CSP, within the left navigation panel go to Product, select Software/Cloud NGFW Credits.Use the Account Selector to ensure that you're viewing the correct account, then click Cloud NGFW Credits to display the credit pools associated with the account.Click Go to Cloud NGFW Credits to access the Cloud NGFW Credit Management application in the Palo Alto Networks hub.
![]()
Manage Credits
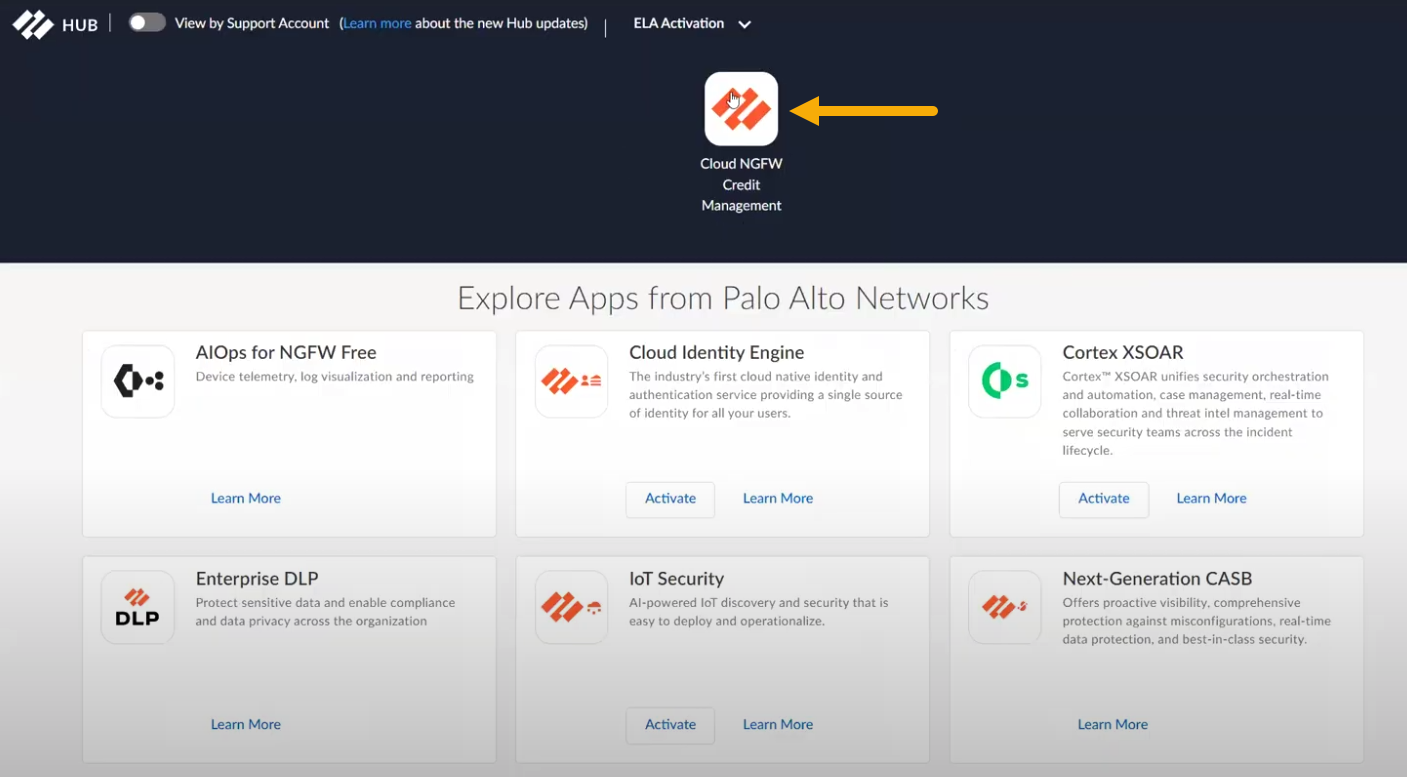
The Cloud NGFW Credit Management Application provides a single location where you can manage your purchased credit pools, create deployment profiles and associate them with your Cloud NGFW tenants.- In the Hub, click Cloud NGFW Credit Management to display the app:
![]() The Cloud NGFW Credit Management application displays the credit pools associated with the CSP account:
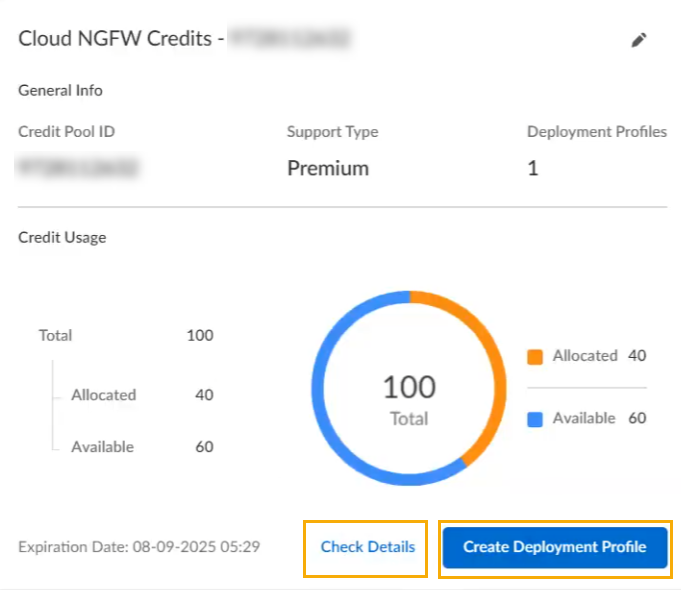
The Cloud NGFW Credit Management application displays the credit pools associated with the CSP account:![]() Each credit pool, displayed as an individual tile, provides two options:
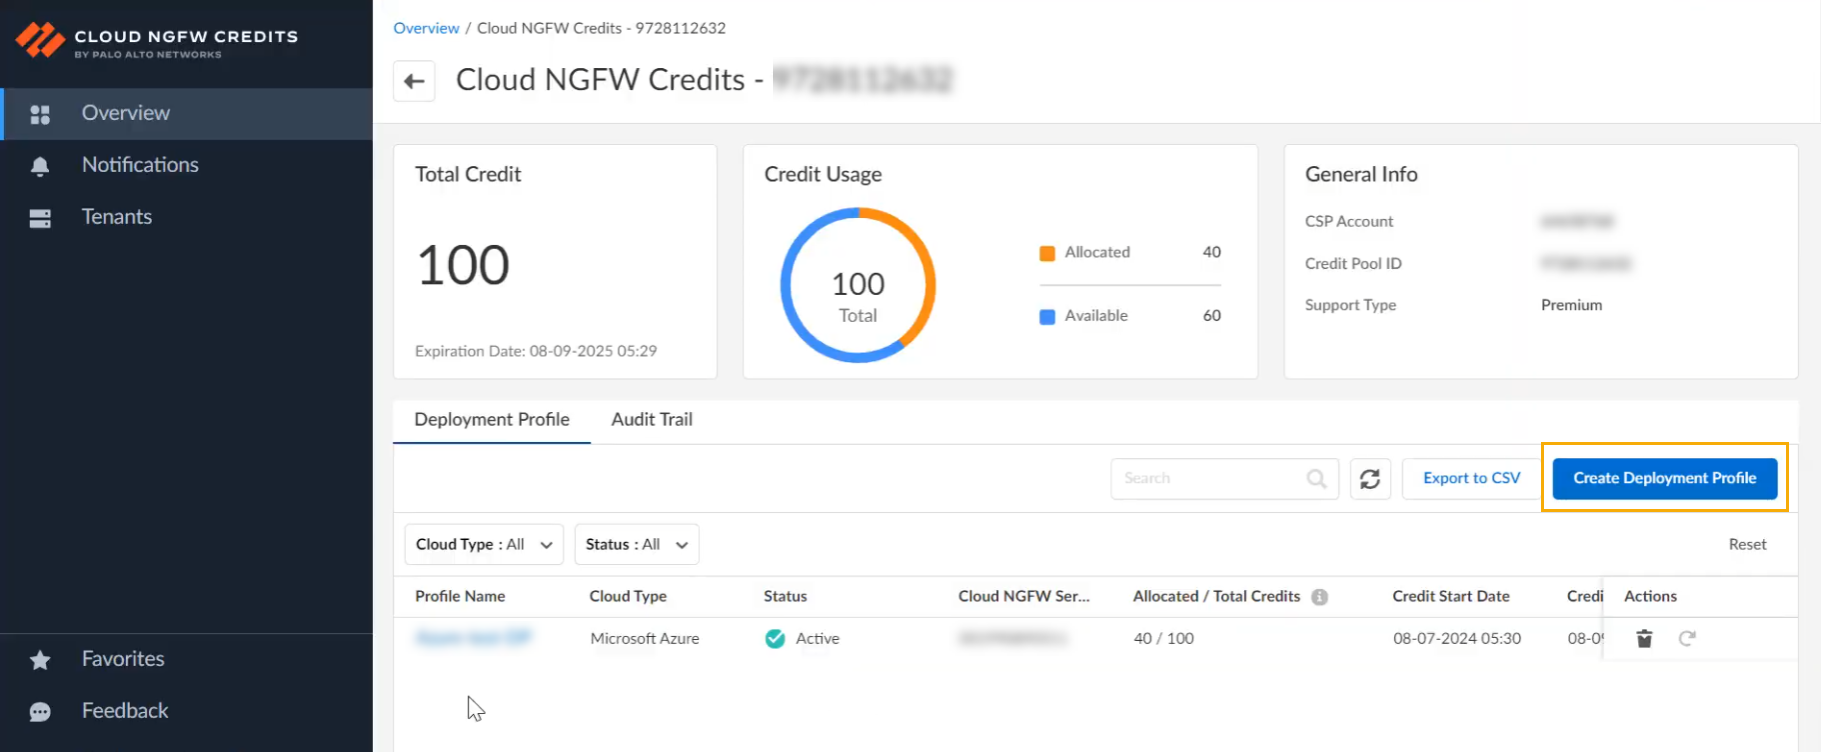
Each credit pool, displayed as an individual tile, provides two options:- Check Details. Use this option to
display information about the credit pool. If a deployment
profile already exists, it appears in the
Deployment Profile table:
![]()
- Create Deployment Profile. Use this option to create a deployment profile to consume activated credits from the pool.
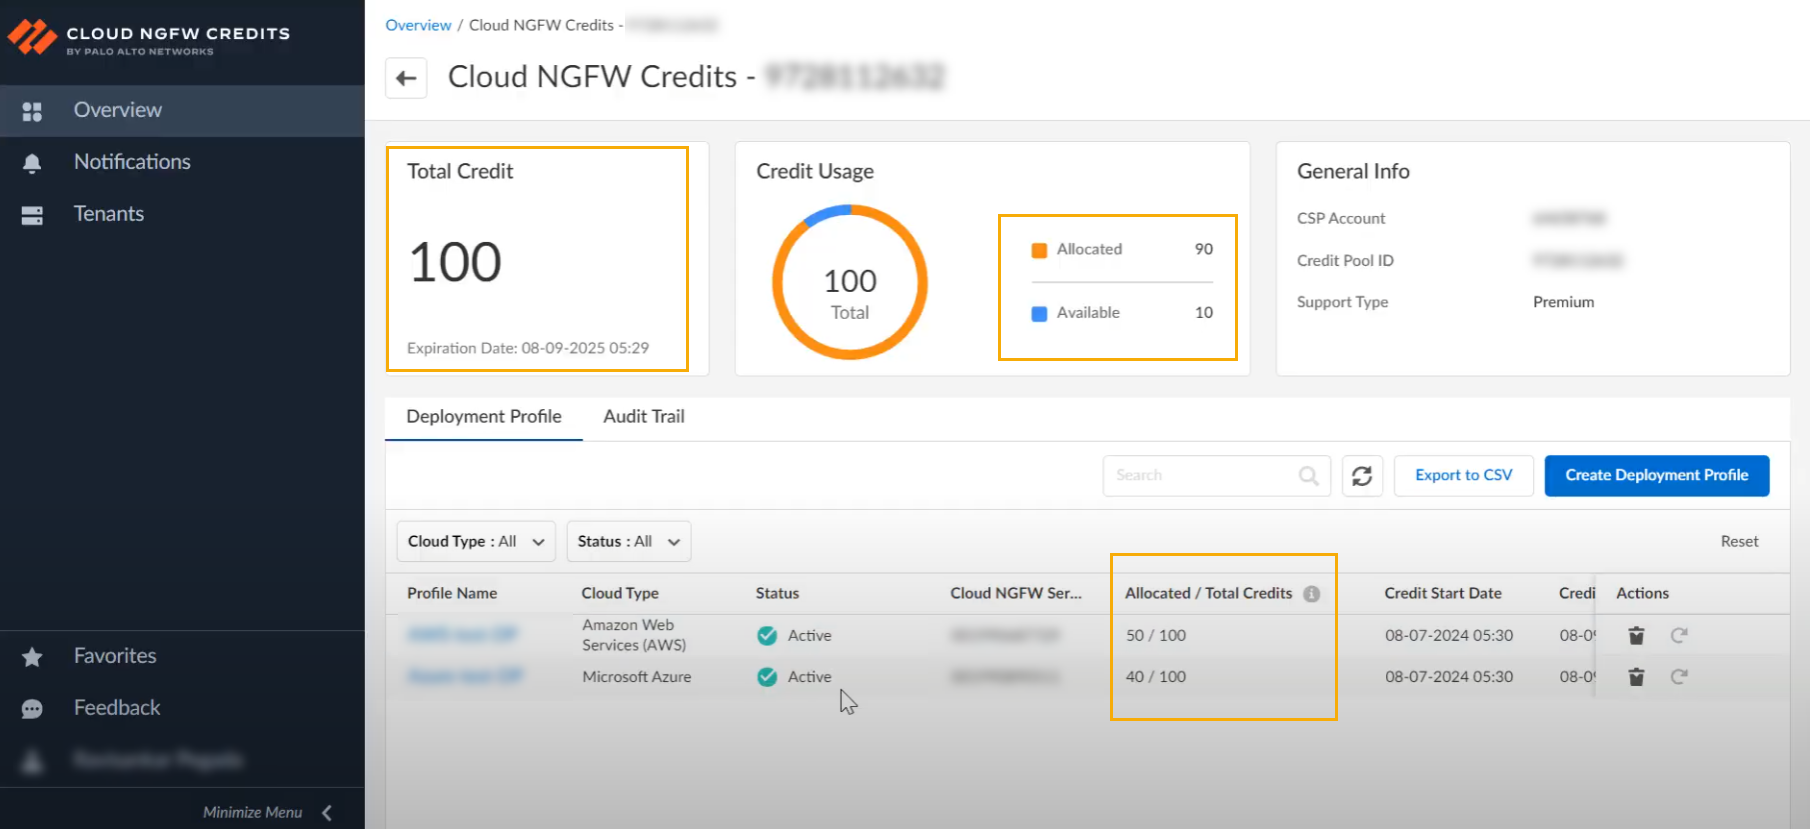
Before you create a deployment profile, estimate the number of firewalls that will use the configuration. You don’t have to deploy all the firewalls at once.Click Create Deployment Profile. In the Create Deployment Profile screen, specify the following information:- In the Name field, use the drop-down menu to select the Credit Pool ID from the list of available options. Enter the corresponding name for the credit pool ID.Select the Cloud Type (either Amazon Web Services or Microsoft Azure).Use the drop-down menu to select the Cloud NGFW Serial Number.If you don’t see a Cloud NGFW Serial number in the drop-down, ensure that you're subscribed to the Cloud NGFW service, and that the tenant isn’t associated with another CSP account.Specify the Number of Credits you want to allocate from the credit pool; the number of available credits from the credit pool appears.Optionally include a description.Click Save.After you have successfully created the deployment profile, the CNGFW Credits page displays the newly created profile along with the number of allocated credits:
![]()
Manage Deployment Profiles
After you create your deployment profile you can edit (add or remove allocated credits), delete it, or view an audit trail. Before modifying your deployment profile, ensure that you understand the following terms—consumption and allocation in the context of Software NGFW credits:- Consumption—the number for Software NGFW credits used by a deployment profile to license deployed firewalls and subscriptions.
- Allocation—the total number of Software NGFW credits assigned to a particular deployment profile.
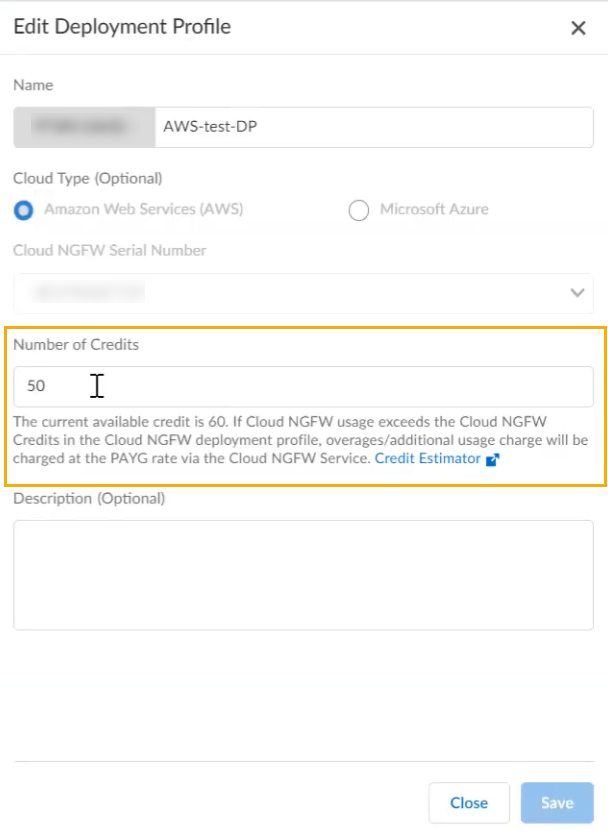
Edit a Deployment ProfileTo edit an existing deployment profile:- In the Cloud NGFW Credits page, select the deployment profile you want to edit.In the Edit Deployment Profile screen, change the Number of Credits.
![]() The number of available credits appears below the Number of Credits field.After changing the number of credits, click Save.
The number of available credits appears below the Number of Credits field.After changing the number of credits, click Save.View an Audit Trail
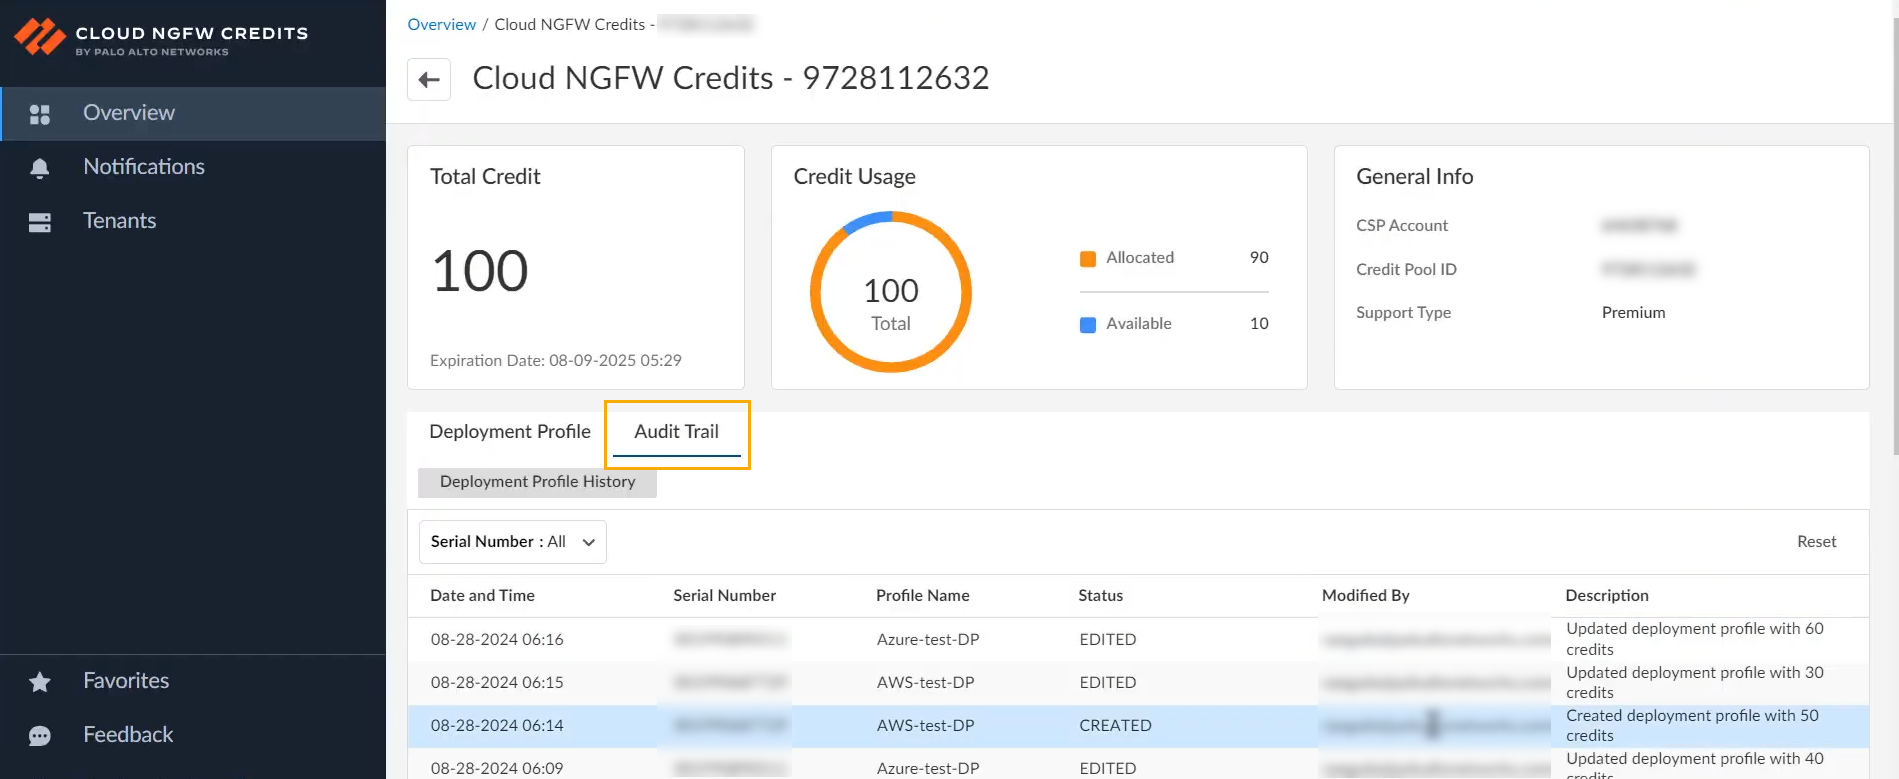
The Cloud NGFW Credit Management application provides an audit trail that allows you to track changes made to a deployment profile. This information includes:- Date and time when the deployment profile was modified.
- The serial number associated with the deployment profile.
- The profile name.
- The status, for example, edited.
- Modified by indicates the user who edited the deployment profile.
- The description describes the nature of the change.
![]() To view an audit trail, in the Cloud NGFW Credits page, click Audit Trail.
To view an audit trail, in the Cloud NGFW Credits page, click Audit Trail.
- Check Details. Use this option to
display information about the credit pool. If a deployment
profile already exists, it appears in the
Deployment Profile table:

