Replace an M-200 or M-600 Appliance Log Drive
Table of Contents
Replace an M-200 or M-600 Appliance Log Drive
Learn how to replace a log drive on an M-200 or M-600
appliance.
The M-200 and M-600 appliance log drives are located
on the front of the appliance. Each drive pair (A1 and A2 for example) is
in an independent RAID 1 array. This redundant configuration helps
ensure that there is no service interruption or loss of log data
if a disk drive fails.
When requesting a replacement log drive
from Palo Alto Networks® or an authorized reseller, you will receive
two new drives. The second drive is required if the failed drive
is a different model than the replacement drive. In this case, replace
both drives in the RAID 1 array that contains the failed drive so
both drives in the array are the same model.
Do
not attempt to replace an M-200 or M-600 log drive with a third-party
drive. Also, do not mix drive models within a RAID 1 array—the drive
model must be the same for both drives in a RAID 1 array. You can,
however, mix drive models in different RAID 1 arrays. For example,
the drives in the A1/A2 array can both be model ST91000640NS and
the drives in the B1/B2 array can both be model ST1000NX0423.
The
following procedure describes how to replace a log drive on an M-200
or M-600 appliance that is in Panorama™ mode or Panorama log collector
mode. This procedure does not apply to an appliance in PAN-DB mode
(M-600 only) or Panorama Management-only mode because the
front log drives are not used for these modes.
- Identify the failed drive and record the drive
model number by running the following operational command and viewing
the status and model fields:
admin@hostname> show system raid detailFor example, the following output shows that disk drive A2 failed and the drive model is ST8000NM0055-1RM.Disk Pair A Available Status clean, degraded Disk id A1 Present model : ST8000NM0055-1RM size : 7630885 MB status : active sync Disk id A2 Present model : ST8000NM0055-1RM size : 7630885 MB status : failed- Remove the failed drive from the RAID 1 array. In this example, run the following command to remove drive A2 from the array:
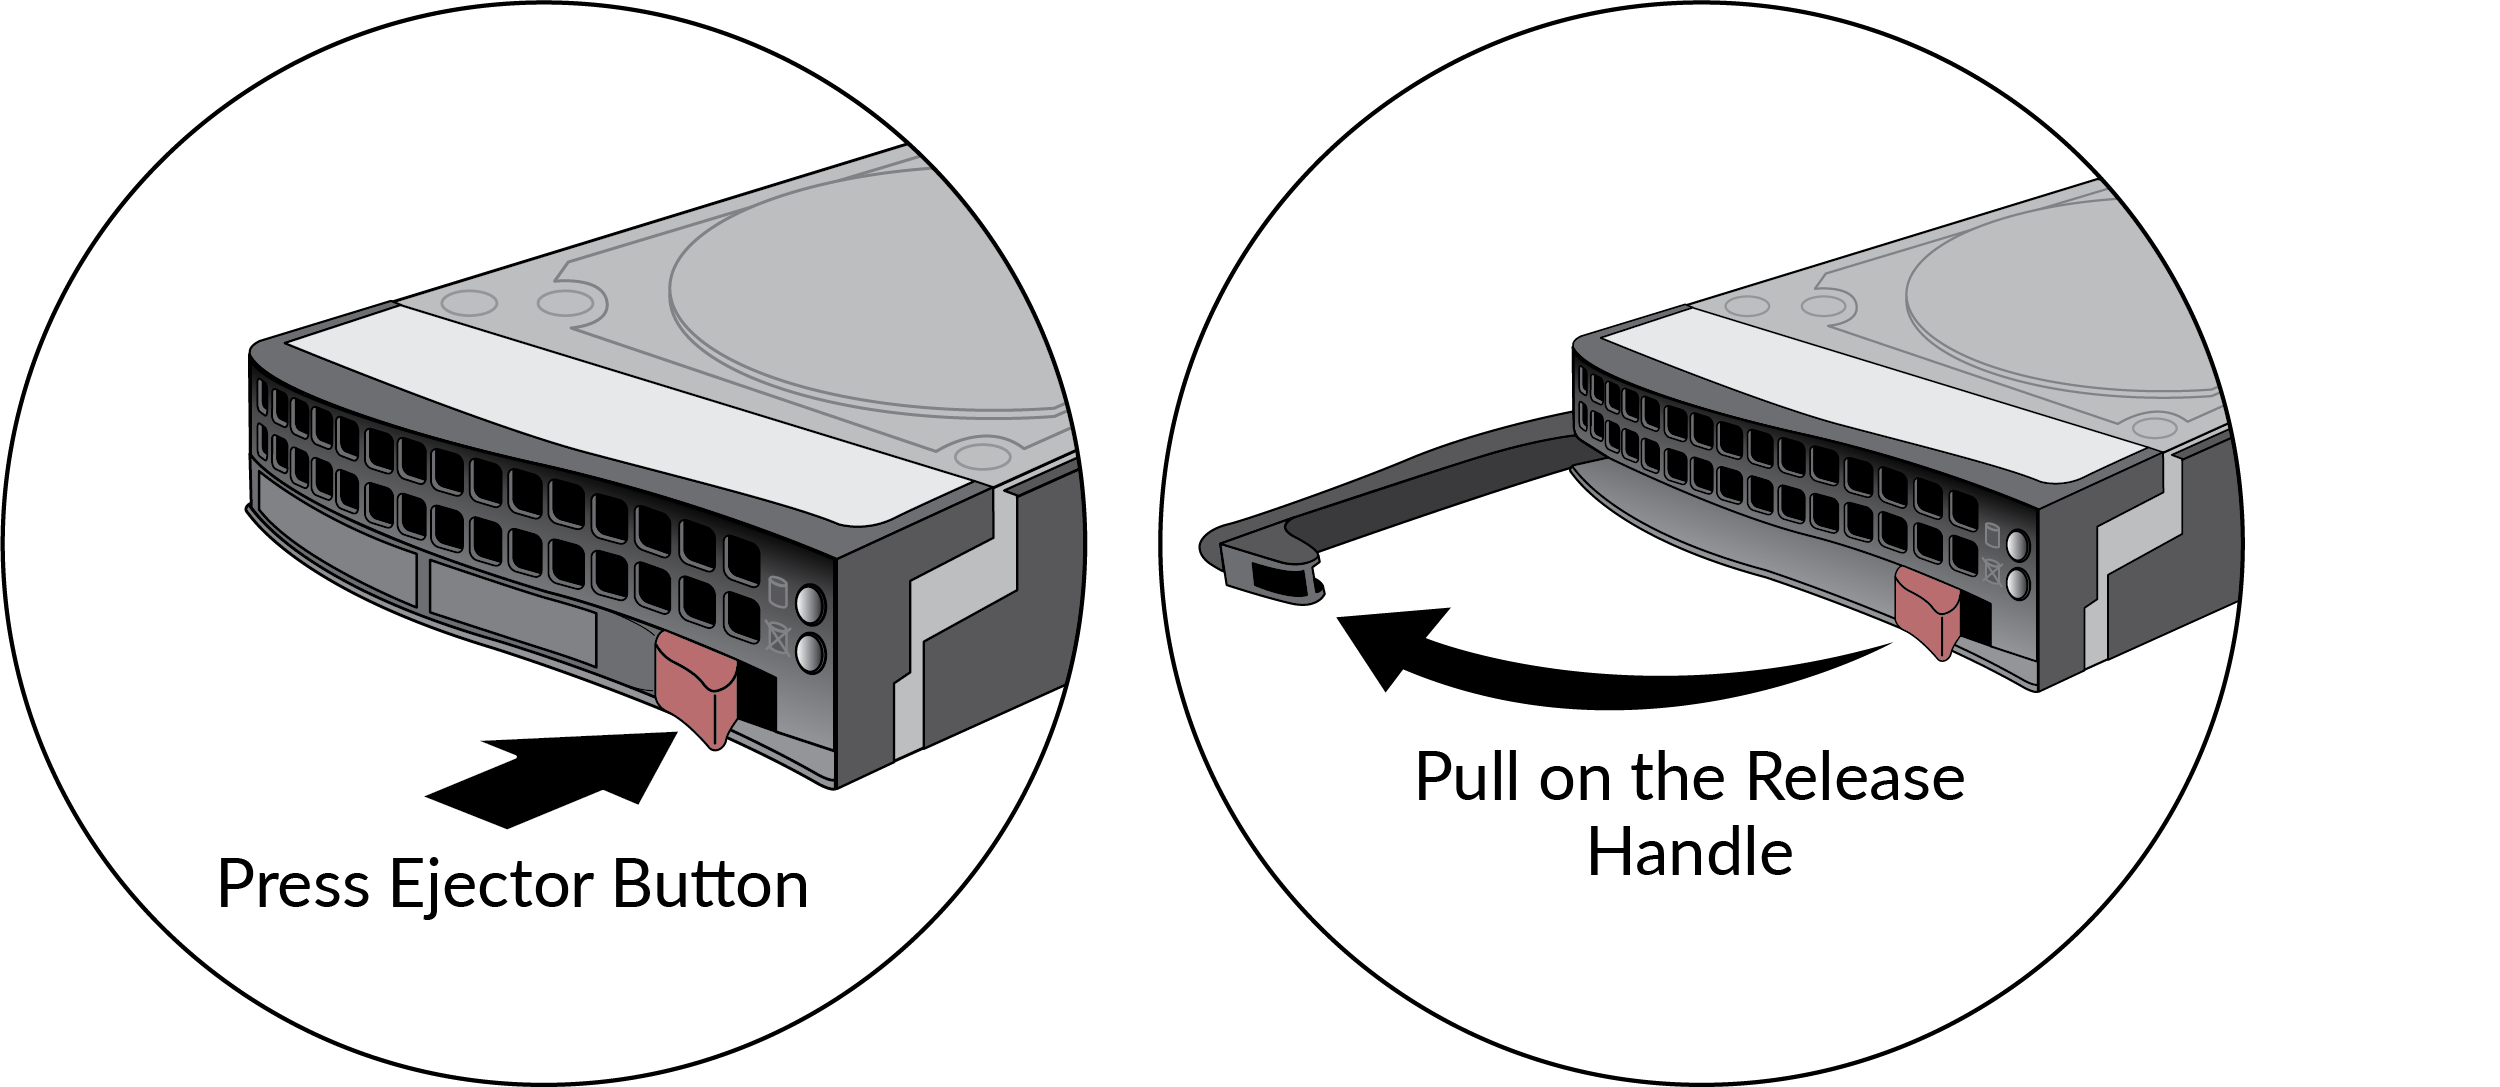
admin@hostname> request system raid remove A2- Press the ejector button on the carrier of the failed drive (A2 in this example) to release the carrier handle and gently pull the handle toward you and slide the carrier out of the appliance.
![]()
- Remove the replacement drive from the packaging and compare the drive model written on the label with the drive model of the failed drive. Proceed as follows based on your findings:
- If the replacement drive is the same model number of the failed drive that you removed, then continue to Step 5.
- If the replacement drive is a different model number than the drive that you removed, then continue to Step 6.
- (Same model replacement drive only) Install a replacement disk drive that is the same model as the other drive in the RAID 1 array.
- Ensure that the drive carrier lever on the replacement drive is in the open position; if it is not, press the ejector button on the drive carrier to release the lever and pull it out until it is fully open.
- Slide the drive carrier in to the drive bay on the appliance until it is about 1/4” from being fully inserted. You can do this by pressing the ejector button on the carrier, which will cause the lever to close part way. When the drive carrier is almost fully inserted, close the lever to seat the drive.
- Add the replacement drive to the RAID 1 array. In this
example, run the following command to add drive A2 to the array:
admin@hostname> request system raid add A2The system automatically configures the new drive to mirror contents of the other drive in that RAID 1 array. - Continue to view RAID status by periodically re-entering
the following command until you see that the disk pair (Disk Pair
A in this example) shows Available and
both drives show the status active sync.
admin@hostname> show system raid detailThe following output shows that the RAID 1 array is functioning properly:Disk Pair A Available Status cleanDisk id A1 Present model : ST8000NM0055-1RM size : 7630885 MB status : active sync Disk id A2 Present model : ST8000NM0055-1RM size : 7630885 MB status : active sync- (Different model replacement drive only) Install a replacement disk drive that is a different model than the other (still functioning) drive in the RAID 1 array:
When you initiate the copy command as described in the following steps, logging and log query will not be available on the disk pair until the copy is complete and the disk pair shows Available. If the other drive pairs (B1/B2, C1/C2, and so on) are low on disk space during the copy process, older logs are deleted to make room for new logs.- Ensure that the drive carrier lever on the replacement drive is in the open position; if it is not, press the ejector button on the drive carrier to release the lever and pull it out until it is fully open.
- Slide the drive carrier in to the drive bay on the appliance until it is about 1/4” from being fully inserted. You can do this by pressing the ejector button on the carrier, which will cause the lever to close part way. When the drive carrier is almost fully inserted, close the lever to seat the drive.
- Copy the data from the existing drive in the RAID 1
array to the replacement drive. In this example, run the following command
to copy the data from drive A1 to drive A2:
admin@hostname> request system raid copy from A1 to A2 - Continue to view RAID status by periodically re-entering
the following command until you see that the disk pair (A in this
example) shows Available
admin@hostname> show system raid detailIn this example, the output shows that Disk Pair A is Available.At this point, drive A1 will show not in use because there is a drive model mismatch. - Install the second replacement drive. In this example, physically remove the drive from bay A1, install it in the carrier, and then install the second replacement drive in to bay A1—one that is the same model as the new drive you installed in bay A2.
- Add the second replacement drive to the RAID 1 array.
In this example, run the following command to add drive A1 to the array:
admin@hostname> request system raid add A1The system will automatically configure the new drive to mirror the contents of the other drive (A2 in this example) in that RAID 1 array. - Continue to view RAID status by periodically re-entering
the following command until you see that the disk pair (A in this
example) shows Available and both drives
show the status active sync.
admin@hostname> show system raid detailThe following output shows that the RAID 1 array is functioning properly:Disk Pair A Available Status clean Disk id A1 Present model : ST8000NM0055-1RM size : 7630885 MB status : active sync Disk id A2 Present model : ST8000NM0055-1RM size : 7630885 MB status : active sync
- (Different model replacement drive only) Install a replacement disk drive that is a different model than the other (still functioning) drive in the RAID 1 array:
- Remove the failed drive from the RAID 1 array. In this example, run the following command to remove drive A2 from the array: