Device Security
Add a Network Segment
Table of Contents
Add a Network Segment
Add a network segment to Device Security by manually configuring one. Use the configured
network segment to manage overlapping IP addresses.
| Where Can I Use This? | What Do I Need? |
|---|---|
|
One of the following subscriptions:
|
A network segment helps Device Security identify distinct devices with
overlapping IP addresses. To take advantage of network
segments, create a network segment and then specify which IP block groups in your
network overlap across sites. Device Security automatically detects most
networks
based on observed traffic, but you can also manually add networks.
Only users with an owner or administrator role can create and manage network
segment configurations.
Strata Cloud Manager
Add a network segment to Device Security in Strata Cloud Manager by manually
configuring one. Use the configured network segment to manage overlapping IP addresses.
Create a Network Segment
Create a Network Segment
- Navigate to .Add a network segment.This brings up the Add Network Segment dialog box.Enter the network segment configuration details.
- Name: Enter a name for the network segment.
- Optional Description: Enter a brief description for the network segment.
- Firewall: Select the firewalls that you want to assign to the network segment. You can search by a firewall's serial number and name, or use the drop-down selector. The drop-down selector shows if firewalls are assigned to a network segment or not. If you select an already assigned firewall, it will be removed from its existing segment after saving the configuration. A network segment must have at least one firewall assigned to it.
- Optional Assigned to site: Select or create the site that the network segment is assigned to. If you don't choose a site, the network segment is assigned to the default site. You can only assign a network segment to one site.
![]()
Add the network segment.Verify that the net network segment appears in the Segments table, with the correct firewalls and site.Create a Network Shared Block
Create a Network Shared Block- Navigate to .Optional If the shared IP block group doesn't appear in the Networks table, add the subnet or IP address block.Convert the shared IP block group from a Subnet or Block to a Shared Block.
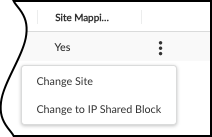
- In the Networks table, find the Subnet or Block that is reused across multiple sites.Click the three vertical dots at the far right of the subnet or block row and select Change to IP Shared Block.
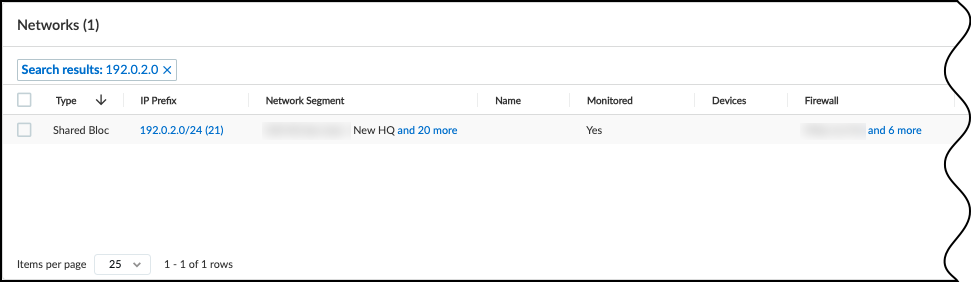
![]() After the Networks table refreshes, find the IP Prefix that you changed, and verify that the Type is Shared Block.
After the Networks table refreshes, find the IP Prefix that you changed, and verify that the Type is Shared Block.![]() Verify that the shared block only has segment types, and that there is a segment for all configured network segments.
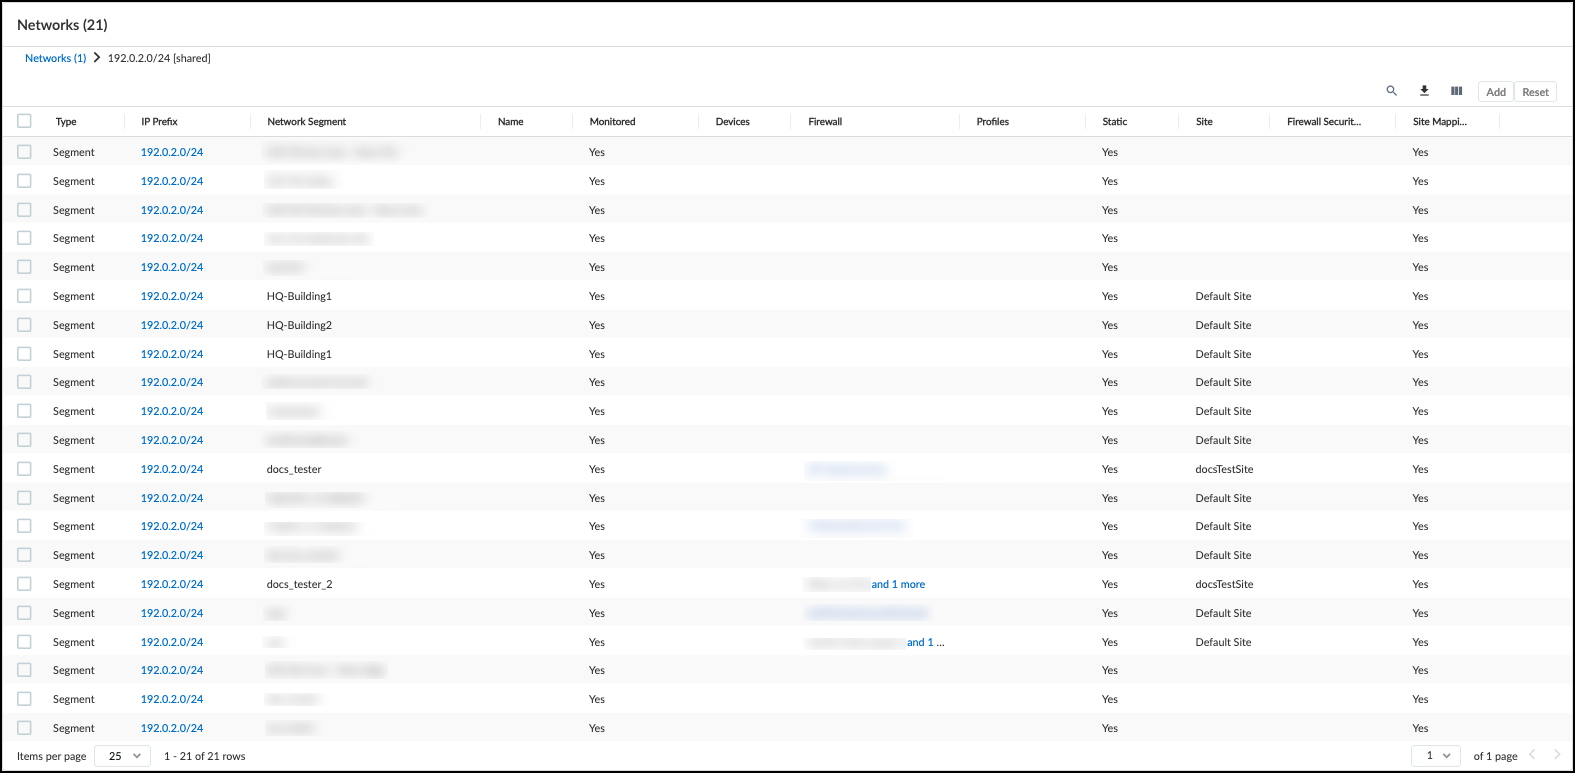
Verify that the shared block only has segment types, and that there is a segment for all configured network segments.- Check that the shared block consists of segments.Click the IP Prefix field for the shared block. This updates the Networks table to show the shared IP prefix. For all the rows, the Type should be Segment.Check that the shared block segment information matches your network segment.Verify that there is a segment row with a Network Segment attribute that matches the name of each of the network segments in the Segments table under . The Site attribute should match the site that each network segment is assigned to.
![]()
Verify the Network Segment Configuration
Verify the Network Segment Configuration- Verify the network segment.
- Navigate to .Verify that your network segment appears in the Segments table, with the correct firewalls and sites.Verify the shared block and the network segment mapping.
- Navigate to .In the Networks table, find the shared block that you configured earlier, and select the IP Prefix field.In the updated Networks table for the shared block, verify that there is a row where the Network Segment attribute is the name of the network segment that you created earlier.For the same row, verify that the Site attribute is the name of the site that your network segment is assigned to.Optional Verify that the shared block and the network segment belong to the correct site.
- Navigate to .Find the site the network segment belongs to, click the three vertical dots at the far right of the site's row, and select Edit Site.In the Edit Site dialog box that appears, verify that the following appears in the respective fields.
- IP Prefix (Optional): The IP prefix of the shared block that you created.
- Network Segment (Optional): The name of the network segment that you created.
Verify that distinct devices and device attributes are assigned correctly in the devices inventory table.Information in the devices inventory table may take time to populate. Device Security needs to see enough traffic from the network segments to identify devices and device attributes.- Navigate to .In the Inventory table, select the Columns icon (three vertical bars) to open the column fields pop-up.Select the following column options.
- IP Address under the Basic category.
- Network Segments under the Network category.
- Firewall under the Traffic category.
Return to the Inventory table and verify that devices with overlapping IP addresses have the correct network segment attribute, and the firewall matches one of the firewalls assigned to the corresponding network segment.
(Legacy) IoT Security
Add a network segment to Device Security by manually configuring one. Use the configured network segment to manage overlapping IP addresses.Create a Network Segment
Create a Network Segment- Navigate to .Add a network segment.This brings up the Add Network Segment dialog box.Enter the network segment configuration details.
- Name: Enter a name for the network segment.
- Optional Description: Enter a brief description for the network segment.
- Firewall: Select the firewalls that you want to assign to the network segment. You can search by a firewall's serial number and name, or use the drop-down selector. The drop-down selector shows if firewalls are assigned to a network segment or not. If you select an already assigned firewall, it will be removed from its existing segment after saving the configuration. A network segment must have at least one firewall assigned to it.
- Optional Assigned to site: Select or create the site that the network segment is assigned to. If you don't choose a site, the network segment is assigned to the default site. You can only assign a network segment to one site.
![]()
Add the network segment.Verify that the net network segment appears in the Segments table, with the correct firewalls and site.Create a Network Shared Block
Create a Network Shared Block- Navigate to .Optional If the shared IP block group doesn't appear in the Networks table, add the subnet or IP address block.Convert the shared IP block group from a Subnet or Block to a Shared Block.
- In the Networks table, find the Subnet or Block that is reused across multiple sites.Click the three vertical dots at the far right of the subnet or block row and select Change to IP Shared Block.
![]() After the Networks table refreshes, find the IP Prefix that you changed, and verify that the Type is Shared Block.
After the Networks table refreshes, find the IP Prefix that you changed, and verify that the Type is Shared Block.![]() Verify that the shared block only has segment types, and that there is a segment for all configured network segments.
Verify that the shared block only has segment types, and that there is a segment for all configured network segments.- Check that the shared block consists of segments.Click the IP Prefix field for the shared block. This updates the Networks table to show the shared IP prefix. For all the rows, the Type should be Segment.Check that the shared block segment information matches your network segment.Verify that there is a segment row with a Network Segment attribute that matches the name of each of the network segments in the Segments table under . The Site attribute should match the site that each network segment is assigned to.
![]()
Verify the Network Segment Configuration
Verify the Network Segment Configuration- Verify the network segment.
- Navigate to .Verify that your network segment appears in the Segments table, with the correct firewalls and sites.Verify the shared block and the network segment mapping.
- Navigate to .In the Networks table, find the shared block that you configured earlier, and select the IP Prefix field.In the updated Networks table for the shared block, verify that there is a row where the Network Segment attribute is the name of the network segment that you created earlier.For the same row, verify that the Site attribute is the name of the site that your network segment is assigned to.Optional Verify that the shared block and the network segment belong to the correct site.
- Navigate to .Find the site the network segment belongs to, click the three vertical dots at the far right of the site's row, and select Edit Site.In the Edit Site dialog box that appears, verify that the following appears in the respective fields.
- IP Prefix (Optional): The IP prefix of the shared block that you created.
- Network Segment (Optional): The name of the network segment that you created.
Verify that distinct devices and device attributes are assigned correctly in the devices inventory table.Information in the devices inventory table may take time to populate. Device Security needs to see enough traffic from the network segments to identify devices and device attributes.- Navigate to .In the Inventory table, select the Columns icon (three vertical bars) to open the column fields pop-up.Select the following column options.
- IP Address under the Basic category.
- Network Segments under the Network category.
- Firewall under the Traffic category.
Return to the Inventory table and verify that devices with overlapping IP addresses have the correct network segment attribute, and the firewall matches one of the firewalls assigned to the corresponding network segment.