IoT Security
Use Network Discovery Polling to Discover Devices
Table of Contents
Use Network Discovery Polling to Discover Devices
Use the Network Discovery plugin for next-generation firewalls to poll
for network devices using various protocols.
| Where Can I Use This? | What Do I Need? |
|---|---|
|
|
To help IoT Security discover and learn about assets, next-generation
firewalls can poll devices using select protocols, without needing any additional
sensors or hardware. Depending on the network deployment, next-generation firewalls
with IoT Security may not see all device traffic, or they may not see enough
traffic to confidently identify some devices. IoT Security uses polling to
learn about these devices that it may not be able to discover through normal network
Traffic logs. This provides greater visibility of your asset inventory and helps
discover potential vulnerabilities in the wider network.
Next-generation firewalls can poll devices using native commands within the
protocols below. Make sure your firewall can reach the devices you want to poll
using the relevant network services.
- BACnet: UDP port 47808
- CIP: TCP port 44818, UDP port 44818
- CodeSysV3: UDP port 1740
- FANUC Focas: TCP port 8193
- IEC 61850 MMS: TCP port 102
- Mitsubishi MELSEOFT TCP: TCP port 5562
- Modbus: TCP port 502
- Omron FINS: UDP port 9600
- Profinet I/O CM: UDP port 34964
- Siemens-S7: TCP port 102
- Siemens-S7-Comm-Plus: TCP port 102
- SNMP v2/v3: UDP port 161
- UMAS Modbus: TCP port 502
- UPnP: UDP port 1900
- WinRM: TCP port 5985
The firewall converts the polling data to Enhanced Application logs (EAL) and sends
them to the Strata Logging Service, and then the
Strata Logging Service streams the logs to IoT Security for analysis.
With advanced configuration mode, you can specify the ports for each protocol, the
timeout period, and the schedule for polling to minimize the impact of polling on
your operations.
For PAN-OS 11.1, polling is available to next-generation firewalls as part of the
free Network Discovery plugin and does not require an add-on license.
Devices and attributes learned through the plugin have “Device Polling” and the
protocol name as the source. Alternatively, IoT Security provides
device attributes by polling
through Cortex XSOAR as part of the IoT Security Third-party
Integrations add-on license, which must be purchased.
The following devices don't support the Network Discovery plugin:
- PA-410
- PA-410R
- PA-410R-5G
- PA-415
- PA-415-5G
Configure Polling with the Network Discovery Plugin
To configure polling with the Network Discovery plugin, you need
to have a next-generation firewall with an associated IoT Security
license. From the management interface of your NGFW, download the
Network Discovery plugin version 2.0.1 or later following the
steps at Install Panorama Plugins.
Plugin management is not supported in Strata Cloud Manager.
If you have an existing installation of the Network Discovery
plugin, you need to uninstall the plugin before installing version 2.0.1.
Make note of your existing configurations before uninstalling the plugin,
and reconfigure any existing features after installing the new plugin
version.
The following instructions are for the Network Discovery plugin
configuration using the PAN-OS web interface on an individual
next-generation firewall. To configure the plugin on Panorama, use
templates and template stacks and
template stack variables
for the IP addresses of the address groups, discovery scope, and ports and
interfaces as needed.
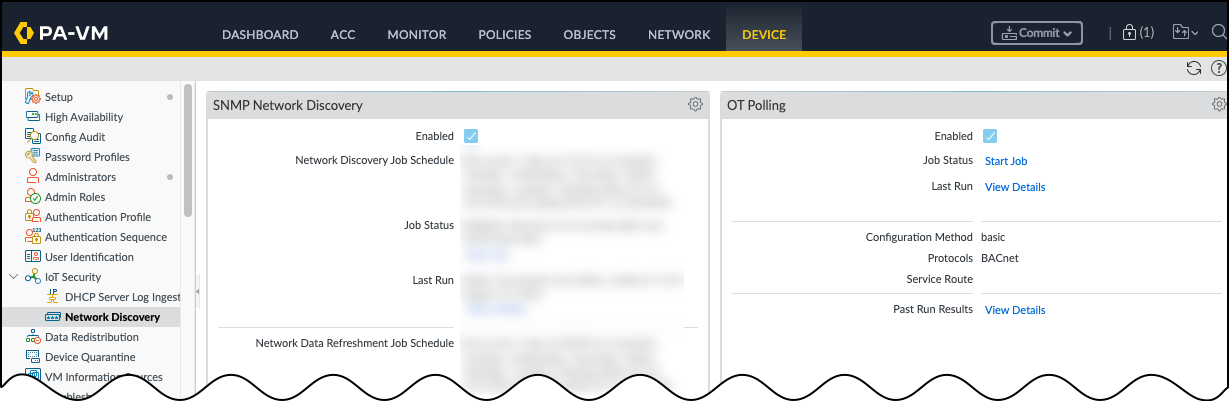
- Open the OT Polling settings for the Network Discovery plugin.Select . In the OT Polling section, click Edit (gear icon).The OT Polling Settings dialog box appears with the Schedule Settings tab active. Select Enable OT Polling to configure polling.
![]() Schedule how often the firewall runs a job to poll for devices.In the Schedule Settings tab, you can define how frequently to poll for devices. Specify which days of the week the job should run, and whether you only want to poll within a particular date range. The polling schedule uses the firewall's time zone for the start and end dates and times.
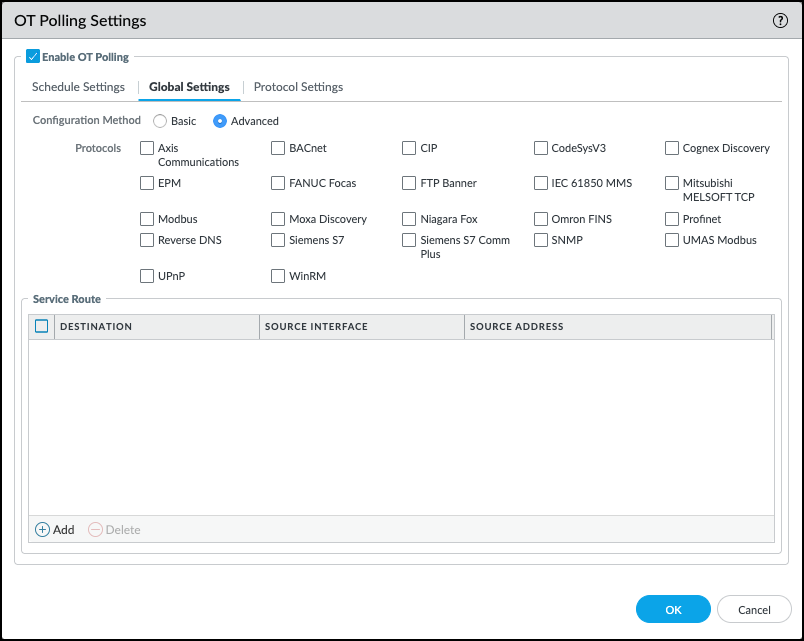
Schedule how often the firewall runs a job to poll for devices.In the Schedule Settings tab, you can define how frequently to poll for devices. Specify which days of the week the job should run, and whether you only want to poll within a particular date range. The polling schedule uses the firewall's time zone for the start and end dates and times.![]() Configure the Global Settings for OT Polling.Click the Global Settings tab. Choose your configuration method and which protocols you want to poll. If you're using a different interface than the management interface, also configure any service routes you want to use.
Configure the Global Settings for OT Polling.Click the Global Settings tab. Choose your configuration method and which protocols you want to poll. If you're using a different interface than the management interface, also configure any service routes you want to use.- Configuration Method: Choose a configuration method. The configuration method affects what fields are configurable in the Protocol Settings tab, and it affects all protocols used for polling.Basic: The Default Port and the Default Timeout fields for the selected protocols are preconfigured. The default ports are fixed, but you can modify the timeout when using the basic configuration method. The IP scope for polling is the same for all protocols.Advanced: Specify the Default Port and Default Timeout fields. We suggest a port for each protocol, as well as the accepted range of values for ports and timeout values. You can configure different IP scopes for each protocol.
- Protocol: Choose the protocol you want to use for device polling. You must select at least one protocol.
- Optional Service Route: Add any service routes you want to use. By default, the management interface is used.
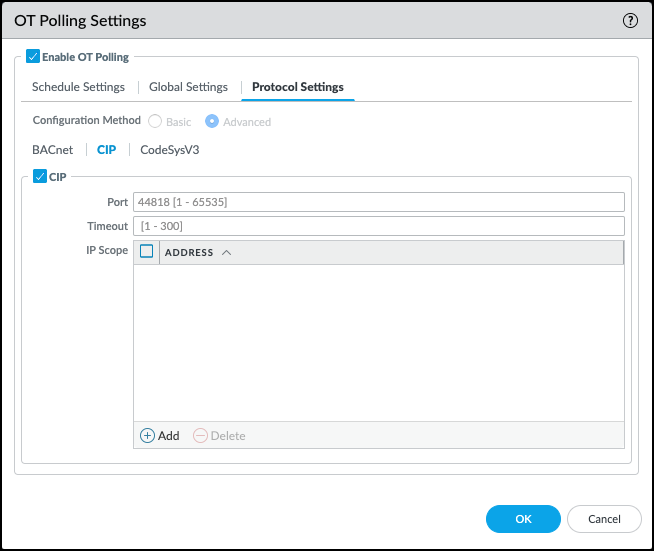
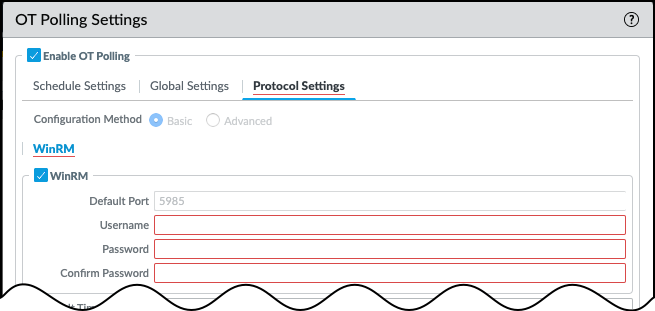
![]() Configure each protocol that you selected for polling.Click the Protocol Settings tab and configure each protocol that you selected.
Configure each protocol that you selected for polling.Click the Protocol Settings tab and configure each protocol that you selected.- Default Port: If you're using the advanced configuration method, enter the port that you want to use for each protocol. If you're using the basic configuration method, you can't change the default port.
- Default Timeout: Enter a default timeout for polling. If you're using the basic configuration method, the default time is preset to 4 seconds. You can enter a timeout value of 1-300 seconds.
- Default IP Scope: Add a default IP scope for polling. You can specify individual IP addresses, multiple IP addresses, or address groups. If you're using the advanced configuration method, you can specify different IP scopes for each protocol.If you specify an IP range or a subnet, the firewall polls every IP address. This can be inefficient and create a lot of unwanted traffic. Network Discovery limits polling to 1,500 IP addresses to manage the amount of traffic introduced and limit the load on the firewall.
![]()
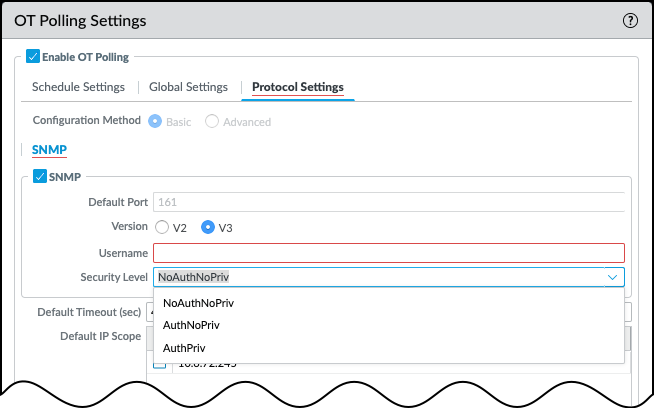
- Optional SNMP: When polling with SNMP, choose either SNMP v2 or SNMP v3.When polling with SNMP v2, enter an SNMP community string that matches the one on the devices to be polled.When polling on SNMP v3, enter a username, and choose a security level (NoAuthNoPriv, AuthNoPriv, or AuthPriv). Depending on the security level you select, you may also need to configure authentication and privacy protocols and passwords.
![]()
- Optional WinRM: When polling with WinRM, enter a WinRM username and password, and confirm the password.
![]()
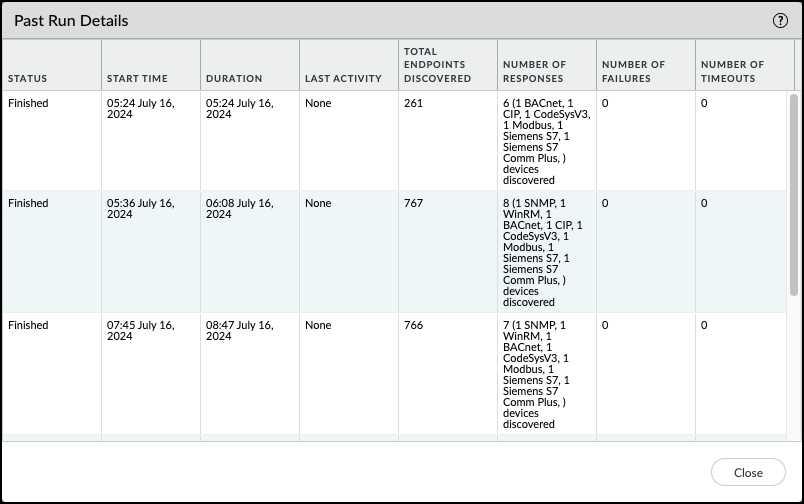
Click OK to save the configured OT Polling settings and close the OT Polling Settings dialog box.Click Start Job in the OT Polling section to start the polling job.Even if you defined a polling schedule, you need to start the job after updating the configuration for changes to take effect.Optional Review the details of the previous polling jobs by clicking View Details for either the Last Run or the Past Run Results.![]()