Device Security
Set up ServiceNow for Integration
Table of Contents
Set up ServiceNow for Integration
Set up ServiceNow for integration with Device Security through
Device Security.
| Where Can I Use This? | What Do I Need? |
|---|---|
|
One of the following subscriptions:
One of the following Cortex XSOAR setups:
|
The following are prerequisites for setting
up ServiceNow for integration with Device Security:
- A configured ServiceNow instance with administrative access
- A ServiceNow user account that XSOAR will use to form a secure connection with the ServiceNow instance and send it device attributes, security alerts, and vulnerabilities
- Your ServiceNow URL
When configuring the
ServiceNow instance on XSOAR, you need to enter the
username and password of the ServiceNow user account and the ServiceNow
URL.
On your ServiceNow instance, you must set up one or two tables, depending
on which method you use to map device attributes from Device Security to
ServiceNow.
- If you map device attributes into a ServiceNow table, you need two tables: one to receive device records and another to receive incidents from Device Security. For ServiceNow to receive device records, you can either modify an existing table or create a new one. For ServiceNow to receive security incidents, you must create a new table.
- If you map device types, categories, or profiles from Device Security to ServiceNow classes, then you only need to create a new table to receive security incidents.
ServiceNow configuration instructions are based on Newyork build, 11-04-2020_1502 and
Tokyo build, 12-11-2023_2153.
- Mapping method: Use ServiceNow Classes Add support for the Purdue levels to which OT devices are assigned.If you want to use the ServiceNow IoT Device table as the mapping method, skip this step and proceed to step 2.This mapping method, using ServiceNow classes, focuses on OT devices, and all but one of the OT device attributes that Device Security sends ServiceNow are predefined in the ServiceNow Configuration Item class. The one attribute for OT devices that must be added is for Purdue Level assignments.Because ServiceNow classes use an inheritance system, child classes inherit attributes added to their parent classes. Therefore, when you add PANW Purdue Level as a device attribute to the Configuration Item class, it’s listed as Added there, and it’s listed as Derived in the Hardware class, which is a child class of Configuration Item and inherits all its attributes. The following steps describe how to add the attribute to the Configuration Item class.It’s possible to use the class mapping method to map attributes for other device types such as IoT and IT devices. However, you might need to configure additional attributes for them in ServiceNow and you must modify XSOAR integration jobs for ServiceNow to include a mapping of their device type, category, or profile in Device Security to the appropriate class in ServiceNow. In this configuration step, it’s assumed that you're only interested in having Device Security send ServiceNow OT device attributes.
- Select All at the top of the ServiceNow page, enter ci class in the Filter navigator field, and then select .
- Select and then double-click Insert a new row.
- Enter PANW Purdue Level as the Column label and then click the green check mark.ServiceNow automatically creates u_panw_purdue_level as the entry in the Column name field to indicate it’s a user-defined attribute.
- Leave the other settings at their default values and Save.
Mapping method: Use ServiceNow IoT Device Table Create or edit a ServiceNow table for receiving device records from Device Security.If you're creating a new table, do step 2.1. If you're editing an existing table, go to step 2.2. If you're using ServiceNow classes instead of the IoT device table as the mapping method, skip this step.- To create a table in ServiceNow for receiving device records from Device Security, filter the navigation menu by entering System Definition in the Filter navigator field, click , and then enter the following:Label: Zingbox discovered devicesName: The name field autofills, automatically prepending u_, converting any uppercase characters to lowercase, and converting spaces and dashes to underscores to connect words. It automatically converts Zingbox discovered devices in the Label field to u_zingbox_discovered_devices in the Name field.Zingbox discovered devices is the default label and u_zingbox_discovered_devices is the default name to which Device Security sends device records. If you use any another table with a different label, you must change the ServiceNow Discovered IoT Device Table Name in the two Device Security jobs that send device records to this table: PANW IoT Bulk Export To ServiceNow and PANW IoT ServiceNow Integration. For example, if you enter Device Security discovered devices for the label in ServiceNow, which automatically generates u_iot_security_discovered_devices as the table name, then enter u_iot_security_discovered_devices in the two ServiceNow jobs in Device SecurityExtends table: Your new table must extend the Configuration Item. Search for Configuration Item and choose it from the list.
- Add the following custom column labels to the table so that ServiceNow can receive inventory updates from Device Security and populate these table columns with data:The following are the default column labels. If you use another cmdb device table with different column labels, you must change the corresponding default values in the two Device Security jobs that send data to this table. The column labels are case-sensitive. For example, category is different from Category.categoryprofileiot_tagiot_vendoriot_modeliot_osiot_ssidiot_siteiot_vlaniot_wired_wirelessos_support
![]()
- When done, click Submit.
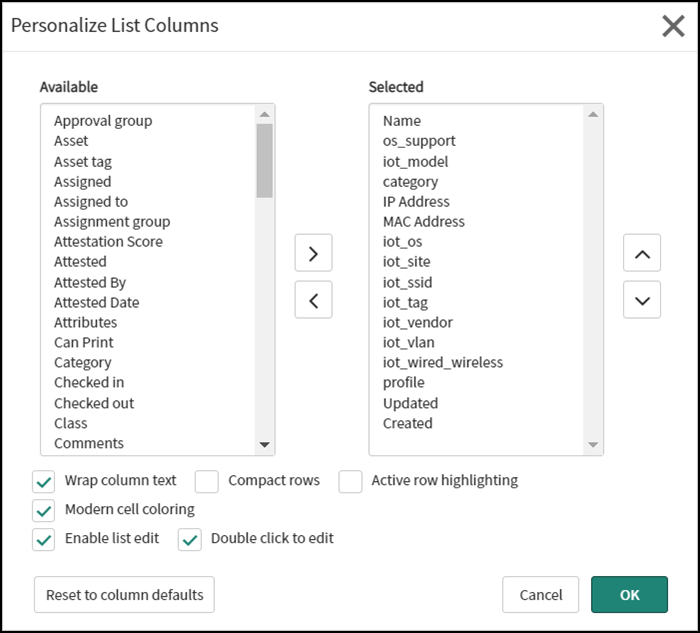
- After adding the custom column labels, the table will consist of predefined and custom columns. To display a smaller set of relevant columns, click the Zingbox discovered devices label on the Tables page, scroll down past the table and click Show List in the Related Links section, and then click the Personalize List icon (). Use the left and right arrows to move column labels so that only the ones you want to see are in the Selected pane and then click OK.
![]()
![]()
Create a ServiceNow table for receiving security incidents from Device Security.- From the ServiceNow Tables page, click New and enter the following:Label: Enter Zingbox alerts vulnerability incident.Name: The name field autofills, automatically prepending u_, converting any uppercase characters to lowercase, and converting spaces and dashes to underscores to connect words. It converts Zingbox alerts vulnerability incident in the Label field to u_zingbox_alerts_vulnerability_incident in the Name field.Extends table: Your new table must extend the Task configuration Item. Choose Task from the list.
![]()
- When done, click Submit.
Add custom table columns to the table.- Return to the table configuration page to edit it.The table consists of a set of predefined table columns. You need to add two custom column labels to let ServiceNow receive comments from Device Security about security incidents and provide links to the Security Alert Details and Vulnerability Details pages.
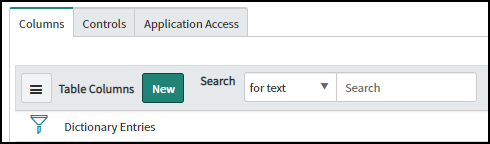
- Click New at the top of the table on the Columns tab.
![]() In the Dictionary Entry form that appears, enter the following and then click Submit:Type: StringColumn label: CommentsColumn name: u_comments (automatically fills based on the label)Max length: 4,000 (characters)
In the Dictionary Entry form that appears, enter the following and then click Submit:Type: StringColumn label: CommentsColumn name: u_comments (automatically fills based on the label)Max length: 4,000 (characters) - To add the next column label, click New again, enter the following, and click Submit:Type: URLColumn label: Security incidentColumn name: u_security_incident (automatically fills)
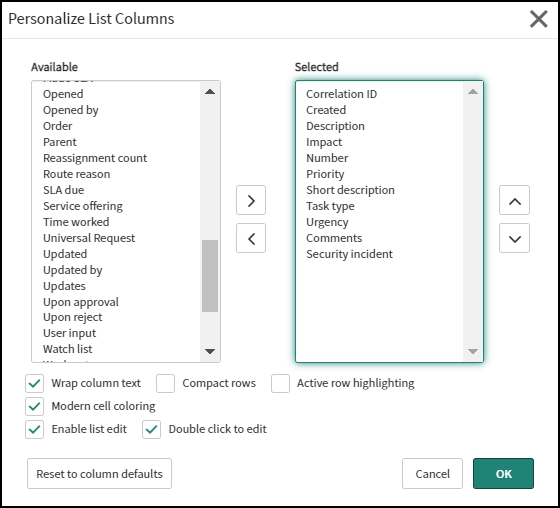
- Because ServiceNow displays a large set of columns, it’s useful to reduce the number to those of interest. To do this, click the Zingbox alerts vulnerability incident label on the Tables page, scroll down past the table and click Show List in the Related Links section, and then click the Update Personalized List icon (). Use the left and right arrows to move column labels so that only the following are in the Selected pane and then click OK.
![]()
![]()
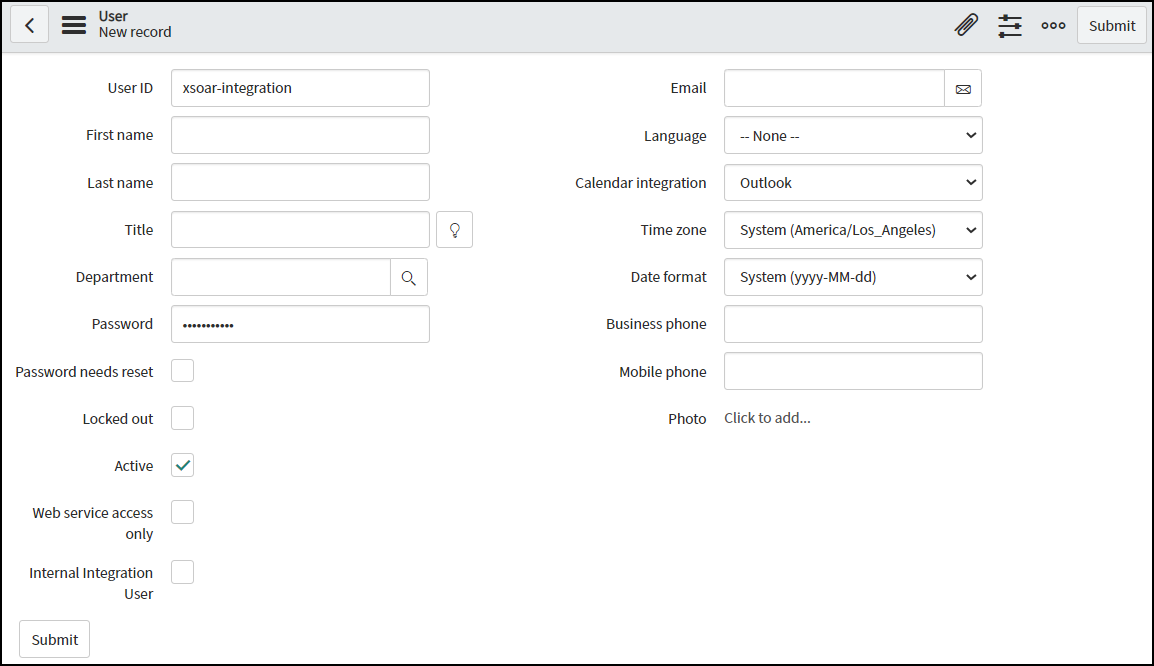
Create a ServiceNow user account for XSOAR to use when connecting to ServiceNow and sending it device attributes, alerts, and vulnerabilities.- Navigate to , click New, enter a user ID and password, and make sure the Password needs reset check box is cleared. Leave the other fields empty and click Submit.
![]()
- On the Users page, click the user ID of the account you just created to return to the account settings.
- To add roles to the user account, scroll down the page, click the Roles tab, and then click Edit. You need these roles for Device Security to be able to send devices to the ServiceNow database. Search for the following roles one by one and add them to the Roles List:
- rest_api_explorer (This allows Device Security to connect to ServiceNow through the ServiceNow API.)
- rest_service
- cmdb_admin
- web_service_admin
- u_zingbox_alerts_vulnerability_incident_user
- u_zingbox_discovered_devices_user
- Click Save to add the roles to the user account.
- On the user account settings page, click Update to save the updated settings.
This completes the ServiceNow setup.