IoT Security
Set up IoT Security and XSOAR for Cisco Meraki Cloud
Table of Contents
Set up IoT Security and XSOAR for Cisco Meraki Cloud
Set up IoT Security and Cortex XSOAR to integrate with Cisco Meraki
Cloud.
| Where Can I Use This? | What Do I Need? |
|---|---|
|
One of the following Cortex XSOAR setups:
|
To set up IoT Security to integrate through Cortex XSOAR with Cisco Meraki
Cloud, you must configure XSOAR with a Meraki Cloud integration instance and one or
both of these jobs:
- (Optional) This job collects data on demand about organizations with which the Meraki user who generated the API key is associated and the networks belonging to each organization.
- This job periodically collects data about the wired and wireless clients in each network.
By default, XSOAR requests data about all the organizations with which the Meraki
user who generated the API key is associated. However, if you want XSOAR to request
data from specific organizations and networks, you can specify them in the XSOAR job
used to import device data to IoT Security.
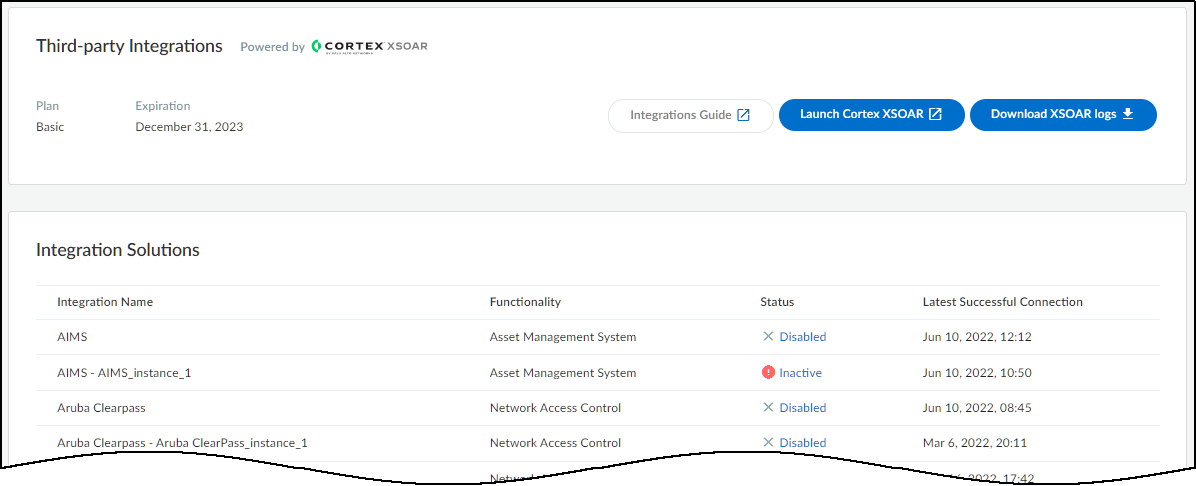
- Log in to IoT Security and from there access Cisco Meraki Cloud settings in Cortex XSOAR.
- Log in to IoT Security and then click Integrations.
![]()
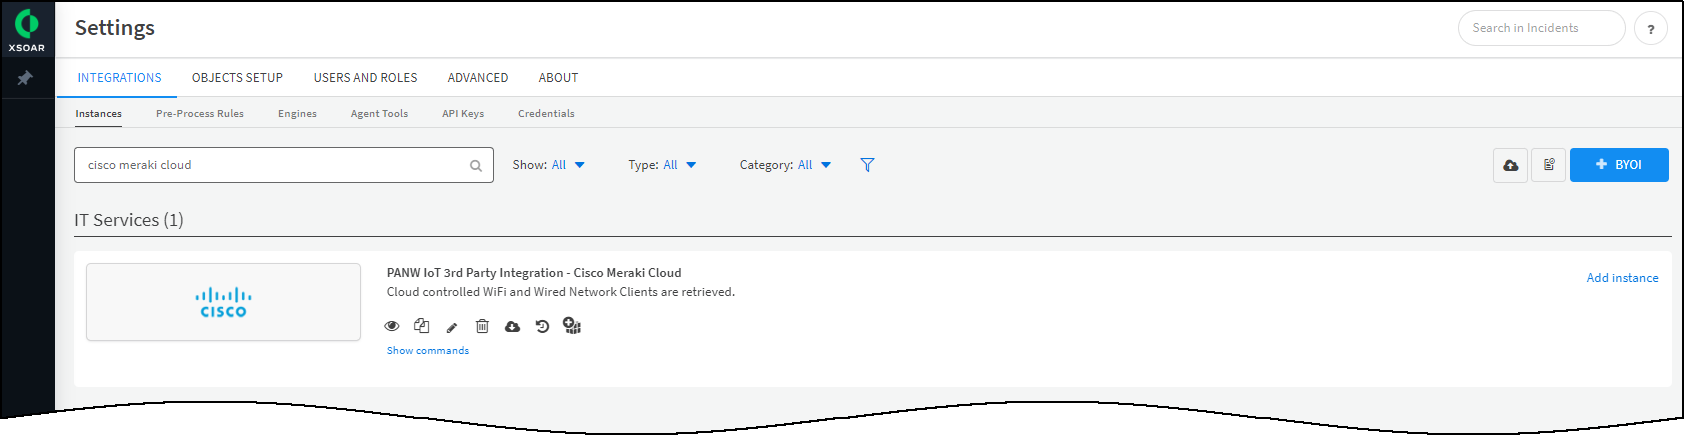
- IoT Security uses Cortex XSOAR to integrate with Cisco Meraki Cloud, and the settings you must configure to integrate with it are in the XSOAR interface. To access these settings, click Launch Cortex XSOAR.The Cortex XSOAR interface opens in a new browser window.
- Click Settings in the left navigation menu, search for cisco meraki cloud to locate it among other instances.
![]()
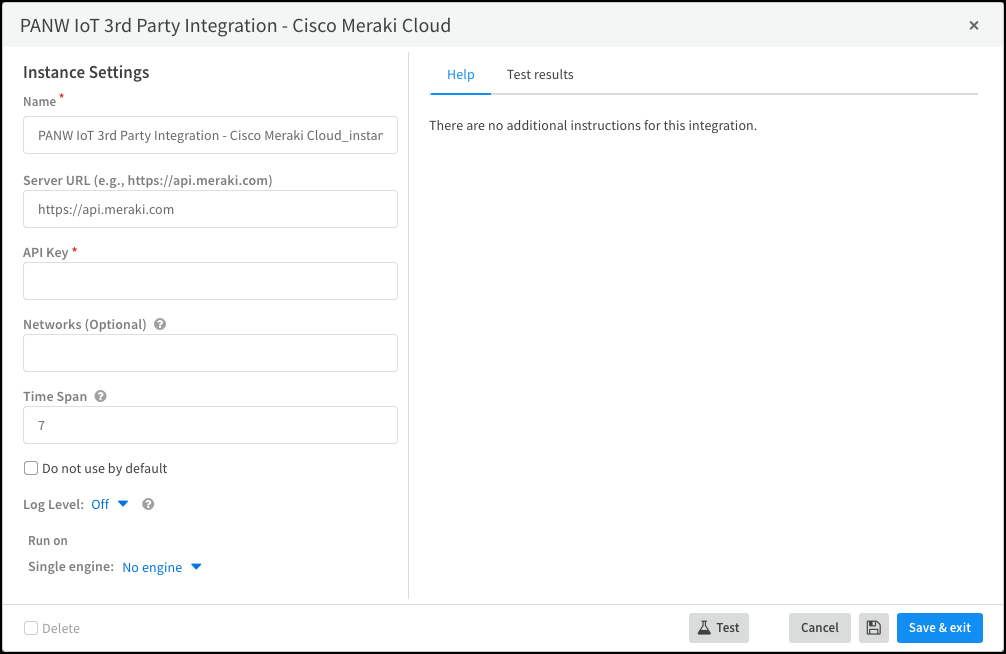
Configure the Cisco Meraki Cloud integration instance.- Click Add instance to open the settings panel.
- Enter the following and leave the other settings as they are:Name: Use the default name of the instance or enter a new one.Server URL: For all regions except China, use the default URL: https://api.meraki.com For deployments in China, replace the default entry with this URL: https://api.meraki.cnAPI Key: Enter the API key you previously copied from the Meraki Cloud dashboard and saved.
![]()
- When finished, click Test.If the test is successful, a Success message appears. If not, check that the settings were entered correctly and then test the configuration again.
![]()
- After the test succeeds, click Done to save your changes, close the settings panel, and activate the instance.
Create a job for XSOAR to query the Cisco Meraki Cloud for a list of its organizations and networks.This job is only necessary if you want to specify a list of Meraki Cloud organizations and networks to set a scope for device data retrieval in the next job.- Copy the name of the instance you just created, navigate to Jobs, and then click New Job at the top of the page.
- In the New Job panel that appears, enter the following and leave the other settings at their default values:Recurring: Clear this because you only need to get a list of Meraki Cloud organizations and networks as needed to set the scope for device retrieval in the next job.Name: Enter a name for the job.Playbook: Choose Get Cisco Meraki Cloud Organizations and Networks - PANW 3rd Party Integration.Integration Instance Name: Paste the Cisco Meraki Cloud instance name you copied a few moments ago.
- Click Create new job.The job appears in the Jobs list.
Enable the job and run it.- Check the Job Status for the job you created. If it’s Disabled, select its check box and then click Enable.
- After you enable it, keep the check box selected and click Run now. The Run Status changes from Idle to Running.XSOAR begins querying Cisco Meraki Cloud for data about its organizations and the networks in each organization.
- After the job finishes, click Completed in the Run Status column.
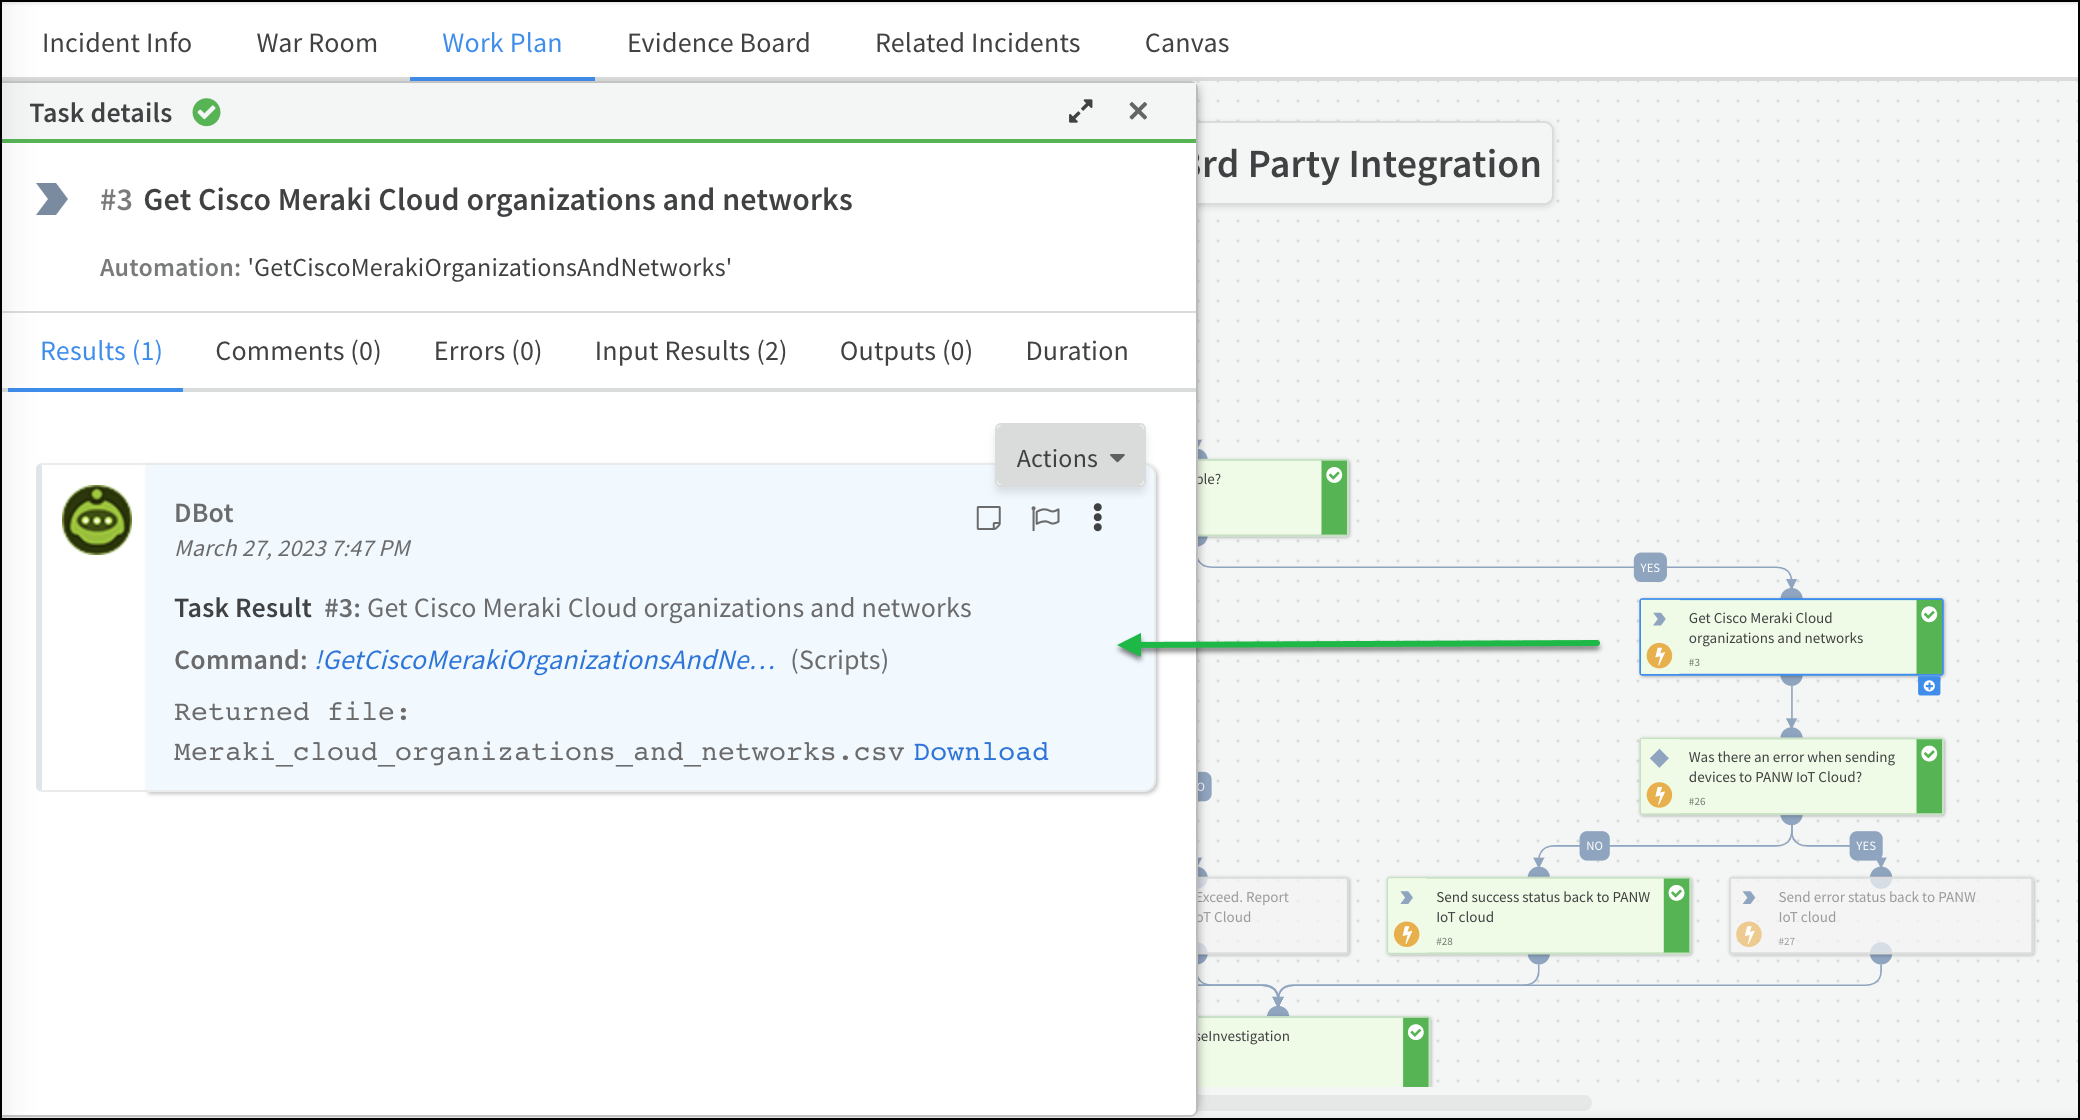
- On the new page that opens, click the Work Plan tab and then click the third task in the playbook, GetCiscoMerakiOrganizationsAndNetworks, which opens a Task details panel.
![]()
- On the Results tab, Download the Meraki_cloud_organizations_and_networks.csv file.
- Open in the file and view the names of Cisco Meraki Cloud organizations and networks.To control where devices are imported from within the Cisco Meraki Cloud hierarchy, use this file as a reference and enter the organization and network names in the Cisco Meraki Organizations and Cisco Meraki Networks fields in the next job.
![]()
Create a second job for XSOAR to query the Cisco Meraki Cloud for data about the wired and wireless clients in its networks and send it to IoT Security.IoT Security updates attributes for devices that are in its database and whose MAC addresses match those returned by Meraki Cloud. Also, if IoT Security learns about devices that aren’t yet in its database, it creates new database entries for them and uses their MAC addresses as device identifiers. Any reported devices without MAC addresses are rejected.- Click New Job at the top of the Jobs page.
- In the New Job panel that appears, enter the following and leave the other settings at their default values:Recurring: Select this because you want to periodically poll Meraki Cloud for data about the devices in its networks.Every: Enter a number and set the interval value (Minutes, Hours, Days, or Weeks) and select the days on which to run the job. This determines how often XSOAR queries Meraki Cloud for details about devices. For example: 60 minutes. (If you don’t select any days, the job runs every day.)Meraki Cloud returns data about both online and offline devices. A device must be offline for more than 31 days by default before Meraki Cloud stops returning data about it to XSOAR.Name: Enter a name for the job.Playbook: Choose Import Cisco Meraki Cloud Network Clients - PANW 3rd Party Integration.Cisco Meraki Networks: Leave this empty to retrieve data about devices in all networks to which the user account associated with the Meraki Cloud API key has access. To retrieve data about devices in specific networks, enter their network names (separated by commas) here. For example: acct, security, warehouse or 10.1.1.0/24, 10.1.2.0/24, 192.168.1.0/24Cisco Meraki Organizations: Leave this empty to retrieve data about devices in networks in all organizations to which the user account associated with the Meraki Cloud API key has access. To retrieve data only about devices in networks in specific organizations, enter organization names (separated by commas) here. For example: San Francisco, Los Angeles, San DiegoIntegration Instance Name: Paste the Cisco Meraki Cloud instance name you previously copied.Playbook Poll Interval: Leave this empty to retrieve data about devices that have been on a Meraki Cloud network at any time during the past 31 days. If you want to retrieve data for a shorter period of time, set the poll interval from 1 to 31 days.
- Click Create new job.The job appears in the Jobs list.
Enable the job and run it.- Check the Job Status for the job you created. If it’s Disabled, select its check box and then click Enable.
- After you enable it, keep the check box selected and Run now. The Run Status changes from Idle to Running.XSOAR begins querying Cisco Meraki Cloud for data about the devices in the networks in each organization. After this initial run, the job will run periodically at the defined interval.
When done, return to the IoT Security portal and check the status of the Cisco Meraki Cloud integration.An integration instance can be in one of the following four states, which IoT Security displays in the Status column on the Integrations page:- Disabled means that either the integration was configured but intentionally disabled or it was never configured and a job that references it is enabled and running.
- Error means that the integration was configured and enabled but is not functioning properly, possibly due to a configuration error or network condition.
- Inactive means that the integration was configured and enabled but no job has run for at least the past 60 minutes.
- Active means that the integration was configured and enabled and is functioning properly.
When you see that its status is Active, the setup is complete. At the defined intervals for each job, XSOAR queries Cisco Meraki Cloud for data about its organizations and networks or it queries for data about the devices in the networks. It then forwards the device data to IoT Security for display on its Devices and Device Details pages.