Next-Generation Firewall
Configure MSDP
Table of Contents
Expand All
|
Collapse All
Next-Generation Firewall Docs
-
-
-
-
-
-
-
- PAN-OS 12.1
- PAN-OS 11.2
- PAN-OS 11.1
- PAN-OS 11.0 (EoL)
- PAN-OS 10.2
- PAN-OS 10.1
- PAN-OS 10.0 (EoL)
- PAN-OS 9.1 (EoL)
- PAN-OS 9.0 (EoL)
- PAN-OS 8.1 (EoL)
-
- PAN-OS 12.1
- PAN-OS 11.2
- PAN-OS 11.1
- PAN-OS 10.2
- PAN-OS 10.1
Configure MSDP
Configure MSDP for IPv4 multicast on an Advanced Routing Engine.
| Where Can I Use This? | What Do I Need? |
|---|---|
|
One of these licenses for Strata Cloud Manager managed NGFWs:
|
Advanced Routing mode supports Multicast Source Discovery Protocol (MSDP) in PIM
Sparse Mode (PIM-SM). MSDP-enabled firewalls in one domain peer with MDSP-enabled
devices in a different domain or autonomous system. The peers exchange control
information and discover multicast sources outside their own domain. MSDP tracks
active sources and shares them with configured peers. MSDP reduces the complexity of
interconnecting multiple PIM-SM domains by allowing the domains to use an
interdomain source tree.
In the sample MSDP topology, the multicast source and receiver are in separate
domains. In each multicast domain is a single RP for a given multicast group. Using
MSDP, RP_1 informs RP_2 of the active sources for which RP_1 acts as Rendezvous
Point. RP_2 is able to create the multicast tree across the domain border.

MSDP uses well-known TCP port 639 for peering. The peer with the higher IP address
listens on port 639; the peer with the lower IP address attempts an active
connection to port 639. Before you configure MSDP, be familiar with RFC 3618. The following task assumes you have IPv4
multicast configured already.
Supported MSDP message types are:
- Source Active (SA)—Contains the IP address of the originating rendezvous point (RP) and one or more (S,G) pairs being advertised. Can also contain an encapsulated data packet.
- Keepalive—Sent to keep the MSDP session active. If no keepalive or SA message is received during the holdtime interval, the MSDP session is reset.
- Notification—Sent if an error is detected.
MSDP TCP connections between RP routers require an underlying IP unicast network. BGP
IPv4 unicast must participate to confirm the reverse-path forwarding (RPF) check
with a peer, thus keeping loop-free forwarding between domains.
You can Create Multicast Routing Profiles before configuration or while in the process of configuring
MSDP.
PAN-OS
Configure MSDP to use with IP multicast on a logical router for a PAN-OS
firewall.
Perform this task to configure Multicast Source Discovery Protocol (MSDP) for a
PAN-OS firewall.
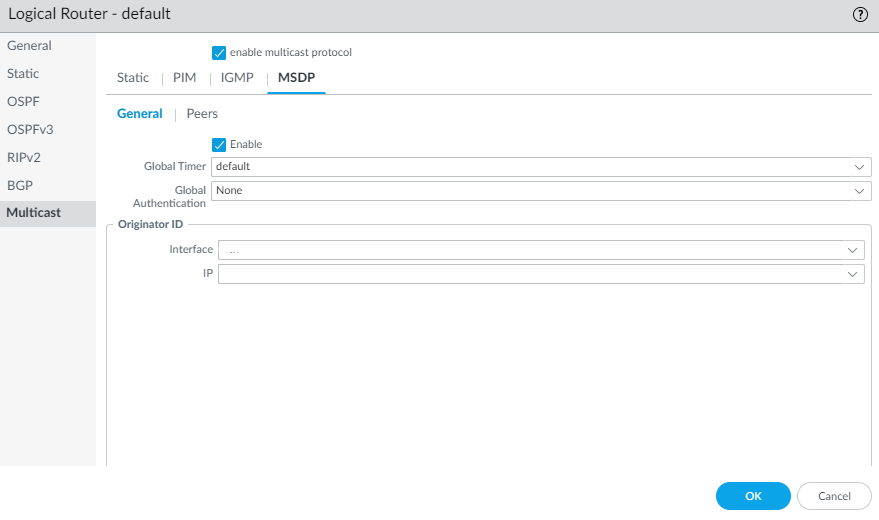
- Configure a Logical Router.Select NetworkRoutingLogical Routers and select a logical router.Select Multicast and enable multicast protocol.Select MSDPGeneral and Enable MSDP.Select the Global Timer profile, or select the default profile (this is the default setting), or create a new timer profile. If you select default, Keep Alive Interval is set to 60, Message Timeout is set to 75, and Connection Retry Interval is set to 30. If you select None, the default values apply.Select the Global Authentication profile or create a new one. Default is None.For the Originator ID, select the Interface that the logical router uses as the RP interface in Source-Active (SA) messages.Select or enter the IP Address (with prefix length) that the logical router uses as the RP address in SA messages. If no Originator IP address is configured, the logical router uses the PIM RP address to encapsulate the SA message.
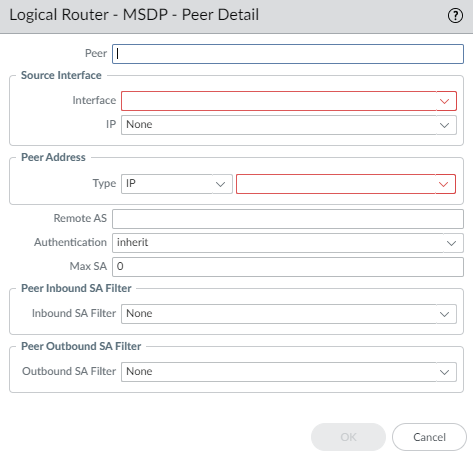
![]() Click OK.Select Peers and Add a Peer name (maximum of 63 characters). The name must start with an alphanumeric character, underscore (_), hyphen (-), or dot (.) and can contain a combination of alphanumeric characters, underscore, or hyphen or dot. No space is allowed.
Click OK.Select Peers and Add a Peer name (maximum of 63 characters). The name must start with an alphanumeric character, underscore (_), hyphen (-), or dot (.) and can contain a combination of alphanumeric characters, underscore, or hyphen or dot. No space is allowed.![]() Enter the Source Interface used to establish the MSDP connection over TCP with its MSDP peer.Select the IP address of the source interface. Default is None.Select the Type of Peer Address:
Enter the Source Interface used to establish the MSDP connection over TCP with its MSDP peer.Select the IP address of the source interface. Default is None.Select the Type of Peer Address:- IP—(default) and select an address object or enter an IP address.
- FQDN—Select or enter the Fully Qualified Domain Name of the peer. The dropdown list displays all FQDN names configured as address objects.
Enter the BGP autonomous system number of the Remote AS where the MSDP peer is located.For Authentication, do one of the following:- Select an authentication profile to apply to this peer, which overrides the Global Authentication Profile you applied to MSDP on the General page.
- inherit (inherit from global authentication) (default) the global authentication profile.
- Select None to disable authentication to this peer, which overrides the Global Authentication Profile.
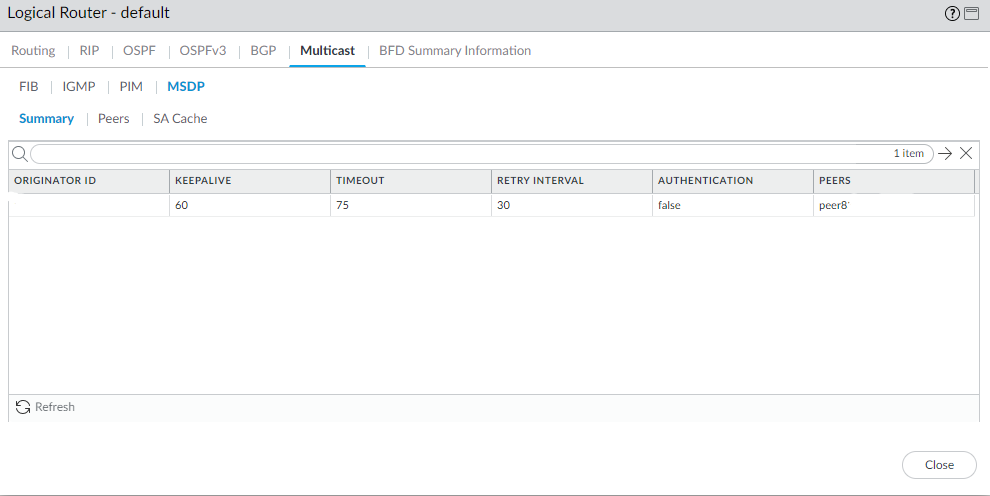
For Max SA, enter the maximum number of Source-Active (SA) entries the SA cache will accept from this MSDP peer. Range is 0 to 1,024; default is 0 (unlimited). After this maximum is reached, new SA messages from this peer are dropped.For Peer Inbound SA Filter, select an access list or create a new access list to filter incoming SA messages (block unwanted groups) from this peer. Default is None.The access list can specify source addresses in an (S,G) pair to filter, or destination (group) addresses in an (S,G) pair to filter, or both.For Peer Outbound SA Filter, select an access list or create a new access list to filter outgoing SA messages (block unwanted groups) being propagated to this peer. Default is None.The access list can specify source addresses in an (S,G) to filter, or destination (group) addresses in an (S,G) to filter, or both.Click OK.Create MSDP authentication and timer profiles if you haven’t done so.Commit.View MSDP information.- Select NetworkRoutingLogical Routers and in the row for the logical router you configured, select More Runtime Stats.Select MulticastMSDPSummary to see general MSDP information, such as originator IP address, timers, authentication, and peer name.
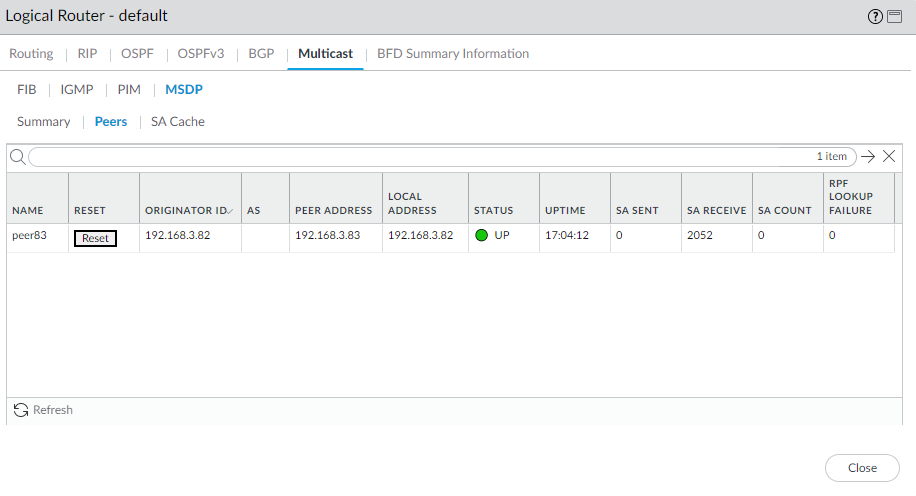
![]() Select Peers to view information about the MSDP peers.
Select Peers to view information about the MSDP peers.![]() Select SA Cache to view Source-Active entries in the cache.
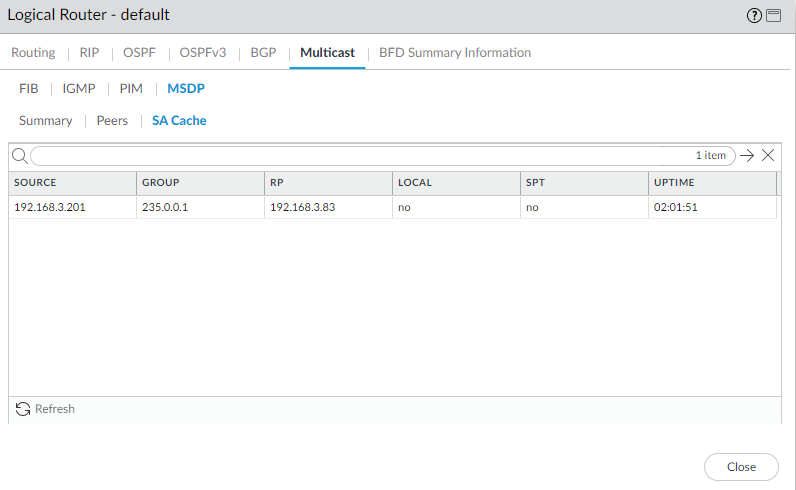
Select SA Cache to view Source-Active entries in the cache.![]() Refresh or Close the runtime stats.
Refresh or Close the runtime stats.Strata Cloud Manager
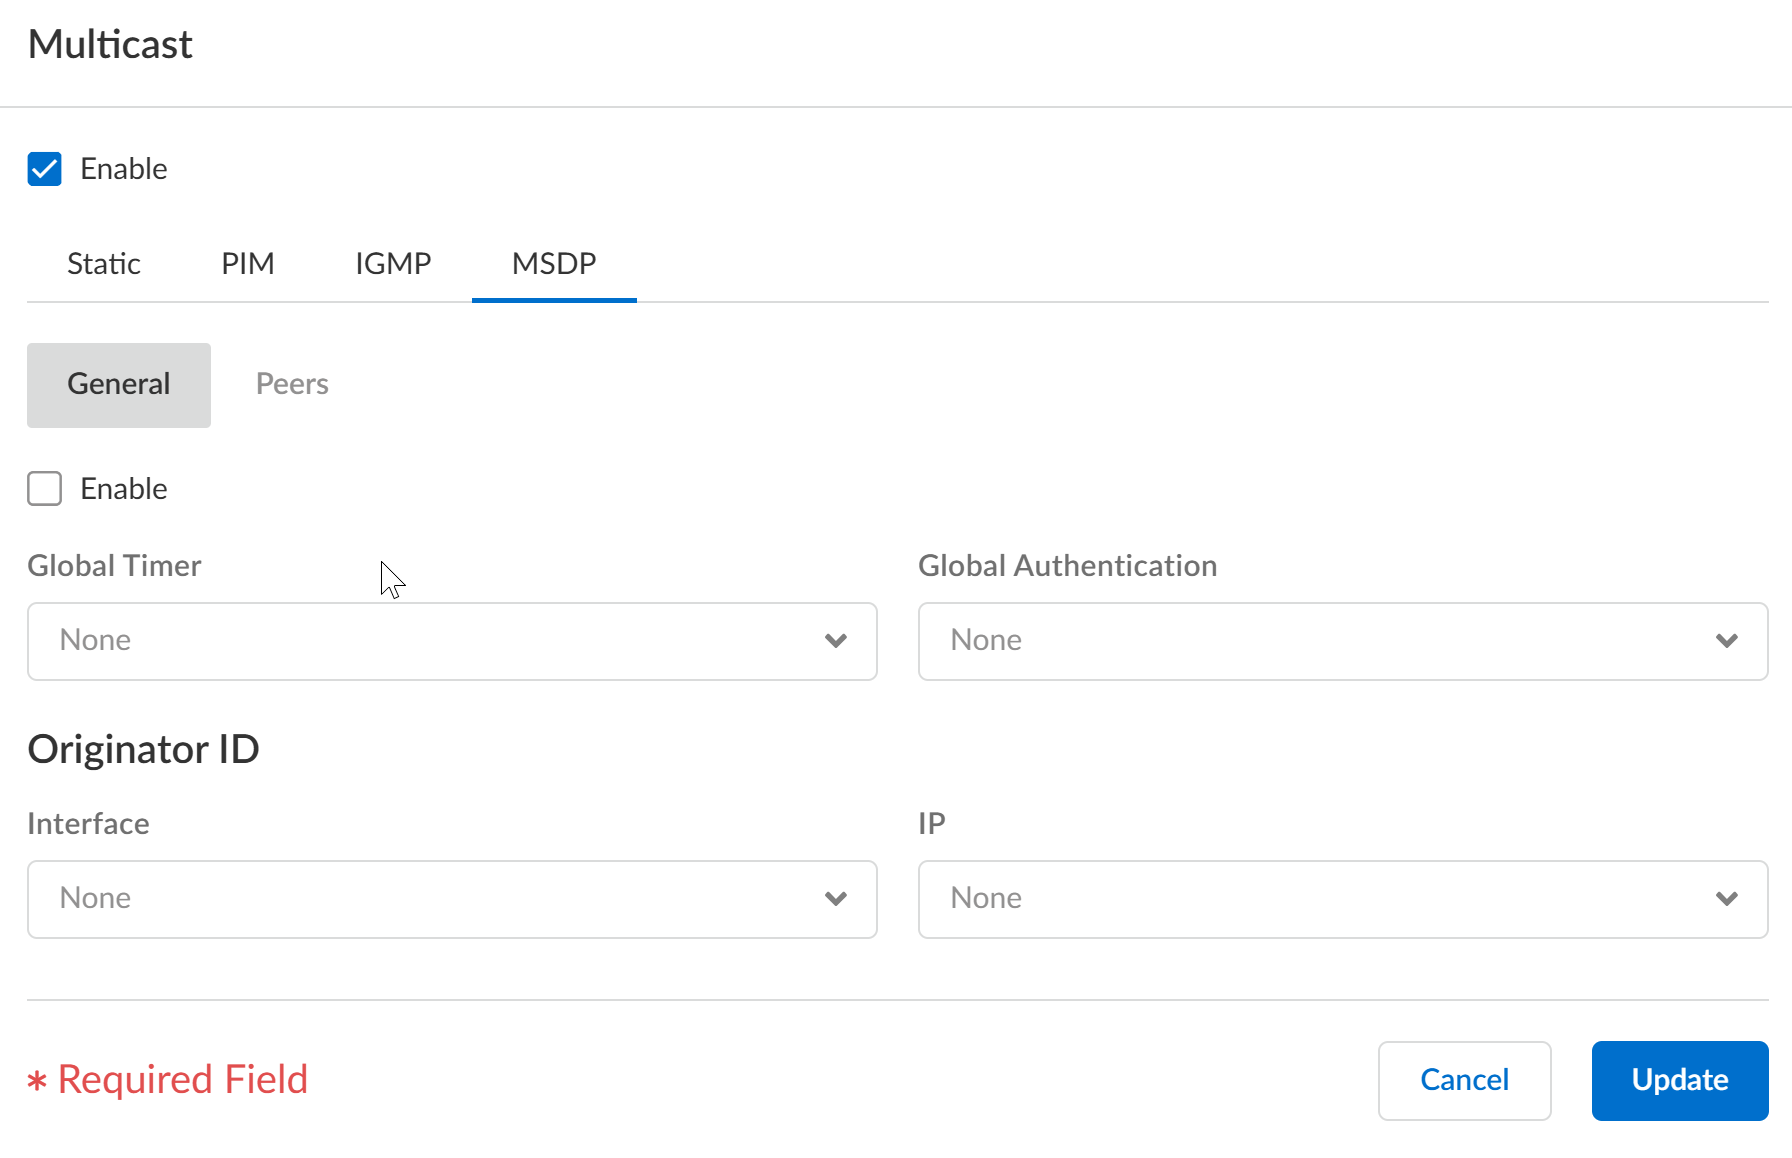
Configure a logical router for Multicast Source Discovery Protocol (MSDP) to use with IP multicast on Strata Cloud Manager.Configure a logical router for Multicast Source Discovery Protocol (MSDP) to use with IP multicast on Strata Cloud Manager.- Select ConfigurationNGFW and Prisma Access.For Configuration Scope, select Folders and then select All Firewalls, a specific folder, or the specific firewalls you want to configure. (Don’t choose Global.)Select DeviceRoutingRouters and select the logical router you're configuring.Edit the Multicast card and Enable multicast.Select the MSDP tab.On the General tab, Enable MSDP.
![]() Select the Global Timer profile, or select the default profile (this is the default setting), or create a new timer profile. If you select default, Keep Alive Interval is set to 60, Message Timeout is set to 75, and Connection Retry Interval is set to 30. If you select None, the default values apply.Select the Global Authentication profile or create a new one. The default is None.For the Originator ID, select the Interface that the logical router uses as the RP interface in Source-Active (SA) messages.Select or enter the IP Address (with prefix length) that the logical router uses as the RP address in SA messages. If no Originator IP address is configured, the logical router uses the PIM RP address to encapsulate the SA message.Select the Peers tab and Add a peer Name (maximum of 63 characters). The name must start with an alphanumeric character, underscore (_), hyphen (-), or dot (.) and can contain a combination of alphanumeric characters, underscore, or hyphen or dot. No space is allowed.
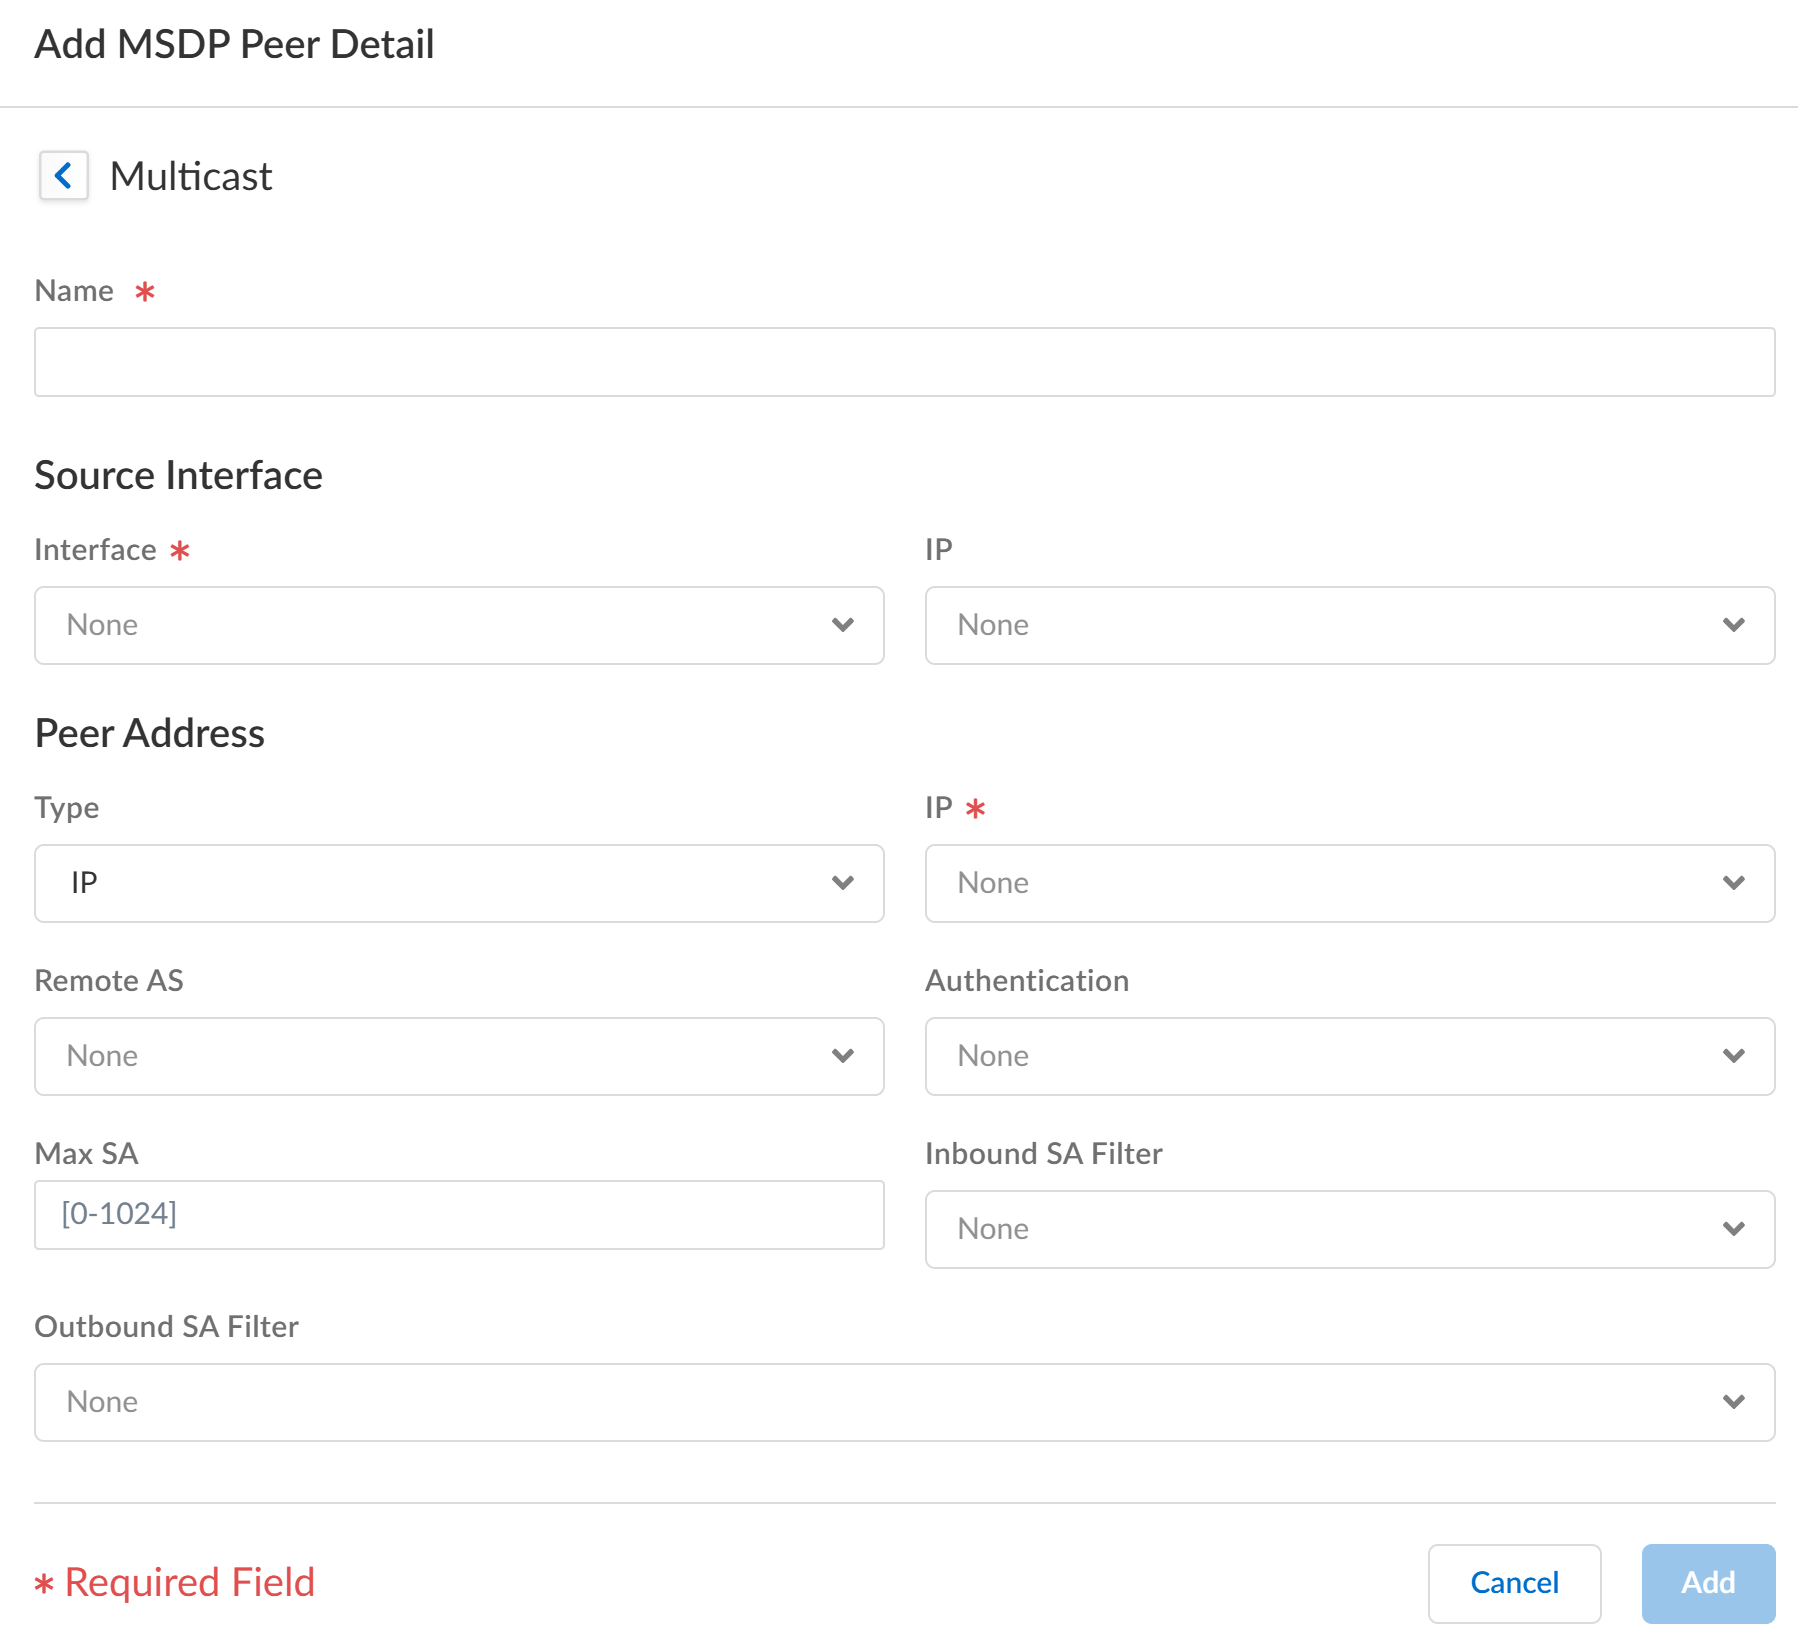
Select the Global Timer profile, or select the default profile (this is the default setting), or create a new timer profile. If you select default, Keep Alive Interval is set to 60, Message Timeout is set to 75, and Connection Retry Interval is set to 30. If you select None, the default values apply.Select the Global Authentication profile or create a new one. The default is None.For the Originator ID, select the Interface that the logical router uses as the RP interface in Source-Active (SA) messages.Select or enter the IP Address (with prefix length) that the logical router uses as the RP address in SA messages. If no Originator IP address is configured, the logical router uses the PIM RP address to encapsulate the SA message.Select the Peers tab and Add a peer Name (maximum of 63 characters). The name must start with an alphanumeric character, underscore (_), hyphen (-), or dot (.) and can contain a combination of alphanumeric characters, underscore, or hyphen or dot. No space is allowed.![]() Enter the Source Interface used to establish the MSDP connection over TCP with its MSDP peer.Select the IP address of the source interface. The default is None.Select the Type of peer address:
Enter the Source Interface used to establish the MSDP connection over TCP with its MSDP peer.Select the IP address of the source interface. The default is None.Select the Type of peer address:- IP—(the default) and select an address object or enter an IP address.
- FQDN—Select or enter the fully qualified domain name of the peer. The drop-down displays all FQDN names configured as address objects.
Enter the BGP autonomous system number of the Remote AS where the MSDP peer is located.For Authentication, do one of the following:- Select an MSDP authentication profile to apply to this peer, which overrides the Global Authentication Profile you applied to MSDP on the General page.
- inherit (Inherit from global authentication) (the default) the global authentication profile.
- Select none (Disable authentication) to disable authentication to this peer, which overrides the Global Authentication Profile.
For Max SA, enter the maximum number of Source-Active (SA) entries the SA cache will accept from this MSDP peer. The range is 0 to 1,024; the default is 0 (unlimited). After this maximum is reached, new SA messages from this peer are dropped.For Inbound SA Filter, select an access list or create a new access list to filter incoming SA messages (block unwanted groups) from this peer. The default is None.The access list can specify source addresses in an (S,G) pair to filter, or destination (group) addresses in an (S,G) pair to filter, or both.For Outbound SA Filter, select an access list or create a new access list to filter outgoing SA messages (block unwanted groups) being propagated to this peer. The default is None.The access list can specify source addresses in an (S,G) to filter, or destination (group) addresses in an (S,G) to filter, or both.Click Add and Update.Save the configuration.Create MSDP authentication and timer profiles for Strata Cloud Manager if you have not done so.Push Config and Push the configuration. Select the Admin Scope and enter a Description for the configuration. Select Push again.

