Next-Generation Firewall
Strata Cloud Manager
Table of Contents
Expand All
|
Collapse All
Next-Generation Firewall Docs
-
-
-
-
-
-
-
- PAN-OS 12.1
- PAN-OS 11.2
- PAN-OS 11.1
- PAN-OS 11.0 (EoL)
- PAN-OS 10.2
- PAN-OS 10.1
- PAN-OS 10.0 (EoL)
- PAN-OS 9.1 (EoL)
- PAN-OS 9.0 (EoL)
- PAN-OS 8.1 (EoL)
-
- PAN-OS 12.1
- PAN-OS 11.2
- PAN-OS 11.1
- PAN-OS 10.2
- PAN-OS 10.1
Strata Cloud Manager
Configure IPv4 multicast for a virtual router on Strata Cloud Manager.
Perform this task to configure IPv4 multicast for a virtual router for Strata Cloud
Manager.
- Select ConfigurationNGFW and Prisma Access.For Configuration Scope, select Folders and then select All Firewalls, a specific folder, or the specific firewalls you want to configure. (Don’t choose Global.)Select DeviceRoutingRouters and select the virtual router you're configuring.Edit the Multicast card and Enable multicast.
![]() (Any-Source Multicast (ASM) only) If the multicast domain in which the virtual router is located uses ASM, identify and configure the local and remote rendezvous points (RPs) for multicast groups.
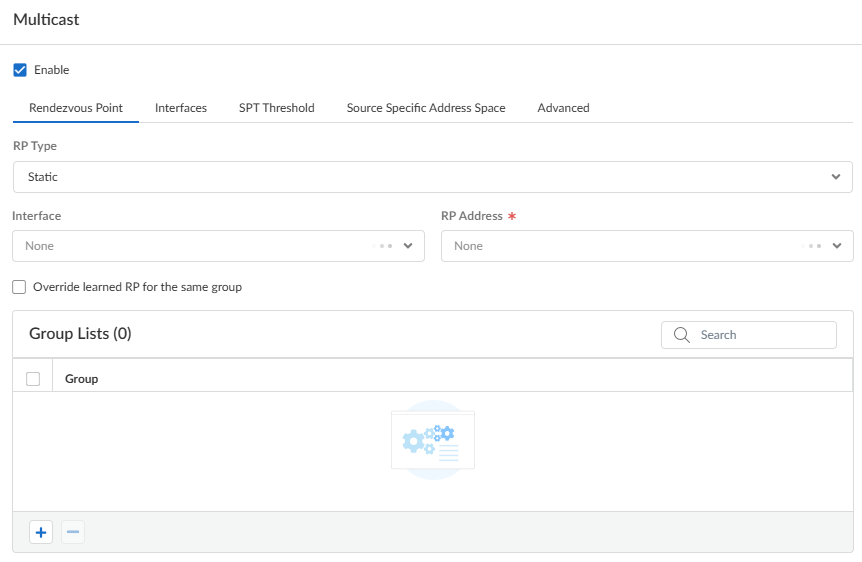
(Any-Source Multicast (ASM) only) If the multicast domain in which the virtual router is located uses ASM, identify and configure the local and remote rendezvous points (RPs) for multicast groups.- Select the Rendezvous Point tab.Select a local RP Type, which determines how the RP is chosen (the options are Static, Candidate, or None).
- Static—Establishes a static mapping of an
RP to multicast groups. Configuring a static RP requires you to
explicitly configure the same RP on other PIM routers in the PIM
domain.
- Select the RP Interface. Valid interface types are Layer 3, virtual wire, loopback, VLAN, Aggregate Ethernet (AE), and tunnel.
- Select the RP Address. The IP addresses of the RP interface you selected populate the list.
- Select Override learned RP for the same group so that this static RP serves as RP instead of the RP elected for the groups in the Group List.
- Add a multicast Group (or multiple groups) that communicate with the RP. Identify a multicast group by an IPv4 multicast address in the range 224.0.0.0 to 239.255.255.255.
![]()
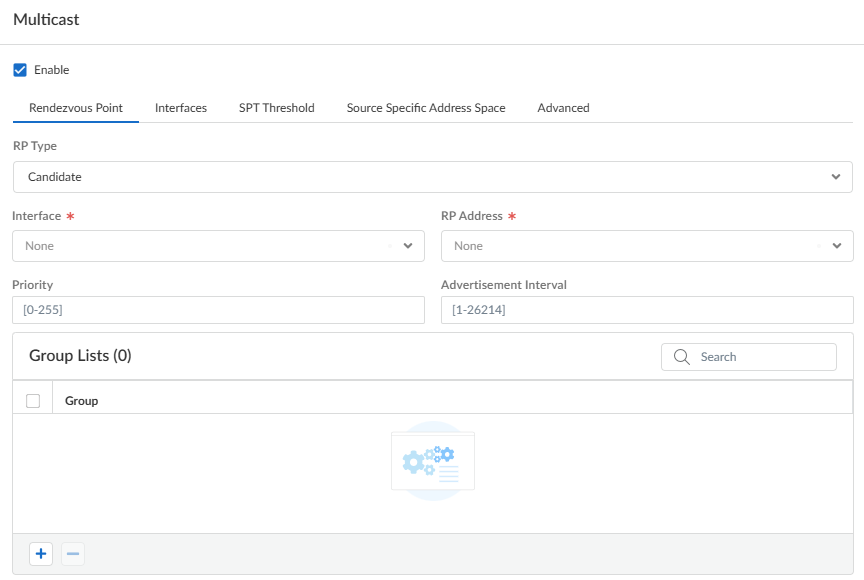
- Candidate—Establishes a dynamic mapping
of an RP to multicast groups based on priority so that each
router in a PIM domain automatically elects the same RP.
- Select the RP Interface of the candidate RP. Valid interface types are Layer 3, loopback, VLAN, Aggregate Ethernet (AE), and tunnel.
- Select the RP Address of the candidate RP. The IP addresses of the RP interface you selected populate the list.
- (Optional) Change the Priority for the candidate RP. The firewall compares the priority of the candidate RP to the priority of other candidate RPs to determine which one acts as RP for the specified groups; the firewall selects the candidate RP with the lowest priority value (range is 0 to 255; the default is 192).
- (Optional) Change the Advertisement Interval (sec) (range is 1 to 26,214; the default is 60).
- Adda Group List of one or more multicast groups for which this candidate RP is proposing to be the RP. A multicast group is identified by an IPv4 multicast address in the range 224.0.0.0 to 239.255.255.255.
![]()
- None—Select if this virtual router isn’t an RP.
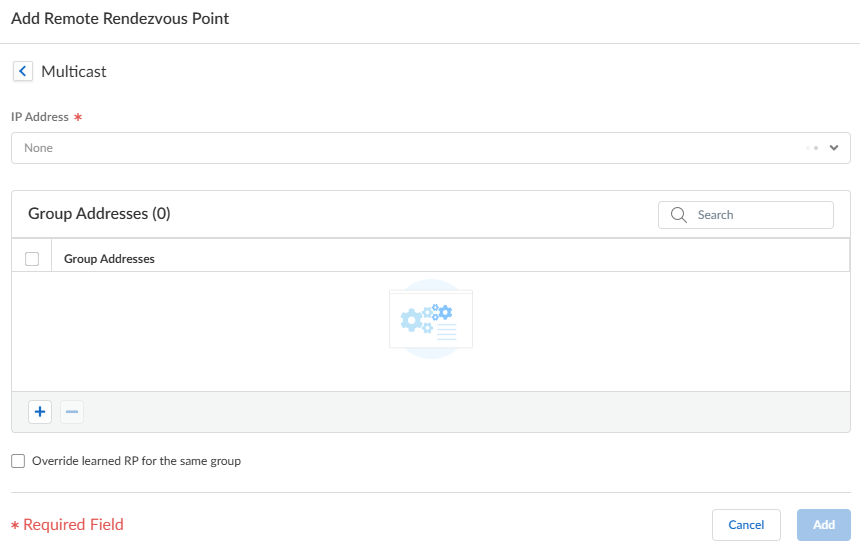
Add a Remote Rendezvous Point and enter the IP Address of that remote (external) RP.Add the multicast Group Addresses for which the specified remote RP address acts as RP.Select Override learned RP for the same group so that the external RP you statically configured serves as RP instead of an RP that is dynamically learned (elected) for the groups in the Group Addresses list.![]() Click Update.Specify a group of interfaces that share a multicast configuration (Internet Group Management Protocol [IGMP], PIM, and group permissions).
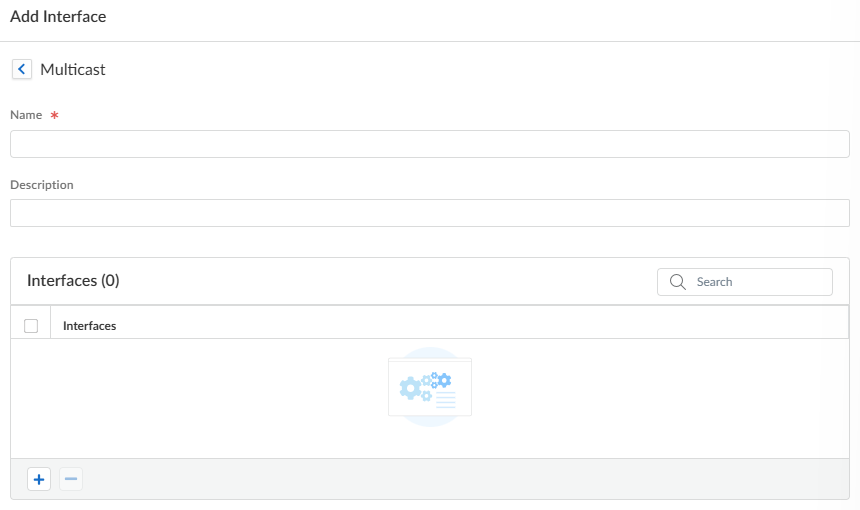
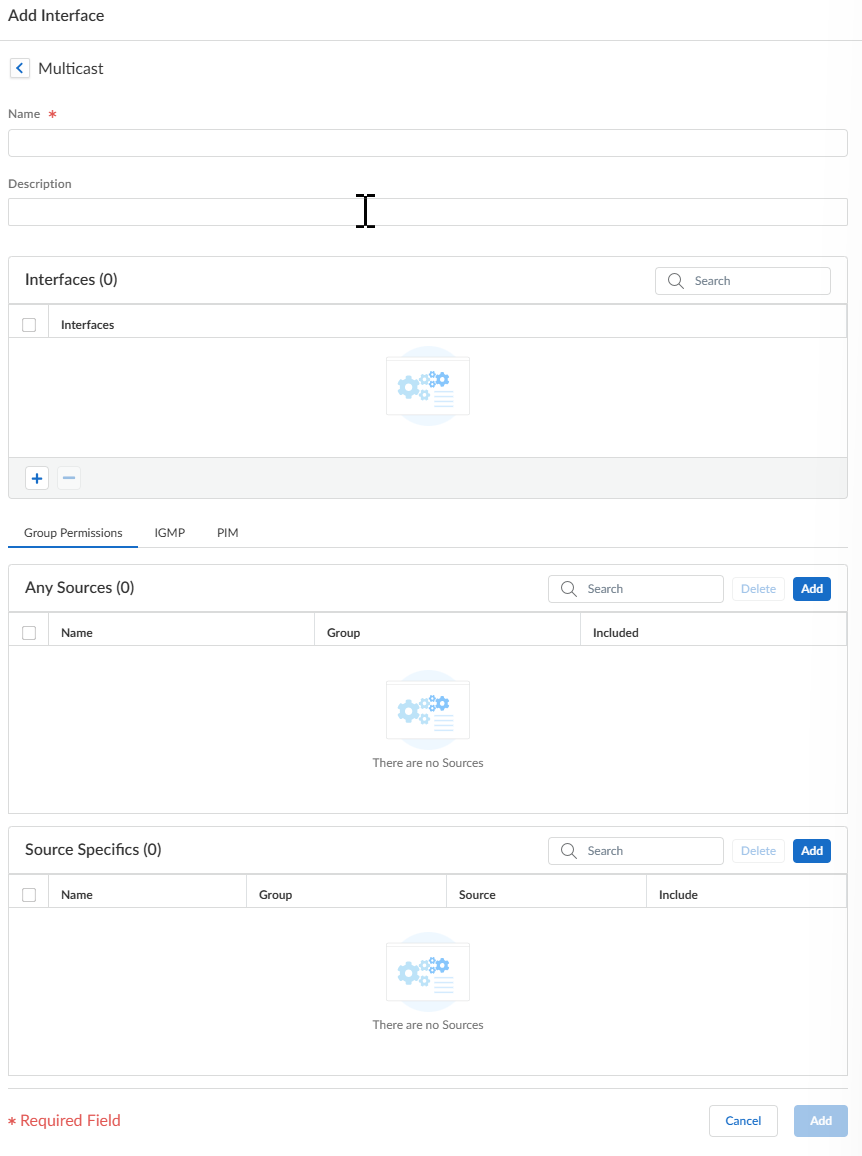
Click Update.Specify a group of interfaces that share a multicast configuration (Internet Group Management Protocol [IGMP], PIM, and group permissions).- On the Interfaces tab, Add a Name for the interface group.Enter a Description.Add an Interface and select one or more Layer 3 interfaces that belong to the interface group.
![]() (Optional) Configure multicast group permissions for the interface group. By default, the interface group accepts IGMP membership reports and PIM join messages from all groups.
(Optional) Configure multicast group permissions for the interface group. By default, the interface group accepts IGMP membership reports and PIM join messages from all groups.- Select the Group Permissions tab.
![]() To configure Any-Source Multicast (ASM) groups for this interface group, in the Any Source window, Add a Name to identify a multicast group that accepts IGMP membership reports and PIM join reports from any source.Enter the multicast Group address or group address and or prefix that can receive multicast packets from any source on these interfaces.Select Included to include the ASM Group address in the interface group (the default). Deselect Included to easily exclude an ASM group from the interface group, such as during testing.Add additional multicast Groups (for the interface group) that want to receive multicast packets from any source.To configure source-specific multicast (SSM) groups in this interface group, in the Source Specific window, Add a Name to identify a multicast group and source address pair. Don't use a name that you used for Any Source multicast. (You must use IGMPv3 to configure SSM.)Enter the multicast Group address or group address and or prefix of the group that wants to receive multicast packets from the specified source only (and can receive the packets on these interfaces).A Source-Specific group for which you specify permissions is a group that the virtual router must treat as source-specific. Configure Source Specific Address Space (a subsequent step in this procedure) that includes the source-specific groups for which you configured permission.Enter the Source IP address from which this multicast group can receive multicast packets.Select Included to include the SSM Group and source address pair in the interface group. Deselect Included to easily exclude the pair from the interface group, such as during testing.Add additional multicast Groups (for the interface group) that want to receive multicast packets from a specific source only.Configure IGMP for the interface group if an interface faces multicast receivers, which must use IGMP to join a group.
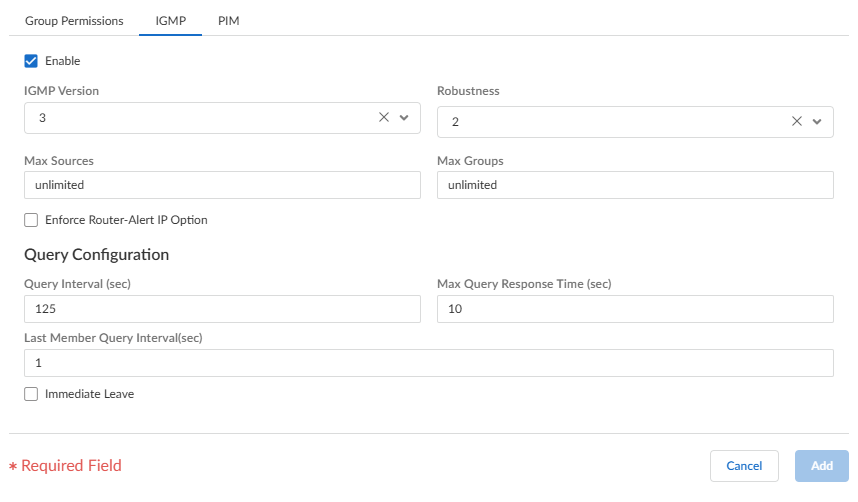
To configure Any-Source Multicast (ASM) groups for this interface group, in the Any Source window, Add a Name to identify a multicast group that accepts IGMP membership reports and PIM join reports from any source.Enter the multicast Group address or group address and or prefix that can receive multicast packets from any source on these interfaces.Select Included to include the ASM Group address in the interface group (the default). Deselect Included to easily exclude an ASM group from the interface group, such as during testing.Add additional multicast Groups (for the interface group) that want to receive multicast packets from any source.To configure source-specific multicast (SSM) groups in this interface group, in the Source Specific window, Add a Name to identify a multicast group and source address pair. Don't use a name that you used for Any Source multicast. (You must use IGMPv3 to configure SSM.)Enter the multicast Group address or group address and or prefix of the group that wants to receive multicast packets from the specified source only (and can receive the packets on these interfaces).A Source-Specific group for which you specify permissions is a group that the virtual router must treat as source-specific. Configure Source Specific Address Space (a subsequent step in this procedure) that includes the source-specific groups for which you configured permission.Enter the Source IP address from which this multicast group can receive multicast packets.Select Included to include the SSM Group and source address pair in the interface group. Deselect Included to easily exclude the pair from the interface group, such as during testing.Add additional multicast Groups (for the interface group) that want to receive multicast packets from a specific source only.Configure IGMP for the interface group if an interface faces multicast receivers, which must use IGMP to join a group.- Select the IGMP tab and Enable IGMP (the default).
![]() Specify IGMP parameters for interfaces in the interface group:
Specify IGMP parameters for interfaces in the interface group:- IGMP Version—1, 2, or 3 (the default).
- Robustness—A variable that the firewall uses to tune the Group Membership Interval, Other Querier Present Interval, Startup Query Count, and Last Member Query Count (range is 1 to 7; the default is 2). Increase the value if the subnet on which this firewall is located is prone to losing packets.
- Max Sources—Maximum number of sources that IGMP can process simultaneously for an interface (range is 1 to 65,535; the default is unlimited).
- Max Groups—Maximum number of groups that IGMP can process simultaneously for an interface (range is 1 to 65,535; the default is unlimited).
- Enforce Router-Alert IP Option (disabled by default)—Setting to select if you require incoming IGMP packets that use IGMPv2 or IGMPv3 to have the IP Router Alert Option, RFC 2113.
- Query Interval (sec)—Number of seconds between IGMP membership Query messages that the virtual router sends to a receiver to determine whether the receiver still wants to receive the multicast packets for a group (range is 1 to 31,744; the default is 125).
- Max Query Response Time (sec)—Maximum number of seconds enabled for a receiver to respond to an IGMP membership Query message before the virtual router determines that the receiver no longer wants to receive multicast packets for the group (range is 0 to 3,174.4; the default is 10).
- Last Member Query Interval (sec)—Number of seconds enabled for a receiver to respond to a Group-Specific Query that the virtual router sends after a receiver sends a Leave Group message (range is 0.1 to 3,174.4; the default is 1).
- Immediate Leave (disabled by default)—When there is only one member in a multicast group and the virtual router receives an IGMP Leave Message for that group, the Immediate Leave setting causes the virtual router to remove that group and outgoing interface from the multicast routing information base (mRIB) and multicast forwarding information base (mFIB) immediately, rather than waiting for the Last Member Query Interval to expire. The Immediate Leave setting saves network resources. You can’t select Immediate Leave if the interface group uses IGMPv1.
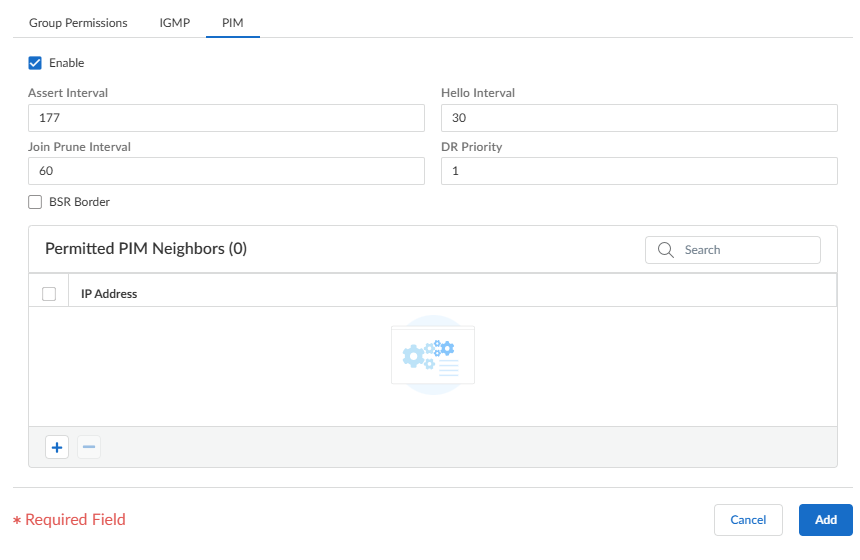
Configure PIM Sparse Mode (PIM-SM) for the interface group.- Select the PIM tab and Enable PIM.
![]() Specify PIM parameters for the interface group:
Specify PIM parameters for the interface group:- Assert Interval—Number of seconds between PIM Assert messages that the virtual router sends to other PIM routers on the multiaccess network when they are electing a PIM forwarder (range is 0 to 65,534; the default is 177).
- Hello Interval—Number of seconds between PIM Hello messages that the virtual router sends to its PIM neighbors from each interface in the interface group (range is 0 to 18,000; the default is 30).
- Join Prune Interval—Number of seconds between PIM Join messages (and between PIM Prune messages) that the virtual router sends upstream toward a multicast source (range is 1 to 18,000; the default is 60).
- DR Priority—Designated Router (DR) priority that controls which router in a multiaccess network forwards PIM Join and Prune messages to the RP (range is 0 to 4,294,967,295; the default is 1). The DR priority takes precedence over IP address comparisons to elect the DR.
- BSR Border—Select this option if the interfaces in the interface group are on a virtual router that is the BSR located at the border of an enterprise LAN. This will prevent RP candidacy BSR messages from leaving the LAN.
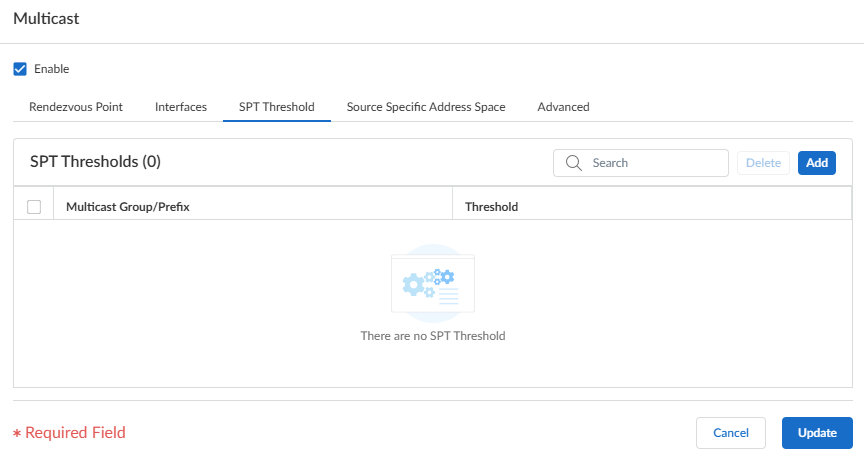
Add one or more Permitted PIM Neighbors by specifying the IP Address of each router from which the virtual router accepts multicast packets.Select Add to add the configuration settings to the interface group.(Optional) Change the Shortest-Path Tree (SPT) threshold, as described in Shortest-Path Tree (SPT) and Shared Tree.- Select the SPT Threshold tab and Add a Multicast Group/Prefix, the multicast group or prefix for which you're specifying the distribution tree.
![]() Specify the Threshold (kb)—The point at which routing to the specified multicast group or prefix switches from shared tree (sourced from the RP) to SPT distribution:
Specify the Threshold (kb)—The point at which routing to the specified multicast group or prefix switches from shared tree (sourced from the RP) to SPT distribution:- 0 (switch on first data packet) (the default)—The virtual router switches from shared tree to SPT for the group or prefix when the virtual router receives the first data packet for the group or prefix.
- never (do not switch to spt)—The virtual router continues to use the shared tree to forward packets to the group or prefix.
- Enter the total number of kilobits from multicast packets that can arrive for the multicast group or prefix at any interface and over any time period, upon which the virtual router changes to SPT distribution for that multicast group or prefix.
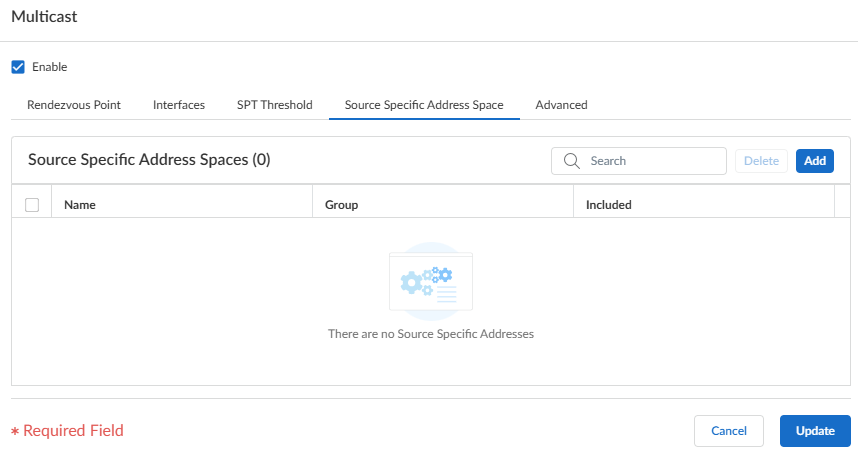
Select Update to save the SPT threshold settings.Identify the multicast groups or groups and prefixes that accept multicast packets only from a specific source.- Select the Source Specific Address Space tab and Add a Name for the space.
![]() Enter the multicast Group address to identify the address space that receives multicast packets from a specific source. If the virtual router receives a multicast packet for an SSM group but the group isn’t covered by a Source Specific Address Space, the virtual router drops the packet.Select Included to include the source-specific address space as a multicast group address range from which the virtual router will accept multicast packets that originated from an allowed specific source. Deselect Included to easily exclude a group address space, such as for testing.Add other source-specific address spaces to include all those groups for which you specified SSM group permissions.Select Update to save the Source Specific Address Space settings.(Optional) Change the length of time that a multicast route remains in the mRIB after the session ends between a multicast group and a source.
Enter the multicast Group address to identify the address space that receives multicast packets from a specific source. If the virtual router receives a multicast packet for an SSM group but the group isn’t covered by a Source Specific Address Space, the virtual router drops the packet.Select Included to include the source-specific address space as a multicast group address range from which the virtual router will accept multicast packets that originated from an allowed specific source. Deselect Included to easily exclude a group address space, such as for testing.Add other source-specific address spaces to include all those groups for which you specified SSM group permissions.Select Update to save the Source Specific Address Space settings.(Optional) Change the length of time that a multicast route remains in the mRIB after the session ends between a multicast group and a source.- Select the Advanced tab.Specify the Multicast Route Age Out Time (sec) (range is 210 to 7,200; the default is 210).Select Update to save the Advanced settings.Save the configuration.Push Config and Push the configuration. Select the Admin Scope and enter a Description for the configuration. Select Push again.


