Next-Generation Firewall
Enhanced Application Logs for Palo Alto Networks Cloud Services
Table of Contents
Enhanced Application Logs for Palo Alto Networks Cloud Services
Learn about enhanced application logs for cloud services.
| Where Can I Use This? | What Do I Need? |
|---|---|
|
The NGFW can collect data that increases visibility into network activity for Palo
Alto Networks apps and services, like Cortex XDR and Internet of Things (IoT)
Security. These Enhanced Application logs are designed strictly for Palo Alto
Networks apps and services to consume and process; you cannot view Enhanced
Application logs on the NGFW or Panorama. Only NGFWs sending logs to the logging
service can generate Enhanced Application logs.
Enabling Enhanced Application Logging (EAL) can
cause undesired logging behavior, such as the generation of URL Filtering logs for traffic to allowed
categories. This can impact storage capacity and performance. Disable EAL to reduce
undesired logs.
Follow these procedures to enable log forwarding of Enhanced Application logs for
Cortex XDR and IoT Security:
Cortex XDR
The types of data that Enhanced Application logs gather include records of DNS
queries, the HTTP header User Agent field that specifies the web browser or tool
used to access a URL, and information about DHCP automatic IP address
assignment. With DHCP information, for example, Cortex XDR™ can alert on unusual
activity based on hostname instead of IP address. This allows the security
analyst using Cortex XDR to meaningfully assess whether the user’s activity is
within the scope of their role, and if not, to more quickly take action to stop
the activity.
To benefit from the most comprehensive set of Enhanced Application logs, enable
User-ID; deployments for the Windows-based User-ID agent and the PAN-OS
integrated User-ID agent both collect some data that is not reflected in the
NGFW User-ID logs but that is useful toward associating network activity with
specific users.
To start forwarding Enhanced Application logs to the Strata Logging Service, turn on Enhanced Application Logging (EAL) globally, and then enable it on a
per-security rule basis (using a Log Forwarding profile). The global setting is
required and captures data for traffic that is not session-based (ARP requests,
for example). The per-security policy rule setting is strongly recommended; the
majority of Enhanced Application logs are gathered from the session-based
traffic that your Security policy rules enforce.
- Enhanced Application Logging requires a Strata Logging Service subscription. User-ID is also recommended. Here are steps to get started with Strata Logging Service and enable User-ID.To Enable Enhanced Application Logging on the NGFW, select and edit Settings.
![]() Continue to enable EAL in the Security policy rules that control the traffic into which you want extended visibility.
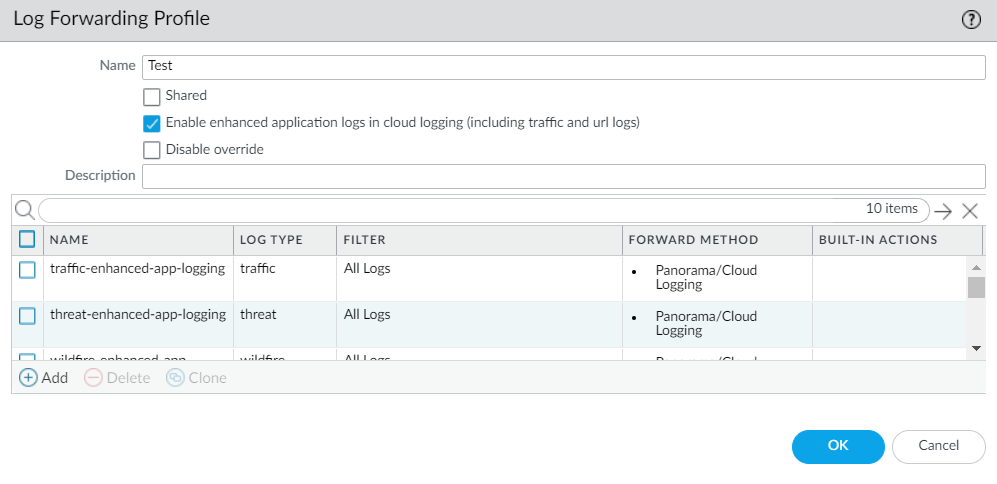
Continue to enable EAL in the Security policy rules that control the traffic into which you want extended visibility.- Select and Add or modify a Log Forwarding profile.Update the profile to Enable enhanced application logs in cloud logging (including traffic and url logs).
![]() Notice that when you enable EAL in a Log Forwarding profile, match lists that specify the log types required for EAL are automatically added to the profile.Click OK to save the profile and continue to update as many profiles as needed.Ensure that the Log Forwarding profile that you’ve updated is attached to a Security policy rule, to trigger log generation and forwarding for the traffic matched to the rule.
Notice that when you enable EAL in a Log Forwarding profile, match lists that specify the log types required for EAL are automatically added to the profile.Click OK to save the profile and continue to update as many profiles as needed.Ensure that the Log Forwarding profile that you’ve updated is attached to a Security policy rule, to trigger log generation and forwarding for the traffic matched to the rule.- To view the profiles attached to each Security policy rule, select .
- To update the Log Forwarding profile attached to a rule, Add or edit a rule and select and select the Log Forwarding profile enabled with EAL.
IoT Security
One part of the NGFW setup for IoT Security involves creating a Log Forwarding profile and applying it to Security policy rules. Although you can apply a profile to each rule individually, a simpler approach is to select a predefined Log Forwarding profile and apply it to as many rules as you like in bulk. The following steps explain this approach to adding the predefined Log Forwarding profile to Security policy rules in bulk.To use this workflow, you must have already configured security policy rules, enabled logging on the rules, and enabled logging services with Enhanced Application Logging (EAL).- Apply a Log Forwarding profile for IoT Security to Security policy rules.
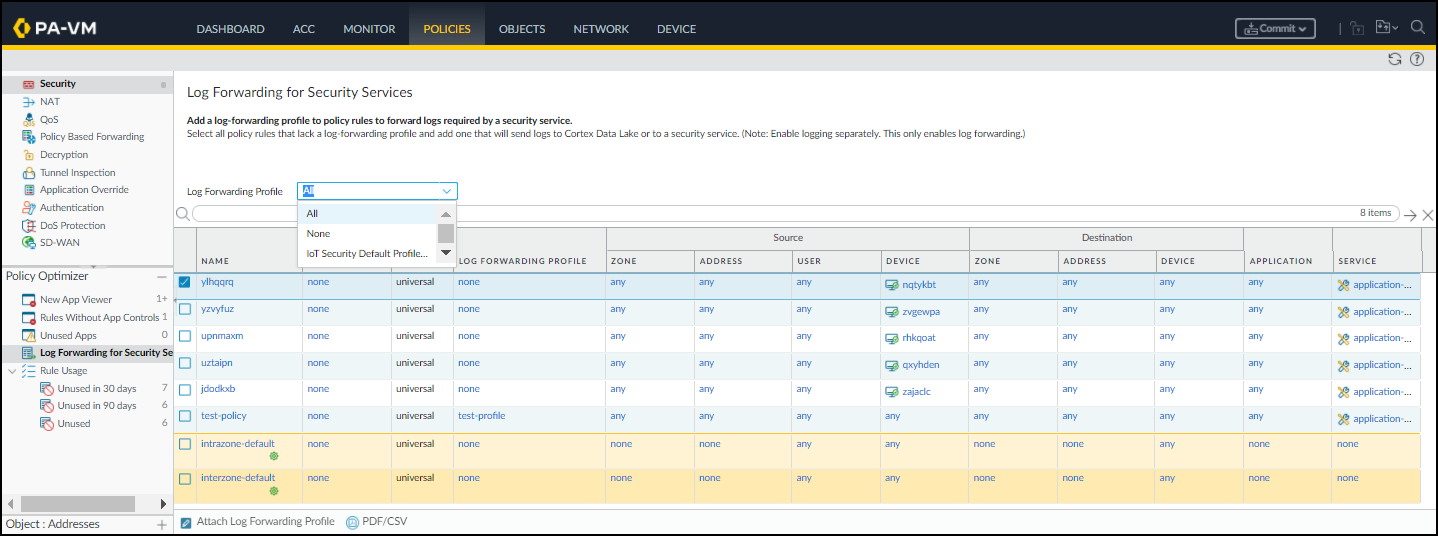
- Log in to your next-generation NGFW and select in the Policy Optimizer section.
- To view all your Security policy rules—including those with a Log Forwarding profile and those without—choose All for Log Forwarding Profile.
![]()
- Select the rules for which you want to forward logs to the logging service.
- Attach Log Forwarding Profile at the bottom of the page.
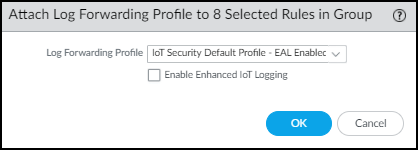
- To apply the default Log Forwarding profile to your rules, choose IoT Security Default Profile - EAL Enabled and OK.The default profile is preconfigured to provide IoT Security with all the log types it requires, including Enhanced Application logs.You don’t have to Enable Enhanced IoT Logging because EAL is already enabled on the IoT Security Default Profile.
![]() orTo forward Enhanced Application logs to an existing Log Forwarding profile that doesn’t already have it, choose it from the Log Forwarding Profile list, select Enable Enhanced IoT Logging and then OK.When you Enable Enhanced IoT Logging, PAN-OS updates the chosen Log Forwarding profile itself and thereby enables enhanced log forwarding on all rules that use the same Log Forwarding profile.PAN-OS adds the chosen Log Forwarding profile to those rules that don’t already have one and replaces previously assigned profiles with this one.
orTo forward Enhanced Application logs to an existing Log Forwarding profile that doesn’t already have it, choose it from the Log Forwarding Profile list, select Enable Enhanced IoT Logging and then OK.When you Enable Enhanced IoT Logging, PAN-OS updates the chosen Log Forwarding profile itself and thereby enables enhanced log forwarding on all rules that use the same Log Forwarding profile.PAN-OS adds the chosen Log Forwarding profile to those rules that don’t already have one and replaces previously assigned profiles with this one.
Commit your changes.