Device Security
Prepare Your Firewall for Device Security
Table of Contents
Expand All
|
Collapse All
Device Security Docs
Prepare Your Firewall for Device Security
Configure your firewall to collect network traffic metadata, forward it to
Strata Logging Service, and install a device certificate.
| Where Can I Use This? | What Do I Need? |
|---|---|
|
One of the following subscriptions:
|
The following steps describe how to enable telemetry and traffic metadata collection
on a Next-Generation Firewall. This includes both installing the
OpenConfig plugin and
enabling Strata Logging Service on a
Next-Generation Firewall and configure it to obtain and log network traffic metadata.
It then explains how to forward the collected metadata to Strata Logging Service
where Device Security uses it to identify various IoT devices on the
network.
The steps below assume you already completed the Device Security
onboarding process but still need to do
the following.
- Install the OpenConfig plugin on your firewalls.
- Install a device license and a logging service license on your firewalls.
- Install certificates on your firewalls (if they are not installed already).
- Configure your firewalls to collect network traffic metadata.
- Configure your firewalls to forward the collected metadata in logs to the logging service.
- Enable Device-ID on zones with devices that you want to monitor and protect with Security policy rules.
- Optional Create service routes and Security policy rules to permit firewalls to communicate with the logging service, Device Security, and the update server through a data interface.
- Follow the steps to install the OpenConfig plugin.If you already have the OpenConfig plugin installed, ensure that you are using the OpenConfig plugin version 2.1.2 or later. You need the OpenConfig plugin to enable packet captures for device identification.Device Security does not perform packet captures on FedRAMP and Device Security China tenants.Install the licenses required for Device Security to function.After onboarding to Device Security, take one of the following actions to install the licenses your firewalls need to use Device Security:Next-generation firewalls: Log in to each of your firewalls, select DeviceLicenses, and then select Retrieve license keys from license server in the License Management section.orPanorama: Log in to Panorama, select PanoramaDevice DeploymentLicenses, and then Refresh. Select the devices onboarded with Device Security and Refresh.This installs the licenses for Device Security and the logging service on the firewall.When the time comes to renew Device Security licenses, use this retrieval function on your firewalls so that they extend their license expiration dates.If necessary, generate a one-time password (OTP) and pre-shared key (PSK) to get device and logging service certificates.This step only applies to firewalls with an Device Security, Doesn't Require Data Lake Subscription. If your firewalls have an Device Security Subscription, which requires Strata Logging Service, see the Strata Logging Service Getting Started for details about generating certificates and installing them on your firewalls.Skip this step if your firewalls run PAN-OS 10.1 or later and already have a device certificate installed. Any firewalls on which you’ve previously installed a device certificate for another Palo Alto Networks product already have this certificate and don’t require a new one. You can check if your firewall has a valid certificate in the General Information section on the Dashboard page in the PAN-OS web interface.Firewalls running PAN-OS 10.1 or later require a device certificate but not a logging service certificate.The following next-generation firewall models automatically install a device certificate when they first connect to the Customer Support Portal (CSP); therefore, you don’t have to install one manually on any of these firewalls running these PAN-OS versions:
- PAN-OS 10.1: PA-410, PA-440, PA-450, PA-460, and PA-5450 firewalls
- PAN-OS 10.2: PA-410, PA-440, PA-450, and PA-460 firewalls; PA-1400 Series and PA-3400 Series firewalls; PA-5410, PA-5420, PA-5430, and PA-5450 firewalls; and PA-7000 Series firewalls
- PAN-OS 11.0 and later: PA-400 Series, PA-400R Series, PA-1400 Series, PA-3400 Series, PA-5400 Series, PA-5450 firewalls, and PA-7000 Series
Also any firewalls on which you’ve previously installed a device certificate for another Palo Alto Networks product already have a device certificate and don’t require a new one.Check the following questions and answers to determine when to generate and install a device certificate on a firewall.Do firewalls already have a device certificate?Do firewalls already have a logging service certificate?Are firewalls managed by Panorama?What to do?YesN/AN/ASkip this step.NoN/AYesEnter the Panorama serial number, generate an OTP in the Customer Support Portal, and enter it in Panorama to generate a device certificate.NoN/ANoGenerate an OTP in the Customer Support Portal and install a device certificate on the firewall.For information about the sites that next-generation firewalls contact to authenticate certificates when communicating with Device Security, see Device Security Integration with Next-generation Firewalls.- Log in to the Device Security portal as a user with owner privileges. To be able to generate OTPs and PSKs, your user account must have been created in the Customer Support Portal (CSP) and assigned a superuser role in the relevant tenant service group (TSG) in Identity & Access. A superuser role in the hub provides owner privileges in Device Security.
- Select AdministrationFirewallsCertificate Generation.
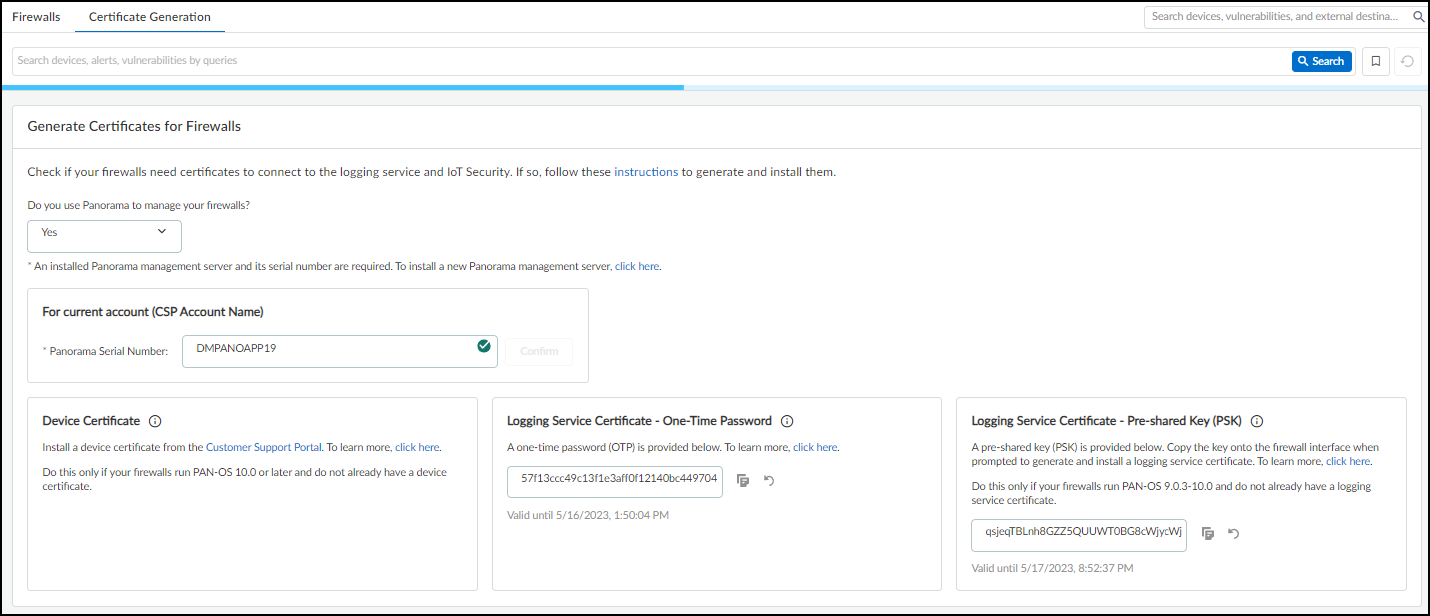
- If you manage your firewalls with Panorama, choose Yes and enter its serial number. This will link your Panorama management server with the applications in this TSG. You can find the Panorama serial number in your Customer Service Portal account in AssetsDevices. After you choose Yes and enter your Panorama serial number, Device Security displays the materials you need to get the certificate or certificates that firewalls need to secure their connections with Device Security and the logging service.If you have a Device Security license that includes Strata Logging Service, then Panorama must be part of the same TSG as Strata Logging Service.
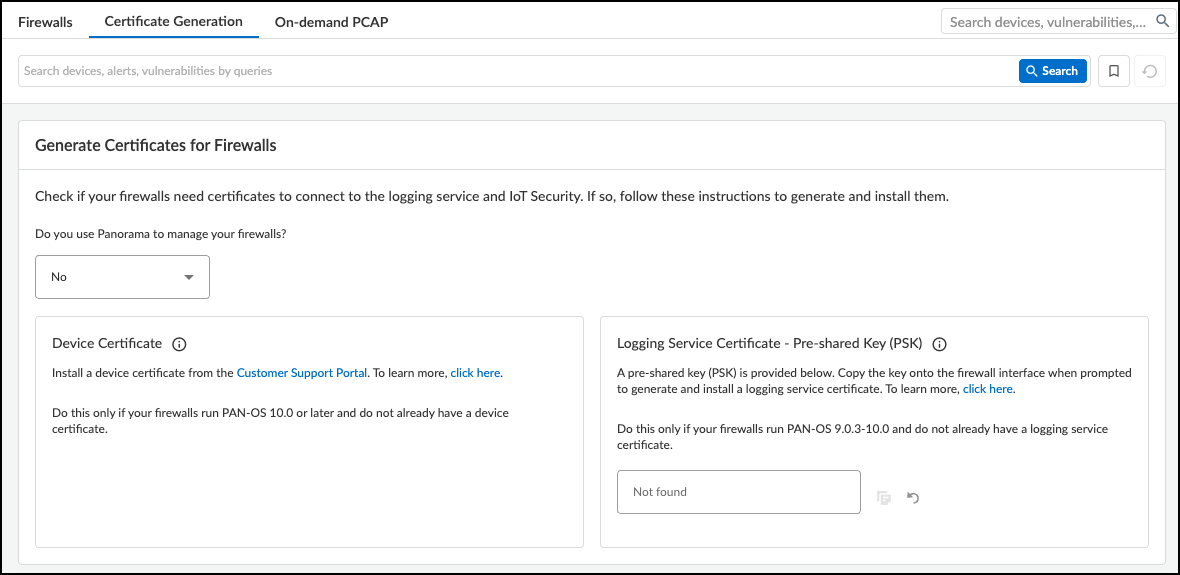
![]() To get a device certificate, click the link to the Customer Support Portal, log in to your account, and then follow the instructions below. To generate a logging service certificate, copy the OTP or PSK and follow the instructions below.If you don’t use Panorama, choose No. Because an OTP for a logging service certificate applies only to Panorama, it's not shown.
To get a device certificate, click the link to the Customer Support Portal, log in to your account, and then follow the instructions below. To generate a logging service certificate, copy the OTP or PSK and follow the instructions below.If you don’t use Panorama, choose No. Because an OTP for a logging service certificate applies only to Panorama, it's not shown.![]() Consider the following points when deciding which certificates you need and how to generate them:Device Certificate: Firewalls require a device certificate to authenticate with Device Security and to also authenticate with the logging service. To generate and install a device certificate on firewalls directly and through Panorama:
Consider the following points when deciding which certificates you need and how to generate them:Device Certificate: Firewalls require a device certificate to authenticate with Device Security and to also authenticate with the logging service. To generate and install a device certificate on firewalls directly and through Panorama:- Generate and install a device certificate on each firewall.
- Use Panorama to generate and install a device certificate on one or more firewalls.When a device certificate is installed on a firewall so it can authenticate itself to the logging service and Device Security, the firewall can’t decrypt encrypted traffic to inspect it and enforce policy rules on it. Therefore, don't try to use decryption policy rules on firewalls that have a device certificate installed on them.
Logging Service Certificate – One-Time Password: An OTP is necessary for Panorama to verify itself with its logging service instance and obtain logging service certificates for Panorama managed firewalls. A logging service certificate authenticates firewalls with the logging service.- Regenerate the OTP if necessary and copy it.
- Log in to the Panorama web interface as an admin user and select PanoramaSetupManagementDevice Certificate and Get certificate.
- Paste the OTP and then click OK.
Logging Service Certificate – Pre-Shared Key: A PSK is necessary to generate a logging service certificate on firewalls without Panorama management running PAN-OS 9.0.3-10.0.x. A logging service certificate authenticates firewalls with the logging service. To generate a logging service certificate:- Regenerate the PSK if necessary and copy it.
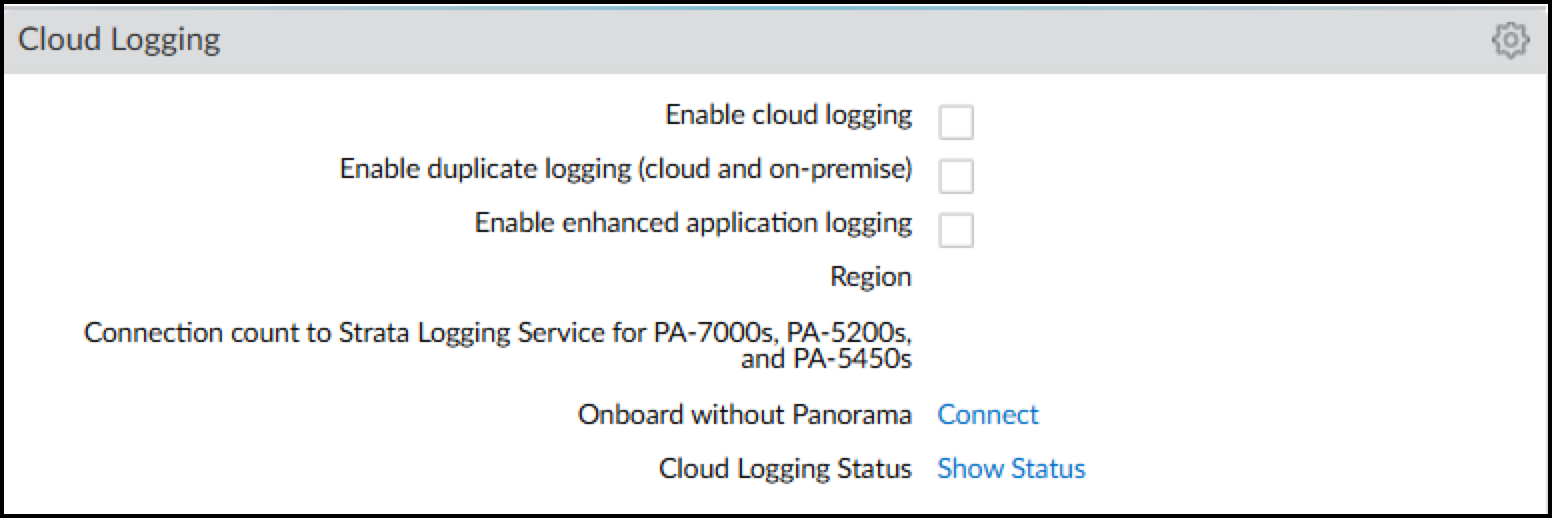
- Log in to your PAN-OS 9.0.3-10.0.x firewall and select DeviceSetupManagement.
![]()
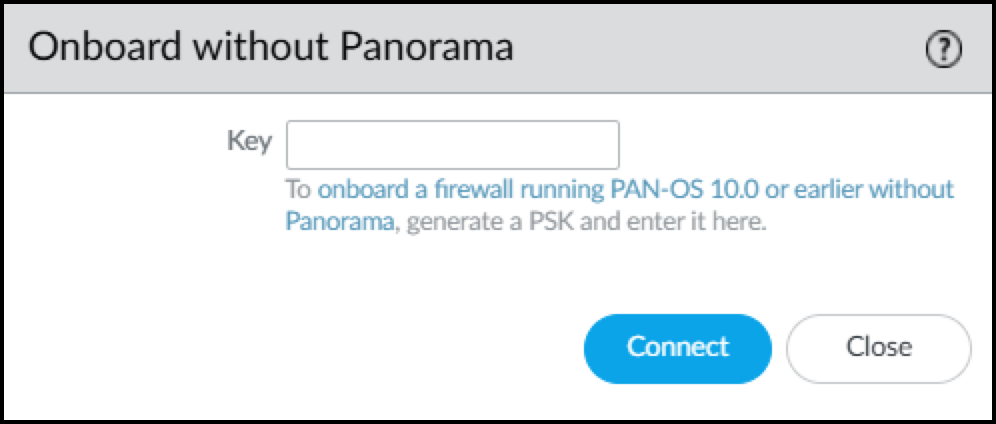
- In the Cloud Logging section, click Connect next to Onboard without Panorama.This opens the Onboard without Panorama dialog.
![]()
- Paste the PSK and Connect.The firewall first connects to the Customer Support Portal, submits the PSK, and downloads a logging service certificate. It then uses the certificate to authenticate itself and connect securely to the logging service.
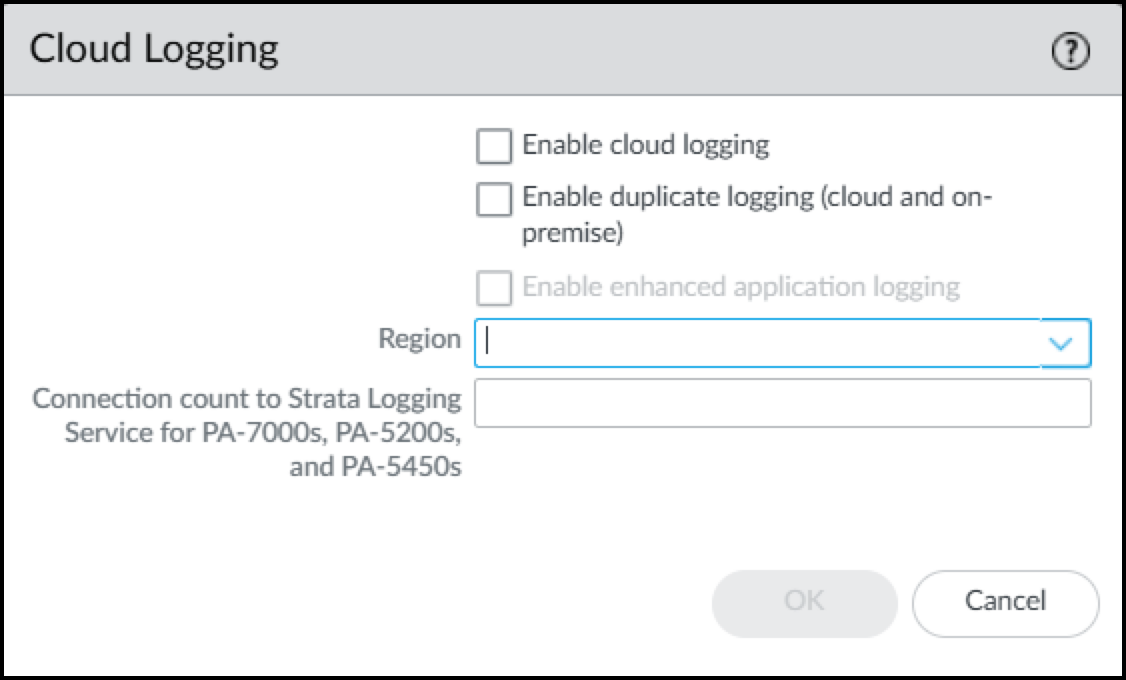
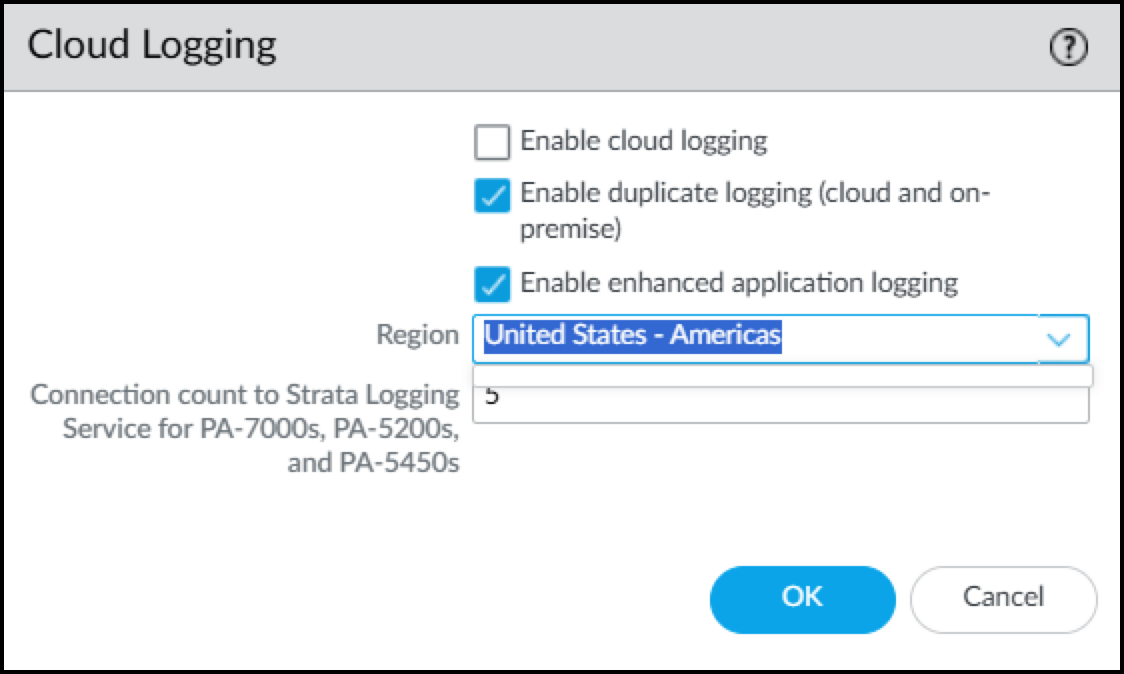
- Click the Edit icon (gear) for Cloud Logging. Select Enable Enhanced Application Logging.If you want to send the logs to the cloud logging service and to Panorama, also select Enable duplicate logging (cloud and on-premise). If you don't need to send the logs to Panorama, select Enable cloud logging. Select one of these options in addition to enabling enhanced application logging. Panorama streams logs through cloud logging for Device Security to ingest, even if you have a Doesn't Require Data Lake license.
![]()
![]()
- Choose the region where Strata Logging Service will ingest logs from your firewalls.For PA-7000 and PA-5200 models, enter the number of connections for sending logs from the firewall to the logging service. The range is 1-20 and the default is 5.
- When done, click OK.The term “Strata Logging Service” is a bit of a misnomer. The firewall forwards logs to Strata Logging Service, which only saves them to Strata Logging Service if you’re using it for data retention. An Device Security, Doesn’t Require Data Lake subscription still uses Strata Logging Service to receive EAL logs from the firewall. Even if you have an Device Security DRDL license, you need to enable Strata Logging Service so that the firewall can forward EAL logs to Device Security.
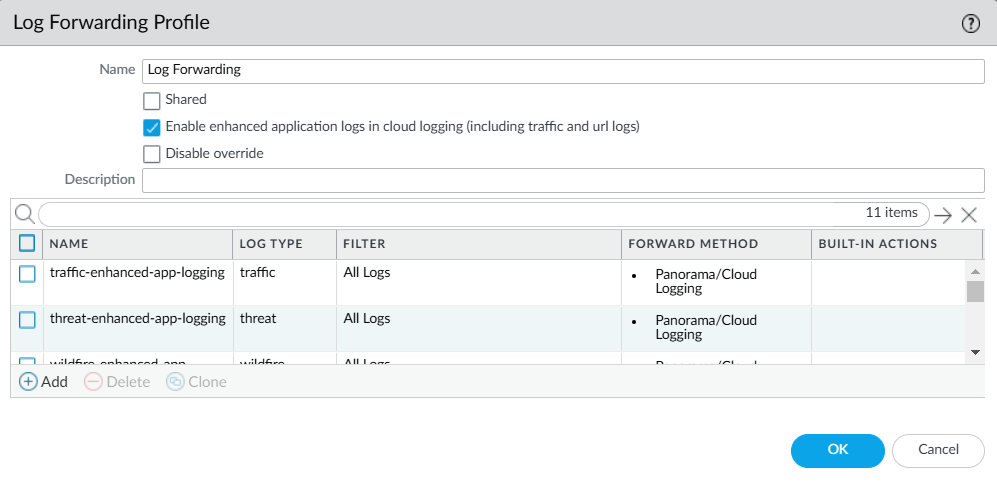
Make sure your firewall is set up to apply policy rules to DHCP traffic between DHCP clients and their DHCP server and to log their traffic.For detailed instructions about setting up firewalls to capture and log DHCP traffic, see Firewall Deployment for Device Visibility.If the firewall has a DHCP server on one of its interfaces, enable DHCP Broadcast Session on DeviceSetupSession. This setting is supported on all firewalls running PAN-OS 10.1.10 or later, PAN-OS 10.2.4 or later, and PAN-OS 11.0.1 or later. (For more information, see Firewall Deployment Options for Device Security.)In addition to detecting devices with dynamically assigned IP addresses, Device Security also discovers and identifies devices with static IP addresses. To learn about the multiple methods Device Security uses to do this and how you can assist, see Devices with Static IP Addresses.To forward logs to the logging service, click ObjectsLog Forwarding and then check for an Device Security Log Forwarding profile.By default, there is an Device Security Default Profile preconfigured. This Log Forwarding profile sends Enhanced Application logs to the logging service so that Device Security can ingest network traffic data.Optionally, you can add a new Log Forwarding profile or edit an existing one.Optional In the Log Forwarding profile, enter a name, click Enable enhanced application logs in cloud logging (including traffic and url logs), and then click OK.![]() A list of Enhanced Application logs automatically populates the page and forwards all logs per type to the logging service. Selecting Enable enhanced application logs in cloud logging (including traffic and url logs) enables the firewall to capture packet payload data (EALs) in addition to session metadata (regular logs) for these different log types. When this Log Forwarding profile is attached to a Security policy rule to control traffic, the firewall forwards both types of data to the logging service. You can’t delete any of these logs from the profile nor modify any of the filters in the Filter column, which are the default "All Logs" filter.Device Security uses the following log types:
A list of Enhanced Application logs automatically populates the page and forwards all logs per type to the logging service. Selecting Enable enhanced application logs in cloud logging (including traffic and url logs) enables the firewall to capture packet payload data (EALs) in addition to session metadata (regular logs) for these different log types. When this Log Forwarding profile is attached to a Security policy rule to control traffic, the firewall forwards both types of data to the logging service. You can’t delete any of these logs from the profile nor modify any of the filters in the Filter column, which are the default "All Logs" filter.Device Security uses the following log types:- traffic – Device Security uses Traffic logs to identify devices, generate policy rule recommendations, risk assessment, device behavior anomaly detection, correlate sessions, and raise security alerts.
- threat – Device Security uses Threat logs to assess risks, detect vulnerabilities, raise security alerts, and generate policy rule recommendations.
- wildfire – Device Security uses WildFire logs to detect IoT-specific file-based attacks, raise security alerts, and generate policy rule recommendations.
- gtp (When GTP is enabled) – Device Security uses GTP logs to identify cellular devices and their network behaviors. If such traffic isn't on the network, firewalls don't generate GTP logs, and you can safely ignore the red icon that appears in the Status column for it on AdministrationFirewalls in the Device Security portal.
The firewall automatically applies the Device Security Default Profile to new Security policy rules when they’re created—or when they’re imported from Device Security. This saves time and effort when importing Security policy rule recommendations from Device Security. Because imported rule recommendations don’t include a Log Forwarding profile, you have to add one manually to each rule after you import it. The default profile helps you avoid this step. The default Log Forwarding profile is only applied when adding new Security policy rules, but it's not retroactively applied to existing rules.Enable log forwarding on Security policy rules.On Security policy rules that apply to traffic whose data you want to collect, enable log forwarding and choose the Log Forwarding profile you just created to send Enhanced Application logs for this traffic to the logging service. For information, see Configure Policies for Log Forwarding.Enable Device-ID in each zone where you want to use it to detect devices and enforce your Security policy rules.For detailed configuration instructions, see Configure Device-ID in the PAN-OS Administrator’s Guide.(Optional) Create service routes and Security policy rules if your firewall uses a data interface to access Strata Logging Service, Device Security, and the update server.Commit your configuration changes.After the configuration is committed, the firewall begins generating logs and forwarding them to the logging service. You can use the Explore app in the hub to see the progress of log forwarding between the firewall and the logging service.

