SD-WAN
Upgrade Standalone Panorama Leveraging SD-WAN Plugin
Table of Contents
Expand All
|
Collapse All
SD-WAN Docs
-
-
-
-
- 3.4
- 3.3
- 3.2
- 3.1
- 3.0
- 2.2
- 2.1
- 2.0
- 1.0
-
Upgrade Standalone Panorama Leveraging SD-WAN Plugin
Upgrade path and step-by-step procedure for the SD-WAN plugin version
that your standalone Panorama management server is running.
| Where Can I Use This? | What Do I Need? |
|---|
Complete the Prerequisites before proceeding with the upgrade
procedure.
Follow the upgrade path based on the SD-WAN plugin version
that your Panorama management server is running.
| Panorama Running SD-WAN Plugin Version | Follow the Steps |
|---|
Standalone Panorama: Upgrade SD-WAN Plugin 1.0.4 to 2.2.7 Version
It's recommended to always ensure that the Panorama software version is higher
than the PAN-OS version. For example, if your Panorama version is 10.1.9, then
your PAN-OS version can be any of the earlier PAN-OS 10.1.9 releases.
Read the important considerations for
upgrading Panorama before you start the upgrade process.
- Download and install Panorama software version 10.0.7-h3.From Panorama 10.0.7-h3, download, and install the latest Panorama 10.1 release.Download and install the SD-WAN plugin version 2.2.7 on Panorama.(Mandatory) (In configuration mode) Commit the changes from the active Panorama.Check the following after upgrading the standalone Panorama.
- Push to devices from Panorama.
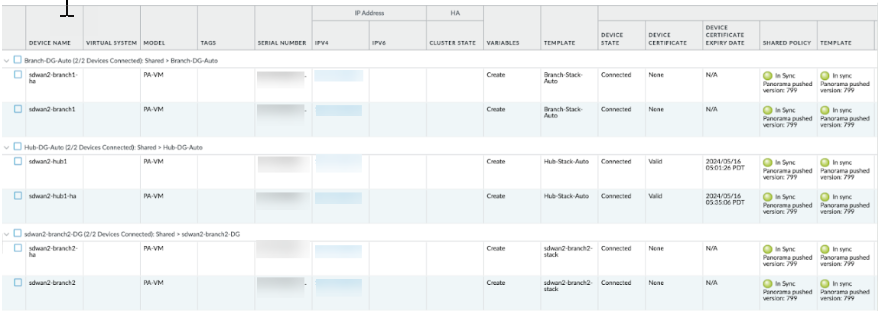
- Select PanoramaManaged DevicesSummary and verify if the device group and templates are in
synchronization on both active and passive Panorama under the
devices summary page.
![]()
- Verify if the SD-WAN configurations such as, Tunnel,
BGP, Key ID, and traffic are as expected.After successful upgrade of the Panorama HA pair, the Key ID, PSK, IP cache, IPSec tunnel cache, and subnet cache will be refreshed which will not affect the functionalities of SD-WAN.
Once the Panorama upgrade is successful, if needed, all the connected devices can be upgraded one-by-one starting with the hub HA pairs/standalone followed by the branch HA pairs/standalone.It's recommended to:- Schedule the upgrade during a maintenance window to minimize service disruption
- Push configuration from Panorama to all firewalls after completing the upgrade to ensure configuration synchronization across all devices
- Verify SD-WAN configuration and functionality after each upgrade to confirm proper operation
After the upgrade is complete, verify the changes after the upgrade.Standalone Panorama: Upgrade SD-WAN Plugin 2.1.x to 2.2.7 Version
It's recommended to always ensure that the Panorama software version is higher than the PAN-OS version. For example, if your Panorama version is 10.1.9, then your PAN-OS version can be any of the earlier PAN-OS 10.1.9 releases.Read the important considerations for upgrading Panorama before you start the upgrade process.- Download and install the latest Panorama 10.1 release.Download and install the SD-WAN plugin version 2.2.7 on Panorama.(Mandatory) (In configuration mode) Commit the changes from the active Panorama.Check the following after upgrading the standalone Panorama.
- Push to devices from Panorama.
- Select PanoramaManaged DevicesSummary and verify if the device group and templates are in
synchronization on both active and passive Panorama under the
devices summary page.
![]()
- Verify if the SD-WAN configurations such as, Tunnel,
BGP, Key ID, and traffic are as expected.After successful upgrade of the Panorama HA pair, the Key ID, PSK, IP cache, IPSec tunnel cache, and subnet cache will be refreshed which will not affect the functionalities of SD-WAN.
Once the Panorama upgrade is successful, if needed, all the connected devices can be upgraded one-by-one starting with the hub HA pairs/standalone followed by the branch HA pairs/standalone.It's recommended to:- Schedule the upgrade during a maintenance window to minimize service disruption
- Push configuration from Panorama to all firewalls after completing the upgrade to ensure configuration synchronization across all devices
- Verify SD-WAN configuration and functionality after each upgrade to confirm proper operation
After the upgrade is complete, verify the changes after the upgrade.Standalone Panorama: Upgrade SD-WAN Plugin 2.2.7 to Supported SD-WAN Plugin Version
It's recommended to always ensure that the Panorama software version is higher than the PAN-OS version. For example, if your Panorama version is 10.1.9, then your PAN-OS version can be any of the earlier PAN-OS 10.1.9 releases.Read the important considerations for upgrading Panorama before you start the upgrade process.- Download the supported SD-WAN plugin version and delete all the other SD-WAN plugin versions downloaded except SD-WAN plugin version 2.2.7.Upgrade the Panorama software version from the 10.1 to the Panorama version compatible with the SD-WAN plugin version to be upgraded (for example, SD-WAN 3.0.8 is compatible with Panorama version 10.2). After a successful upgrade, the compatible SD-WAN plugin will be installed automatically.To verify if the correct SD-WAN plugin version is installed on your Panorama, check the General Information in the Panorama Dashboard.(Mandatory) (In configuration mode) Commit the changes from the active Panorama.Check the following after upgrading the standalone Panorama.
- Push to devices from Panorama.
- Select PanoramaManaged DevicesSummary and verify if the device group and templates are in
synchronization on both active and passive Panorama under the
devices summary page.
![]()
- Verify if the SD-WAN configurations such as, Tunnel,
BGP, Key ID, and traffic are as expected.After successful upgrade of the Panorama HA pair, the Key ID, PSK, IP cache, IPSec tunnel cache, and subnet cache will be refreshed which will not affect the functionalities of SD-WAN.
Once the Panorama upgrade is successful, if needed, all the connected devices can be upgraded one-by-one starting with the hub HA pairs/standalone followed by the branch HA pairs/standalone.It's recommended to:- Schedule the upgrade during a maintenance window to minimize service disruption
- Push configuration from Panorama to all firewalls after completing the upgrade to ensure configuration synchronization across all devices
- Verify SD-WAN configuration and functionality after each upgrade to confirm proper operation
After the upgrade is complete, verify the changes after the upgrade.

