Next-Generation Firewall
Strata Cloud Manager
Table of Contents
Expand All
|
Collapse All
Next-Generation Firewall Docs
-
-
-
-
-
-
-
- PAN-OS 12.1
- PAN-OS 11.2
- PAN-OS 11.1
- PAN-OS 11.0 (EoL)
- PAN-OS 10.2
- PAN-OS 10.1
- PAN-OS 10.0 (EoL)
- PAN-OS 9.1 (EoL)
- PAN-OS 9.0 (EoL)
- PAN-OS 8.1 (EoL)
-
- PAN-OS 12.1
- PAN-OS 11.2
- PAN-OS 11.1
- PAN-OS 10.2
- PAN-OS 10.1
Strata Cloud Manager
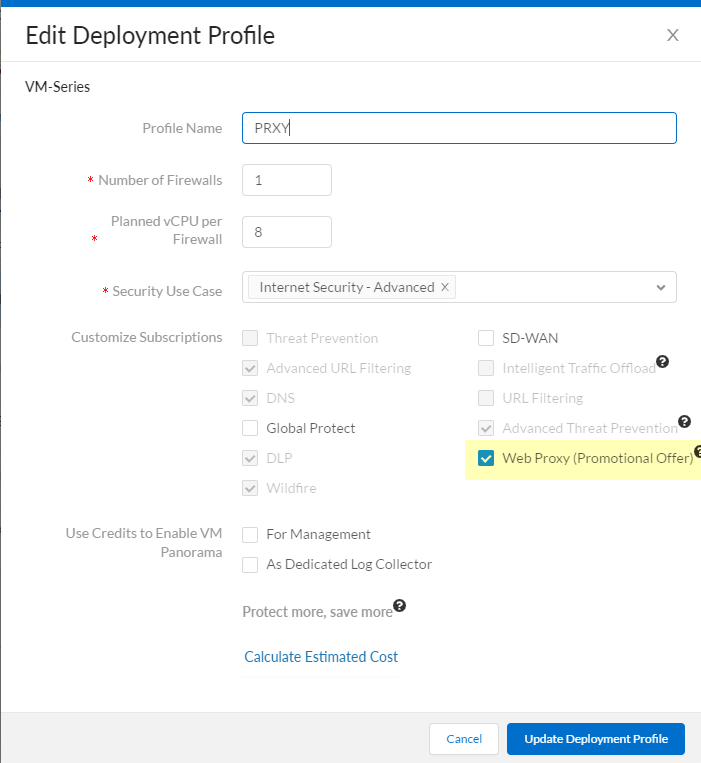
- (VM Series only) If you have not already done so, activate the license for web proxy.This step is required for the PA-1400 Series, PA-3400 Series, PA-5400 Series (excluding the PA-5450), and VM Series. The following steps are for the VM series; for the PA-Series firewalls, follow the steps to activate subscription licenses.
- Log in to the Customer Service Portal (CSP).Edit the deployment profile.Select Web Proxy (Promotional Offer).
![]() Click Update Deployment Profile.On the firewall, retrieve the license keys from the server.If the license key retrieval is not successful, restart the firewall and repeat this step before proceeding.Set up the necessary interfaces and zones.Do not edit the proxy zone.As a best practice, use Layer 3 (L3) for all interfaces and configure a separate zone for each interface within the same virtual routers and the same virtual systems.
Click Update Deployment Profile.On the firewall, retrieve the license keys from the server.If the license key retrieval is not successful, restart the firewall and repeat this step before proceeding.Set up the necessary interfaces and zones.Do not edit the proxy zone.As a best practice, use Layer 3 (L3) for all interfaces and configure a separate zone for each interface within the same virtual routers and the same virtual systems.- Configure an interface for the client.Configure an interface for the outgoing traffic to the internet.Set up the Transparent Proxy.
- In Strata Cloud Manager, select ManageConfigurationNGFW and Prisma AccessDevice SettingsConfiguration Scope.Select the folder, snippet, or device for which you want to configure Transparent Proxy.Select Device SettingsProxyProxy SettingsCustomize.
![]() Select Transparent Proxy as the Mode.
Select Transparent Proxy as the Mode.![]() Specify the Client Facing Interface.This is the interface for client traffic that you configured in an earlier step.Specify an Outbound Zone for outgoing traffic to the internet.You can Create New if you don't already have an outbound zone configured.Specify the IP addresses for the primary and secondary DNS servers that you want to connect to and the interface for the DNS proxy connection.After you push your configuration, Strata Cloud Manager will automatically create a DNS Proxy Object with these specifications on your devices. You can view the object on the devices themselves but not in Strata Cloud Manager.(Optional) Specify the Connect Timeout to define (in seconds) how long the proxy waits for a response from the web server. If there is no response after the specified amount of time has elapsed, the proxy closes the connection. The default is 5 seconds.(Optional) Specify the Web Traffic Service Port if you'd like web traffic to use special ports. The default ports are 80 and 443.(Optional) Use the default loopback interface (loopback.999) or enter a different one.The loopback interface must follow the format loopback.x, with x being any integer value.After you push your configuration, Strata Cloud Manager will automatically create a loopback interface with these specifications on your devices. You can view the interface on the devices themselves but not in Strata Cloud Manager.(Optional) Choose Whether to nat outbound traffic and enter an Outbound Interface.This creates a source NAT rule. Select this if your network cannot directly reach the internet.Save.Configure Transparent Proxy Policy Rules.These are a set of rules that determine what traffic passes through the proxy. After you push your configuration, these rules create Destination NAT rules on your devices, which apply NAT to the traffic that passes through the loopback interface configured earlier.In Strata Cloud Manager, however, Transparent Proxy Policy rules are visible only in web proxy configuration, not under NAT elsewhere in the app.
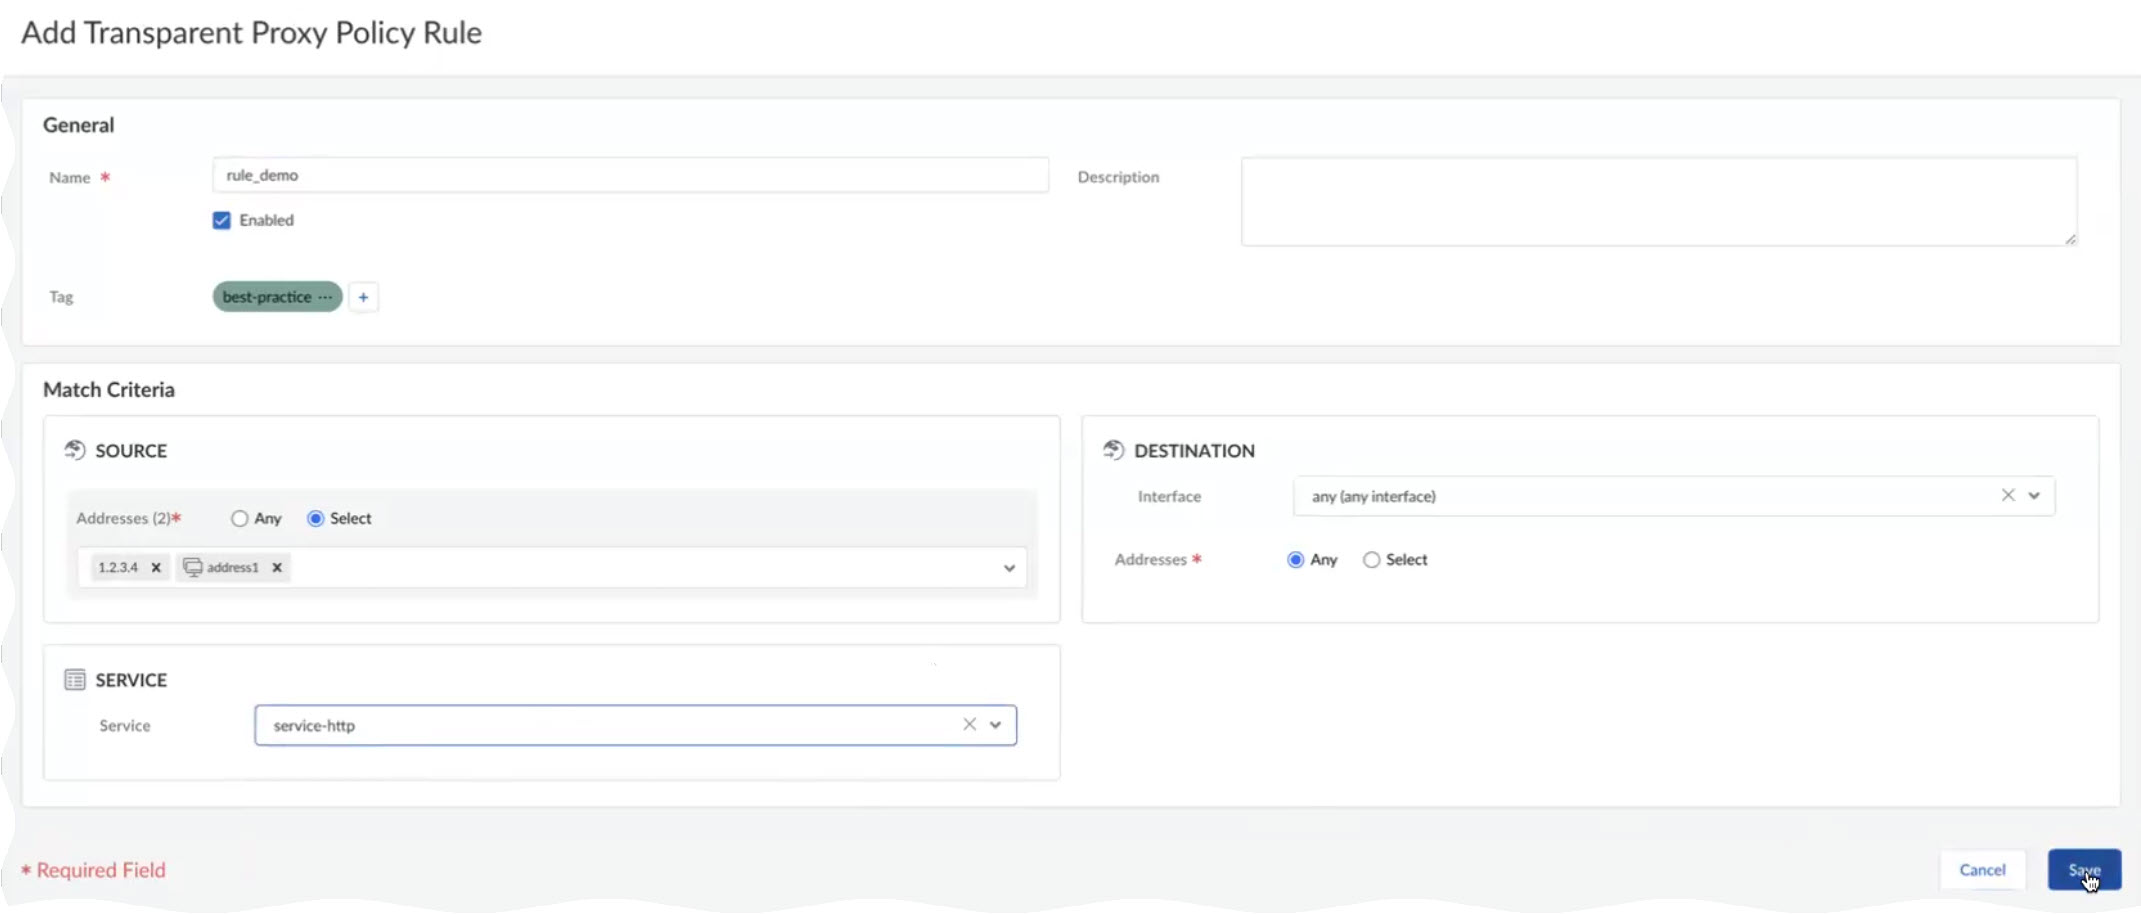
Specify the Client Facing Interface.This is the interface for client traffic that you configured in an earlier step.Specify an Outbound Zone for outgoing traffic to the internet.You can Create New if you don't already have an outbound zone configured.Specify the IP addresses for the primary and secondary DNS servers that you want to connect to and the interface for the DNS proxy connection.After you push your configuration, Strata Cloud Manager will automatically create a DNS Proxy Object with these specifications on your devices. You can view the object on the devices themselves but not in Strata Cloud Manager.(Optional) Specify the Connect Timeout to define (in seconds) how long the proxy waits for a response from the web server. If there is no response after the specified amount of time has elapsed, the proxy closes the connection. The default is 5 seconds.(Optional) Specify the Web Traffic Service Port if you'd like web traffic to use special ports. The default ports are 80 and 443.(Optional) Use the default loopback interface (loopback.999) or enter a different one.The loopback interface must follow the format loopback.x, with x being any integer value.After you push your configuration, Strata Cloud Manager will automatically create a loopback interface with these specifications on your devices. You can view the interface on the devices themselves but not in Strata Cloud Manager.(Optional) Choose Whether to nat outbound traffic and enter an Outbound Interface.This creates a source NAT rule. Select this if your network cannot directly reach the internet.Save.Configure Transparent Proxy Policy Rules.These are a set of rules that determine what traffic passes through the proxy. After you push your configuration, these rules create Destination NAT rules on your devices, which apply NAT to the traffic that passes through the loopback interface configured earlier.In Strata Cloud Manager, however, Transparent Proxy Policy rules are visible only in web proxy configuration, not under NAT elsewhere in the app.- Select Add Rule.
![]() Name the rule.(Optional) Add tags to label your rule.Specify a source address or leave it as Any.Specify a destination address or leave it as Any.(Optional) Specify a destination interface.(Optional) Select a Service.Save.
Name the rule.(Optional) Add tags to label your rule.Specify a source address or leave it as Any.Specify a destination address or leave it as Any.(Optional) Specify a destination interface.(Optional) Select a Service.Save.![]() Push your configuration and verify on your firewalls.
Push your configuration and verify on your firewalls.- To verify, log in to the firewall and select NetworkProxy.You should see information corresponding to the transparent proxy that you just configured.
![]()


