Migrate Port-Based to App-ID Based Security Policy Rules
Table of Contents
Migrate Port-Based to App-ID Based Security Policy Rules
Policy Optimizer converts port-based Security policy
rules to app-based rules without compromising app availability to
safely enable applications.
When you transition from a legacy firewall
to a Palo Alto Networks next-generation firewall, you inherit a
large number of port-based rules that allow any application on the
ports, which increases the attack surface because any application
can use an open port. Policy Optimizer identifies all applications
seen on any legacy port-based Security policy rule and provides
an easy workflow for selecting the applications you want to allow
on that rule. Migrate port-based rules to application-based allow
rules to reduce the attack surface and safely enable applications
on your network. Use Policy Optimizer to maintain the rulebase as
you add new applications.
Migrate
a few port-based rules at a time to application-based rules, in
a prioritized manner. A gradual conversion is safer than migrating
a large rulebase at one time and makes it easier to ensure that
new application-based rules control the necessary applications.
Use Policy Optimizer information to prioritize
which rules to convert first.
To migrate a configuration
from a legacy firewall to a Palo Alto Networks device, see Best Practices for Migrating
to Application-Based Policy.
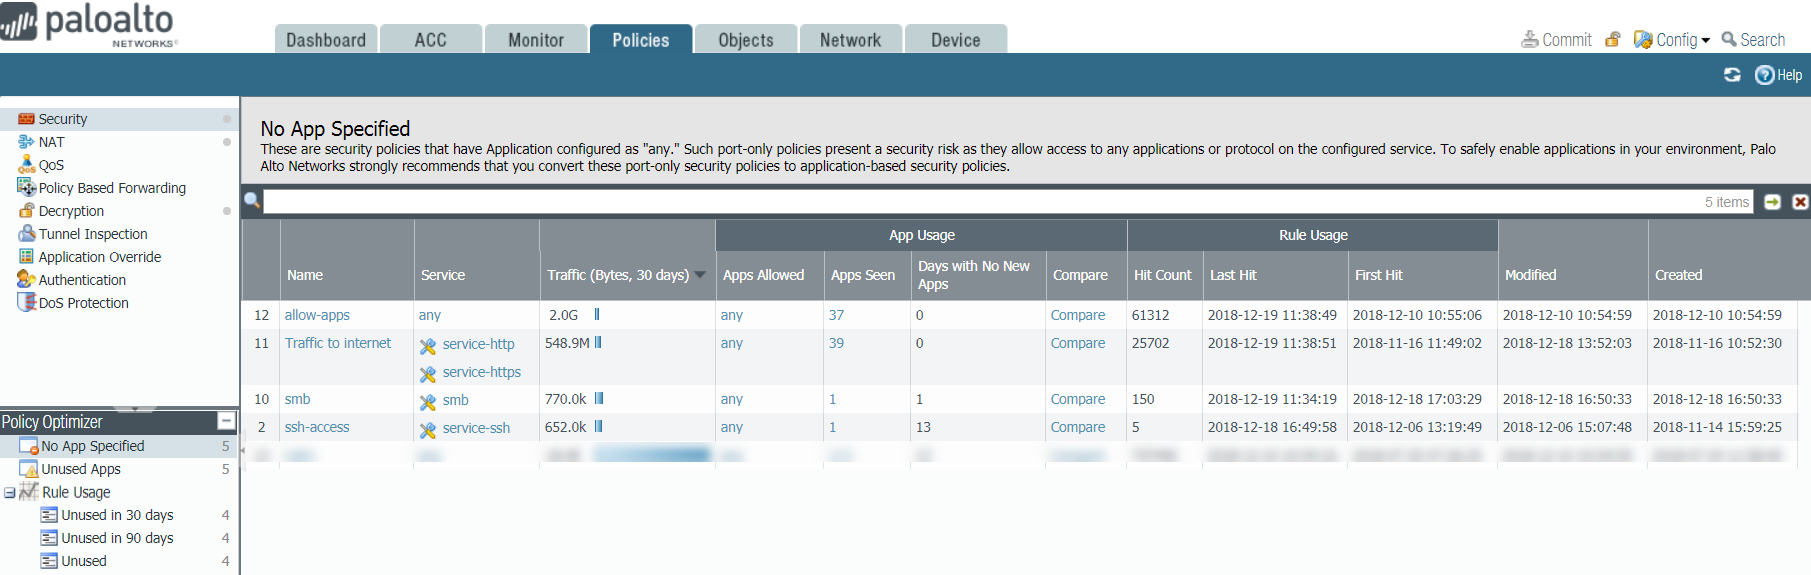
- Identify port-based rules.Port-based rules have no configured (allowed) applications. displays all port-based rules (Apps Allowed is any).
![]() Prioritize which port-based rules to convert first.enables you to sort rules without affecting their order in the rulebase and provides other information that helps you prioritize rules for conversion based on your business goals and risk tolerance.
Prioritize which port-based rules to convert first.enables you to sort rules without affecting their order in the rulebase and provides other information that helps you prioritize rules for conversion based on your business goals and risk tolerance.- Traffic (Bytes, 30 days)—(Click to sort.) Rules that currently match the most traffic are at the top of the list. This is the default sorting order.
- Apps Seen—(Click to sort.) A large number of legitimate applications matching a port-based rule may indicate you should replace it with multiple application-based rules that tightly define the applications, users, and sources and destinations. For example, if a port-based rule controls traffic for multiple applications for different user groups on different sets of devices, create separate rules that pair applications with their legitimate users and devices to reduce the attack surface and increase visibility. (Clicking the Apps Seen number or Compare shows you the applications that have matched the rule.)The firewall updates Apps Seen approximately every hour. However, if there is a large volume of application traffic or a large number of rules, it may take longer than an hour to update. After you add an application to a rule, wait at least an hour before running Traffic logs to see the application’s log information.
- Days with No New Apps—(Click to sort.) When the applications seen on a port-based rule stabilize, you can be more confident the rule is mature, conversion won’t accidentally exclude legitimate applications, and no more new applications will match the rule. The Created and Modified dates help you evaluate a rule’s stability because older rules that have not been modified recently may also be more stable.
- Hit Count—Displays rules with the most matches over a selected time frame. You can exclude rules for which you reset the hit counter and specify the exclusion time period in days. Excluding rules with recently reset hit counters prevents misconceptions about rules that show fewer hits than you expect because you didn’t know the counter was reset.You can also use Hit Count to View Policy Rule Usage and help identify and remove unused rules to reduce security risks and keep your rulebase organized.
Review the Apps Seen on port-based rules, starting with the highest priority rules.On No Apps Specified, click Compare or the number in Apps Seen to open Applications & Usage, which lists applications that matched a port-based rule over a specified Timeframe, with each application’s Risk, the date it was First Seen, the date it was Last Seen, and the amount of traffic over the last 30 days.![]() You can check Applications seen on port-based rules over the past 7, 15, or 30 days, or over the rule’s lifetime (Anytime). For migrating rules, Anytime provides the most complete assessment of applications that matched the rule.You can search and filter the Apps Seen, but keep in mind that it takes an hour or more to update Apps Seen. You can also order the Apps Seen by clicking the column headers. For example, you can click Traffic (30 days) to bring the applications with the most recent traffic to the top of the list, or click Subcategory to organize the applications by subcategory.The granularity of measurement for First Seen and Last Seen data is one day, so on the day you define a rule, the dates in these two columns are the same. On the second day the firewall sees traffic on an application, you’ll see a difference in the dates.Clone or add applications to the rule to specify the applications you want to allow on the rule.On Applications & Usage, convert a port-based rule to an application-based rule by:
You can check Applications seen on port-based rules over the past 7, 15, or 30 days, or over the rule’s lifetime (Anytime). For migrating rules, Anytime provides the most complete assessment of applications that matched the rule.You can search and filter the Apps Seen, but keep in mind that it takes an hour or more to update Apps Seen. You can also order the Apps Seen by clicking the column headers. For example, you can click Traffic (30 days) to bring the applications with the most recent traffic to the top of the list, or click Subcategory to organize the applications by subcategory.The granularity of measurement for First Seen and Last Seen data is one day, so on the day you define a rule, the dates in these two columns are the same. On the second day the firewall sees traffic on an application, you’ll see a difference in the dates.Clone or add applications to the rule to specify the applications you want to allow on the rule.On Applications & Usage, convert a port-based rule to an application-based rule by:- Cloning the rule—Preserves the original port-based rule and places the cloned application-based rule directly above it in the rulebase.
- Adding applications to the rule—Replaces the original port-based rule with the new application-based rule and deletes the original rule.If you have existing application-based rules and you want to migrate applications to them from port-based rules, you can Add Applications to an Existing Rule.
Some applications appear on the network at intervals, for example, for quarterly or yearly events. These applications may not display on the Applications & Usage screen if the history isn’t long enough to capture their latest activity.When you clone a rule or add applications to a rule, nothing else about the original rule changes. The original rule’s configuration remains the same except for the applications you added to the rule. For example, if the original rule’s Service allowed Any application or specified a particular service, you need to change the Service to Application-Default to restrict the allowed applications to their default ports on the new rule.Cloning is the safest way to migrate rules, especially when Applications & Usage shows more than a few well-known applications matching the rule (Rule Cloning Migration Use Case: Web Browsing and SSL Traffic provides an example of this). Cloning preserves the original port-based rule and places it below the cloned application-based rule, which eliminates the risk of losing application availability because traffic that doesn’t match the cloned rule flows through to the port-based rule. When traffic from legitimate applications hasn’t hit the port-based rule for a reasonable period of time, you can remove it to complete that rule’s migration.To clone a port-based rule:- In Apps Seen, click the check box next to each application you want in the cloned rule. Keep in mind that it takes an hour or more to update Apps Seen.
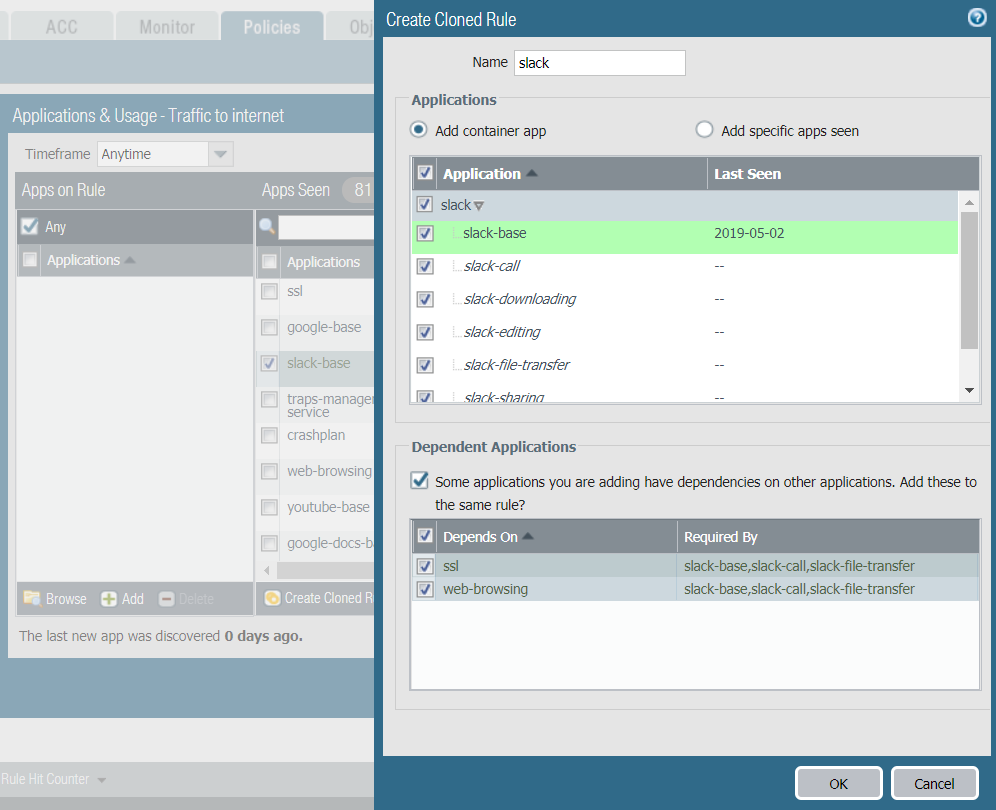
- Click Create Cloned Rule. In the Create Cloned Rule dialog, Name the cloned rule (“slack” in this example) and add other applications in the same container and application dependencies, if required. For example, to clone a rule by selecting the slack-base application:
![]() The green text is the selected application to clone. The container application (slack) is in the gray row. The applications listed in italics are applications that have not been seen on the rule but are in the same container as the selected application. Individual applications that have been seen on the rule are in normal font. All the applications are included in the cloned rule by default (Add Container App, which adds all the applications in the container, is selected by default) to help prevent the rule from breaking in the future.
The green text is the selected application to clone. The container application (slack) is in the gray row. The applications listed in italics are applications that have not been seen on the rule but are in the same container as the selected application. Individual applications that have been seen on the rule are in normal font. All the applications are included in the cloned rule by default (Add Container App, which adds all the applications in the container, is selected by default) to help prevent the rule from breaking in the future. - If you want to allow all of the applications in the container, leave Add container app selected. This also “future proofs” the rule because when an application is added to the container app, it’s automatically added to the rule.If you want to constrain access to some of the individual applications in the container, uncheck the box next to each individual application you don’t want users to access. This also unchecks the container app, so if you want to allow new applications in the container later, you have to add those applications individually.If you uncheck the container app, all the apps are unchecked and you manually select the apps you want to include in the cloned rule.
- Leave the application dependencies checked, in this example, ssl and web-browsing (these are applications that the selected application requires).
- Click OK to add the new application-based rule directly above the port-based rule in the rulebase.
- Commit the configuration.
When you clone a rule and Commit the configuration, the applications you select for the cloned rule are removed from the original port-based rule’s Apps Seen list. For example, if a port-based rule has 16 Apps Seen and you select two individual applications and one dependent application for the cloned rule, after cloning, the port-based rule shows 13 Apps Seen because the three selected applications have been removed from the port-based rule (16-3 = 13). The cloned rule shows the three added applications in Apps on Rule.Creating a cloned rule with a container app works a bit differently. For example, a port-based rule has 16 Apps Seen and you select one individual application and a container app for the cloned rule. The container app has five individual applications and has one dependent application. After cloning, the cloned rule shows seven Apps on Rule—the individual application, the five individual applications in the container app, and the dependent application for the container app. However, in the original port-based rule, Apps Seen shows 13 applications because only the individual application, the container app, and the container app’s dependent application are removed from the port-based rule.In contrast to cloning, adding applications to a port-based rule replaces the rule with the resulting application-based rule. Adding applications to a rule is simpler than cloning, but riskier because you may inadvertently miss applications that should be on the rule, and the original port-based rule is no longer in the rulebase to catch accidental omissions. However, adding applications to port-based rules that apply to only a few well-known applications migrates the rule quickly to an application-based rule. For example, for a port-based rule that only controls traffic to TCP port 22, the only legitimate application is SSH, so it’s safe to add applications to the rule.Adding applications using the traditional Security policy rule’s Application tab does not change Apps Seen or Apps on Rule. To preserve accurate application usage information, when replacing port-based rules with application-based rules, add applications using Add to This Rule or Match Usage (or create a cloned rule or add applications to an existing application-based rule instead) in Apps Seen.There are three ways to replace a port-based rule with an application-based rule by adding applications (Add to This Rule and Match Usage in Apps Seen and Add in Apps on Rule):- Add to This Rule applications from Apps Seen (applications that matched the rule). Keep in mind that it takes an hour or more to update Apps Seen.
- Select applications from Apps Seen on the rule.
- Click Add to Rule. In the Add to Rule dialog, add other applications in the same container app and application dependencies, if required. For example, to add slack-base to a rule:
![]() Similar to the Create Cloned Rule dialog, the green text in Add to This Rule is the selected application to add to the rule. The container app (slack) is in the gray row. The applications listed in italics are applications that have not been seen on the rule but are in the same container as the selected application. Individual applications that have been seen on the rule are in normal font. All the applications are included in the cloned rule by default (Add Container App, which adds all the applications in the container, is selected by default) to help prevent the rule from breaking in the future.
Similar to the Create Cloned Rule dialog, the green text in Add to This Rule is the selected application to add to the rule. The container app (slack) is in the gray row. The applications listed in italics are applications that have not been seen on the rule but are in the same container as the selected application. Individual applications that have been seen on the rule are in normal font. All the applications are included in the cloned rule by default (Add Container App, which adds all the applications in the container, is selected by default) to help prevent the rule from breaking in the future. - If you want to allow all of the applications in the container, leave Add container app selected. This also “future proofs” the rule because when an application is added to the container app, it’s automatically added to the rule.If you want to constrain access to some of the individual applications in the container, uncheck the box next to each individual application you don’t want users to access. This also unchecks the container app, so if you want to allow new applications in the container later, you have to add those applications individually.If you uncheck the container app, all the apps are unchecked and you manually select the apps you want to include in the cloned rule.
- Leave the application dependencies checked, in this example, ssl and web-browsing (these are applications that the selected application requires).
- Click OK to replace the port-based rule with the new application-based rule.
When you Add to This Rule and Commit the configuration, the applications you didn’t add are removed from Apps Seen because the new application-based rule no longer allows them. For example, if a rule has 16 Apps Seen and you Add to This Rule three applications, the resulting new rule shows only those three added applications in Apps Seen.Add to This Rule with a container app works a bit differently. For example, a port-based rule has 16 Apps Seen and you select one individual application and a container app to add to the new rule. The container app has five individual applications and has one dependent application. After adding the applications to the rule, the new rule shows seven Apps on Rule—the individual application, the five individual applications in the container app, and the dependent application for the container app. However, Apps Seen shows 13 applications because the individual application, the container app, and the container app’s dependent application are removed from that list. - Add all of the Apps Seen on the rule to the rule at one time with one click (Match Usage).Port-based rules allow any application, so Apps Seen may include unneeded or unsafe applications. Use Match Usage to convert a rule only when the rule has seen a small number of well-known applications with legitimate business purposes. A good example is TCP port 22, which should only allow SSH traffic, so if SSH is the only application seen on a port-based rule that opens port 22, you can safely Match Usage.
- In Apps Seen, click Match Usage. Keep in mind that it takes an hour or more to update Apps Seen. All the applications in Apps Seen are copied to Apps on Rule.
- Click OK to create the application-based rule and replace the port-based rule.
- If you know the applications you want on the rule, you can Add applications manually in Apps on Rule. However, this method is equivalent to using the traditional Security policy rule Application tab and does not change Apps Seen or Apps on Rule. To preserve accurate application usage information, convert rules using Add to Rule, Create Cloned Rule, or Match Usage in Apps Seen.
- In Apps on Rule, Add (or Browse) and select applications to add to the rule. This is equivalent to adding applications on the Application tab.
- Click OK to add the applications to the rule and replace the port-based rule with the new application-based rule.Because this method is equivalent to adding applications using the Application tab, the dialog to add application dependencies doesn’t pop up.
For each application-based rule, set the Service to application-default.If business needs require you to allow applications (for example, internal custom applications) on non-standard ports between particular clients and servers, restrict the exception to only the required application, sources, and destinations. Consider rewriting custom applications so they use the application default port.Commit the configuration.Monitor the rules.- Cloned rules—Monitor the original port-based rule to ensure the application-based rule matches the desired traffic. If applications you want to allow match the port-based rule, add them to the application-based rule or clone another application-based rule for them. When only applications that you don’t want on your network match the port-based rule for a reasonable period of time, the cloned rule is robust (it catches all the application traffic you want to control) and you can safely remove it.
- Rules with Added Applications—Because you convert only port-based rules that have a few well-known applications directly to application-based rules, in most cases the rule is solid from the start. Monitor the converted rule to see if the expected traffic matches the rule—if there’s less traffic than expected, the rule may not allow all of the necessary applications. If there’s more traffic than expected, the rule may allow unwanted traffic. Listen to user feedback—if users can’t access applications they need for business purposes, the rule (or another rule) may be too tight.