Configure MFA Between Duo and the Firewall
Table of Contents
Configure MFA Between Duo and the Firewall
Multi-factor authentication (MFA) allows you
to protect company assets by using multiple factors to verify the
identity of users before allowing them to access network resources.
There are multiple ways to use the Duo identity management service
to authenticate with the firewall:
- Two-factor authentication for VPN logins using the GlobalProtect Gateway and a RADIUS server profile (supported on PAN-OS 7.0 and later).
- API-based integration using Captive Portal and an MFA server profile (does not require a Duo Authentication Proxy or SAML IdP - supported on PAN-OS 8.0 and later).
- SAML integration for on-premise servers (supported on PAN-OS 8.0 and later).
To enable SAML MFA between the firewall
and Duo to secure administrative access to the firewall:
Configure Duo for SAML MFA with Duo Access Gateway
Before you begin, verify that you have deployed
the DuoAccessGateway (DAG)
on an on-premise server in your DMZ zone.
Create your Duo administrator account and configure
the Duo Access Gateway to authenticate your users before they can
access resources.
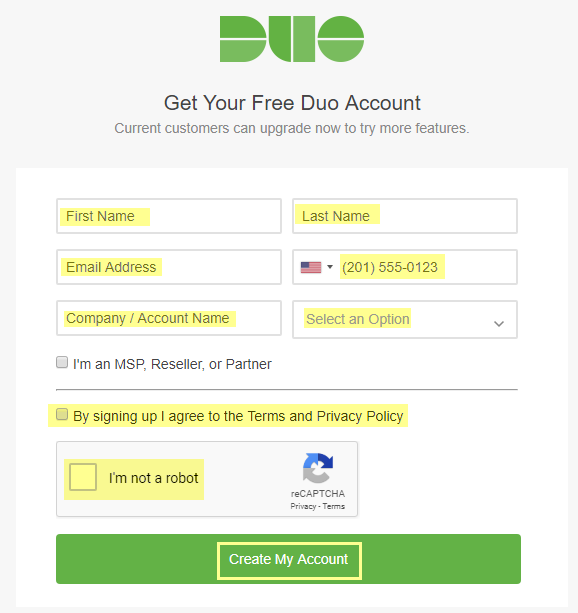
- Create your Duo administrator account.
- On the Duo account creation page, enter your First Name, Last Name, Email Address, Cell Phone Number, Company / Account Name, and select the number of employees in the organization.Agree to the Terms and Privacy Policy and respond to the reCAPTCHA challenge to Create My Account.
![]() Verify your Duo administrator account.
Verify your Duo administrator account.- Select the authentication verification method (Duo Push, Text Me, or Calling...).Enter the Passcode you receive and Submit it to verify your account.
![]() Configure your Duo service for SAML.After creating your configuration, download the configuration file at the top of the page.
Configure your Duo service for SAML.After creating your configuration, download the configuration file at the top of the page.- In the Duo Admin Panel, select .Enter Palo Alto Networks to search the applications.Locate SAML - Palo Alto Networks in the list of results, then Protect this Application.
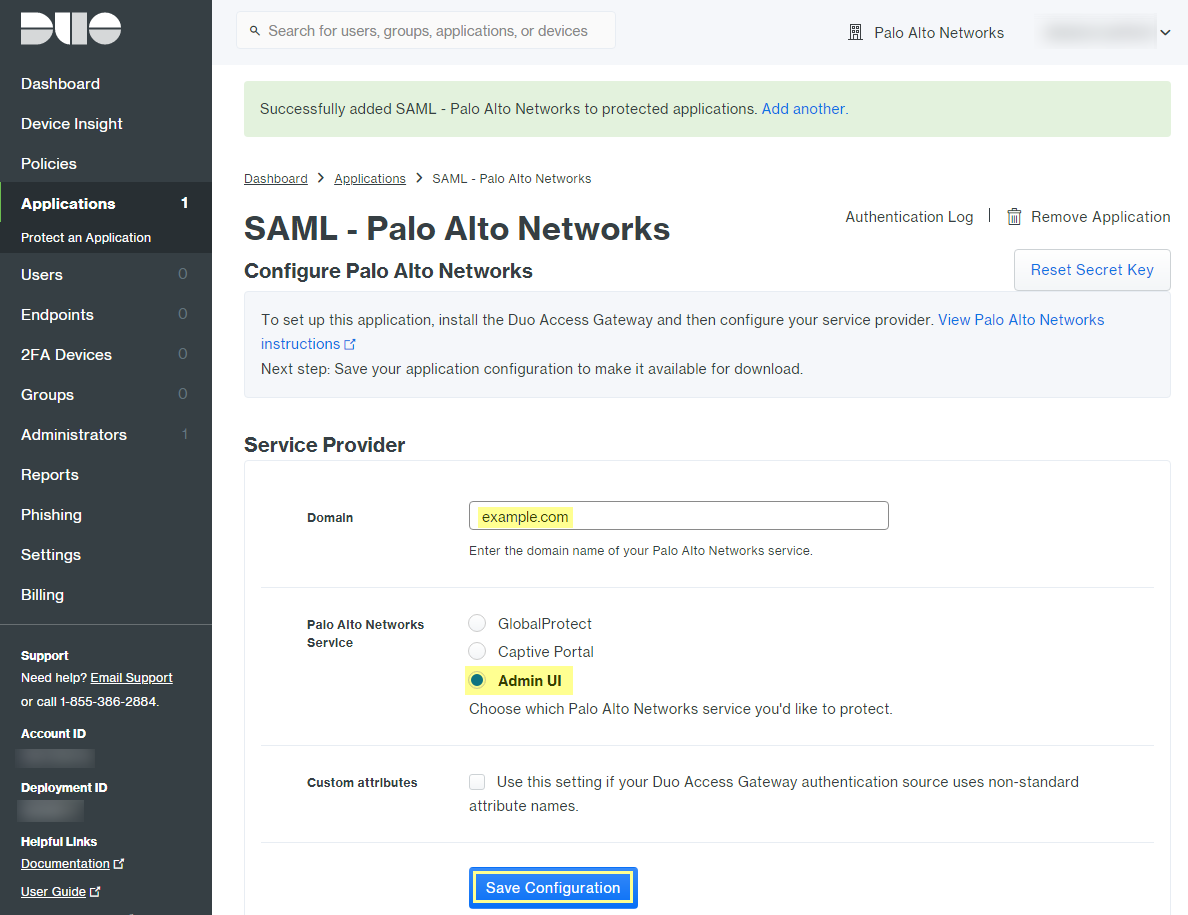
![]() Enter the Domain.Select Admin UI as the Palo Alto Networks Service.Configure your Policy and other Settings, and Save Configuration.
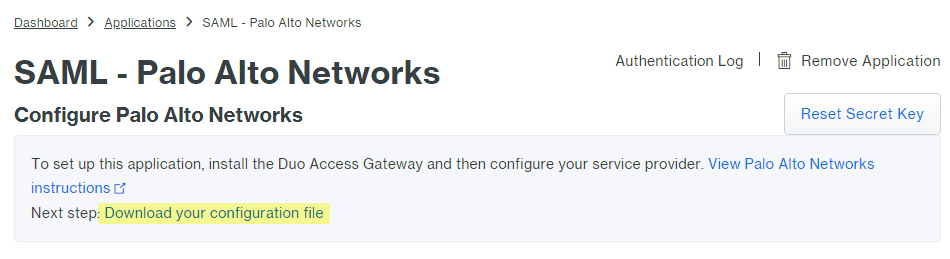
Enter the Domain.Select Admin UI as the Palo Alto Networks Service.Configure your Policy and other Settings, and Save Configuration.![]() Download your configuration file.The link to download the file is at the top of the page.
Download your configuration file.The link to download the file is at the top of the page.![]() Upload the configuration file to the Duo Access Gateway (DAG).
Upload the configuration file to the Duo Access Gateway (DAG).- In the DAG admin console, select Applications.Click Choose File and select the configuration file you downloaded, then Upload it.In , disable User agent binding, then Save Settings.In the DAG admin console, configure your Active Directory or OpenLDAP server as the authentication source and download the metadata file.
- Log in to the DAG admin console.In , select your Source type (Active Directory or OpenLDAP) and Set Active Source.In Configure Sources, enter the Attributes.
- For Active Directory, enter mail,sAMAccountName,userPrincipalName,objectGUID.
- For OpenLDAP, enter mail,uid.
- For any custom attributes, append them to the end of the list and separate each attribute with a comma. Do not delete any existing attributes.
Save Settings to save the configuration.Select , then click Download XML metadata to download the XML metadata you will need to import into the firewall.The file will be named dag.xml. Because this file includes sensitive information to authenticate your Duo account with the firewall, make sure to keep the file in a secure location to avoid the risk of compromising this information.Configure the Firewall to Integrate with Duo
- Import the Duo metadata.
- Log on to the firewall web interface.On the firewall, select .Enter the Profile Name.Browse to the Identity Provider Metadata file (dag.xml).If the Duo Access Gateway provides a self-signed certificate as the signing certificate for the IdP, you cannot Validate Identity Provider Certificate. In this case, ensure that you are using PAN-OS 9.1.3 or a later 9.1 version to mitigate exposure to CVE-2020-2021.
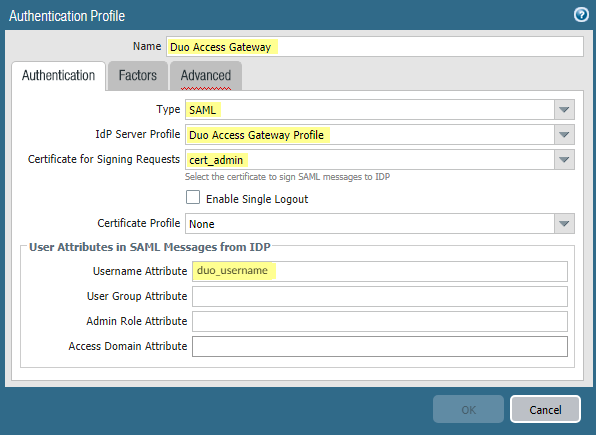
![]() Add an authentication profile.The authentication profile allows Duo as the identity provider that validates administrator login credentials.
Add an authentication profile.The authentication profile allows Duo as the identity provider that validates administrator login credentials.- Add an Authentication Profile.Enter the profile Name.Select SAML as the authentication Type.Select Duo Access Gateway Profile as the IdP Server Profile.Select the certificate you want to use for SAML communication with the Duo Access Gateway for the Certificate for Signing Requests.Enter duo_username as the Username Attribute.
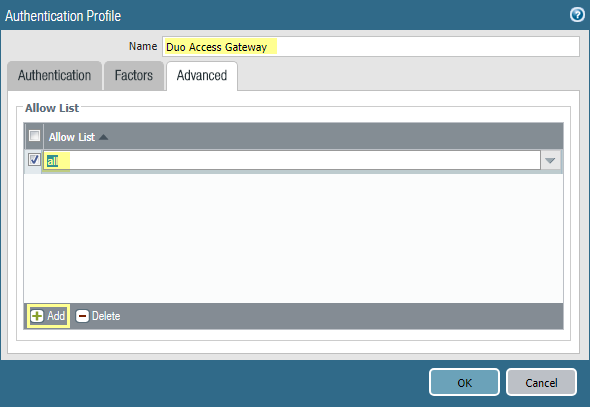
![]() Select Advanced to Add an allow list.Select all, then click OK.Commit the changes.
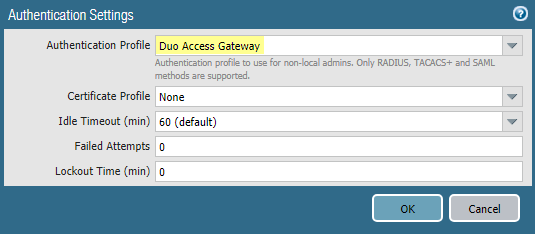
Select Advanced to Add an allow list.Select all, then click OK.Commit the changes.![]() Specify the authentication settings that the firewall uses for SAML authentication with Duo.
Specify the authentication settings that the firewall uses for SAML authentication with Duo.- Select and edit the Authentication Settings.Select Duo Access Gateway as the Authentication Profile, then click OK.
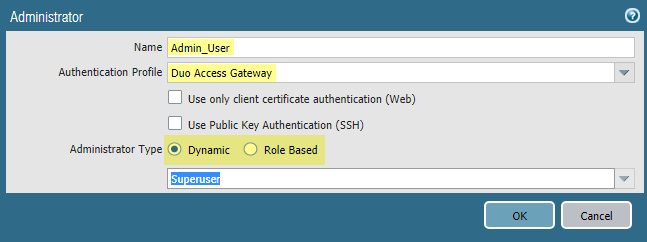
![]() Commit your changes.Add accounts for administrators who will authenticate to the firewall using Duo.
Commit your changes.Add accounts for administrators who will authenticate to the firewall using Duo.- Select and Add an account.Enter a user Name.Select Duo Access Gateway as the Authentication Profile.Select the Administrator Type, then click OK.Select Role Based if you want to use a custom role for the user. Otherwise, select Dynamic. To require administrators to log in using SSO with Duo, assign the authentication profile to all current administrators.
![]()
Verify MFA with Duo
- Log in to the web interface on the firewall.Select Use Single Sign-On and Continue.Enter your login credentials on the Duo Access Gateway login page.Select an authentication method (push notification, phone call, or passcode entry).When you authenticate successfully, you will be redirected to the firewall web interface.