Use Case: ACC—Path of Information Discovery
Table of Contents
Expand All
|
Collapse All
Next-Generation Firewall Docs
-
PAN-OS 9.1 (EoL)
- PAN-OS 11.1 & Later
- PAN-OS 11.0 (EoL)
- PAN-OS 10.2
- PAN-OS 10.1
- PAN-OS 10.0 (EoL)
- PAN-OS 9.1 (EoL)
- Cloud Management of NGFWs
-
- Management Interfaces
-
- Launch the Web Interface
- Configure Banners, Message of the Day, and Logos
- Use the Administrator Login Activity Indicators to Detect Account Misuse
- Manage and Monitor Administrative Tasks
- Commit, Validate, and Preview Firewall Configuration Changes
- Export Configuration Table Data
- Use Global Find to Search the Firewall or Panorama Management Server
- Manage Locks for Restricting Configuration Changes
-
-
- Define Access to the Web Interface Tabs
- Provide Granular Access to the Monitor Tab
- Provide Granular Access to the Policy Tab
- Provide Granular Access to the Objects Tab
- Provide Granular Access to the Network Tab
- Provide Granular Access to the Device Tab
- Define User Privacy Settings in the Admin Role Profile
- Restrict Administrator Access to Commit and Validate Functions
- Provide Granular Access to Global Settings
- Provide Granular Access to the Panorama Tab
- Panorama Web Interface Access Privileges
-
- Reset the Firewall to Factory Default Settings
-
- Plan Your Authentication Deployment
- Configure SAML Authentication
- Configure Kerberos Single Sign-On
- Configure Kerberos Server Authentication
- Configure TACACS+ Authentication
- Configure RADIUS Authentication
- Configure LDAP Authentication
- Configure Local Database Authentication
- Configure an Authentication Profile and Sequence
- Test Authentication Server Connectivity
- Troubleshoot Authentication Issues
-
- Keys and Certificates
- Default Trusted Certificate Authorities (CAs)
- Certificate Deployment
- Configure the Master Key
- Export a Certificate and Private Key
- Configure a Certificate Profile
- Configure an SSL/TLS Service Profile
- Replace the Certificate for Inbound Management Traffic
- Configure the Key Size for SSL Forward Proxy Server Certificates
-
- HA Overview
-
- Prerequisites for Active/Active HA
- Configure Active/Active HA
-
- Use Case: Configure Active/Active HA with Route-Based Redundancy
- Use Case: Configure Active/Active HA with Floating IP Addresses
- Use Case: Configure Active/Active HA with ARP Load-Sharing
- Use Case: Configure Active/Active HA with Floating IP Address Bound to Active-Primary Firewall
- Use Case: Configure Active/Active HA with Source DIPP NAT Using Floating IP Addresses
- Use Case: Configure Separate Source NAT IP Address Pools for Active/Active HA Firewalls
- Use Case: Configure Active/Active HA for ARP Load-Sharing with Destination NAT
- Use Case: Configure Active/Active HA for ARP Load-Sharing with Destination NAT in Layer 3
- Refresh HA1 SSH Keys and Configure Key Options
- HA Firewall States
- Reference: HA Synchronization
-
- Use the Dashboard
- Monitor Applications and Threats
- Monitor Block List
-
- Report Types
- View Reports
- Configure the Expiration Period and Run Time for Reports
- Disable Predefined Reports
- Custom Reports
- Generate Custom Reports
- Generate the SaaS Application Usage Report
- Manage PDF Summary Reports
- Generate User/Group Activity Reports
- Manage Report Groups
- Schedule Reports for Email Delivery
- Manage Report Storage Capacity
- View Policy Rule Usage
- Use External Services for Monitoring
- Configure Log Forwarding
- Configure Email Alerts
-
- Configure Syslog Monitoring
-
- Traffic Log Fields
- Threat Log Fields
- URL Filtering Log Fields
- Data Filtering Log Fields
- HIP Match Log Fields
- IP-Tag Log Fields
- User-ID Log Fields
- Tunnel Inspection Log Fields
- SCTP Log Fields
- Authentication Log Fields
- Config Log Fields
- System Log Fields
- Correlated Events Log Fields
- GTP Log Fields
- Syslog Severity
- Custom Log/Event Format
- Escape Sequences
- Forward Logs to an HTTP/S Destination
- Firewall Interface Identifiers in SNMP Managers and NetFlow Collectors
-
- User-ID Overview
- Enable User-ID
- Map Users to Groups
- Enable User- and Group-Based Policy
- Enable Policy for Users with Multiple Accounts
- Verify the User-ID Configuration
-
- App-ID Overview
- App-ID and HTTP/2 Inspection
- Manage Custom or Unknown Applications
-
- Apply Tags to an Application Filter
- Create Custom Application Tags
- Workflow to Best Incorporate New and Modified App-IDs
- See the New and Modified App-IDs in a Content Release
- See How New and Modified App-IDs Impact Your Security Policy
- Ensure Critical New App-IDs are Allowed
- Monitor New App-IDs
- Disable and Enable App-IDs
- Safely Enable Applications on Default Ports
- Applications with Implicit Support
- Application Level Gateways
- Disable the SIP Application-level Gateway (ALG)
- Maintain Custom Timeouts for Data Center Applications
-
- Best Practices for Securing Your Network from Layer 4 and Layer 7 Evasions
- Set Up Antivirus, Anti-Spyware, and Vulnerability Protection
- Set Up File Blocking
- Prevent Brute Force Attacks
- Customize the Action and Trigger Conditions for a Brute Force Signature
- Enable Evasion Signatures
- Monitor Blocked IP Addresses
- Threat Signature Categories
- Create Threat Exceptions
- Custom Signatures
- Threat Prevention Resources
-
- Decryption Overview
-
- Keys and Certificates for Decryption Policies
- SSL Forward Proxy
- SSL Forward Proxy Decryption Profile
- SSL Inbound Inspection
- SSL Inbound Inspection Decryption Profile
- SSL Protocol Settings Decryption Profile
- SSH Proxy
- SSH Proxy Decryption Profile
- Decryption Profile for No Decryption
- SSL Decryption for Elliptical Curve Cryptography (ECC) Certificates
- Perfect Forward Secrecy (PFS) Support for SSL Decryption
- SSL Decryption and Subject Alternative Names (SANs)
- High Availability Support for Decrypted Sessions
- Decryption Mirroring
- Configure SSL Forward Proxy
- Configure SSL Inbound Inspection
- Configure SSH Proxy
- Configure Server Certificate Verification for Undecrypted Traffic
- Enable Users to Opt Out of SSL Decryption
- Temporarily Disable SSL Decryption
- Configure Decryption Port Mirroring
- Verify Decryption
-
- How Decryption Broker Works
- Layer 3 Security Chain Guidelines
- Configure Decryption Broker with One or More Layer 3 Security Chain
- Transparent Bridge Security Chain Guidelines
- Configure Decryption Broker with a Single Transparent Bridge Security Chain
- Configure Decryption Broker with Multiple Transparent Bridge Security Chains
- Activate Free Licenses for Decryption Features
-
- About Palo Alto Networks URL Filtering Solution
- How Advanced URL Filtering Works
- URL Filtering Use Cases
- Plan Your URL Filtering Deployment
- URL Filtering Best Practices
- Activate The Advanced URL Filtering Subscription
- Configure URL Filtering
- Test URL Filtering Configuration
- Log Only the Page a User Visits
- Create a Custom URL Category
- URL Category Exceptions
- Use an External Dynamic List in a URL Filtering Profile
- Allow Password Access to Certain Sites
- URL Filtering Response Pages
- Customize the URL Filtering Response Pages
- HTTP Header Logging
- Request to Change the Category for a URL
-
-
- Tap Interfaces
-
- Layer 2 and Layer 3 Packets over a Virtual Wire
- Port Speeds of Virtual Wire Interfaces
- LLDP over a Virtual Wire
- Aggregated Interfaces for a Virtual Wire
- Virtual Wire Support of High Availability
- Zone Protection for a Virtual Wire Interface
- VLAN-Tagged Traffic
- Virtual Wire Subinterfaces
- Configure Virtual Wires
- Configure an Aggregate Interface Group
- Use Interface Management Profiles to Restrict Access
- Virtual Routers
- Service Routes
- RIP
- Route Redistribution
-
- DNS Overview
- DNS Proxy Object
- DNS Server Profile
- Multi-Tenant DNS Deployments
- Configure a DNS Proxy Object
- Configure a DNS Server Profile
- Use Case 1: Firewall Requires DNS Resolution
- Use Case 2: ISP Tenant Uses DNS Proxy to Handle DNS Resolution for Security Policies, Reporting, and Services within its Virtual System
- Use Case 3: Firewall Acts as DNS Proxy Between Client and Server
- DNS Proxy Rule and FQDN Matching
- Dynamic DNS Overview
- Configure Dynamic DNS for Firewall Interfaces
-
- NAT Rule Capacities
- Dynamic IP and Port NAT Oversubscription
- Dataplane NAT Memory Statistics
-
- Translate Internal Client IP Addresses to Your Public IP Address (Source DIPP NAT)
- Enable Clients on the Internal Network to Access your Public Servers (Destination U-Turn NAT)
- Enable Bi-Directional Address Translation for Your Public-Facing Servers (Static Source NAT)
- Configure Destination NAT with DNS Rewrite
- Configure Destination NAT Using Dynamic IP Addresses
- Modify the Oversubscription Rate for DIPP NAT
- Reserve Dynamic IP NAT Addresses
- Disable NAT for a Specific Host or Interface
-
-
- Policy Types
- Policy Objects
- Track Rules Within a Rulebase
- Enforce Policy Rule Description, Tag, and Audit Comment
- Move or Clone a Policy Rule or Object to a Different Virtual System
-
- External Dynamic List
- Built-in External Dynamic Lists
- Configure the Firewall to Access an External Dynamic List
- Retrieve an External Dynamic List from the Web Server
- View External Dynamic List Entries
- Exclude Entries from an External Dynamic List
- Enforce Policy on an External Dynamic List
- Find External Dynamic Lists That Failed Authentication
- Disable Authentication for an External Dynamic List
- Register IP Addresses and Tags Dynamically
- Use Dynamic User Groups in Policy
- Use Auto-Tagging to Automate Security Actions
- CLI Commands for Dynamic IP Addresses and Tags
- Application Override Policy
- Test Policy Rules
-
PAN-OS 11.1 & Later
- PAN-OS 11.1 & Later
- PAN-OS 11.0 (EoL)
- PAN-OS 10.2
- PAN-OS 10.1
-
- Tap Interfaces
-
- Layer 2 and Layer 3 Packets over a Virtual Wire
- Port Speeds of Virtual Wire Interfaces
- LLDP over a Virtual Wire
- Aggregated Interfaces for a Virtual Wire
- Virtual Wire Support of High Availability
- Zone Protection for a Virtual Wire Interface
- VLAN-Tagged Traffic
- Virtual Wire Subinterfaces
- Configure Virtual Wires
- Configure a PPPoE Client on a Subinterface
- Configure an IPv6 PPPoE Client
- Configure an Aggregate Interface Group
- Configure Bonjour Reflector for Network Segmentation
- Use Interface Management Profiles to Restrict Access
-
- DHCP Overview
- Firewall as a DHCP Server and Client
- Firewall as a DHCPv6 Client
- DHCP Messages
- Dynamic IPv6 Addressing on the Management Interface
- Configure an Interface as a DHCP Server
- Configure an Interface as a DHCPv4 Client
- Configure an Interface as a DHCPv6 Client with Prefix Delegation
- Configure the Management Interface as a DHCP Client
- Configure the Management Interface for Dynamic IPv6 Address Assignment
- Configure an Interface as a DHCP Relay Agent
-
- DNS Overview
- DNS Proxy Object
- DNS Server Profile
- Multi-Tenant DNS Deployments
- Configure a DNS Proxy Object
- Configure a DNS Server Profile
- Use Case 1: Firewall Requires DNS Resolution
- Use Case 2: ISP Tenant Uses DNS Proxy to Handle DNS Resolution for Security Policies, Reporting, and Services within its Virtual System
- Use Case 3: Firewall Acts as DNS Proxy Between Client and Server
- DNS Proxy Rule and FQDN Matching
-
- NAT Rule Capacities
- Dynamic IP and Port NAT Oversubscription
- Dataplane NAT Memory Statistics
-
- Translate Internal Client IP Addresses to Your Public IP Address (Source DIPP NAT)
- Create a Source NAT Rule with Persistent DIPP
- PAN-OS
- Strata Cloud Manager
- Enable Clients on the Internal Network to Access your Public Servers (Destination U-Turn NAT)
- Enable Bi-Directional Address Translation for Your Public-Facing Servers (Static Source NAT)
- Configure Destination NAT with DNS Rewrite
- Configure Destination NAT Using Dynamic IP Addresses
- Modify the Oversubscription Rate for DIPP NAT
- Reserve Dynamic IP NAT Addresses
- Disable NAT for a Specific Host or Interface
-
- Network Packet Broker Overview
- How Network Packet Broker Works
- Prepare to Deploy Network Packet Broker
- Configure Transparent Bridge Security Chains
- Configure Routed Layer 3 Security Chains
- Network Packet Broker HA Support
- User Interface Changes for Network Packet Broker
- Limitations of Network Packet Broker
- Troubleshoot Network Packet Broker
-
- Enable Advanced Routing
- Logical Router Overview
- Configure a Logical Router
- Create a Static Route
- Configure BGP on an Advanced Routing Engine
- Create BGP Routing Profiles
- Create Filters for the Advanced Routing Engine
- Configure OSPFv2 on an Advanced Routing Engine
- Create OSPF Routing Profiles
- Configure OSPFv3 on an Advanced Routing Engine
- Create OSPFv3 Routing Profiles
- Configure RIPv2 on an Advanced Routing Engine
- Create RIPv2 Routing Profiles
- Create BFD Profiles
- Configure IPv4 Multicast
- Configure MSDP
- Create Multicast Routing Profiles
- Create an IPv4 MRoute
-
-
PAN-OS 11.2
- PAN-OS 11.2
- PAN-OS 11.1
- PAN-OS 11.0 (EoL)
- PAN-OS 10.2
- PAN-OS 10.1
- PAN-OS 10.0 (EoL)
- PAN-OS 9.1 (EoL)
- PAN-OS 9.0 (EoL)
- PAN-OS 8.1 (EoL)
- Cloud Management and AIOps for NGFW
End-of-Life (EoL)
Use Case: ACC—Path of Information Discovery
The ACC has a wealth of information that you can use
as a starting point for analyzing network traffic. Let’s look at
an example on using the ACC to uncover events of interest. This
example illustrates how you can use the ACC to ensure that legitimate
users can be held accountable for their actions, detect and track
unauthorized activity, and detect and diagnose compromised hosts
and vulnerable systems on your network.
The widgets and filters in the ACC give you the capability to
analyze the data and filter the views based on events of interest
or concern. You can trace events that pique your interest, directly
export a PDF of a tab, access the raw logs, and save a personalized
view of the activity that you want to track. These capabilities
make it possible for you to monitor activity and develop policies
and countermeasures for fortifying your network against malicious
activity. In this section, you will Interact with the ACC widgets across different tabs, drill down using widget filters,
and pivot the ACC views using global filters, and export a PDF for
sharing with incidence response or IT teams.
At first glance, you see the Application Usage and User Activity
widgets in the ACCNetwork
Activity tab. The User Activity widget
shows that user Marsha Wirth has transferred 718 Megabytes of data
during the last hour. This volume is nearly six times more than
any other user on the network. To see the trend over the past few hours,
expand the Time period to the Last
6 Hrs, and now Marsha’s activity has been 6.5 Gigabytes
over 891 sessions and has triggered 38 threats signatures.
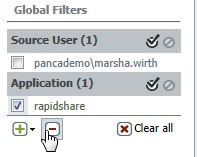
Because Marsha has transferred a large volume of data, apply
her username as a global filter (ACC Filters) and pivot all the views in the ACC to Marsha’s traffic activity.
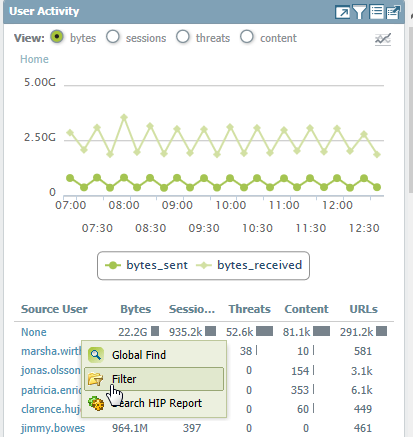
The Application Usage tab now shows that the top application
that Martha used was rapidshare, a Swiss-owned file-hosting site
that belongs to the file-sharing URL category. For further investigation,
add rapidshare as a global filter, and view Marsha’s activity in
the context of rapidshare.
Consider whether you want to sanction rapidshare for company
use. Should you allow uploads to this site and do you need a QoS
policy to limit bandwidth?
To view which IP addresses Marsha has communicated with, check
the Destination IP Activity widget, and view
the data by bytes and by URLs.
To find out which countries Marsha communicated with, sort on sessions in
the Destination Regions widget.
From this data, you can confirm that Marsha, a user on your network,
has established sessions in Korea and the European Union, and she
logged 19 threats in her sessions within the United States.
To look at Marsha’s activity from a threat perspective, remove
the global filter for rapidshare.
In the Threat Activity widget on the Threat
Activity tab, view the threats. The widget displays
that her activity had triggered a match for 26 vulnerabilities in
the overflow, DoS and code-execution threat category. Several of
these vulnerabilities are of critical severity.
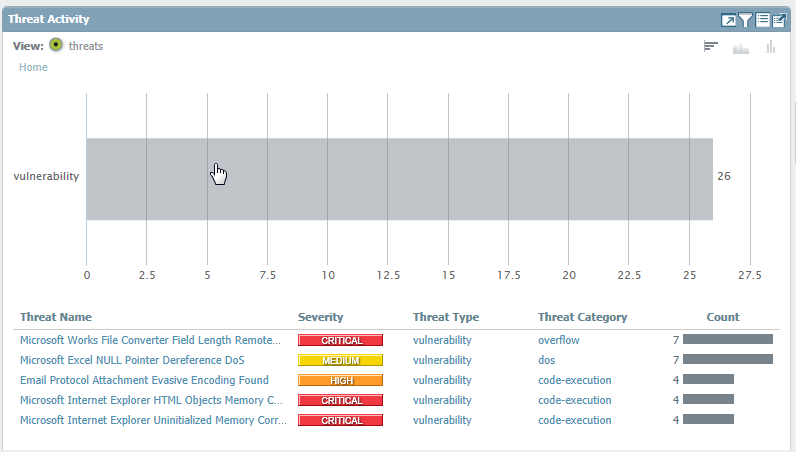
To further drill-down into each vulnerability, click into the
graph and narrow the scope of your investigation. Each click automatically
applies a local filter on the widget.
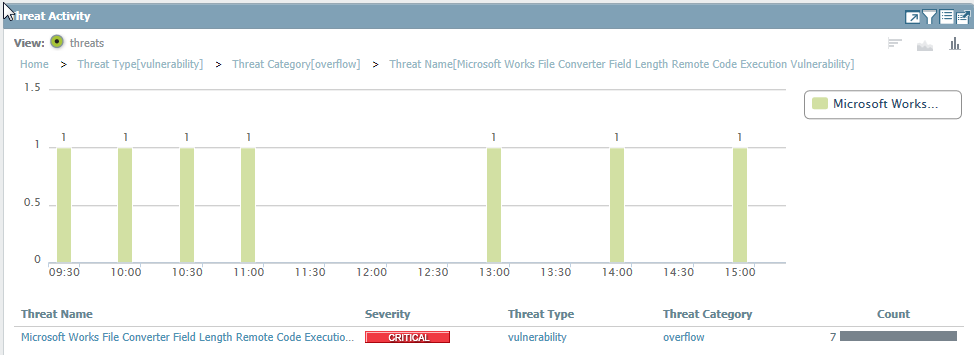
To investigate each threat by name, you can create a global filter
for say, Microsoft Works File Converter Field Length
Remote Code Execution Vulnerability. Then, view the User
Activity widget in the Network Activity tab.
The tab is automatically filtered to display threat activity for
Marsha (notice the global filters in the screenshot).
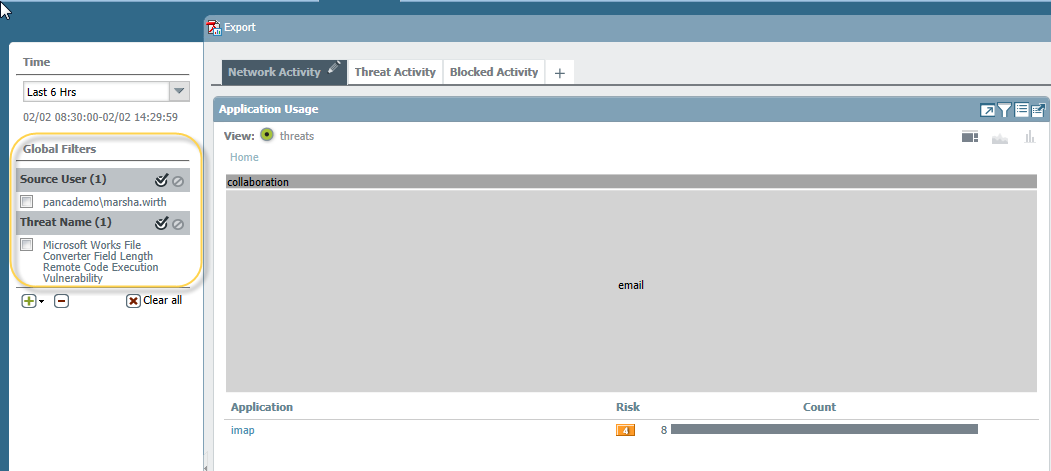
Notice that this Microsoft code-execution vulnerability was triggered
over email, by the imap application. You can now establish that
Martha has IE vulnerabilities and email attachment vulnerabilities,
and perhaps her computer needs to be patched. You can now either
navigate to the Blocked Threats widget in
the Blocked Activity tab to check how many
of these vulnerabilities were blocked.
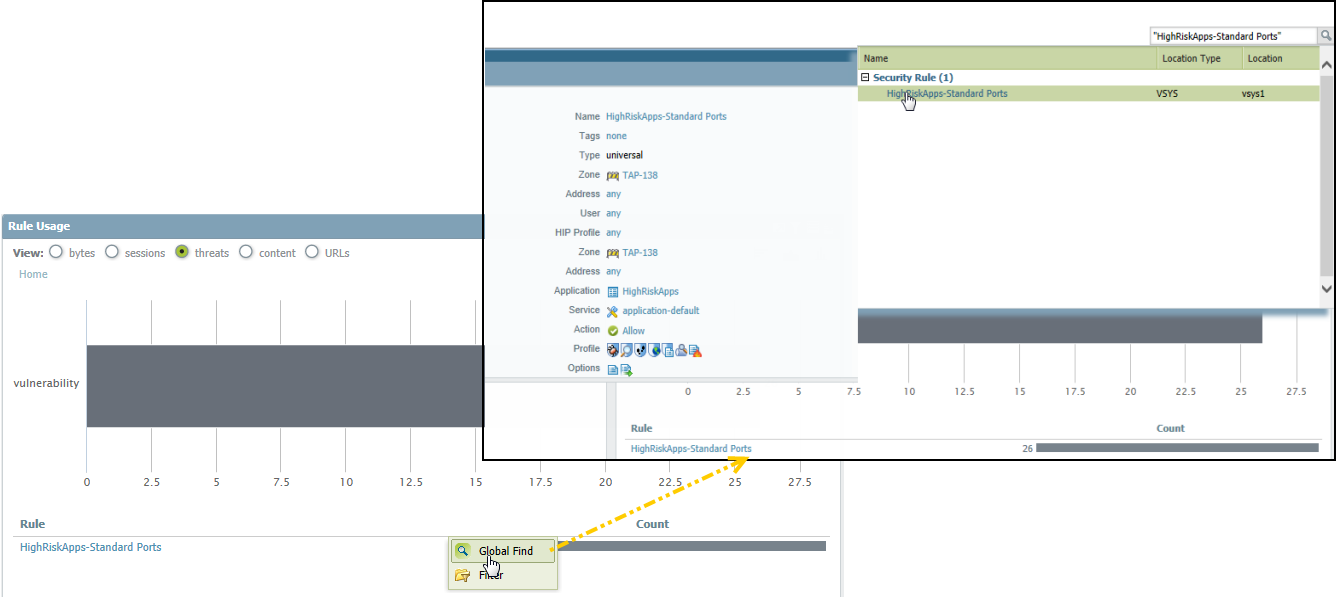
Or, you can check the Rule Usage widget
on the Network Activity tab to discover how
many vulnerabilities made it into your network and which security rule
allowed this traffic, and navigate directly to the security rule
using the Global Find capability.
Then, drill into why imap used a non-standard port 43206 instead
of port 143, which is the default port for the application. Consider
modifying the security policy rule to allow applications to only
use the default port for the application, or assess whether this
port should be an exception on your network.
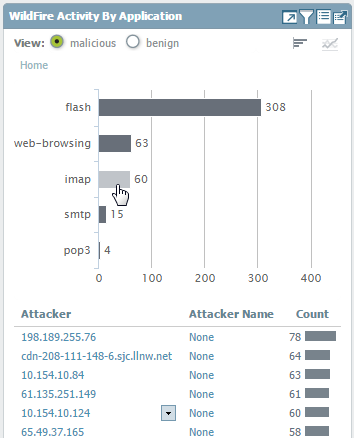
Click into the bar for imap in the graph and drill into the inbound
threats associated with the application. To find out who an IP address
is registered to, hover over the attacker IP address and select
the Who Is link in the drop-down.
Because the session count from this IP address is high, check
the Blocked Content and Blocked
Threats widgets in the Blocked Activity tab
for events related to this IP address. The Blocked Activity tab
allows you to validate whether or not your policy rules are effective
in blocking content or threats when a host on your network is compromised.
Use the Export PDF capability on the ACC
to export the current view (create a snapshot of the data) and send
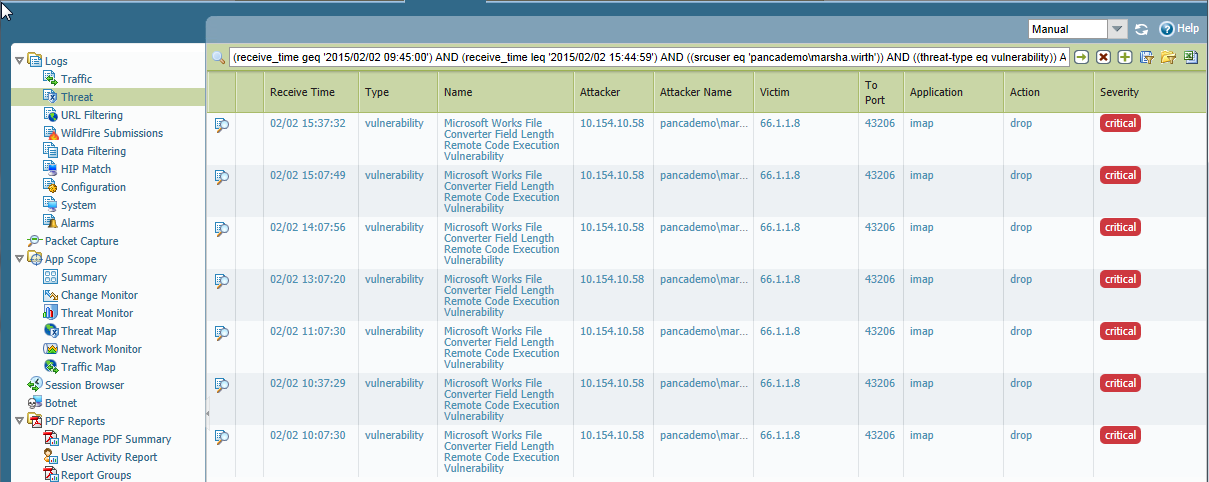
it to an incidence response team. To view the threat logs directly
from the widget, you can also click the
icon to jump to the logs; the
query is generated automatically and only the relevant logs are
displayed onscreen (for example in MonitorLogsThreat Logs).
You have now used the ACC to review network data/trends to find
which applications or users are generating the most traffic, and
how many application are responsible for the threats seen on the
network. You were able to identify which application(s), user(s)
generated the traffic, determine whether the application was on
the default port, and which policy rule(s) allowed the traffic into
the network, and determine whether the threat is spreading laterally
on the network. You also identified the destination IP addresses,
geo-locations with which hosts on the network are communicating
with. Use the conclusions from your investigation to craft goal-oriented
policies that can secure users and your network.