Download PDF
Upload the Panorama Virtual Appliance Image to Alibaba Cloud
Table of Contents
11.0 (EoL)
Expand all | Collapse all
-
- Determine Panorama Log Storage Requirements
-
- Setup Prerequisites for the Panorama Virtual Appliance
- Perform Initial Configuration of the Panorama Virtual Appliance
- Set Up The Panorama Virtual Appliance as a Log Collector
- Set Up the Panorama Virtual Appliance with Local Log Collector
- Set up a Panorama Virtual Appliance in Panorama Mode
- Set up a Panorama Virtual Appliance in Management Only Mode
-
- Preserve Existing Logs When Adding Storage on Panorama Virtual Appliance in Legacy Mode
- Add a Virtual Disk to Panorama on an ESXi Server
- Add a Virtual Disk to Panorama on vCloud Air
- Add a Virtual Disk to Panorama on Alibaba Cloud
- Add a Virtual Disk to Panorama on AWS
- Add a Virtual Disk to Panorama on Azure
- Add a Virtual Disk to Panorama on Google Cloud Platform
- Add a Virtual Disk to Panorama on KVM
- Add a Virtual Disk to Panorama on Hyper-V
- Add a Virtual Disk to Panorama on Oracle Cloud Infrastructure (OCI)
- Mount the Panorama ESXi Server to an NFS Datastore
-
- Increase CPUs and Memory for Panorama on an ESXi Server
- Increase CPUs and Memory for Panorama on vCloud Air
- Increase CPUs and Memory for Panorama on Alibaba Cloud
- Increase CPUs and Memory for Panorama on AWS
- Increase CPUs and Memory for Panorama on Azure
- Increase CPUs and Memory for Panorama on Google Cloud Platform
- Increase CPUs and Memory for Panorama on KVM
- Increase CPUs and Memory for Panorama on Hyper-V
- Increase the CPUs and Memory for Panorama on Oracle Cloud Infrastructure (OCI)
- Complete the Panorama Virtual Appliance Setup
-
- Convert Your Evaluation Panorama to a Production Panorama with Local Log Collector
- Convert Your Evaluation Panorama to a Production Panorama without Local Log Collector
- Convert Your Evaluation Panorama to VM-Flex Licensing with Local Log Collector
- Convert Your Evaluation Panorama to VM-Flex Licensing without Local Log Collector
- Convert Your Production Panorama to an ELA Panorama
-
- Register Panorama
- Activate a Panorama Support License
- Activate/Retrieve a Firewall Management License when the Panorama Virtual Appliance is Internet-connected
- Activate/Retrieve a Firewall Management License when the Panorama Virtual Appliance is not Internet-connected
- Activate/Retrieve a Firewall Management License on the M-Series Appliance
- Install the Panorama Device Certificate
- Install the Device Certificate for a Dedicated Log Collector
-
- Migrate from a Panorama Virtual Appliance to an M-Series Appliance
- Migrate a Panorama Virtual Appliance to a Different Hypervisor
- Migrate from an M-Series Appliance to a Panorama Virtual Appliance
- Migrate from an M-500 Appliance to an M-700 Appliance
- Migrate from an M-600 Appliance to an M-700 Appliance
- Migrate from an M-100 Appliance to an M-500 Appliance
- Migrate from an M-100 or M-500 Appliance to an M-200 or M-600 Appliance
-
- Configure an Admin Role Profile
- Configure an Admin Role Profile for Selective Push to Managed Firewalls
- Configure an Access Domain
-
- Configure a Panorama Administrator Account
- Configure Local or External Authentication for Panorama Administrators
- Configure a Panorama Administrator with Certificate-Based Authentication for the Web Interface
- Configure an Administrator with SSH Key-Based Authentication for the CLI
- Configure RADIUS Authentication for Panorama Administrators
- Configure TACACS+ Authentication for Panorama Administrators
- Configure SAML Authentication for Panorama Administrators
- Configure Tracking of Administrator Activity
-
- Add a Firewall as a Managed Device
- Change Between Panorama Management and Cloud Management
-
- Add a Device Group
- Create a Device Group Hierarchy
- Create Objects for Use in Shared or Device Group Policy
- Revert to Inherited Object Values
- Manage Unused Shared Objects
- Manage Precedence of Inherited Objects
- Move or Clone a Policy Rule or Object to a Different Device Group
- Push a Policy Rule to a Subset of Firewalls
- Device Group Push to a Multi-VSYS Firewall
- Manage the Rule Hierarchy
- Manage the Master Key from Panorama
- Schedule a Configuration Push to Managed Firewalls
- Redistribute Data to Managed Firewalls
-
- Plan the Transition to Panorama Management
- Migrate a Firewall to Panorama Management and Reuse Existing Configuration
- Migrate a Firewall to Panorama Management and Push a New Configuration
- Migrate a Firewall HA Pair to Panorama Management and Reuse Existing Configuration
- Migrate a Firewall HA Pair to Panorama Management and Push a New Configuration
- Load a Partial Firewall Configuration into Panorama
- Localize a Panorama Pushed Configuration on a Managed Firewall
-
- Configure a Managed Collector
- Monitor Managed Collector Health Status
- Configure Log Forwarding to Panorama
- Configure Syslog Forwarding to External Destinations
- Forward Logs to Strata Logging Service
- Verify Log Forwarding to Panorama
- Modify Log Forwarding and Buffering Defaults
- Configure Log Forwarding from Panorama to External Destinations
-
- Add Standalone WildFire Appliances to Manage with Panorama
- Remove a WildFire Appliance from Panorama Management
-
-
- Configure a Cluster and Add Nodes on Panorama
- Configure General Cluster Settings on Panorama
- Remove a Cluster from Panorama Management
- Configure Appliance-to-Appliance Encryption Using Predefined Certificates Centrally on Panorama
- Configure Appliance-to-Appliance Encryption Using Custom Certificates Centrally on Panorama
- View WildFire Cluster Status Using Panorama
-
-
- Preview, Validate, or Commit Configuration Changes
- Commit Selective Configuration Changes for Managed Devices
- Push Selective Configuration Changes to Managed Devices
- Enable Automated Commit Recovery
- Compare Changes in Panorama Configurations
- Manage Locks for Restricting Configuration Changes
- Add Custom Logos to Panorama
- Use the Panorama Task Manager
- Reboot or Shut Down Panorama
- Configure Panorama Password Profiles and Complexity
-
-
- Verify Panorama Port Usage
- Resolve Zero Log Storage for a Collector Group
- Replace a Failed Disk on an M-Series Appliance
- Replace the Virtual Disk on an ESXi Server
- Replace the Virtual Disk on vCloud Air
- Migrate Logs to a New M-Series Appliance in Log Collector Mode
- Migrate Logs to a New M-Series Appliance in Panorama Mode
- Migrate Logs to a New M-Series Appliance Model in Panorama Mode in High Availability
- Migrate Logs to the Same M-Series Appliance Model in Panorama Mode in High Availability
- Migrate Log Collectors after Failure/RMA of Non-HA Panorama
- Regenerate Metadata for M-Series Appliance RAID Pairs
- View Log Query Jobs
- Troubleshoot Registration or Serial Number Errors
- Troubleshoot Reporting Errors
- Troubleshoot Device Management License Errors
- Troubleshoot Automatically Reverted Firewall Configurations
- View Task Success or Failure Status
- Generate a Stats Dump File for a Managed Firewall
- Recover Managed Device Connectivity to Panorama
- Restore an Expired Device Certificate
End-of-Life (EoL)
Upload the Panorama Virtual Appliance Image to Alibaba Cloud
Upload the Panorama™ qcow2 image to Alibaba Cloud to
create a custom image.
Complete the following procedure to upload
a Panorama™ management server qcow2 file for KVM and create a custom
image that you need to launch the Panorama virtual appliance. Uploading
and creating the image is required only once. You can use the same
image for all subsequent deployments of the Panorama virtual appliance.
- Download the Panorama qcow2 file for KVM from the Palo Alto Networks Customer Support Portal (CSP).
- Log in to the Palo Alto Networks CSP.Select UpdatesSoftware Updates and select Panorama Base Images from the software updates filter drop-down.Download the latest version of the Panorama-KVM qcow2 file.Log in to the Alibaba Cloud Console.Create an Object Storage Service (OSS) bucket for the Panorama virtual appliance image.
- From the Alibaba Cloud menu, select Object Storage ServiceBuckets and Create Bucket.Enter a descriptive Bucket Name.Select the bucket Region.This region must be in the same region you plan on deploying your Panorama virtual appliance and in the same region as the firewalls you plan to manage with Panorama.Configure the remaining OSS bucket settings as needed.Click OK.You are automatically taken to the OSS bucket Overview page after successful creation.Upload the qcow2 file to the OSS bucket.
- In the OSS bucket Overview, select Files and Upload the qcow2 file you downloaded in the previous step.For Upload To target, select Current.For the File ACL, select Inherited from Bucket.Click Select Files and select the qcow2 file.Alternatively, you can drag and drop the qcow2 file into the Files to Upload section.Upload the qcow2 file.A Task List window appears displaying the upload Status. Continue to the next step after the qcow2 file upload Status displays Uploaded.Make the qcow2 file a bootable image.
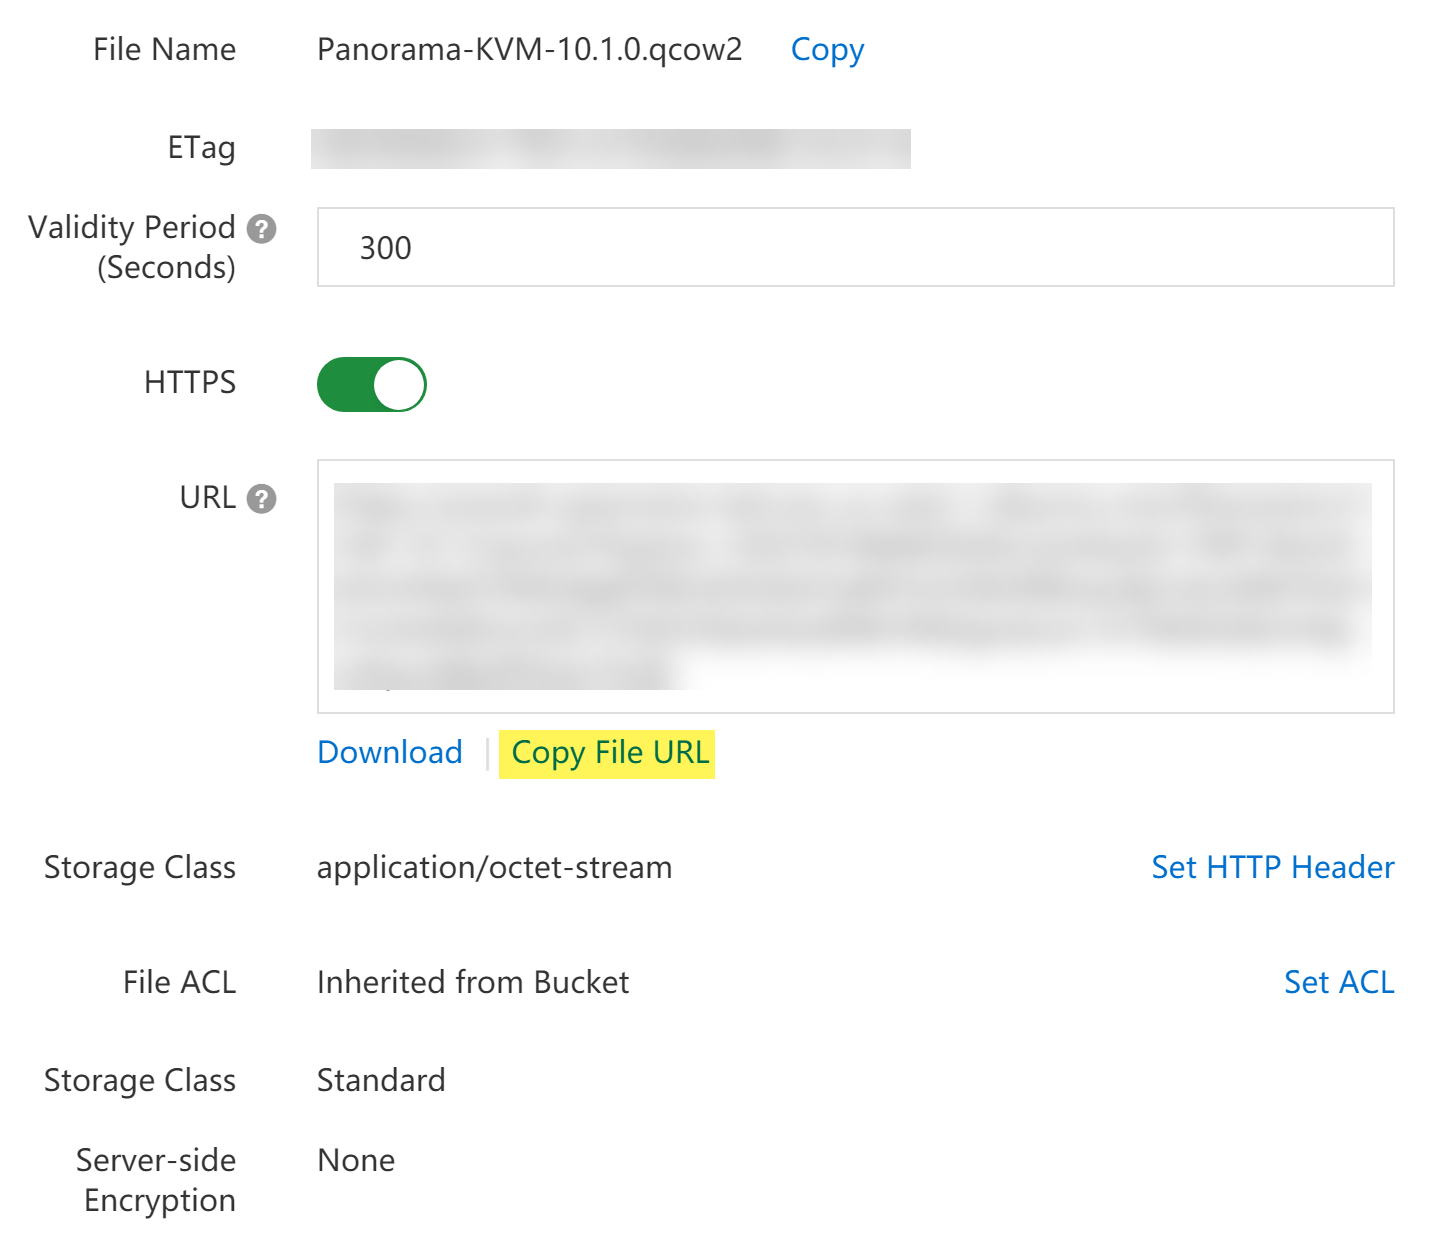
- In the OSS bucket Overview, select Files and click the qcow2 file you uploaded to view the file Details.Click Copy File URL and exit the file Details.
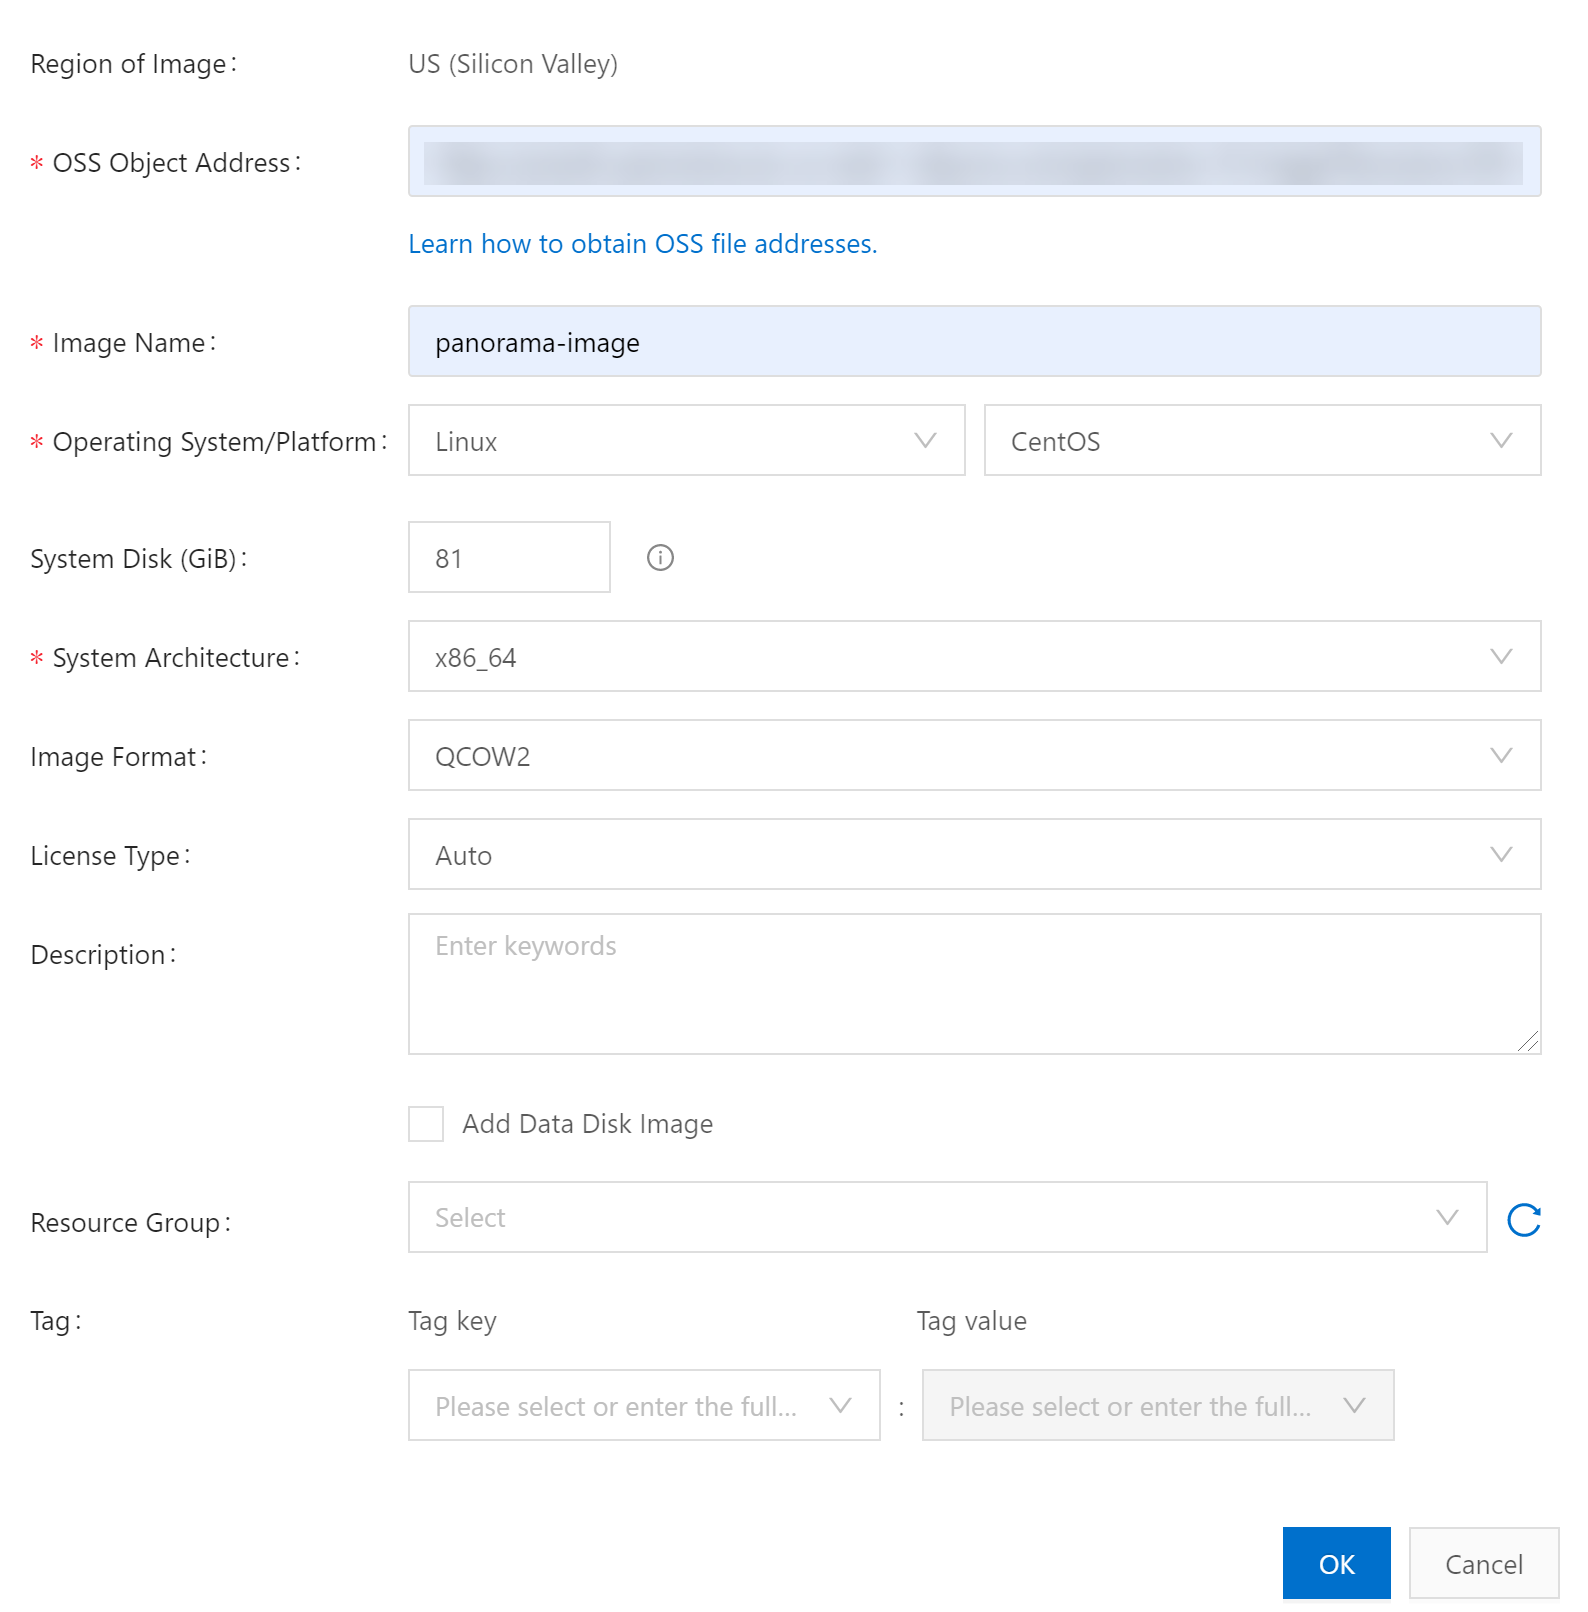
![]() From the Alibaba Cloud menu, select Elastic Compute ServiceInstances & ImagesImages and Import Image.Paste the OSS Object Address for the qcow2 file.This the file URL you copied in the previous step.Enter an Image Name.For the Operating System/Platform, select Linux CentOS.For the System Disk (GiB), enter 81.For the System Architecture, select x86_64.For the Image Format, select QCOW2.Click OK.
From the Alibaba Cloud menu, select Elastic Compute ServiceInstances & ImagesImages and Import Image.Paste the OSS Object Address for the qcow2 file.This the file URL you copied in the previous step.Enter an Image Name.For the Operating System/Platform, select Linux CentOS.For the System Disk (GiB), enter 81.For the System Architecture, select x86_64.For the Image Format, select QCOW2.Click OK.![]()