Prisma Browser
Enterprise Data Loss Prevention
Table of Contents
Enterprise Data Loss Prevention
Enterprise Data Loss Prevention - Prisma Browser (ES)
| Where Can I Use This? | What Do I Need? |
|---|---|
|
|
|
Palo Alto Networks’ Enterprise Data Loss Prevention (EDLP) is a cloud-native
security service that safeguards sensitive data from loss, theft, and misuse.
Traditional on-premise solutions cannot effectively protect data distributed across
cloud apps, remote workforces, and diverse devices. EDLP addresses these challenges with
a unified, scalable, and intelligent approach.
This article explains EDLP’s core concepts, key features, integration with the Palo Alto
Networks security ecosystem, and configuration in the Prisma Browser.
Core Concepts
These are the core concepts behind EDLP:
- Unified, Cloud-delivered Approach - EDLP is a single, centralized service that integrates natively with Palo Alto Networks products such as NGFWs, Prisma Access, Prisma Browser).
- Data Classification as the Foundation - EDLP identifies sensitive data using advanced classification methods that extend beyond simple keyword matching.
- Multi-channel Protection - EDLP protects data in motion (network traffic, email, file uploads), at rest (SaaS and cloud storage), and in use (endpoints and browsers).
- Centralized Policy Engine - EDLP provides one console for managing data control sets, classifiers, and incidents, ensuring consistent policy enforcement across network, cloud, and endpoint controls.
Key Features
Advanced Data Classification
- Machine Learning & Trainable Classifiers — Detect complex, unstructured data like source code; trainable on proprietary datasets.
- Exact Data Matching (EDM) — Match against encrypted datasets (e.g., employee records).
- Indexed Document Matching (IDM) — Detects partial or full document copies regardless of format.
- Optical Character Recognition (OCR) — Extracts and scans text from images and PDFs.
Incident Management & Remediation
- Centralized Visibility — Unified incident logging across all channels.
- Detailed Context — Each incident record includes the user, application, data profile, and policy violated.
Platform Integration and Policy Enforcement
- Centralized Data Sets — Manage classifiers and data profiles from a single console.
- Prisma Access & Prisma Browser Integration — EDLP applies the same classifiers to remote workers and browser-based activity, enforcing last-mile controls.
- Consistent Enforcement — Enforcement points (NGFW, Prisma Access, Prisma Browser) send content for inspection, apply the policy action, and log incidents centrally.
Configure EDLP in Prisma Browser
This section outlines how to configure EDLP in Prisma Browser by defining data
profiles, applying them in rules, and monitoring incidents.
Before You Begin
Before you begin - make sure you understand the following concepts:
- EDLP integrates with Access & Data Control rules in Prisma Browser.
- You can create a new rule or modify an existing one.
- Data Profiles must be defined in the central EDLP console before they can be applied in Prisma Browser.
- To support rapid deployment, the system includes 24 predefined Data profiles
that cover commonly required use cases.. These predefined Profiles include:
- GDPR
- HIPPA
- Malware
- Secrets and credentials
- CommonweralthAustralia-PrivAct88
EDLP can operate using OCR information, however it
is only supported for Cloud-assisted profiles with File Download and File Upload
controls.
Step 1: Define Data
Check for existing profiles
Review the predefined profiles in the EDLP console before creating a new one.
Configure Data Profiles
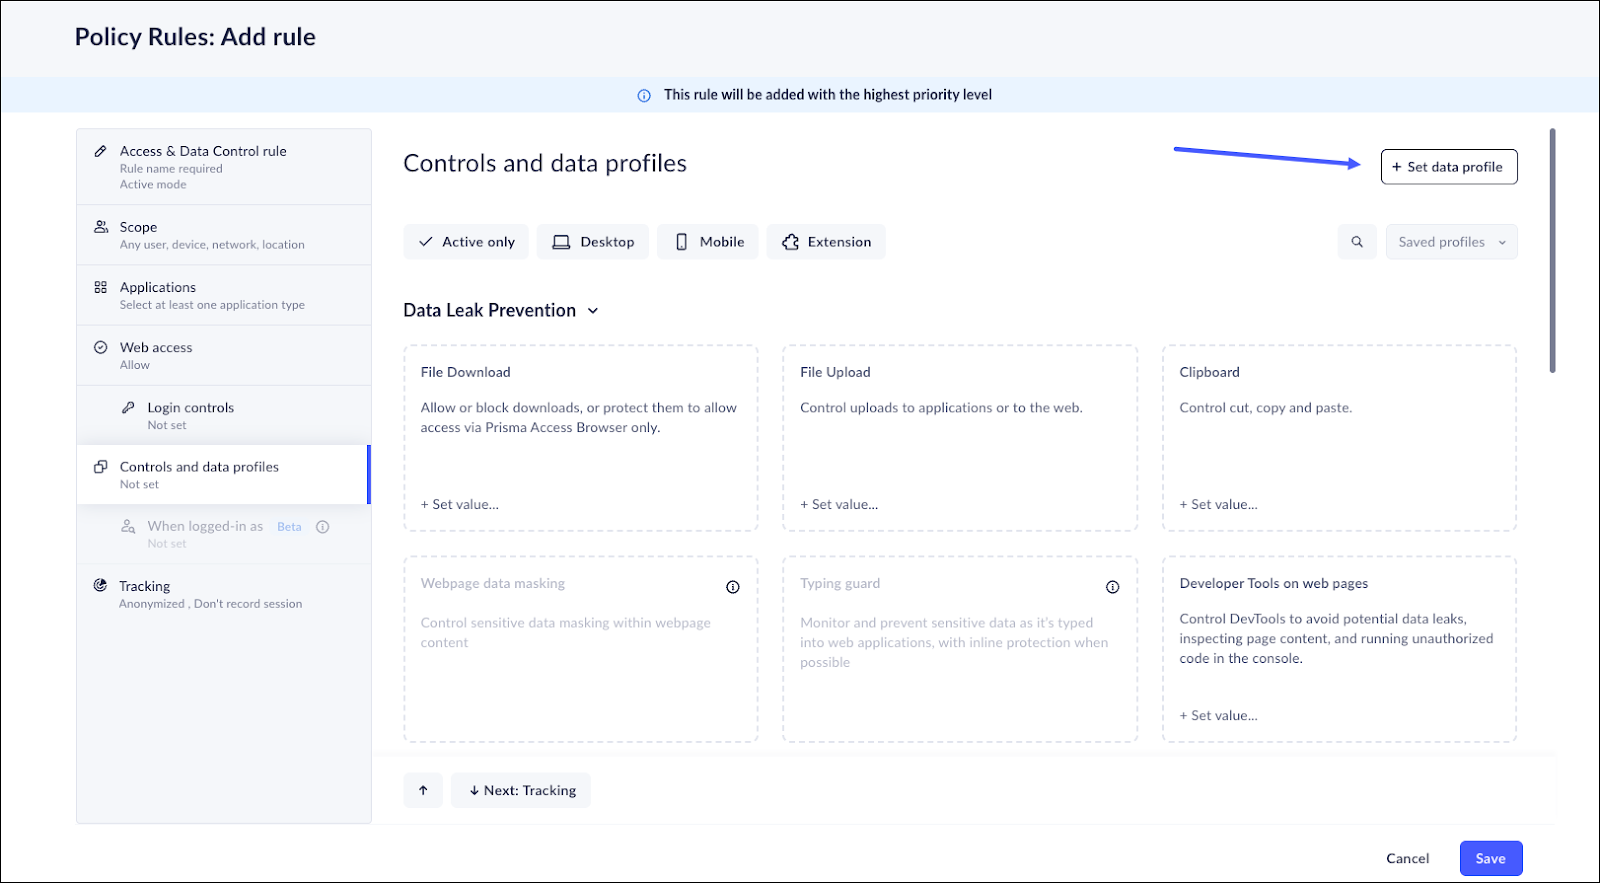
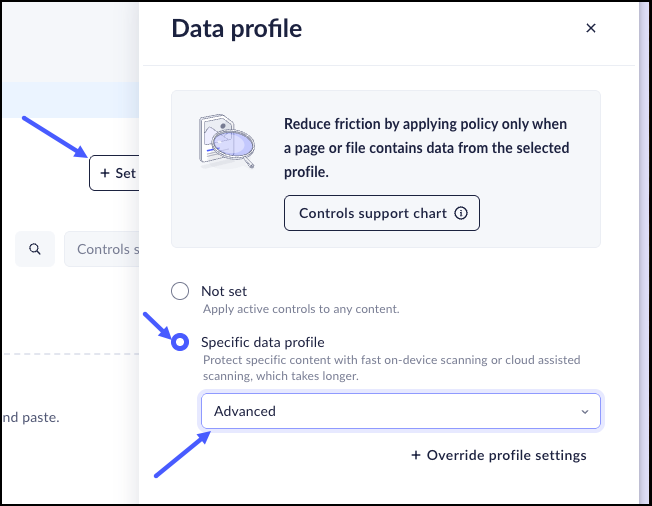
- In the Controls and Data Profiles page, click + Set data
profile.
![]()
- Choose one of the following:
- Not set (Any Content) — Applies selected controls to all content.
- Specific data profile (Specific content) — Applies
controls only to content matched by a selected profile.
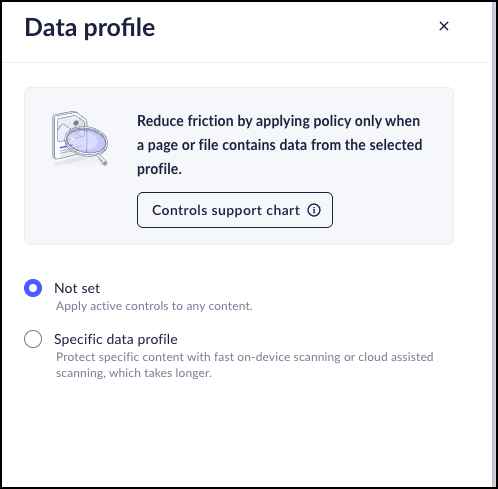
- Supports both on-device and cloud-assisted
scanning.Cloud-assisted scanning adds latency.
![]()
- Supports both on-device and cloud-assisted
scanning.
- If you select Specific data profile, the Select data
profile field appears.
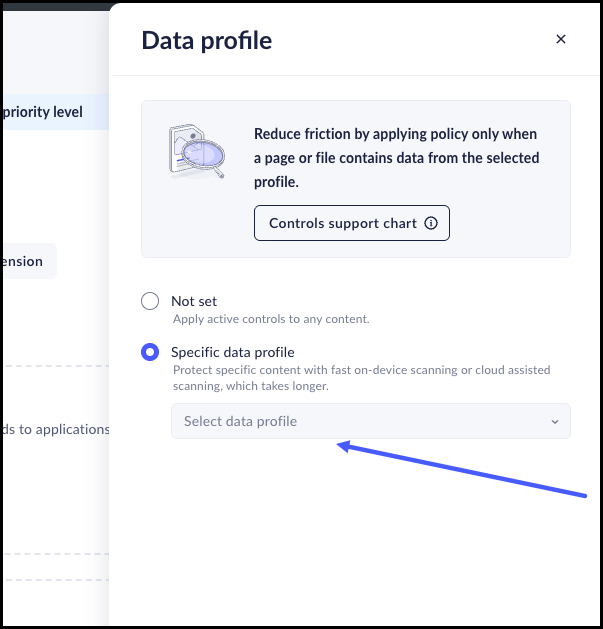
![]()
- Select an existing profile or scroll to the bottom and click Create
new profile.
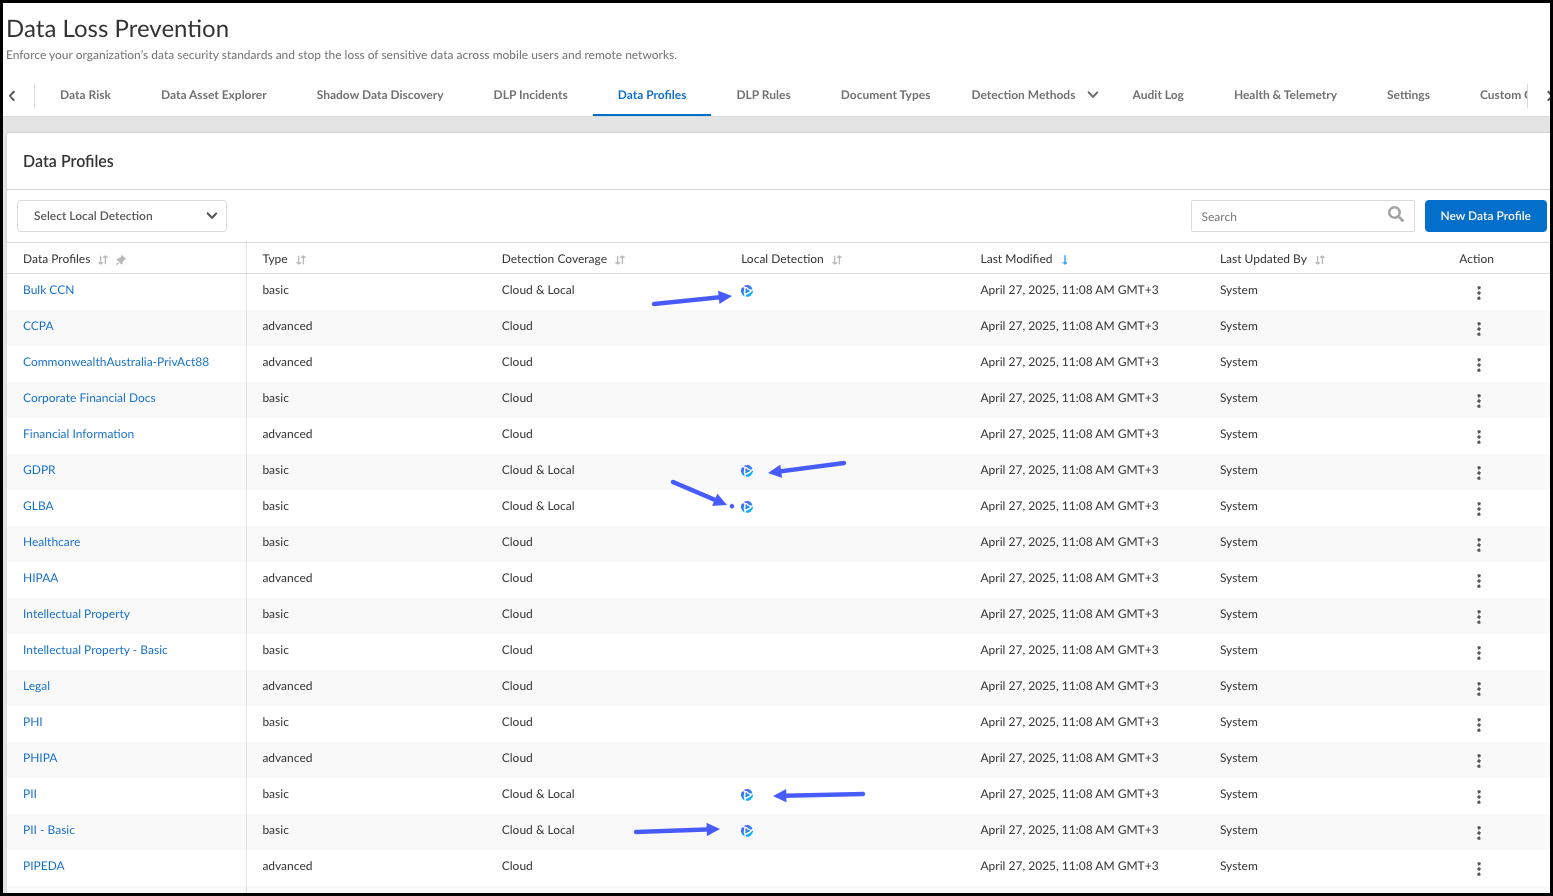
![]() All profiles work with the Prisma Browser. Profiles marked with the Prisma Browser logo can also run locally inside the browser and support last-mile controls for actions other than upload, download, and print.
All profiles work with the Prisma Browser. Profiles marked with the Prisma Browser logo can also run locally inside the browser and support last-mile controls for actions other than upload, download, and print.![]()
- Click New Data Profile to begin adding a new profile. For details, see the EDLP Profile Creation Help.
When you create a Profile using Data Masking, it is
strongly recommended that you rely on simple logic. Complex logic may run
incorrectly, as once some information is displayed, the system may need to
go back and mask it based on the logic. This can result in inconsistencies
and significant latencies.
Step 2. Understand Profile Types
- On-device Profiles
- Purpose: Low-latency scanning.
- Classifiers: Regex, dictionaries, basic types.
- Processing: All scanning occurs locally.
- Cloud-Assisted Profiles
- Purpose: High-accuracy scanning
- Classifiers: EDM, IDM, ML.
- Processing: Content is sent to EDLP cloud service.
Using Cloud-assisted profiles will result in latency.
Step 3. Review Control Support
Not all Access & Data Controls support all profile types. Use
the Controls Support Chart to verify the support level for each
control.
- Supported by the scan — Fully supported.
- Not supported by the scan, but can be applied — Not supported but can be added to the rule, ignoring the data profile selection,
- Not supported and cannot be used with other controls — Control unavailable with selected profile.
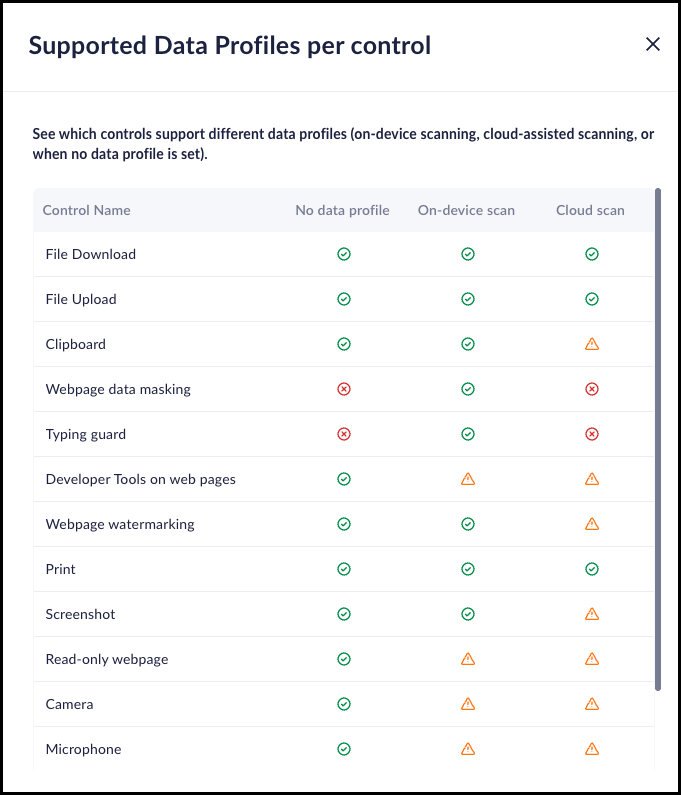
Examples
- File Download — Supports any data profile selection.
- Webpage Data Masking — Requires on-device data profile
- Clipboard — Supported for On-device data profiles, not supported in cloud-assisted scans (but can still be applied ignoring the data profile selection).
Step 4. Apply Profiles in Prisma Browser Rules
- Select Profile — When creating or editing a rule, choose a data profile. The console indicates whether it is On-Device or Cloud-Assisted.
- Set Controls — Apply the profile to data controls such as File Upload, File Download, Clipboard, or Screen Share.
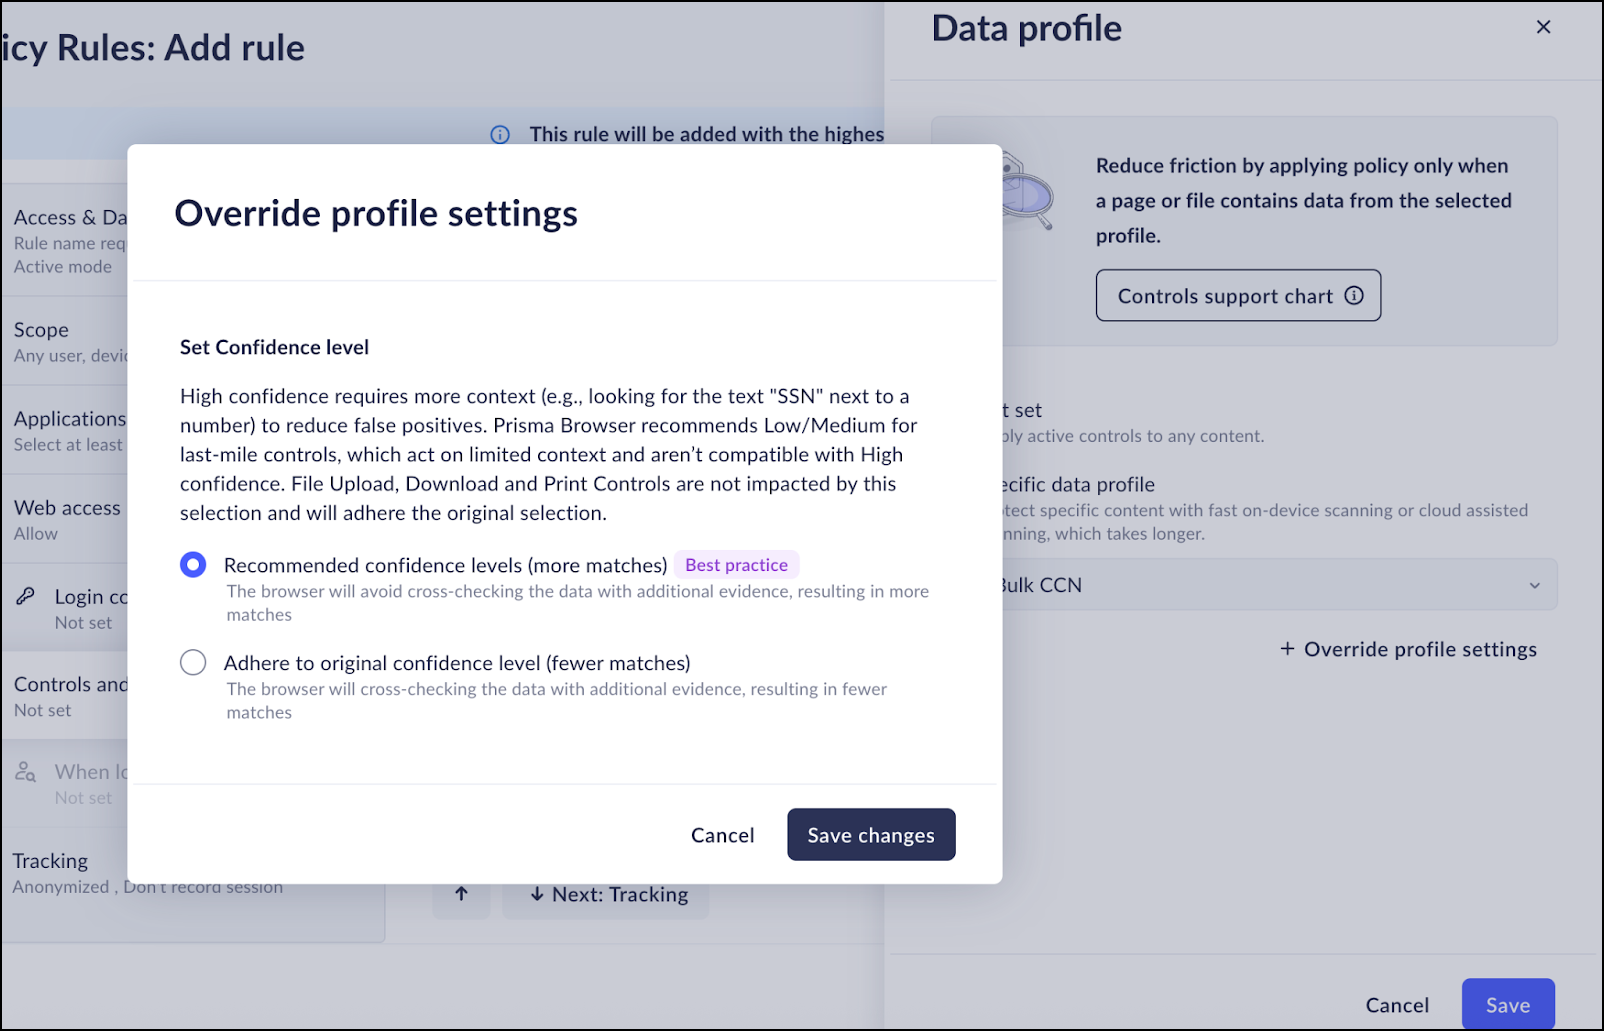
- Override Confidence (On-Device only) — Adjust
confidence level. You can change the confidence levels defined in the
data profile for changing scan results. Be aware of the following:
- Recommended confidence levels - Results in more
matches, as the scanning will take every possible positive,
without cross-checking the data. For example, any combination
that looks like an SSN will be flagged as an SSN.
- This only impacts Clipboard, Screenshot, Data masking, Typing Guard, and Watermark controls. File upload, File download, and Print controls will not be impacted by this configuration.
- Adhere to Original Confidence — Results in
fewer matches, as the browser will look for additional evidence
before flagging a positive. For example, a combination of
numbers that look like an SSN will need the indicator SSN before
it will flag anything. this may miss some positives matches
- Recommended confidence levels - Results in more
matches, as the scanning will take every possible positive,
without cross-checking the data. For example, any combination
that looks like an SSN will be flagged as an SSN.
To override the Profile settings:
![]()
- After you select an on-device data profile, you will have the option to override profile settings.
- Click +Override profile settings.
- In the window, select the confidence level that you want to use.
- Click Save changes.
Step 5. Monitor and Analyze Incidents
- Unified Visibility — Prisma Browser logs all DLP events in the central EDLP console. This gives you a single dashboard to view all incidents across your network, cloud, and browser.
- Incident Details — You can investigate each incident to see which Prisma Browser policy triggered it. The platform provides data snippets (a preview of the sensitive data) and can save the full file as evidence.
No Support for Secondary Data Profiles
When you use Data Profiles—which allow administrators to set highly
specific security responses (like blocking high-risk data but only alerting on
low-risk data)—the system doesn't use the Secondary Rule option.
The Prisma Browser rules handle all the blocking and alerting actions.
To avoid confusion and conflict, the profile setup strictly requires that all its
component parts only use the Primary Rule setting. This ensures that the
fine-tuned, complex policy works exactly as the administrator designed it.
Any secondary rules are ignored.
There is a known limitation when using OCR; it is only
supported for Cloud-assisted profiles with File Download and File Upload
controls.
Data Snippets and Evidence Storage - Locating Security Incident Details
When either the Prisma Browser local scanning or the EDLP detects
sensitive data that violates a policy, two critical types of forensic data are
generated:
- Data Snippets
- Evidence Storage
These provide security administrators with details about the incident.
Data Snippets - The When and the Where
Data snippets are short, masked fragments of text that trigger
security violation. They show what (including 200 characters before
and after the trigger, if it exists) content caused the alert without
exposing the entire sensitive file or document.
These snippets are often masked to maintain privacy. The snippets are
visible in the Prisma Browser Events.
Configuring Snippets
Snippets are globally enabled in the EDLP settings.
- In the Controls and Data Profiles tab, click Set data profile.
- In the Data profile window, select Specific data profile, and select a data profile.
- Click Save.
![]()
- In the Tracking tab, select Content scanning (EDLP) from either On or Enhanced.
- Select Data Snippet.
Snippets are supported for all
content-supporting controls.
Evidence Storage
Evidence storage is the repository for the full file or complete
data that triggered the policy violation. This provides the entire
context needed for thorough forensic investigation. The Evidence Storage is
available in two places:
- The customer-configured storage (for example, an AWS S3 bucket).
- Within the DLP Incident details, where it is ready for administrator review.
Configuring Evidence Storage
Evidence storage is globally enabled in the EDLP settings.
- In the Controls and Data tab, click Set Data profile.
- In the Data profile window, select Specific data profile, and select a data profile.
- Click Save.
- In the Tracking tab, you will be able to select Content scanning (EDLP) from either On or Enhanced.
- Select Evidence Storage
Evidence storage is supported for File
Download, File Upload, and Print controls.
Unified Incident Management
The integration between E-DLP and the Prisma Browser
streamlines investigation for security teams:
- Prisma Browser events ( or local administrators) include a direct link to the corresponding E-DLP incident.
- This link allows security administrators to jump straight into the Unified Incident Manager for full investigation, where they can view the data snippet, examine the surrounding PAB event details, and access the full evidence file.