Prisma SD-WAN
Configure an OSPF in Prisma SD-WAN
Table of Contents
Configure an OSPF in Prisma SD-WAN
Prisma SD-WAN supports the Open Shortest Path First is an interior gateway protocol
(IGP) often used to manage network routes dynamically in large enterprise
networks.
| Where Can I Use This? | What Do I Need? |
|---|---|
|
|
Prisma SD-WAN supports the Open Shortest Path First routing protocol with
the Layer 3 switches toward the Branch sites and Aggregation Layer at the campus and
data center sites.
OSPF is an interior gateway protocol (IGP) often used to manage network
routes dynamically in large enterprise networks. It dynamically determines routes by
obtaining information from other routers and advertising routes to other routers
through Link State Advertisements (LSAs). The information gathered from the LSAs is
used to construct a network topology map. This topology map is shared across routers
in the network and used to populate the IP routing table with available routes.
Changes in the network topology are detected dynamically and used to
generate a new topology map within seconds. A shortest path tree is computed for
each route. Metrics associated with each routing interface are used to calculate the
best route. These can include distance, network throughput, link availability, etc.
Additionally, these metrics can be configured statically to direct the outcome of
the OSPF topology map.
The Palo Alto Networks implementation of OSPF fully supports the following
RFCs:
- RFC 2328 (for IPv4)

Enable Layer 3 Direct Private WAN Forwarding to allow the ION device to peer with an
OSPF router via the private WAN interface.
Enable Layer 3 Direct Private WAN Forwarding and Layer 3 LAN Forwarding to use
dynamic LAN routing.
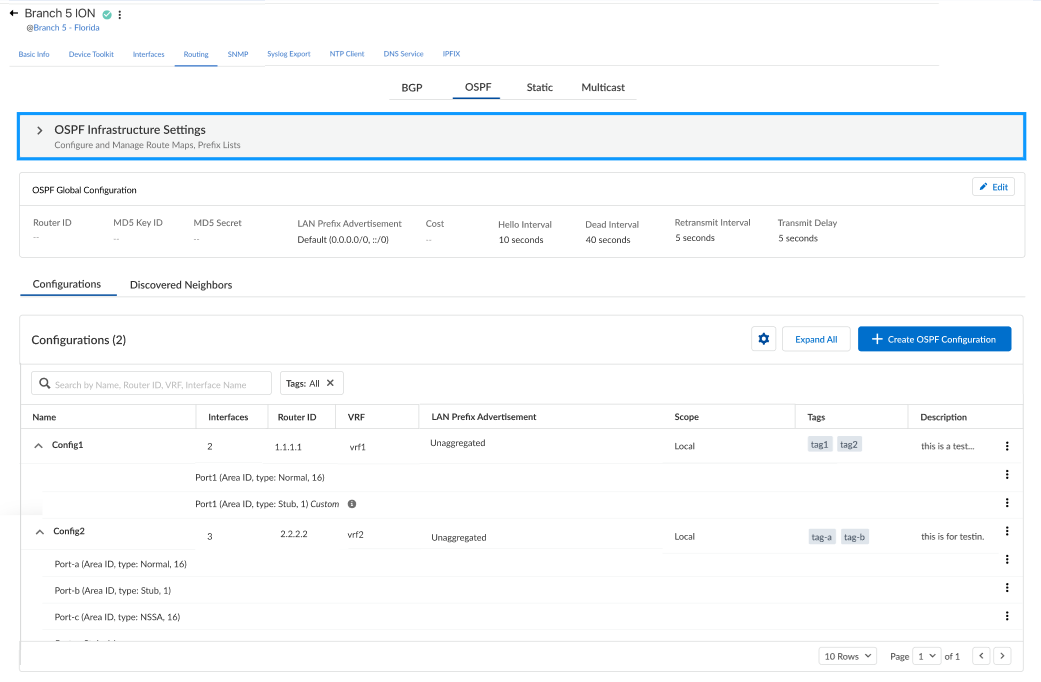
- Log in to Strata Cloud Manager.Select .Enable L3 Direct Private WAN Forwarding to allow the ION device to send underlay MPLS traffic or peer with an OSPF router on a private WAN interface. You don't need to enable this field to run OSPF on the internet or standard VPNs.Enable L3 LAN Forwarding to use dynamic LAN routing.You can enable Layer 3 LAN Forwarding only when no Private Layer 2 bypass pairs are associated with any device's interfaces. If a device has Private Layer 2 interfaces, you will see a message to remove them and then enable Layer 3 LAN Forwarding.For the ION device to use dynamic LAN routing, you must enable both L3 Private WAN Forwarding and L3 LAN Forwarding.Select to configure and manage the Route Maps and Prefix Lists.
![]()
- (Optional) Enter the ION device's IP address for Router ID. The router ID is an IPv4 address and the ION device's OSPF ID.(Optional) Enter an MD5 Key ID between 1 and 255 and an MD5 Secret of up to 16 characters. The MD5 password you specify will be applied to the messages exchanged with the peer.Configure LAN Prefix Advertisement in the following ways:
- Default—The device advertises only the default prefix (0.0.0.0/0). This is the default setting for LAN prefix advertisement.
- Unaggregated—The device advertises prefixes as is.
- Auto-Aggregated—The device summarizes the unaggregated prefixes into the most significant possible blocks and advertises the prefixes.
The device advertises only as default, unaggregated, or auto-aggregated to the LAN.(Optional) Enter the Cost range, which is 1 - 65535.The Hello Interval (sec) is the interval in seconds at which the OSPF process sends hello packets to its directly connected neighbors (the range is 1 - 65535; the default is 10).The Dead Counts (sec)—The number of seconds that a neighbor router waits for a hello packet from the device before declaring the router down. The range is 1-65535. Default is 40.The Retransmit Interval (sec) is the length of time, in seconds, that OSPF waits to receive a Link State Advertisement (LSA) from a neighbor before retransmitting it (the range is 1 - 65535; the default is 5).The Transit Delay (sec) is the length of time an LSA is delayed seconds before being sent out of an interface (range is 1 - 65535; default is 1).Select Create OSPF Configuration to create or add a new OSPF configuration.![]()
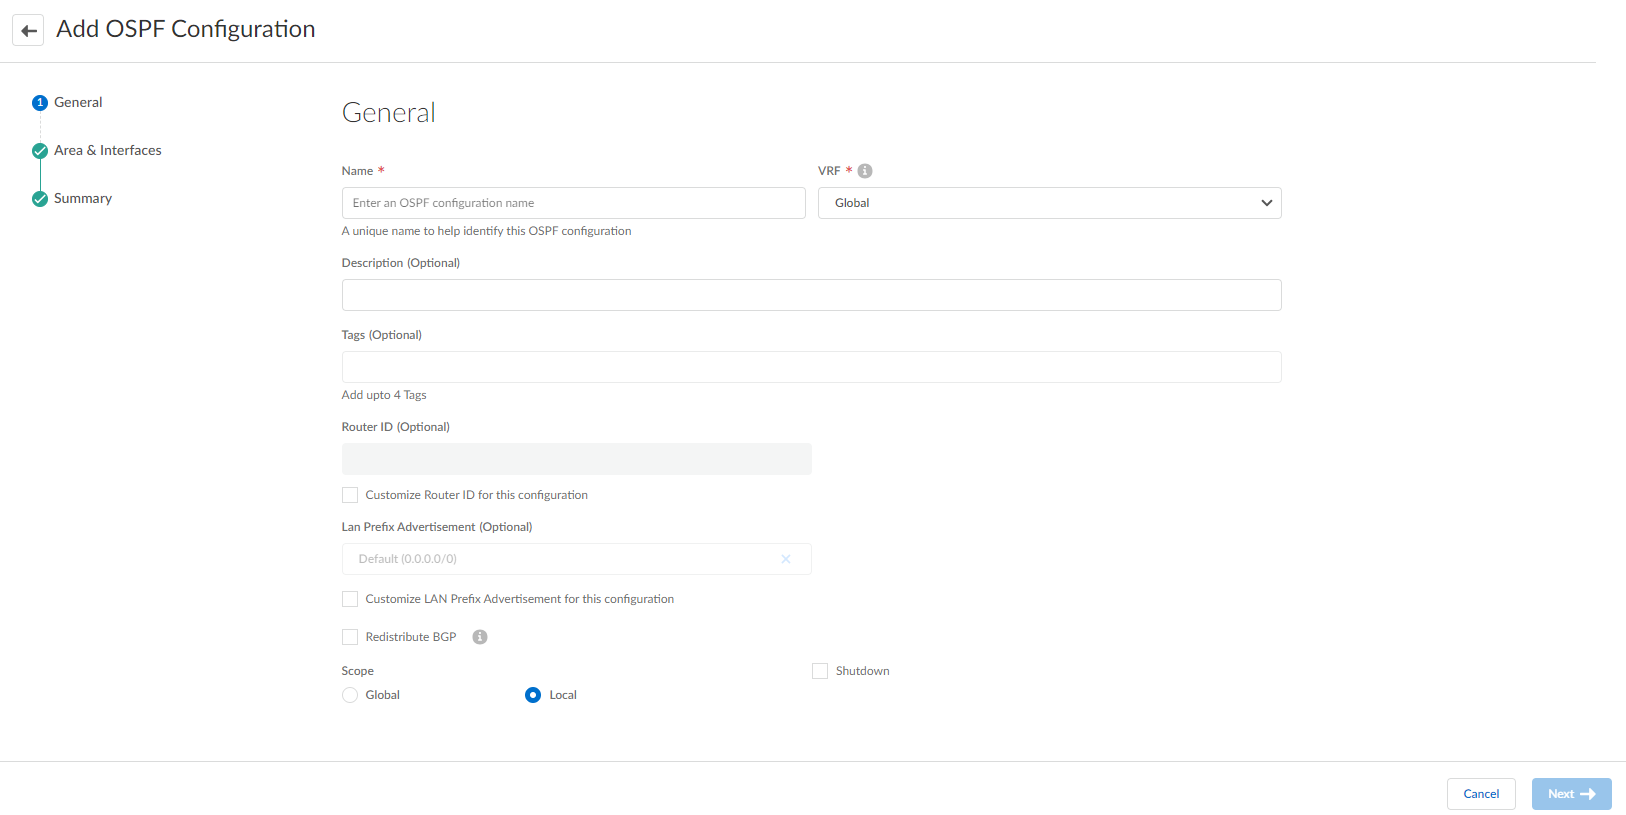
- Enter a unique OSPF configuration Name and VRF (global or custom VRF) in the General tab. (Optionally) enter a description and tags for the OSPF.The VRF will be enabled only when the associated device supports VRF. By default, it's Global.
- (Optional) Enter the Router ID, an IPv4 address, and the ION device's OSPF ID.
- Select LAN Prefix Advertisement. The device advertises only the default prefix (0.0.0.0/0), the default setting for LAN prefix advertisement. (Optional) LAN Advertisement Route Map: select the Route Map to advertise the LAN (Only Unaggregated and Auto-Aggregated Prefixes have this setting.).
- Select Redistribute BGP to advertise all the BGP Prefixes into OSPF.
- Toggle Scope to Local or Global. Local indicates that prefixes won't be advertised.
- Select the Shutdown check box if you don't need to use the created peer. The Shutdown check box is deselected by default.
Configure Area ID and Type with Interfaces on the Area & Interfaces tab.- Area ID: Configure the area over which the OSPF parameters can be applied. Enter an identifier for the area in the x.x.x.x format. This is the identifier that each neighbor must accept to be part of the same area.
- Type: Select one of the following
options:
- Normal—There are no restrictions; the area can carry all routes.
- Stub—There is no outlet from the area. To reach a destination outside of the area, one must go through the border, which connects to other areas.
- NSSA (Not-So-Stubby Area)—it's possible to leave the area directly, but only by routes other than OSPF routes.
- Associate Area with Interfaces—Choose the interface.
- Select Override Global Config to override the global configurations for the selected Interface and click Apply.
Review the OSPF configuration. The Summary tab displays the OSPF configuration. Make changes if needed and Submit.Discovered Neighbors
Two OSPF-enabled routers connected by a shared network and in the same OSPF area form a relationship and are OSPF neighbors. The connection between these routers can be through a common broadcast domain or a point-to-point connection. This connection is made through the exchange of hello OSPF protocol packets. These neighbor relationships are used to exchange routing updates between routers.- Config Name: Displays the name of the configured OSPF.Status: Displays the status of the configuration.Neighbor ID: Displays the router ID of the router (neighbor) on the other side of the virtual link.Interface Name: Displays the Interface name selected for this interface.VRF: Displays the attached VRF.Area ID: Displays the Area ID associated with the OSPF.