SD-WAN
Configure Multiple Virtual Routers on SD-WAN Hub
Table of Contents
Configure Multiple Virtual Routers on SD-WAN Hub
Configure multiple virtual routers on the SD-WAN hub to use
overlapping subnet IP addresses on the branches that connect with the same SD-WAN hub.
| Where Can I Use This? | What Do I Need? |
|---|---|
|
We have introduced support for multiple virtual routers on the SD-WAN
hub that enable you to have overlapping IP subnet addresses on branch devices
connecting to the same SD-WAN hub. With this feature you can have
multiple logical routing domains with overlapping subnets. When you enable this
feature, the SD-WAN hub supports overlapping subnets only if the
overlapping subnets are in different virtual routers.
By default, multiple virtual routers on an SD-WAN hub is disabled.
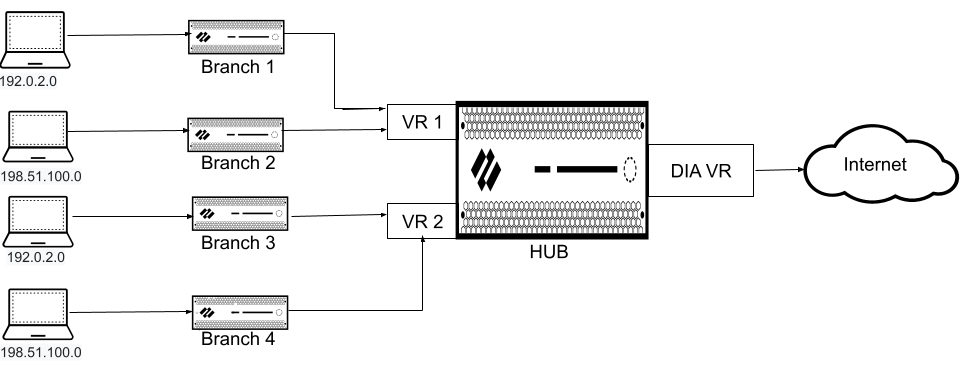
The following figure illustrates an SD-WAN hub with two virtual
routers. By enabling multiple virtual routers support on the SD-WAN hub, the four branches connecting to the same SD-WAN hub can have overlapping IP subnets or belong to different
entities and function independently because their traffic goes to different virtual
routers.
Multiple virtual router feature is supported on both SD-WAN hub
firewall as well as Prisma Access hub. You can onboard Prisma Access as a hub from
the branch, when the branch is connected to an on-premises hub where the multiple
virtual router feature is enabled.
Configure multiple virtual routers while adding an SD-WAN hub firewall ().
Importing multiple virtual routers related configuration using a CSV file while
importing the SD-WAN device is not supported.
(PAN-OS 11.1.3 and later releases, and SD-WAN
plugin
3.2.1 and later releases) We support advanced routing when the multiple
virtual routers on SD-WAN hub is
enabled.
- Log in to the Panorama Web Interface.Select and Add a new SD-WAN firewall.While creating a hub template, add all the virtual routers participating in the SD-WAN hub where the multiple virtual router will be enabled. You must do this before adding the SD-WAN device using the SD-WAN plugin. While creating the hub template, ensure that the virtual router name on the branch matches with one of the virtual routers on the hub.To configure multiple virtual routers on the SD-WAN hub:
- Select the Type of SD-WAN device as Hub.
- Select Enable Multi-VR Support.
The virtual router selected for the Virtual Router Name is used as the hub direct internet access (DIA) virtual router and considered as the default virtual router. The configuration specified under the BGP tab must be specific to the DIA virtual router.- We don't support FEC and packet duplication when multiple virtual router feature is enabled on the SD-WAN hub.
- The multiple virtual router feature on SD-WAN hub is supported only in a hub-spoke topology (and not supported in a full mesh topology).
- To process internet traffic on the SD-WAN hub, SD-WAN policy must ensure that the MPLS tag is selected only when the MPLS link has internet access and NAT.
- PAN-OS does not support forwarding traffic in clear text (when the VPN Data Tunnel Support is disabled on the SD-WAN Interface Profile) outside of the SD-WAN VPN tunnel when multiple virtual routers support on the SD-WAN hub feature is enabled.
The number of virtual routers supported on the Palo Alto Networks firewalls are as follows:Palo Alto Networks Firewall Maximum Virtual Routers Supported Maximum SD-WAN Hub Virtual Routers Supported PA-3400 11 10 PA-5220 and PA-5410 20 20 PA-5250 and PA-5430 125 50 PA-5420 50 20 PA-5260, PA-5280, PA-5400, PA-5440, PA-5445, and PA-7000. 225 50 (Optional) Configure virtual routers.- Select the Virtual Routers tab to configure multiple virtual routers for the SD-WAN hub.BGP routing uses IPv4 by default and hence Enable IPv4 BGP Support is enabled and you can't change this configuration.Enter the name of the Virtual Router.Select an already created Zone in the hub template () that is appropriate for the virtual router that you are configuring.If you configure the same zone for two or more virtual routers in the Multi-VR Configuration, ensure that the virtual routers are not configured with the overlapping subnets.(Optional) Enter the virtual Router ID, which must be unique among all routers.Specify a static IPv4 Loopback Address for BGP peering. Auto VPN configuration automatically creates a loopback interface with the same IPv4 address that you specify. If you specify an existing loopback address, the commit will fail, so you should specify an IPv4 address that is not already a loopback address.Enter the AS Number. The autonomous system number specifies a commonly defined routing policy to the internet. The AS number must be unique for every hub and branch location.Disable the Remove Private AS option (the default is enabled) if you have endpoints that need to exchange routes with a hub or branch firewall in an SD-WAN BGP topology and therefore you don’t want to remove private AS numbers (64512 to 65534) from the AS_PATH attribute in BGP Updates. In this case, you want to allow the private AS numbers to leave the SD-WAN private AS in BGP Updates.The Remove Private AS setting applies to all BGP peer groups on the branch or hub firewall. If you need this setting to differ among BGP peer groups or peers, you must configure the setting outside of the SD-WAN plugin.If you change the Remove Private AS setting, commit to all SD-WAN cluster nodes, and subsequently downgrade to an SD-WAN plugin version earlier than 2.0.2, then all configuration related to Remove Private AS must be done outside of the SD-WAN plugin or directly on the firewalls.Enter Prefix(es) to Redistribute. On a hub device, you must enter at least one prefix to redistribute.Click OKClick Add at the bottom of the Virtual Routers tab to add more virtual routers.
