Enterprise DLP
Create a Nested Data Profile
Table of Contents
Create a Nested Data Profile
Create a single
Enterprise Data Loss Prevention (E-DLP)
data profile containing multiple data
profiles to simplify management of sensitive data leaving your network.Where Can I Use This? | What Do I Need? |
|---|---|
|
Or any of the following licenses that include the Enterprise DLP license
|
Enterprise Data Loss Prevention (E-DLP)
supports creating a single data profile that contains
multiple nested data profiles. Creating a
single data profile that contains multiple nested data profiles allows you to
consolidate the match criteria to prevent exfiltration of sensitive data to a single
data profile that can be used in a single Security policy rule. This allows you to
simplify the management of sensitive data leaving your network and reduces the need
to manage multiple Security policy rules and data profiles. When you create a data profile that contains predefined data profiles and patterns,
be sure to consider the detection types used by the predefined data
patterns because the detection type determines how
Enterprise DLP
arrives at a
verdict for scanned files.- Adding, deleting, or otherwise modifying the nested data profiles you add to data profile is supported only from the DLP app on the hub andStrata Cloud Manager, but not fromPanorama.
- Adding a nested data profile to another nested data profile is not supported.
- Nesting a data profile that includes an EDM data set to an existing data profile if one wasn’t included when the data profile was originally created is supported.
Strata Cloud Manager
Strata Cloud Manager
Create and configure an
Enterprise Data Loss Prevention (E-DLP)
data profile containing multiple data
profiles on Strata Cloud Manager
.- Log in toStrata Cloud Manager.
- Select and .You can also create a new data profile by copying an existing data profile that already contains multiple data profiles. This allows you to quickly modify an existing data profile with additional data profile match criteria while preserving the original data profile from which the new data profile was copied.Data profiles created by copying an existing data profile are appended withCopy - <name_of_original_data_profile>.
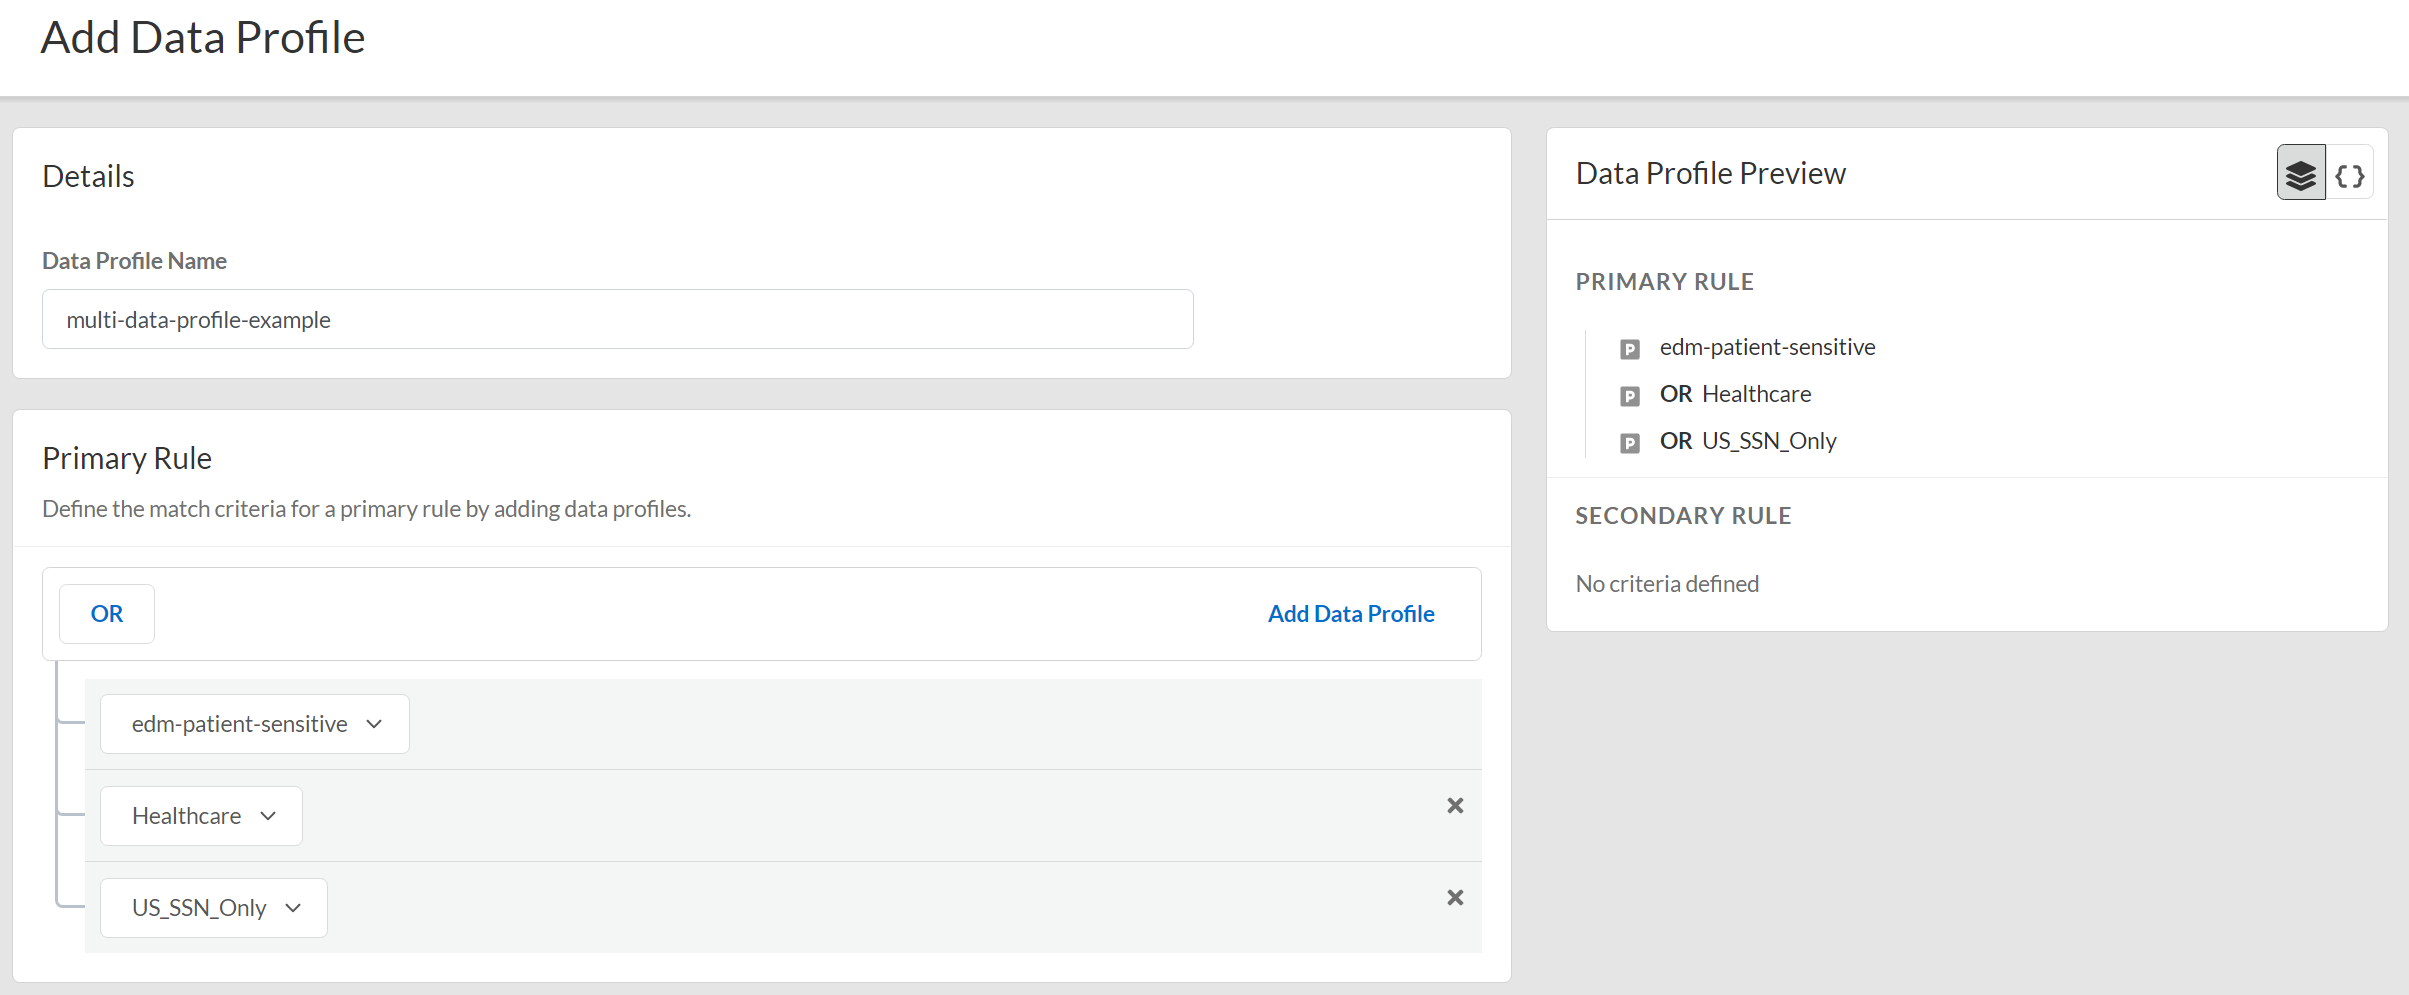
- Enter theData Profile Name.
- Configure the Primary Rule for the data profile.Add Data Profileto add predefined or custom data profiles. Repeat this step to include additional data profiles.Data profile match criteria for traffic that you want to allow must be added to the Primary Rule. Data profiles match criteria for traffic that you want to block can be added to either Primary Rule or Secondary Rule.A data profile containing multiple data profiles support any combination of data profiles with data patterns only, data patterns and EDM data sets, and EDM data sets only.Only theORoperator is supported.
![]()
- (Optional) Configure a Secondary Rule.Add Data Profileto add predefined or custom data profiles. Repeat this step to include additional data profiles.Data profile match criteria added to the Secondary Rule block all traffic that meets the match criteria for the data profile by default and can’t be modified. If you want to allow traffic that matches a data profile match criteria, add it to the Primary Rule.A data profile containing multiple data profiles support any combination of data profiles with data patterns only, data patterns and EDM data sets, and EDM data sets only.Only theORoperator is supported.
- Savethe data profile.
- Verify that the data profile you created.
- DLP App on the hub—Log in to the DLP app on the hub as a Superuser and selectData Profilesto view the data profile you created.
- —Log in toStrata Cloud ManagerStrata Cloud Managerand select and search for the data profile you created.
- PanoramaandPrisma Access (Managed by Panorama)See Update a Data Profile for more information on which data profile settings are editable onPanoramafor a data profile created onStrata Cloud Manager.If the data profile has both Primary and Secondary Patterns, changing the data profile Action onPanoramadeletes all Secondary Pattern match criteria.
- Select the data profile created onStrata Cloud Manager.
- Set the data profile Action toBlocktraffic that matches the data profile match criteria.
- Select andCommit.
- ClickOK.
- Select andEdit Selections.
- SelectDevice GroupsandInclude Device and Network Templates.
- Pushyour configuration changes to your managed firewalls that are usingEnterprise DLP.
- Create a Security policy rule and associate the data profile.
- —Modify a DLP Rule for Prisma Access on Strata Cloud ManagerStrata Cloud Manager
DLP App
Create an
Enterprise Data Loss Prevention (E-DLP)
data profile containing multiple data profiles on the
DLP app.- Log in to the DLP app on the hub.If you don’t already have access to the DLP app on the hub, see the hub Getting Started Guide. Only Superusers can access the hub.
- Select .You can also create a new data profile by copying an existing data profile that already contains multiple data profiles. This allows you to quickly modify an existing data profile with additional data profile match criteria while preserving the original data profile from which the new data profile was copied.Data profiles created by copying an existing data profile are appended withCopy - <name_of_original_data_profile>.
- Enter theData Profile Name.
- Configure the Primary Rule for the data profile.Add Data Profileto add predefined or custom data profiles. Repeat this step to include additional data profiles.Data profile match criteria for traffic that you want to allow must be added to the Primary Rule. Data profiles match criteria for traffic that you want to block can be added to either Primary Rule or Secondary Rule.A data profile containing multiple data profiles support any combination of data profiles with data patterns only, data patterns and EDM data sets, and EDM data sets only.Only theORoperator is supported.
![]()
- (Optional) Configure a Secondary Rule.Add Data Profileto add predefined or custom data profiles. Repeat this step to include additional data profiles.Data profile match criteria added to the Secondary Rule block all traffic that meets the match criteria for the data profile by default and can’t be modified. If you want to allow traffic that matches a data profile match criteria, add it to the Primary Rule.A data profile containing multiple data profiles support any combination of data profiles with data patterns only, data patterns and EDM data sets, and EDM data sets only.Only theORoperator is supported.
- Savethe data profile.
- Verify that the data profile you created.
- DLP App on the hub—Log in to the DLP app on the hub as a Superuser and selectData Profilesto view the data profile you created.
- —Log in toStrata Cloud ManagerStrata Cloud Managerand select and search for the data profile you created.
- PanoramaandPrisma Access (Managed by Panorama)See Update a Data Profile for more information on which data profile settings are editable onPanoramafor a data profile created on the DLP app.
- Log in to thePanoramaweb interface.
- Select and navigate to the data profile you created.
- (Optional) Edit the data profile Action to block traffic.The Action for a data profile created on the DLP app is configured toAlertby default.If the data profile has both Primary and Secondary Patterns, changing the data profile Action onPanoramadeletes all Secondary Pattern match criteria.
- Select the data profile created on the DLP app.
- Set the data profile Action toBlocktraffic that matches the data profile match criteria.
- Select andCommit.
- ClickOK.
- Select andEdit Selections.
- SelectDevice GroupsandInclude Device and Network Templates.
- Pushyour configuration changes to your managed firewalls that are usingEnterprise DLP.
- Attach the data profile to a Security policy rule.
- —Modify a DLP Rule for Prisma Access on Strata Cloud ManagerStrata Cloud Manager
- Log in to thePanoramaweb interface.
- Select and specify theDevice Group.
- Select the Security policy rule to which you want to add the data profile.
- SelectActionsand set theProfile TypetoProfiles.
- Select theData Filteringprofile you created.
- ClickOK.
- SelectCommitandCommit and Push.