Enterprise DLP
Create an Advanced Data Profile
Table of Contents
Create an Advanced Data Profile
Create an advanced Enterprise Data Loss Prevention (E-DLP) data profile containing any combination
of custom and file property data patterns, and advanced detection methods such as EDM and
custom document types.
On May 7, 2025, Palo Alto Networks is introducing new Evidence Storage and Syslog Forwarding service IP
addresses to improve performance and expand availability for these services
globally.
You must allow these new service IP addresses on your network
to avoid disruptions for these services. Review the Enterprise DLP
Release Notes for more
information.
| Where Can I Use This? | What Do I Need? |
|---|---|
|
Or any of the following licenses that include the Enterprise DLP license
|
Advanced data profiles are data profiles that can any combination of predefined,
custom regex, or file property data pattern and advanced
detection methods such as EDM data sets and custom document types. Enterprise DLP synchronizes
advanced data profiles between Panorama and Strata Cloud Manager.
When you create a data profile using predefined data patterns, be sure to consider
the detection type used by the predefined data
patterns because the detection type determines how Enterprise DLP arrives at a
verdict for scanned files.
Enterprise DLP doesn't support updating an advanced data
profile to include only data patterns if the advanced data profile
includes at least one data pattern and advanced detection method when it was
initially created. However, Enterprise DLP supports updating a data profile
that includes data patterns and advanced detection methods to only include
advanced detection methods.
Create a Classic Data Profile to create a data profile containing only predefined or
custom data patterns.
- Log in to Strata Cloud Manager.Select and .You can also create a new data profile by copying an existing data profile. This enables you to quickly modify an existing data profile with additional match criteria while preserving the original data profile from which the new data profile was copied.Data profiles created by copying an existing data profile are appended with Copy - <name_of_original_data_profile>. This name can be edited as needed.Adding an EDM data set to a copied data profile is supported only if the original data profile had an EDM data set to begin with. Adding an EDM data set to a data profile that does not already have an EDM data set isn’t supported.Enter the Data Profile Name.(Prisma Browser) If you copied a Cloud detection data profile, you can Convert to Local Supported Profile to convert the match criteria to regex match criteria supported for Local Detection by Prisma Browser.Configure the Primary Rule for the data profile.Data pattern match criteria for traffic that you want to allow must be added to the Primary Rule. Data pattern match criteria for traffic that you want to block can be added to either Primary Rule or Secondary Rule.
- Enter a descriptive Data Profile Name.Select the data pattern operator (AND or OR).Add Data Pattern.Define the data profile match criteria.
- Data PatternsSelect and define the data pattern match criteria.
- Predefined ML-based data patterns support only the Any occurrence condition with either High or Lowconfidence. You can't configure any other traffic match criteria other than the confidence level for Predefined ML-based data patterns.
- Occurrence Condition—Specify the occurrences condition required to trigger a Security policy rule action.
- Any—Security policy rule action triggered if Enterprise DLP detects at least one instance of matched traffic.
- Less than or equal to—Security policy rule action triggered if Enterprise DLP detects instances of matched traffic, with the maximum being the specified Count.
- More than or equal to—Security policy rule action triggered if Enterprise DLP detects instances of matched traffic, with a minimum being the specified Count.
- Between (inclusive)—Security policy rule action triggered if Enterprise DLP detects any number of instances of matched traffic between the specific Count range.
- Count—Specify the number of instances of matched traffic required to trigger a Security policy rule action.For example, to match a pattern that appears three or more times in a file, select More than or equal to as the Occurrence Condition and specify 3 as the Threshold.
- Default Range—1 - 500
- Increased Range—1 - 1,500Contact Palo Alto Networks Support to increase the occurrence count supported by your Enterprise DLP tenant.
- Confidence—Specify the confidence level required for a Security policy rule action to be taken (High or Low).
- Unique Occurrences—Check (enable) to detect only unique instances of traffic matches. Only unique occurrences of traffic matches are counted toward the specified Count.This setting is disabled by default. Keep Unique Occurrences disabled if you want all instances of traffic matches to count toward the specified Count.
- Data DictionarySelect and define the data dictionary match criteria.
- Dictionary—Select a custom or predefined data pattern.
- Occurrence Condition—Specify the occurrences condition required to trigger a Security policy rule action.
- Any—Security policy rule action triggered if Enterprise DLP detects at least one instance of matched traffic.
- Less than or equal to—Security policy rule action triggered if Enterprise DLP detects instances of matched traffic, with the maximum being the specified Count.
- More than or equal to—Security policy rule action triggered if Enterprise DLP detects instances of matched traffic, with a minimum being the specified Count.
- Between (inclusive)—Security policy rule action triggered if Enterprise DLP detects any number of instances of matched traffic between the specific Count range.
- Count—Specify the number of instances of matched traffic required to trigger a Security policy rule action.Range is 1 - 1,500.For example, to match a pattern that appears three or more times in a file, select More than or equal to as the Occurrence Condition and specify 3 as the Threshold.
- Confidence—Specify the confidence level required for a Security policy rule action to be taken (High or Low).
- Unique Occurrences—Check (enable) to detect only unique instances of traffic matches. Only unique occurrences of traffic matches are counted toward the specified Count.This setting is disabled by default. Keep Unique Occurrences disabled if you want all instances of traffic matches to count toward the specified Count.
- Custom Document TypesSelect and define the custom document type match criteria.
- Overlapping Score Condition—Specify the custom document overlapping score required to trigger a Security policy rule action.
- Greater Than or Equal To—Security policy rule triggered if Enterprise DLP detects an instance of matched traffic with the specified minimum overlapping score.
- Between (Inclusive)—Security policy rule action triggered if Enterprise DLP detects an instance of matched traffic with an overlapping score between the specified min and max overlapping scores.
- EDMSelect and define the EDM match criteria.
- EDM Dataset—Select an EDM data set uploaded to the DLP cloud service.
- Occurrence Condition—Specify the occurrences condition required to trigger a Security policy rule action.
- Count—Specify the number of instances of matched traffic required to trigger a Security policy rule action. Range is 1 - 500.
- Configure EDM data set Primary Fields values to specify whether a Security policy rule action is taken if Any (OR) or All (AND) primary fields are matched and if Any (OR) or All (AND) secondary fields are matched.
- (Any(OR) only) Enter the Count to specify the number of instances of matched traffic required to trigger a Security policy rule action. Range is 1 - 500.When you select Any (OR), the maximum Count setting is one less than the total number of fields included in the Primary Field or Secondary Field.
- Select the Primary Fields values.The list of available values is populated from the selected EDM data set. Select at least one primary field value.You’re required to add at least one column where the column values occurs up to 12 times in the selected EDM data set for the Primary Field. For example, if the EDM data set contains columns for first name, last name, social security number, and credit card number, add social security number and credit card in the primary field.
- Data ProfilesSelect to add a granular or nested data profile to enhance your Enterprise DLP detection capabilities by enabling you to apply differentiated inline content inspection requirements and response actions within the same Security policy rule.
- Granular—Check (enable) Do you want granular control over your profiles? to add granular data profile match criteria. Data profiles that include granular data profile match criteria don't support a Secondary Rule.
- Nested—Don't check Do you want granular control over your profiles? to add nested data profile match criteria. Data profiles that include nested granular data profile match criteria support a Secondary Rule.
For example, you can use a granular profile to block high-risk data patterns while alerting on lower-risk ones, set varying log severities for different data profiles, and selecting specific file types for each data profile included the granular data profile. Granular profiles simplify policy rulebase management by consolidating multiple rules into a single, more flexible policy. This allows your security administrators to streamline Security policy rulebase administration. It reduces false positive detections and achieves a more nuanced approach to data protection that aligns closely with your organization's risk management strategy while maintaining a lean and efficient policy rulebase.(Enterprise DLP Plugin 5.0 and earlier releases) Granular profiles are backwards compatible. This means that if you can configure a granular profile on Strata Cloud Manager, Enterprise DLP can successfully synchronize the granular data profile and make it available for use on Panorama and NGFW running PAN-OS 11.1 or earlier releases and Enterprise DLP plugin 5.0 and earlier releases.Search for and select one or more compatible predefined or custom data profiles and click Apply to add them. Enterprise DLP does not support adding a granular or nested profile to another granular or nested profile. - GroupSelect to nest and group additional match criteria so you can more accurately define your compliance rules.When you click add a new Group, the new match criteria group is nested under the most recently added match criteria. You can’t nest a new match criteria group between existing match criteria. If you add multiple match criteria, you must remove the match criteria that follow the match criteria that you want to add.For example, you added EDM_Dataset1, Data_Pattern2, and EDM_Dataset3 to the Primary Rule. If you wanted to added nested match criteria to Data_Pattern2, you must first remove EDM_Dataset3 from the Primary Rule.You can select the same match criteria or different match criteria to more accurately define your compliance rules. Enterprise DLP supports up to three level of additional groups for each match criteria.Nested match criteria support the AND, OR, and NOT operators. Refer to the descriptions above to configure the nested match criteria.
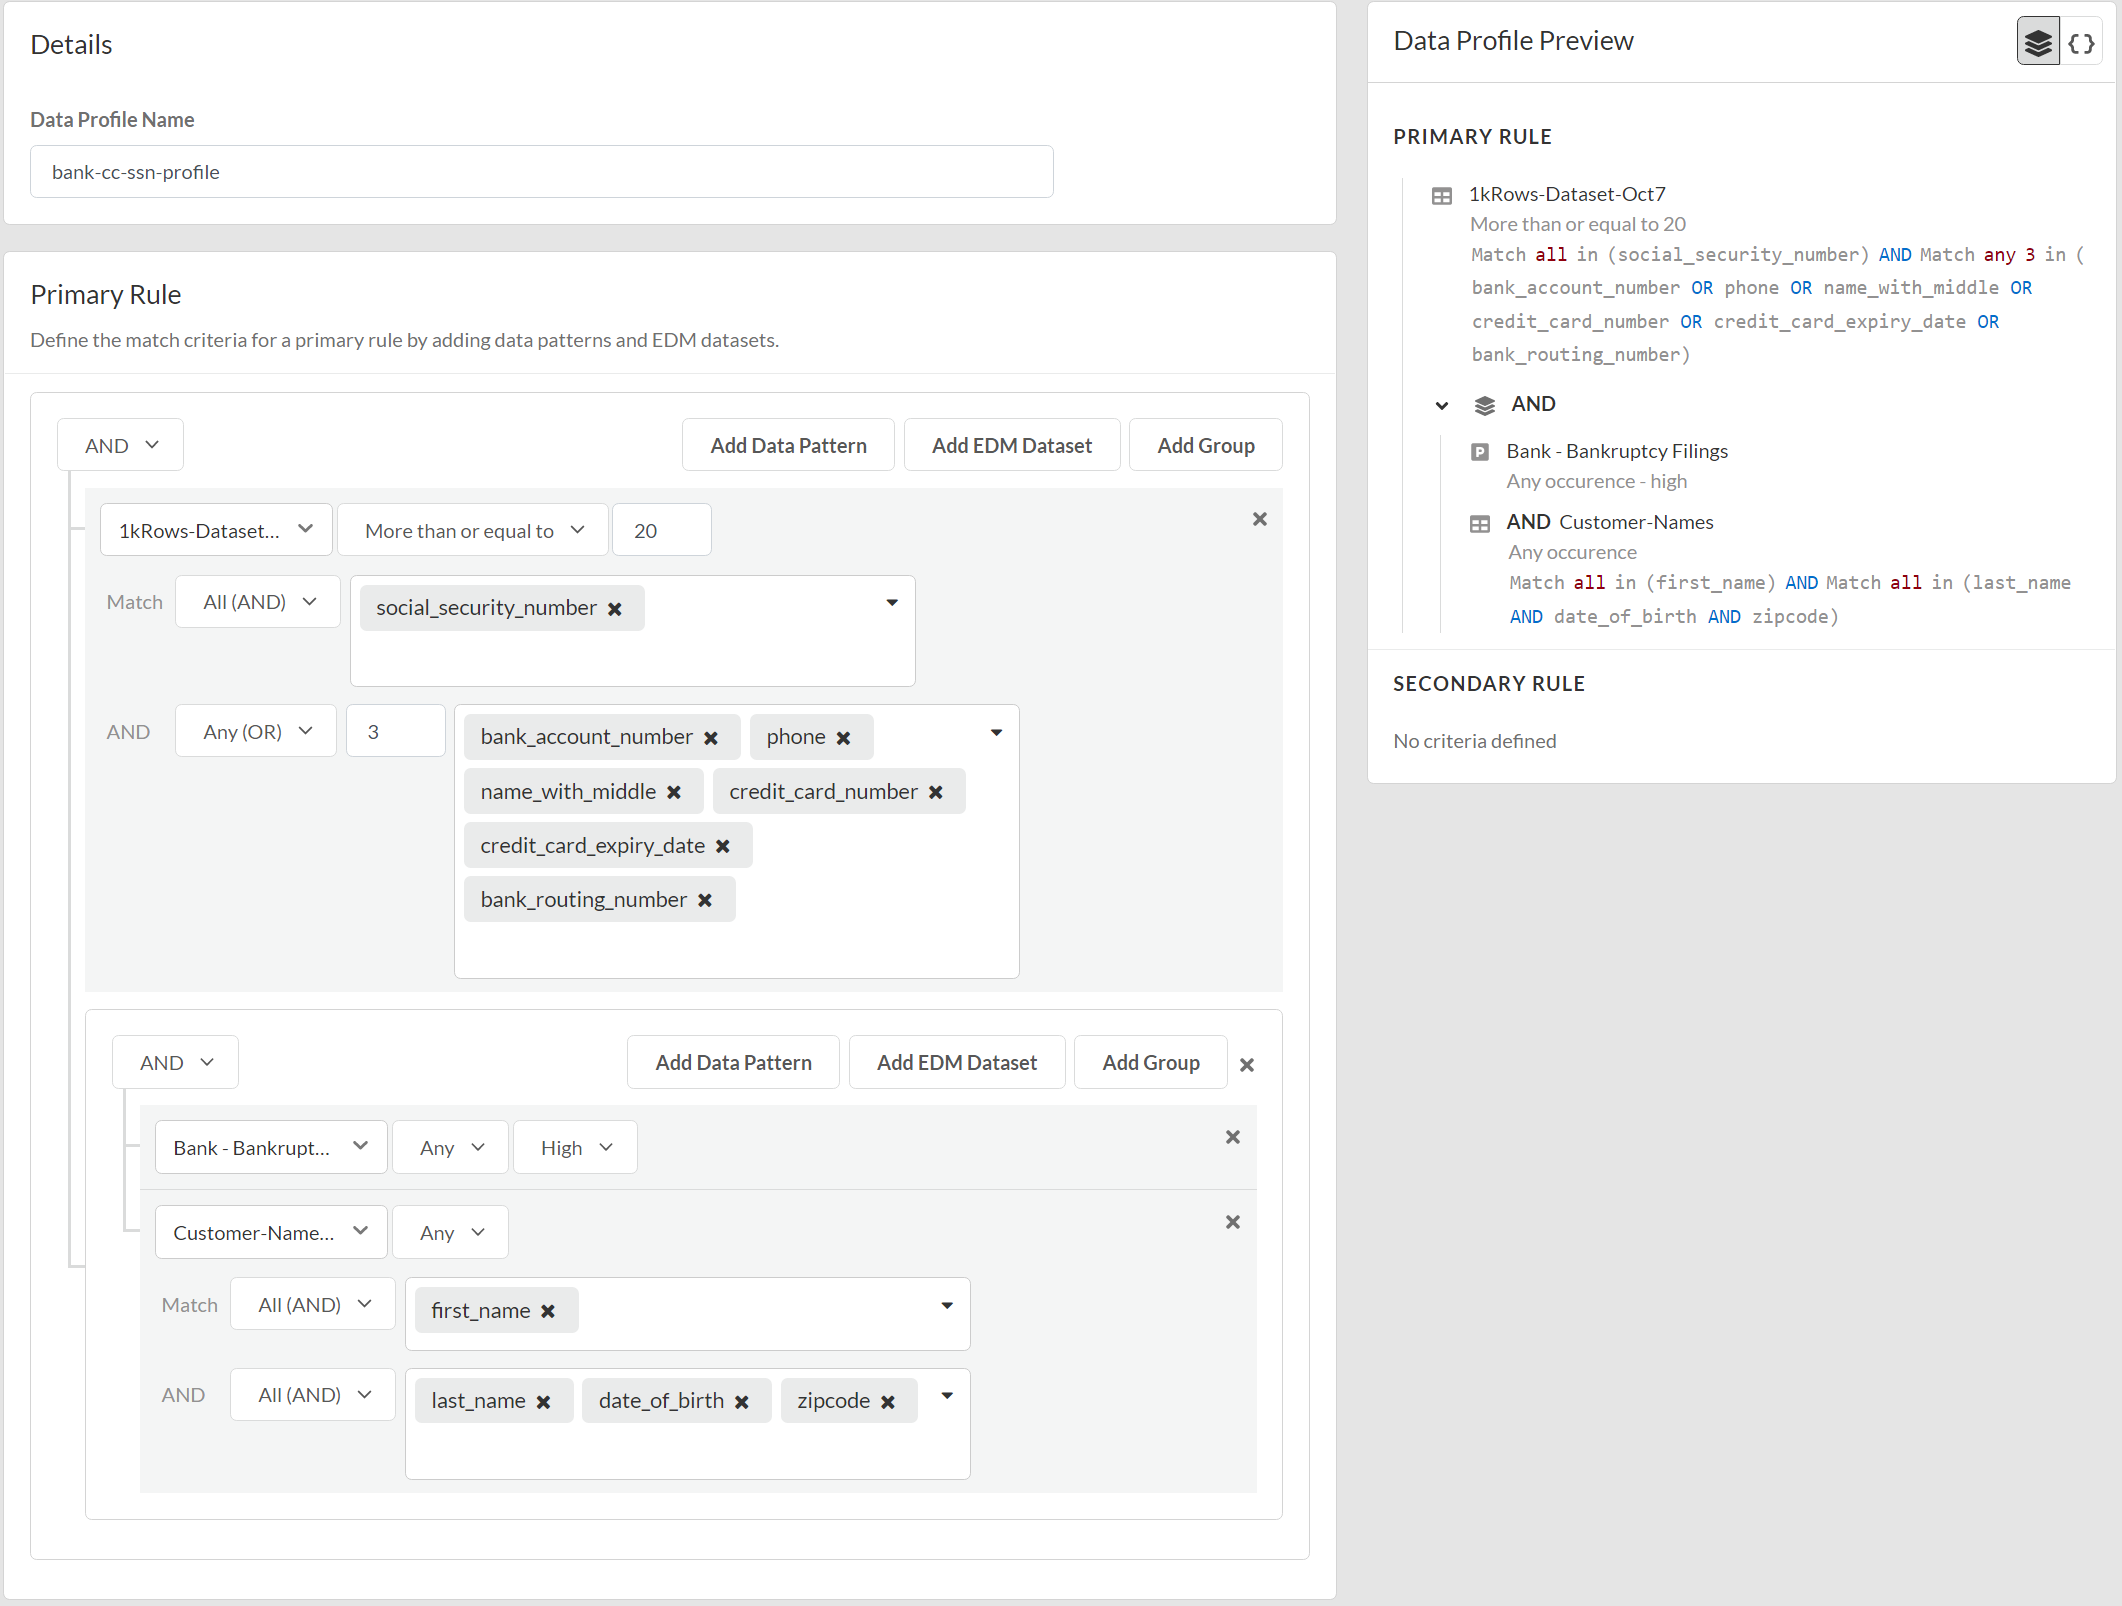
![]() (Optional) Configure a Secondary Rule.Data pattern match criteria added to the Secondary Rule block all traffic that meets the match criteria for the data patterns by default and can’t be modified. If you want to allow traffic that matches a data pattern match criteria, add it to the Primary Rule.Review the Data Profile Preview to verify the data profile match criteria.Enterprise DLP displays a detailed list view of your Primary and Secondary Rule configuration.Click Test Run to test and verify the data profile accurately detects the sensitive data you configured it to detect.Save the data profile.In Data Profiles, search for the data profile you created to verify it was successfully created.Modify a DLP rule to attach the data profile to a Security policy rule.The DLP rule defines the type of traffic to inspect, the impacted file types, action, log severity, and more for the data profile match criteria. Enterprise DLP automatically creates a DLP rule with an identical name as the data profile from which it was created.
(Optional) Configure a Secondary Rule.Data pattern match criteria added to the Secondary Rule block all traffic that meets the match criteria for the data patterns by default and can’t be modified. If you want to allow traffic that matches a data pattern match criteria, add it to the Primary Rule.Review the Data Profile Preview to verify the data profile match criteria.Enterprise DLP displays a detailed list view of your Primary and Secondary Rule configuration.Click Test Run to test and verify the data profile accurately detects the sensitive data you configured it to detect.Save the data profile.In Data Profiles, search for the data profile you created to verify it was successfully created.Modify a DLP rule to attach the data profile to a Security policy rule.The DLP rule defines the type of traffic to inspect, the impacted file types, action, log severity, and more for the data profile match criteria. Enterprise DLP automatically creates a DLP rule with an identical name as the data profile from which it was created.