Device Security
Create and Schedule Queries
Table of Contents
Expand All
|
Collapse All
Device Security Docs
Create and Schedule Queries
Build and validate complex queries for Device Security, run them, save them for
reuse, and schedule them to run on a recurring basis.
| Where Can I Use This? | What Do I Need? |
|---|---|
|
One of the following subscriptions:
|
While the global query works on multiple pages, you can access all features of the
Query Builder from the Queries tab. From there, you can
build and validate more complex queries, run them, and then save the ones you want
to reuse. You can also modify saved queries, duplicate existing queries as a
starting point, and schedule queries to run on a recurring basis.
Make sure you understand the structure of a query
before you start creating and saving queries.
Create a New Query
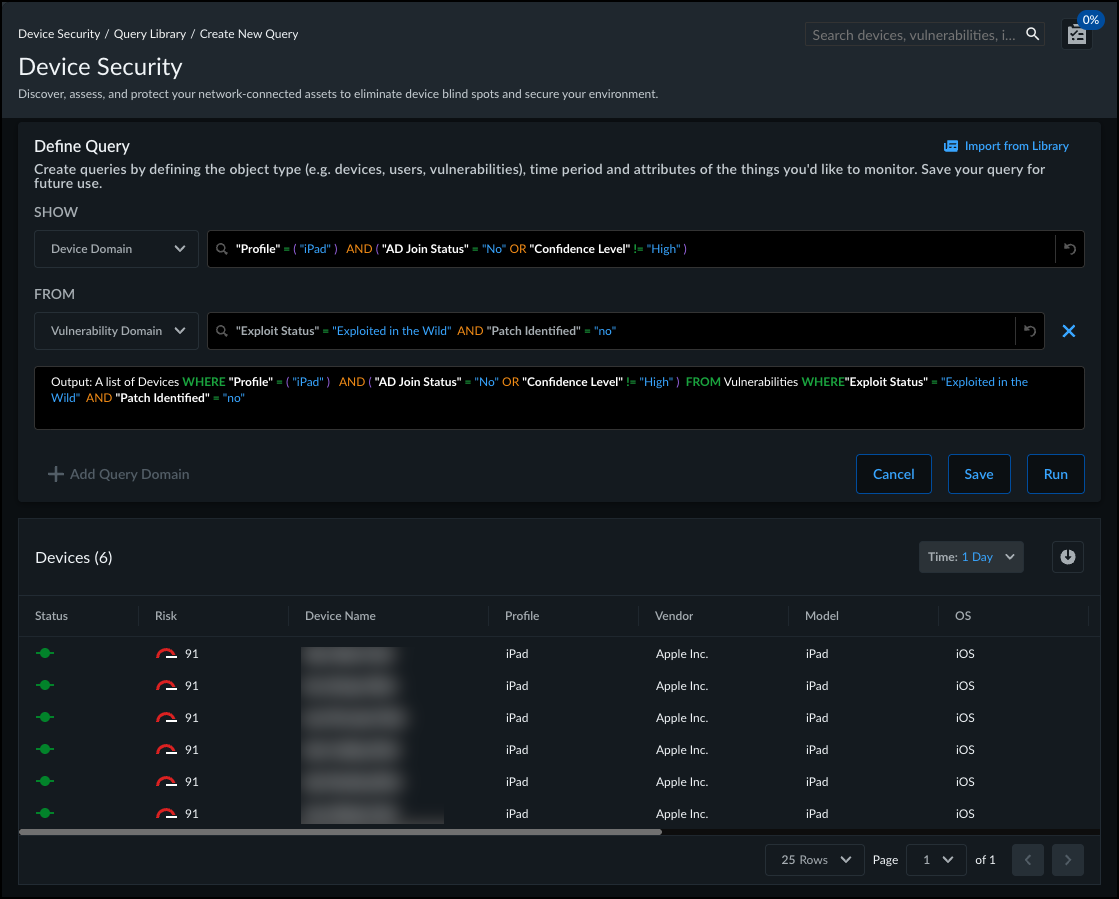
- Navigate to QueriesQuery Library, and from the top of the table, select Create New Query to go to the Define Query page.Optional Select an existing saved query to use as a starting point for creating your new query.
- Select Import from Library.Select the saved query that you want to start with by either typing the name or selecting from the drop-down.After you select a saved query, the fields autopopulate with the saved query's definition.From the Select Domain drop-down, select the domain you want to query.You can select one of three domains:Device Domain – Query based on device attributes, including attributes for active third-party integrations. If the Device Domain is your primary domain, you can select a secondary domain to narrow down query results.Alert Domain – Query based on alert attributes. If Alert Domain is your primary domain, you can't select a secondary domain.Vulnerability Domain – Query based on vulnerability attributes. If Vulnerability Domain is your primary domain, you can't select a secondary domain.Define your query.When you are typing an attribute or attribute value, always start with a quotation mark ("). Without a leading quotation mark, then individual words will automatically be enclosed in quotation marks when you enter a space character.If you select an option from the auto-fill drop-down, then the Query Builder automatically encloses the selected option in quotation marks.
- Select an attribute to query by.You can select an attribute from the drop-down that appears when you select the Input Query… field. Before you start typing, this list only contains common attributes.If you start typing, the list refines to attributes that match your input, including displaying third-party attributes.Select a logical operator for the attribute value you want to search for or against.The drop-down shows which logical operators are valid for the selected attribute.Select the attribute value that you want to search for or against.The drop-down shows which attribute values you can select, based on values seen for your devices, alerts, or vulnerabilities.Optional Define additional attributes and attribute values for querying, using valid connecting operators.Optional If you selected Device Domain as your primary domain, add a secondary domain and define your query for the secondary domain.You can select Alert Domain or Vulnerability Domain as a secondary domain. Define the query for the secondary domain the same way you defined the query for your primary domain, with attributes and operators specific to the secondary domain.Validate your syntax using the output box to review your complete query.The output box updates as you build out your criteria. It shows your complete query definition, including appending the secondary domain query if you added one. The output box checks only for valid syntax and displays an error if the query syntax is invalid. This can happen for a variety of reasons, such as an empty or incomplete query, or incompatible operators for the attributes.Run the query to view the results.When you Run the query, for the first time, a table appears at the bottom of the page. The table displays results from the past day that match your criteria. You can change the time filter to search for all matching devices from the past hour, up to the past year.
![]() Optional Download the results, or modify the matching criteria and Run your query again.
Optional Download the results, or modify the matching criteria and Run your query again.Save and Schedule a Query
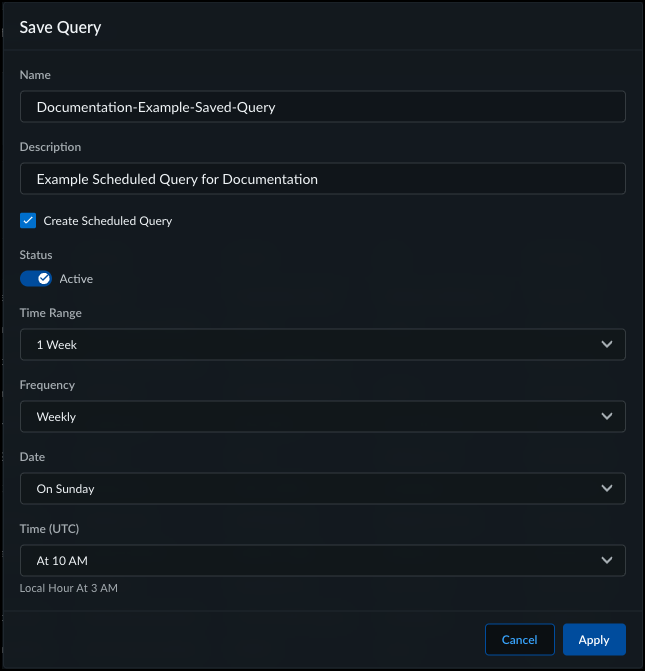
When you Create a New Query, you can choose to save the query if you want to reuse it. You can access saved queries when building a new query from the Query Library, or when using the global query on pages such as the assets inventory and vulnerabilities inventory. You can also choose to schedule the query if you want to view the results of your query on a recurring basis.- After you Create a New Query, click Save to bring up the Save Query pop-up dialog.Enter a Name for your query.Optional Enter a description for the query to explain what it's for.Optional Select Create Scheduled Query to run the query on a recurring basis.Creating a scheduled query doesn't automatically run the query. You need to enable the scheduled query before it runs.
- Toggle the Status if you want to enable the scheduled query after saving.The Status is "Disabled" by default when you first schedule a query.Select the Time Range of how far back the query should search for devices.Select the Frequency for how often the scheduled query should run.Select the Time (UTC) for when the scheduled query should run.
![]() Click Apply to save the query and return to the Query Library.Verify that your saved query appears in the Query Library and the Scheduled column correctly reflects if it is a scheduled query.
Click Apply to save the query and return to the Query Library.Verify that your saved query appears in the Query Library and the Scheduled column correctly reflects if it is a scheduled query.Modify a Saved or Scheduled Query
You can modify a saved query to update the name and description, to change the matching criteria, and to create or remove a schedule. To modify a saved or scheduled query, you have a few options:- Query Library table Name
- Query Library table ActionsThe Actions option in the Query Library table doesn't support modifying the query's matching criteria.
- (Scheduled Queries) Scheduled Query page
Modify a Query from the Query Library Name
- Navigate to QueriesQuery Library and find your query in the Query Library table.Select the query's name to open up the query in a side-panel.The side-panel displays the Query Builder, pre-filled with the matching criteria of the selected query.Update the matching criteria, and then Run the query to ensure the updated query finds the devices you want.Save the query to bring up the Edit Query query-name pop-up dialog.Update the name, description, and schedule as desired.Apply the updated query.
Modify a Query from the Query Library Actions
- Navigate to QueriesQuery Library and find your query in the Query Library table.In the Actions column, select Three-dots menuEdit Query to bring up the Edit Query pop-up dialog.Update the name, description, and schedule as desired.Apply the updated query.
Modify a Query from Scheduled Query
If a query has a recurring schedule, you can edit it from the Scheduled Query page, even if the schedule is disabled.- Navigate to QueriesScheduled Query and find your query in the Scheduled Query table.Select the query's name to open up the query in a side-panel.The side-panel displays the Query Builder, pre-filled with the matching criteria of the selected query.Update the matching criteria, and then Run the query to ensure the updated query finds the devices you want.Save the query to bring up the Edit Query query-name pop-up dialog.Update the name, description, and schedule as desired.Apply the updated query.
Delete a Query
When you delete queries, the deleted queries no longer appear in the Query Library or in the saved queries list for the global query. If the query ran on a schedule, you can still view previously executed queries in the Query Log.- Navigate to QueriesQuery Library and find your query in the Query Library table.In the Actions column, select Three-dots menuDelete Query to bring up the Confirmation pop-up dialog.Confirm.


