Custom Reports
Table of Contents
Expand All
|
Collapse All
Next-Generation Firewall Docs
-
PAN-OS 9.1 (EoL)
- PAN-OS 11.1 & Later
- PAN-OS 11.0 (EoL)
- PAN-OS 10.2
- PAN-OS 10.1
- PAN-OS 10.0 (EoL)
- PAN-OS 9.1 (EoL)
- Cloud Management of NGFWs
-
- Management Interfaces
-
- Launch the Web Interface
- Configure Banners, Message of the Day, and Logos
- Use the Administrator Login Activity Indicators to Detect Account Misuse
- Manage and Monitor Administrative Tasks
- Commit, Validate, and Preview Firewall Configuration Changes
- Export Configuration Table Data
- Use Global Find to Search the Firewall or Panorama Management Server
- Manage Locks for Restricting Configuration Changes
-
-
- Define Access to the Web Interface Tabs
- Provide Granular Access to the Monitor Tab
- Provide Granular Access to the Policy Tab
- Provide Granular Access to the Objects Tab
- Provide Granular Access to the Network Tab
- Provide Granular Access to the Device Tab
- Define User Privacy Settings in the Admin Role Profile
- Restrict Administrator Access to Commit and Validate Functions
- Provide Granular Access to Global Settings
- Provide Granular Access to the Panorama Tab
- Panorama Web Interface Access Privileges
-
- Reset the Firewall to Factory Default Settings
-
- Plan Your Authentication Deployment
- Configure SAML Authentication
- Configure Kerberos Single Sign-On
- Configure Kerberos Server Authentication
- Configure TACACS+ Authentication
- Configure RADIUS Authentication
- Configure LDAP Authentication
- Configure Local Database Authentication
- Configure an Authentication Profile and Sequence
- Test Authentication Server Connectivity
- Troubleshoot Authentication Issues
-
- Keys and Certificates
- Default Trusted Certificate Authorities (CAs)
- Certificate Deployment
- Configure the Master Key
- Export a Certificate and Private Key
- Configure a Certificate Profile
- Configure an SSL/TLS Service Profile
- Replace the Certificate for Inbound Management Traffic
- Configure the Key Size for SSL Forward Proxy Server Certificates
-
- HA Overview
-
- Prerequisites for Active/Active HA
- Configure Active/Active HA
-
- Use Case: Configure Active/Active HA with Route-Based Redundancy
- Use Case: Configure Active/Active HA with Floating IP Addresses
- Use Case: Configure Active/Active HA with ARP Load-Sharing
- Use Case: Configure Active/Active HA with Floating IP Address Bound to Active-Primary Firewall
- Use Case: Configure Active/Active HA with Source DIPP NAT Using Floating IP Addresses
- Use Case: Configure Separate Source NAT IP Address Pools for Active/Active HA Firewalls
- Use Case: Configure Active/Active HA for ARP Load-Sharing with Destination NAT
- Use Case: Configure Active/Active HA for ARP Load-Sharing with Destination NAT in Layer 3
- Refresh HA1 SSH Keys and Configure Key Options
- HA Firewall States
- Reference: HA Synchronization
-
- Use the Dashboard
- Monitor Applications and Threats
- Monitor Block List
-
- Report Types
- View Reports
- Configure the Expiration Period and Run Time for Reports
- Disable Predefined Reports
- Custom Reports
- Generate Custom Reports
- Generate the SaaS Application Usage Report
- Manage PDF Summary Reports
- Generate User/Group Activity Reports
- Manage Report Groups
- Schedule Reports for Email Delivery
- Manage Report Storage Capacity
- View Policy Rule Usage
- Use External Services for Monitoring
- Configure Log Forwarding
- Configure Email Alerts
-
- Configure Syslog Monitoring
-
- Traffic Log Fields
- Threat Log Fields
- URL Filtering Log Fields
- Data Filtering Log Fields
- HIP Match Log Fields
- IP-Tag Log Fields
- User-ID Log Fields
- Tunnel Inspection Log Fields
- SCTP Log Fields
- Authentication Log Fields
- Config Log Fields
- System Log Fields
- Correlated Events Log Fields
- GTP Log Fields
- Syslog Severity
- Custom Log/Event Format
- Escape Sequences
- Forward Logs to an HTTP/S Destination
- Firewall Interface Identifiers in SNMP Managers and NetFlow Collectors
-
- User-ID Overview
- Enable User-ID
- Map Users to Groups
- Enable User- and Group-Based Policy
- Enable Policy for Users with Multiple Accounts
- Verify the User-ID Configuration
-
- App-ID Overview
- App-ID and HTTP/2 Inspection
- Manage Custom or Unknown Applications
-
- Apply Tags to an Application Filter
- Create Custom Application Tags
- Workflow to Best Incorporate New and Modified App-IDs
- See the New and Modified App-IDs in a Content Release
- See How New and Modified App-IDs Impact Your Security Policy
- Ensure Critical New App-IDs are Allowed
- Monitor New App-IDs
- Disable and Enable App-IDs
- Safely Enable Applications on Default Ports
- Applications with Implicit Support
- Application Level Gateways
- Disable the SIP Application-level Gateway (ALG)
- Maintain Custom Timeouts for Data Center Applications
-
- Best Practices for Securing Your Network from Layer 4 and Layer 7 Evasions
- Set Up Antivirus, Anti-Spyware, and Vulnerability Protection
- Set Up File Blocking
- Prevent Brute Force Attacks
- Customize the Action and Trigger Conditions for a Brute Force Signature
- Enable Evasion Signatures
- Monitor Blocked IP Addresses
- Threat Signature Categories
- Create Threat Exceptions
- Custom Signatures
- Threat Prevention Resources
-
- Decryption Overview
-
- Keys and Certificates for Decryption Policies
- SSL Forward Proxy
- SSL Forward Proxy Decryption Profile
- SSL Inbound Inspection
- SSL Inbound Inspection Decryption Profile
- SSL Protocol Settings Decryption Profile
- SSH Proxy
- SSH Proxy Decryption Profile
- Decryption Profile for No Decryption
- SSL Decryption for Elliptical Curve Cryptography (ECC) Certificates
- Perfect Forward Secrecy (PFS) Support for SSL Decryption
- SSL Decryption and Subject Alternative Names (SANs)
- High Availability Support for Decrypted Sessions
- Decryption Mirroring
- Configure SSL Forward Proxy
- Configure SSL Inbound Inspection
- Configure SSH Proxy
- Configure Server Certificate Verification for Undecrypted Traffic
- Enable Users to Opt Out of SSL Decryption
- Temporarily Disable SSL Decryption
- Configure Decryption Port Mirroring
- Verify Decryption
-
- How Decryption Broker Works
- Layer 3 Security Chain Guidelines
- Configure Decryption Broker with One or More Layer 3 Security Chain
- Transparent Bridge Security Chain Guidelines
- Configure Decryption Broker with a Single Transparent Bridge Security Chain
- Configure Decryption Broker with Multiple Transparent Bridge Security Chains
- Activate Free Licenses for Decryption Features
-
- About Palo Alto Networks URL Filtering Solution
- How Advanced URL Filtering Works
- URL Filtering Use Cases
- Plan Your URL Filtering Deployment
- URL Filtering Best Practices
- Activate The Advanced URL Filtering Subscription
- Configure URL Filtering
- Test URL Filtering Configuration
- Log Only the Page a User Visits
- Create a Custom URL Category
- URL Category Exceptions
- Use an External Dynamic List in a URL Filtering Profile
- Allow Password Access to Certain Sites
- URL Filtering Response Pages
- Customize the URL Filtering Response Pages
- HTTP Header Logging
- Request to Change the Category for a URL
-
-
- Tap Interfaces
-
- Layer 2 and Layer 3 Packets over a Virtual Wire
- Port Speeds of Virtual Wire Interfaces
- LLDP over a Virtual Wire
- Aggregated Interfaces for a Virtual Wire
- Virtual Wire Support of High Availability
- Zone Protection for a Virtual Wire Interface
- VLAN-Tagged Traffic
- Virtual Wire Subinterfaces
- Configure Virtual Wires
- Configure an Aggregate Interface Group
- Use Interface Management Profiles to Restrict Access
- Virtual Routers
- Service Routes
- RIP
- Route Redistribution
-
- DNS Overview
- DNS Proxy Object
- DNS Server Profile
- Multi-Tenant DNS Deployments
- Configure a DNS Proxy Object
- Configure a DNS Server Profile
- Use Case 1: Firewall Requires DNS Resolution
- Use Case 2: ISP Tenant Uses DNS Proxy to Handle DNS Resolution for Security Policies, Reporting, and Services within its Virtual System
- Use Case 3: Firewall Acts as DNS Proxy Between Client and Server
- DNS Proxy Rule and FQDN Matching
- Dynamic DNS Overview
- Configure Dynamic DNS for Firewall Interfaces
-
- NAT Rule Capacities
- Dynamic IP and Port NAT Oversubscription
- Dataplane NAT Memory Statistics
-
- Translate Internal Client IP Addresses to Your Public IP Address (Source DIPP NAT)
- Enable Clients on the Internal Network to Access your Public Servers (Destination U-Turn NAT)
- Enable Bi-Directional Address Translation for Your Public-Facing Servers (Static Source NAT)
- Configure Destination NAT with DNS Rewrite
- Configure Destination NAT Using Dynamic IP Addresses
- Modify the Oversubscription Rate for DIPP NAT
- Reserve Dynamic IP NAT Addresses
- Disable NAT for a Specific Host or Interface
-
-
- Policy Types
- Policy Objects
- Track Rules Within a Rulebase
- Enforce Policy Rule Description, Tag, and Audit Comment
- Move or Clone a Policy Rule or Object to a Different Virtual System
-
- External Dynamic List
- Built-in External Dynamic Lists
- Configure the Firewall to Access an External Dynamic List
- Retrieve an External Dynamic List from the Web Server
- View External Dynamic List Entries
- Exclude Entries from an External Dynamic List
- Enforce Policy on an External Dynamic List
- Find External Dynamic Lists That Failed Authentication
- Disable Authentication for an External Dynamic List
- Register IP Addresses and Tags Dynamically
- Use Dynamic User Groups in Policy
- Use Auto-Tagging to Automate Security Actions
- CLI Commands for Dynamic IP Addresses and Tags
- Application Override Policy
- Test Policy Rules
-
PAN-OS 11.1 & Later
- PAN-OS 11.1 & Later
- PAN-OS 11.0 (EoL)
- PAN-OS 10.2
- PAN-OS 10.1
-
- Tap Interfaces
-
- Layer 2 and Layer 3 Packets over a Virtual Wire
- Port Speeds of Virtual Wire Interfaces
- LLDP over a Virtual Wire
- Aggregated Interfaces for a Virtual Wire
- Virtual Wire Support of High Availability
- Zone Protection for a Virtual Wire Interface
- VLAN-Tagged Traffic
- Virtual Wire Subinterfaces
- Configure Virtual Wires
- Configure a PPPoE Client on a Subinterface
- Configure an IPv6 PPPoE Client
- Configure an Aggregate Interface Group
- Configure Bonjour Reflector for Network Segmentation
- Use Interface Management Profiles to Restrict Access
-
- DHCP Overview
- Firewall as a DHCP Server and Client
- Firewall as a DHCPv6 Client
- DHCP Messages
- Dynamic IPv6 Addressing on the Management Interface
- Configure an Interface as a DHCP Server
- Configure an Interface as a DHCPv4 Client
- Configure an Interface as a DHCPv6 Client with Prefix Delegation
- Configure the Management Interface as a DHCP Client
- Configure the Management Interface for Dynamic IPv6 Address Assignment
- Configure an Interface as a DHCP Relay Agent
-
- DNS Overview
- DNS Proxy Object
- DNS Server Profile
- Multi-Tenant DNS Deployments
- Configure a DNS Proxy Object
- Configure a DNS Server Profile
- Use Case 1: Firewall Requires DNS Resolution
- Use Case 2: ISP Tenant Uses DNS Proxy to Handle DNS Resolution for Security Policies, Reporting, and Services within its Virtual System
- Use Case 3: Firewall Acts as DNS Proxy Between Client and Server
- DNS Proxy Rule and FQDN Matching
-
- NAT Rule Capacities
- Dynamic IP and Port NAT Oversubscription
- Dataplane NAT Memory Statistics
-
- Translate Internal Client IP Addresses to Your Public IP Address (Source DIPP NAT)
- Create a Source NAT Rule with Persistent DIPP
- PAN-OS
- Strata Cloud Manager
- Enable Clients on the Internal Network to Access your Public Servers (Destination U-Turn NAT)
- Enable Bi-Directional Address Translation for Your Public-Facing Servers (Static Source NAT)
- Configure Destination NAT with DNS Rewrite
- Configure Destination NAT Using Dynamic IP Addresses
- Modify the Oversubscription Rate for DIPP NAT
- Reserve Dynamic IP NAT Addresses
- Disable NAT for a Specific Host or Interface
-
- Network Packet Broker Overview
- How Network Packet Broker Works
- Prepare to Deploy Network Packet Broker
- Configure Transparent Bridge Security Chains
- Configure Routed Layer 3 Security Chains
- Network Packet Broker HA Support
- User Interface Changes for Network Packet Broker
- Limitations of Network Packet Broker
- Troubleshoot Network Packet Broker
-
- Enable Advanced Routing
- Logical Router Overview
- Configure a Logical Router
- Create a Static Route
- Configure BGP on an Advanced Routing Engine
- Create BGP Routing Profiles
- Create Filters for the Advanced Routing Engine
- Configure OSPFv2 on an Advanced Routing Engine
- Create OSPF Routing Profiles
- Configure OSPFv3 on an Advanced Routing Engine
- Create OSPFv3 Routing Profiles
- Configure RIPv2 on an Advanced Routing Engine
- Create RIPv2 Routing Profiles
- Create BFD Profiles
- Configure IPv4 Multicast
- Configure MSDP
- Create Multicast Routing Profiles
- Create an IPv4 MRoute
-
-
PAN-OS 11.2
- PAN-OS 11.2
- PAN-OS 11.1
- PAN-OS 11.0 (EoL)
- PAN-OS 10.2
- PAN-OS 10.1
- PAN-OS 10.0 (EoL)
- PAN-OS 9.1 (EoL)
- PAN-OS 9.0 (EoL)
- PAN-OS 8.1 (EoL)
- Cloud Management and AIOps for NGFW
End-of-Life (EoL)
Custom Reports
In order to create purposeful custom reports, you must
consider the attributes or key pieces of information that you want
to retrieve and analyze, such as threats, as well as the best way
to categorize the information, such as grouping by rule UUID, which
will allow you to see the rule that applies to each threat type.
This consideration guides you in making the following selections
in a custom report:
Selection | Description |
---|---|
Database | You can base the report on one of the following
database types:
Reports based on detailed logs take much longer
to run and are not recommended unless absolutely necessary. |
Attributes | The columns that you want to use as the
match criteria. The attributes are the columns that are available
for selection in a report. From the list of Available
Columns, you can add the selection criteria for matching
data and for aggregating the details (the Selected Columns). |
Sort By/ Group By | The Sort By and the Group By criteria
allow you to organize/segment the data in the report; the sorting
and grouping attributes available vary based on the selected data
source. The Sort By option specifies the attribute that is
used for aggregation. If you do not select an attribute to sort
by, the report will return the first N number of results without
any aggregation. The Group By option allows you to select
an attribute and use it as an anchor for grouping data; all the
data in the report is then presented in a set of top 5, 10, 25 or
50 groups. For example, when you select Hour as the Group By selection
and want the top 25 groups for a 24-hr time period, the results
of the report will be generated on an hourly basis over a 24-hr
period. The first column in the report will be the hour and the next
set of columns will be the rest of your selected report columns. |
The following example illustrates how the Selected Columns and Sort By/Group
By criteria work together when generating reports:
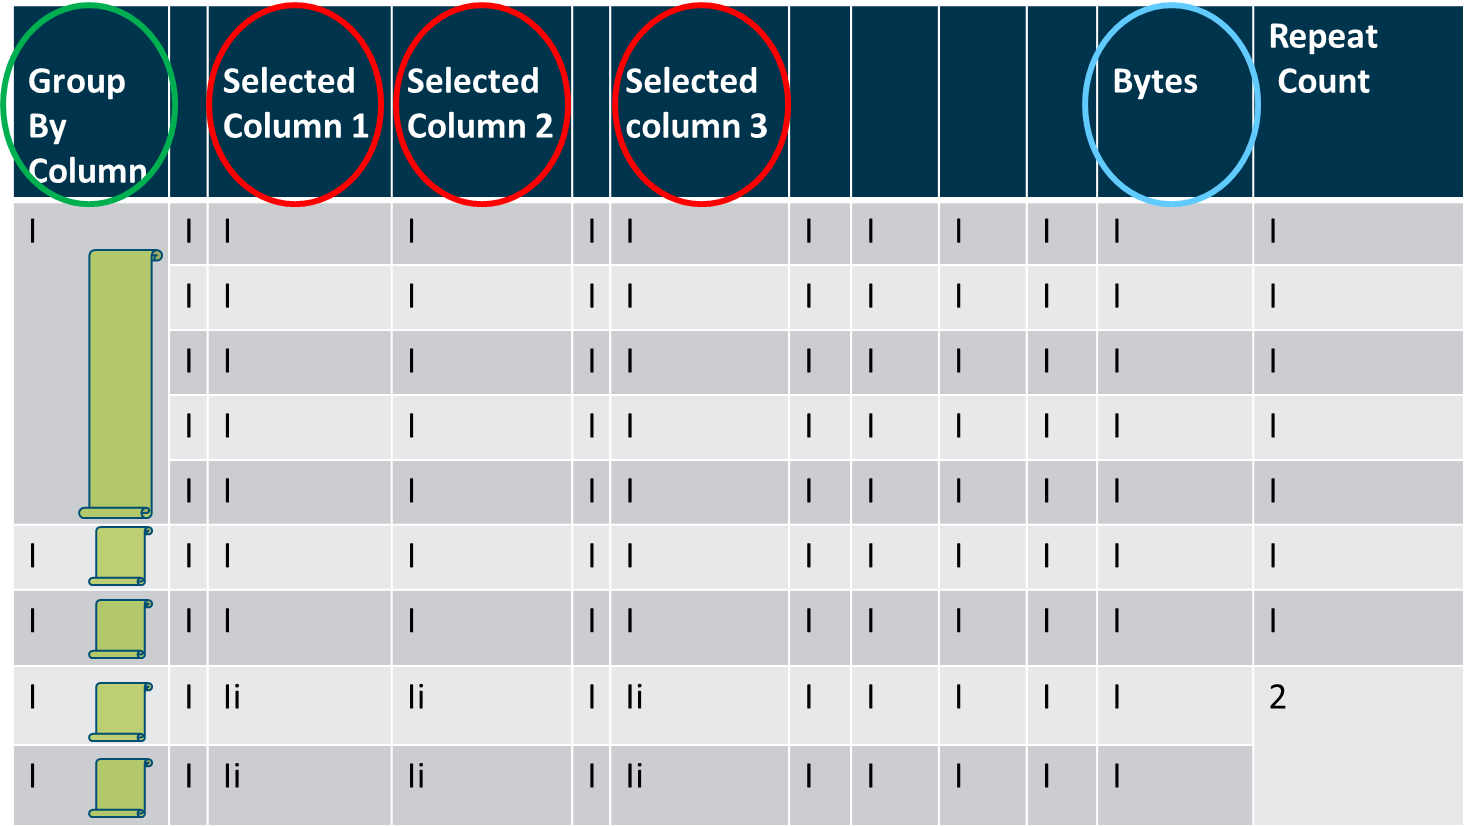
 ![]() The columns
circled in red (above) depict the columns selected, which are the
attributes that you match against for generating the report. Each
log entry from the data source is parsed and these columns are matched
on. If multiple sessions have the same values for the selected columns,
the sessions are aggregated and the repeat count (or sessions) is
incremented. The column circled in blue indicates the chosen
sort order. When the sort order (Sort By)
is specified, the data is sorted (and aggregated) by the selected
attribute. The column circled in green indicates the Group By selection,
which serves as an anchor for the report. The Group By column
is used as a match criteria to filter for the top N groups. Then,
for each of the top N groups, the report enumerates the values for
all the other selected columns. | |
For example, if a report has the following
selections: The output
will display as follows: The report
is anchored by Day and sorted by Sessions.
It lists the 5 days (5 Groups) with maximum
traffic in the Last 7 Days time frame. The
data is enumerated by the Top 5 sessions
for each day for the selected columns—App Category, App Subcategory and Risk. | |
Time Frame | The date range for which you want to analyze
data. You can define a custom range or select a time period ranging
from the last 15 minutes to the last 30 days. The reports can be
run on demand or scheduled to run at a daily or weekly cadence. |
Query Builder | The query builder allows you to define specific
queries to further refine the selected attributes. It allows you
see just what you want in your report using and and or operators
and a match criteria, and then include or exclude data that matches
or negates the query in the report. Queries enable you to generate
a more focused collation of information in a report. |