Prisma SD-WAN
Configure a Route Map
Table of Contents
Expand All
|
Collapse All
Prisma SD-WAN Docs
-
-
-
- CloudBlade Integrations
- CloudBlades Integration with Prisma Access
-
-
-
-
- 6.5
- 6.4
- 6.3
- 6.2
- 6.1
- 5.6
- New Features Guide
- On-Premises Controller
- Prisma SD-WAN CloudBlades
- Prisma Access CloudBlade Cloud Managed
- Prisma Access CloudBlade Panorama Managed
Configure a Route Map
You can configure a route map to filter and update routes. The route map can be
associated with a BGP peer and can be used to filter routes based on criteria.
| Where Can I Use This? | What Do I Need? |
|---|---|
|
|
You can optionally configure a route map to filter and update routes. Associate
the route map with a BGP peer to filter routes. You can configure multiple route
maps but you can apply only one route map to a peer. If filtering needs are
identical, you can use the same route map for inbound and outbound
traffic.
The branch ION device filters received routes based on the route map.
Filters may be based on a prefix list, AS path list, or community list. For example,
a peer may advertise 1000 routes, but you may be interested in only 20 routes from
this peer. You can apply conditions to filter the 20 routes of interest to the ION
device.
Route maps are auto-generated for core and edge peers. You need to
create route maps for a classic peer in a branch or a data center. Using match and
set criteria and permit and deny clauses, the ION device accepts or denies routes
that are advertised.

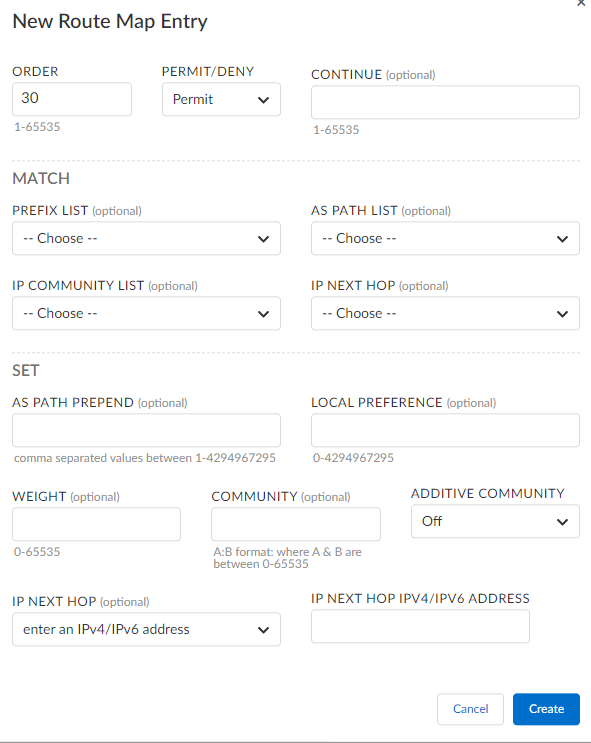
- Select ConfigurationPrisma SD-WANION DevicesClaimedConfigure the deviceRoutingBGP/PeersRoute Maps.Select Create Route Map to create a new route map.On the Info screen, enter a name and optionally enter a description and tags for the route map.(Optional) On the Entries screen, click Add an Entry to add entries to a route map.You must create two route map entries using the continue option to filter IPv4 and IPv6 routes for the same peer, as we support a single route map per peer.
![]() You can either configure IPv4 or IPv6 prefix, not both.
You can either configure IPv4 or IPv6 prefix, not both.- Enter an order number from 1 to 65535 to define the order in which this route map will be used.Order number from 99 to 103 are reserved for auto generated route maps, hence enter an order number excluding 99-103 to define the order in which this route map will be used.Select Permit to allow routes to be advertised or Deny to block the routes from being advertised.(Optional) Select Continue to use the rule that the route matches.For example, if a route matches order #10, go to the rule with order #10.(Optional) For Match, choose from the Prefix List, IP Community List, AS Path List, or IP Next Hop.If you have a match criteria for a route map with a set IP-next-hop peer address that needs to be present for both IPv4 and IPv6 prefixes, you must add one more entry with a continue option, and IP-next-hop set as the IPv6 peer address for IPv6 filtering to work.If you modify an associated Prefix List, AS Path List, or IP Community List, you must perform a soft reset on the corresponding BGP peer for the changes to take effect on advertised or received routes. The soft reset causes BGP to re-evaluate its routing policies for that peer without tearing down the BGP/TCP connection.(Optional) For Set, enter values for AS Path Prepend, Weight, Local Preference, Community, and Additive Community.Where you want to create a customized or autogenerated route map with a set clause as peer-address, you must set peer-address and ipv6-peer-address(with continue entry for both) based on the address-family.(Optional) For IP Next Hop, select peer-address, or IPv6-peer-address, or enter an IPv4 or IPv6 address of the next hop.Click Create to create the route map.
Redistribute
Route redistribution is the process of making learned routes from one routing protocol (or a static or connected route) available to a different routing protocol, thereby increasing the accessibility of network traffic. Without route redistribution, a router or virtual router advertises and shares routes only with other routers that run the same routing protocol. You can redistribute IPv4 BGP, connected, or static routes into the OSPF and redistribute OSPF, connected, or static routes into the BGP. ![]()


