SD-WAN
Onboard PAN-OS Firewalls to Prisma Access for Cloud-based Security
Table of Contents
Onboard PAN-OS Firewalls to Prisma Access for Cloud-based Security
Configure an SD-WAN branch firewall to connect to a Prisma Access hub
for cloud-based security.
| Where Can I Use This? | What Do I Need? |
|---|---|
|
|
SD-WAN plugin 2.2
and later versions
provides Prisma Access hub support, in which PAN-OS firewalls connecting to Prisma Access compute nodes (CNs)
achieve cloud-based security in an SD-WAN hub-and-spoke topology. In
this topology, the SD-WAN hubs are Prisma Access CNs (IPSec
Termination Nodes) and the SD-WAN branches are PAN-OS
firewalls. A maximum of four hubs (any combination of PAN-OS hubs
participating in DIA AnyPath and Prisma Access hubs) are supported. SD-WAN automatically creates IKE and IPSec tunnels that connect the
branch to the hub. Review the system requirements for SD-WAN and Prisma
Access.
It's important to configure Prisma Access first, and then configure SD-WAN.
- If you're starting a brand new Prisma Access configuration, read the Prisma Access Administrator’s Guide and complete Phase 1 and then Phase 2 configuration steps.
- If you already have Prisma Access running, ensure Phase 1 is complete, and then complete Phase 2.
The following flowchart shows the order of the two configuration phases and basic
steps within each phase. The full Prisma Access prerequisites with links and the
configuration steps for SD-WAN follow the flowchart.
| PHASE 1—PRISMA ACCESS | PHASE 2—SD-WAN |
|---|---|
| (COMPLETE PHASE 1 FIRST) | (BEGIN ONLY AFTER COMPLETING PHASE 1) |
|
|
Before you connect SD-WAN to Prisma Access, you must have a branch
firewall with an interface that has SD-WAN enabled. Additionally,
ensure you have performed the following Prisma Access prerequisites for one or
more tenants; these are the Phase 1 steps:
- For , set up the infrastructure subnet, infrastructure BGP AS, template stack and device group for a tenant on the Service Setup page.
- On the Remote Networks page, set up template stacks, templates, device groups, trust and untrust zones, and bandwidth allocation for specific regions.
- Ensure your Prisma Access deployment is
licensed for remote networks by
selecting and checking your license information.
- Licenses available after November 17, 2020 show the amount of licensed bandwidth you have for remote networks in the Net Capacity area.
- Licenses available before November 17, 2020 show the available remote network bandwidth in the GlobalProtect Cloud Service for Remote Networks area under Total Mbps.
- Ensure your deployment allocates bandwidth per compute location, instead of by location.
- Ensure you have assigned bandwidth to the compute location that corresponds to the location to which you want to onboard. Prisma Access allocates one IPSec termination node per 500 Mbps of bandwidth you allocate to a region.
- Perform a local commit and push to the Prisma Access cloud.
After you have performed the preceding steps for Phase 1 with Prisma Access,
perform the following Phase 2 steps for SD-WAN.
- Log in to the Panorama Web Interface.Specify the BGP local address pool for loopback addresses.
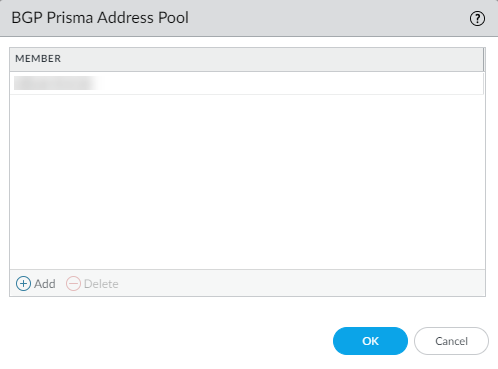
- Select .At the bottom of the screen, select BGP Prisma Address Pool.
![]() Add an unused private subnet (prefix and netmask) for the local BGP addresses for Prisma Access.
Add an unused private subnet (prefix and netmask) for the local BGP addresses for Prisma Access.![]() Click OK.Commit.Do not simply change an existing address pool if Prisma Access is already onboarded. If you need to change an address pool, perform the following steps during a maintenance window to update the SD-WAN branch and the Prisma Access CN with your address pool changes:
Click OK.Commit.Do not simply change an existing address pool if Prisma Access is already onboarded. If you need to change an address pool, perform the following steps during a maintenance window to update the SD-WAN branch and the Prisma Access CN with your address pool changes:- Use Panorama to access an SD-WAN branch and delete the existing onboarding that the address pool change will impact; then do a local Commit.
- Update the VPN address pool, and then do a local Commit.
- Perform the Prisma Access onboarding again, and then do a local Commit and Push.
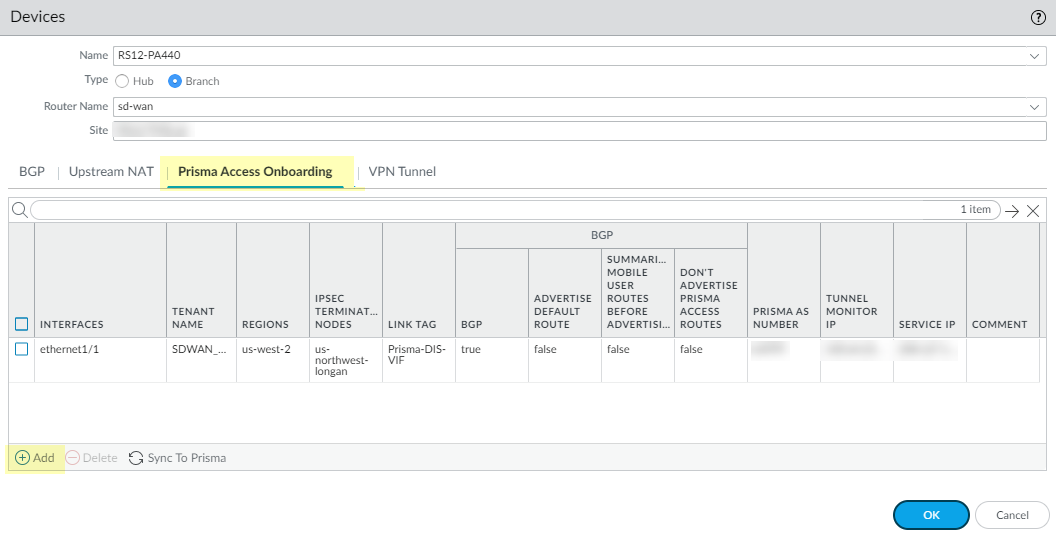
Select the SD-WAN branch firewall to connect to the Prisma Access hub and configure the connection.- Select .Select the branch firewall on which you enabled SD-WAN, whose name then populates the Name field.Select the Type of device as Branch.Select the Router Name.Enter the Site.All SD-WAN devices must have a unique Site name.Select Prisma Access Onboarding and Add.
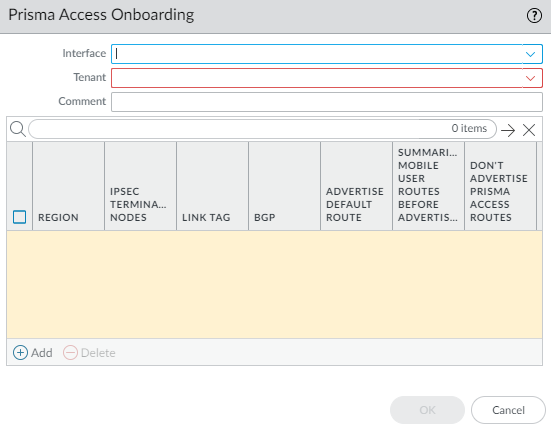
![]() Select a local, SD-WAN-enabled Interface on the firewall to connect to the Prisma Access hub.Select a Prisma Access Tenant (select default for a single tenant environment).All SD-WAN interfaces on a branch firewall must use the same Prisma Access tenant.Enter a helpful Comment.
Select a local, SD-WAN-enabled Interface on the firewall to connect to the Prisma Access hub.Select a Prisma Access Tenant (select default for a single tenant environment).All SD-WAN interfaces on a branch firewall must use the same Prisma Access tenant.Enter a helpful Comment.![]() Add a compute node to a Region by selecting the region where the CN (Prisma Access hub) is located.There can be multiple regions per interface.
Add a compute node to a Region by selecting the region where the CN (Prisma Access hub) is located.There can be multiple regions per interface.![]() Select an IPSec Termination Node (GP gateway) from the list of nodes; the list is based on the nodes that Prisma Access spun up for the region earlier. You are choosing the hub to which this branch connects. SD-WAN Auto VPN configuration builds IKE and IPSec relationships and tunnels with this node.Enable BGP for communication between the branch and hub (Enable is the default).Advertise Default Route to allow the Prisma Access hub’s default route to be advertised to the branch firewall.Summarize Mobile User Routes before advertising to have the Prisma Access hub advertise summarized mobile user IP subnet routes, thereby reducing the number of advertisements to the branches.Don’t Advertise Prisma Access Routes to prevent the IPSec Termination Node/hub from advertising its Prisma Access routes to the SD-WAN branches.Enter the Secret for authentication of BGP communications and Confirm Secret.(SD-WAN plugin 3.2.0 and later versions) Configure the VPN tunnel parameters and authentication type to authenticate the PAN-OS firewall and Prisma Access hub.
Select an IPSec Termination Node (GP gateway) from the list of nodes; the list is based on the nodes that Prisma Access spun up for the region earlier. You are choosing the hub to which this branch connects. SD-WAN Auto VPN configuration builds IKE and IPSec relationships and tunnels with this node.Enable BGP for communication between the branch and hub (Enable is the default).Advertise Default Route to allow the Prisma Access hub’s default route to be advertised to the branch firewall.Summarize Mobile User Routes before advertising to have the Prisma Access hub advertise summarized mobile user IP subnet routes, thereby reducing the number of advertisements to the branches.Don’t Advertise Prisma Access Routes to prevent the IPSec Termination Node/hub from advertising its Prisma Access routes to the SD-WAN branches.Enter the Secret for authentication of BGP communications and Confirm Secret.(SD-WAN plugin 3.2.0 and later versions) Configure the VPN tunnel parameters and authentication type to authenticate the PAN-OS firewall and Prisma Access hub.- (Optional) If you want to preserve the Type of Service
(ToS) information in the encapsulated packets, select
Copy TOS Header.If there are multiple sessions inside the tunnel (each with a different ToS value), copying the ToS header can cause the IPSec packets to arrive out of order.
- Select the Authentication: Pre
Shared Key or
Certificate. The pre-shared key is automatically generated if selected as an authentication type for a region.Ensure that you select the same authentication type for all the branch devices and the Prisma Access device that is added.
(SD-WAN plugin 3.2.0 and later versions) Select Certificate to configure certificate-based authentication.(SD-WAN plugin 3.2.0 and later releases) (Only if enabling Certificate authentication type) The certificate must be present on the Panorama before performing Prisma Access Onboarding of the SD-WAN branch firewall. We do not support SCEP-generated certificate. Select a Local Certificate—one that is already on the Panorama.Ensure the following for the certificate that you have in the Panorama for the successful Prisma Access onboarding process:- The certificate must be unique for each SD-WAN device. That is, you can't share the certificate among multiple SD-WAN devices.Keep the following in mind while generating the branch and hub firewall certificates that is used for SD-WAN tunnel authentication:
- Two different hub devices can use the same hub certificate.
- Two different branch devices can
use
the
same branch certificates if the following conditions
are met:
- Branch devices are not part of the same VPN cluster
- There is no common hub device between the VPN clusters that these branch devices would be part of
- (HA deployments only) Two different branch devices can also have the same branch certificates if they are configured as HA members.
- If the hub device is common between VPN clusters, certificates for branch devices part of these VPN clusters should have unique certificates with all attributes having unique values. If you don't ensure the uniqueness of the certificate and its values, then commit will fail on the hub device (no commit failure on Panorama).
Also ensure that the leaf certificates (branch and hub firewall certificates) used for SD-WAN tunnel authentication are generated meeting the following criteria:- Key usage should have digital signatures
- All certificates must be signed by the same root CA
- The device certificate must be directly signed by the root CA
- Certificate format should be PKCS12
- The certificate attributes are used for determining the local ID
and peer ID for IKE gateways. Hence,
the
leaf certificates, that is,
the
branch and hub firewall certificates that is used for
SD-WAN
tunnel authentication must be generated with the following three
certificate attributes and each certificate attribute should be
assigned with three unique attribute values. Otherwise, a commit
error will be thrown.
- FQDN (Host Name)
- IP address (IP)
- User FQDN (Alt Email)
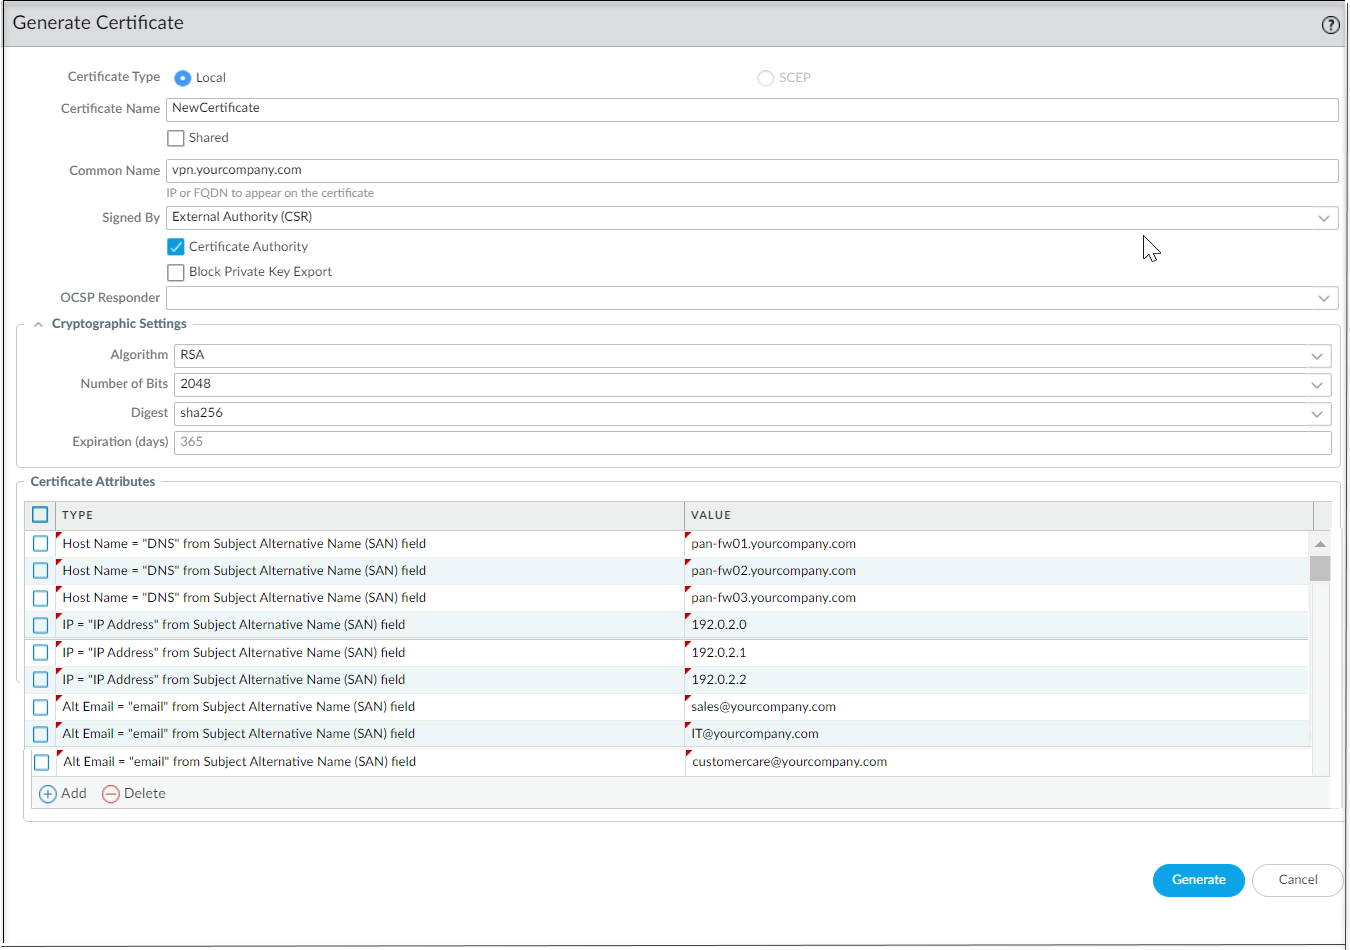
It's mandatory to have unique Host Name, IP, and Alt Email certificate attributes among all certificates. That is, none of the certificates should have these attribute values in common.In the below example, NewCertificate is generated with the total of nine mandatory certificate attributes. The Host Name certificate attribute is configured with three unique attribute values: pan-fw01.yourcompany.com, pan-fw02.yourcompany.com, and pan-fw03.yourcompany.com. The IP certificate attribute is configured with three unique attribute values: 192.0.2.0, 192.0.2.1, and 192.0.2.2. The Alt Email certificate attribute is configured with three unique attribute values: sales@yourcompany.com, IT@yourcompany.com, and customercare@yourcompany.com.![]()
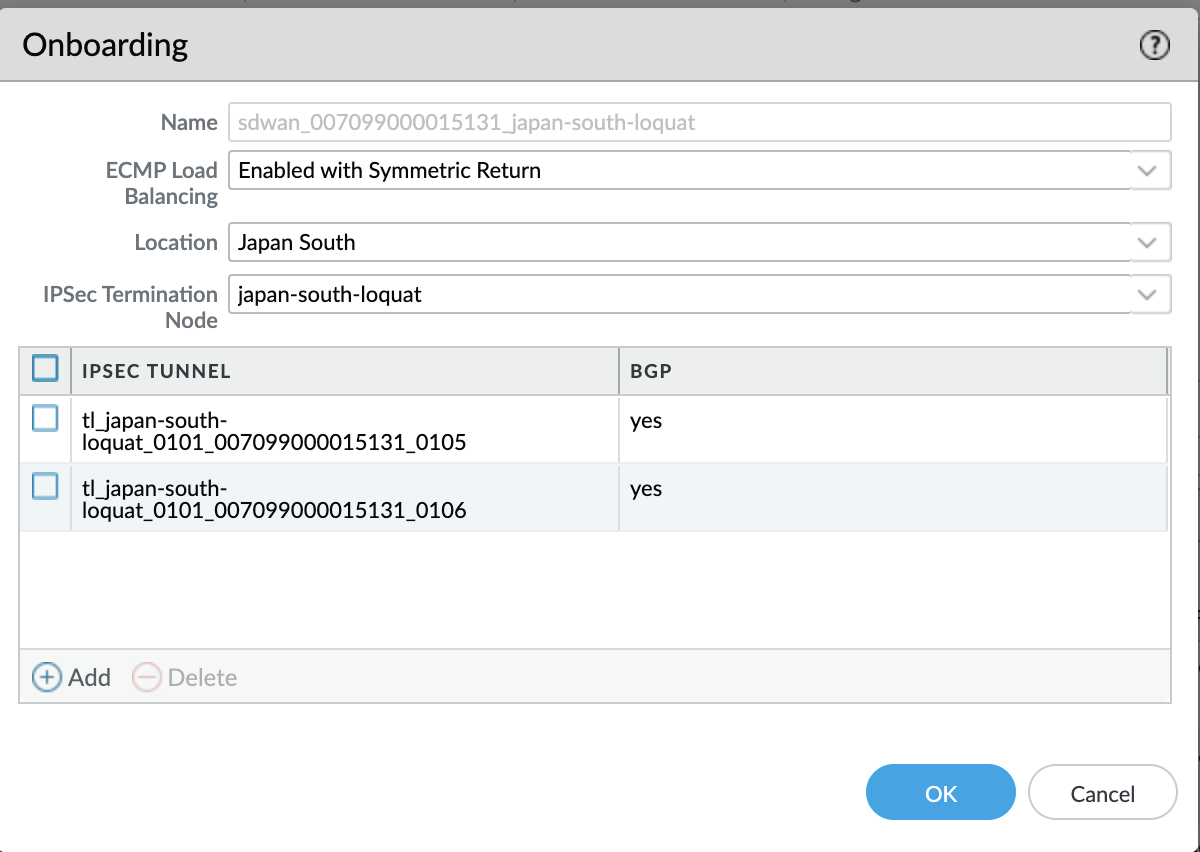
(SD-WAN plugin 3.2.0 and later versions) (Optional) (Only if enabling Certificate authentication type) Choose a Certificate Profile. A Certificate Profile contains information about how to authenticate the peer gateway.(SD-WAN plugin 3.2.0 and later versions) (Optional) Enable strict validation of peer’s extended key use to control strictly how the key can be used.Select a Link Tag for the hub.When you want to enable ECMP for a Prisma Access hub, onboard more than one branch interface to the same compute node (CN) and use the same Link Tag on those branch interfaces.Click OK. The display will include a Peer AS number and the Tunnel Monitor IP address provided by Prisma Access.Commit and Push the configuration to the cloud, where Prisma Access spins up the correct number of IPSec Termination Nodes based on requested bandwidth.When more than one IPSec tunnel is going to the same CN, the Prisma Access configuration has ECMP enabled with symmetric return, as shown in this Prisma Access example:![]() Verify that onboarding is complete.
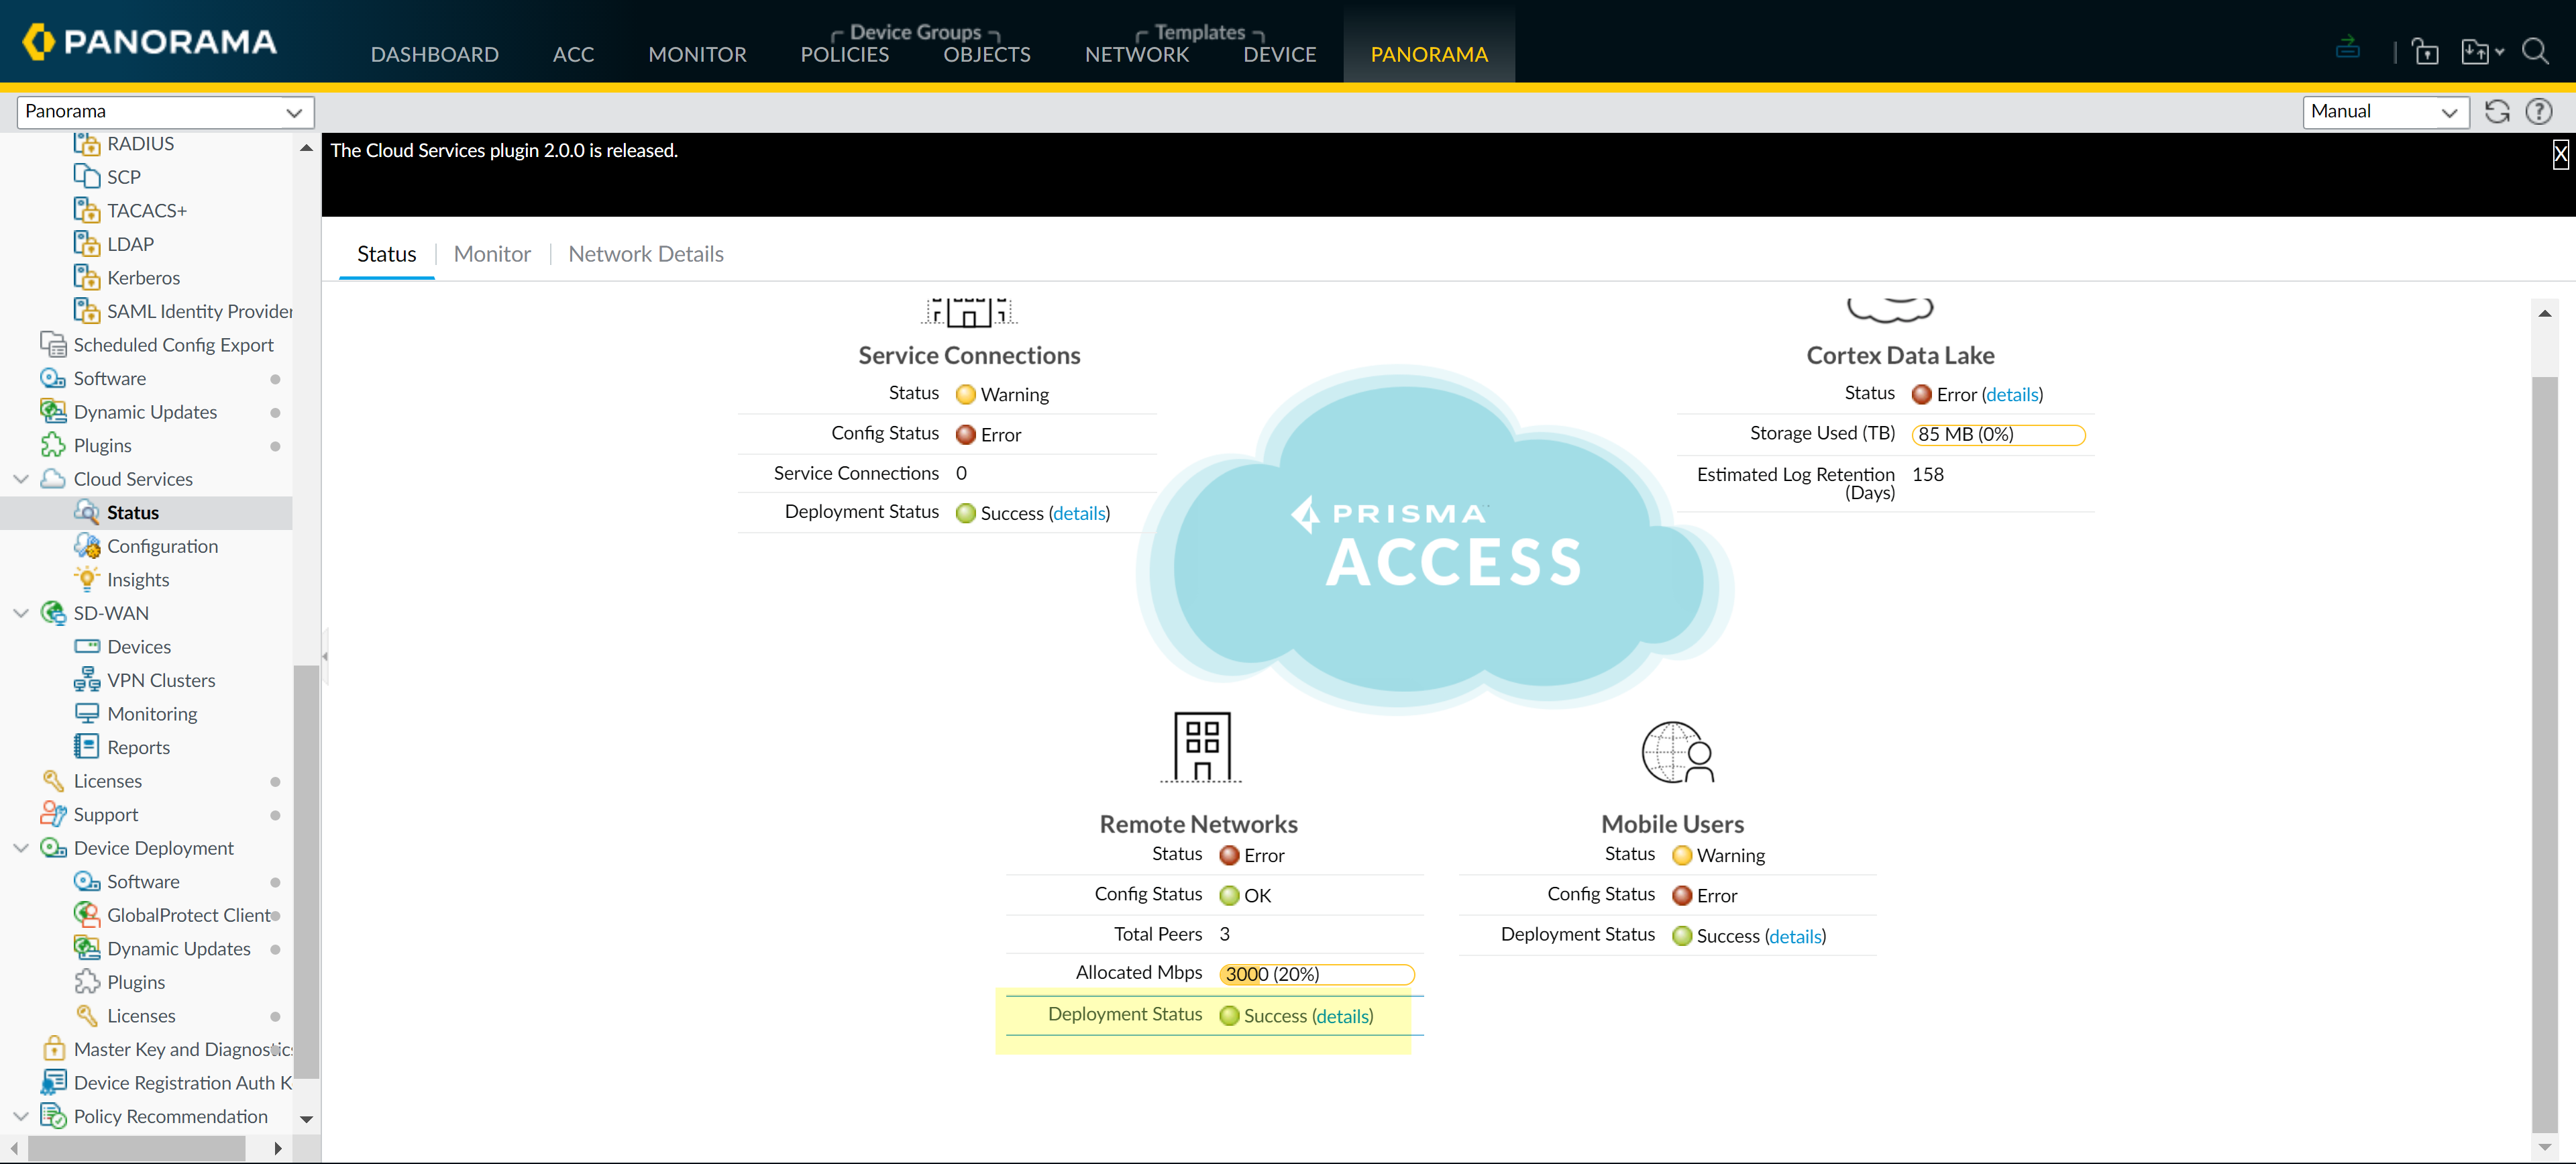
Verify that onboarding is complete.- Select and verify that the Remote Networks Deployment Status displays success.
![]() Select the Remote Networks Deployment Status details.Confirm that the Prisma Access node completion displays 100%.
Select the Remote Networks Deployment Status details.Confirm that the Prisma Access node completion displays 100%.![]() Synchronize the branch firewall to Prisma Access to retrieve the service IP address(es) of the CNs.
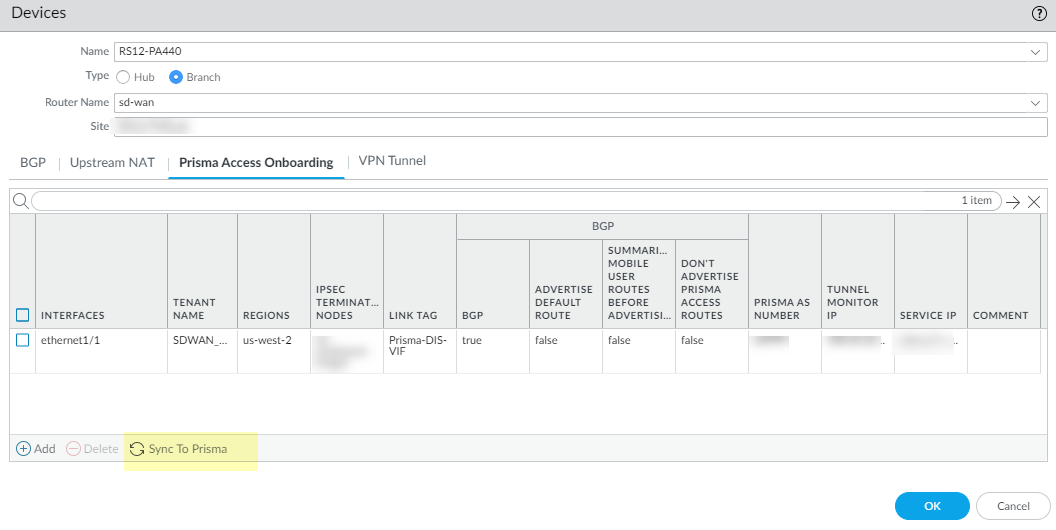
Synchronize the branch firewall to Prisma Access to retrieve the service IP address(es) of the CNs.- Select .Select the SD-WAN branch device.Select Prisma Access Onboarding and Sync To Prisma (and respond to message to continue). Repeat for each branch device.After the sync to Prisma is successful, you will see the Prisma Access configuration parameters on the SD-WAN branch firewall. If not, wait for approximately 15 minutes and repeat the Sync to Prisma. If necessary, go to the Prisma Access plugin and verify that the CN onboarding has finished (you can see the CN with the bandwidth and IP addresses assigned). After that verification, retry Sync To Prisma.
![]() Commit to Panorama.Push to Devices to push to the local branch firewall. Edit Selections to select the Push Scope Selection. Select the correct Template and Device Group.On the branch firewall, select and see the new interface that was created with the Link Tag you created, assigned to the Security Zone named zone-to-pa-hub, and with the IPSec tunnel connecting to the CN.Select and verify the IPSec tunnel is up.Select and verify the IKE gateway is up.Create an SD-WAN policy rule to generate monitoring data.This step is required to baseline Prisma Access Hub latency, jitter, and packet loss data for accurate traffic distribution. SD-WAN monitoring data is generated from traffic that matches your SD-WAN policy rules.
Commit to Panorama.Push to Devices to push to the local branch firewall. Edit Selections to select the Push Scope Selection. Select the correct Template and Device Group.On the branch firewall, select and see the new interface that was created with the Link Tag you created, assigned to the Security Zone named zone-to-pa-hub, and with the IPSec tunnel connecting to the CN.Select and verify the IPSec tunnel is up.Select and verify the IKE gateway is up.Create an SD-WAN policy rule to generate monitoring data.This step is required to baseline Prisma Access Hub latency, jitter, and packet loss data for accurate traffic distribution. SD-WAN monitoring data is generated from traffic that matches your SD-WAN policy rules.- Define path selection for SD-WAN traffic using traffic distribution profile.Define your custom SD-WAN application thresholds (using path quality profiles) with high latency, jitter, and packet loss thresholds.A Path Quality profile is required to create an SD-WAN policy rule. Creating a Path Quality profile with high thresholds allows you to baseline latency, jitter, and packet loss for the Prisma Access hub without causing app to swap to a different link.Configure an SD-WAN policy rule.Commit and Commit and Push to branch firewalls.(Only if enabling Pre Shared Key authentication type) Refresh the Prisma IKE pre-shared key.If you need to change the current Prisma IKE key that is used to secure the IPSec connection between the branch and the Prisma hub, perform this step to randomly generate a new key for the tunnel and update both sides of the tunnel. Perform this step when the hub and branch are not busy.Do not create an IKE gateway manually with a name beginning with “gw_” because such names are reserved for Prisma IKE creation during onboarding. This step to refresh the Prisma IKE pre-shared key refreshes all such named IKE gateways if there are any apart from those created by Prisma Access.
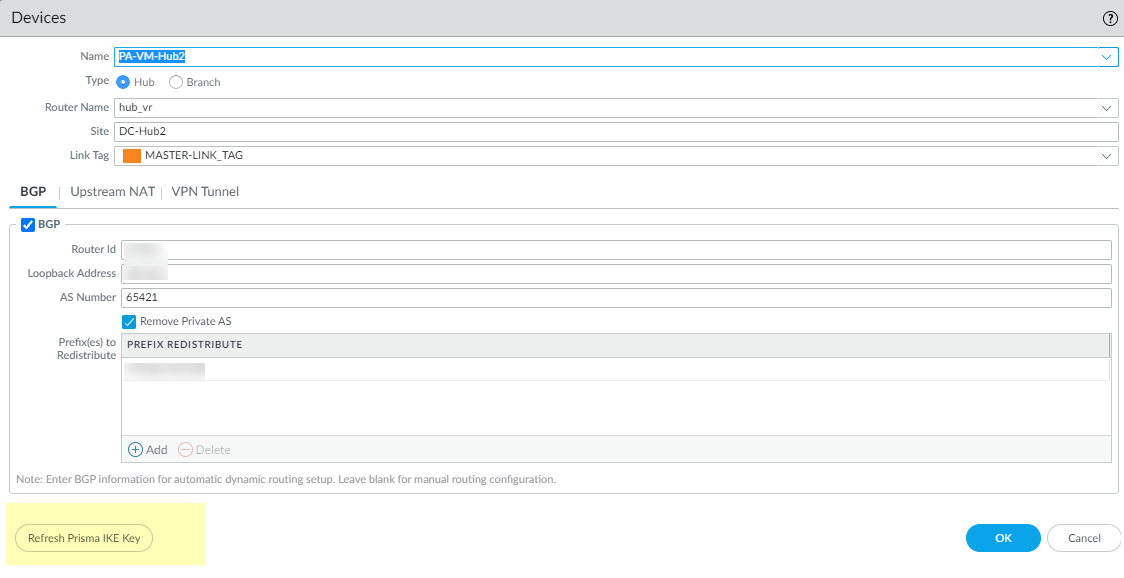
- Select and select a device.At the bottom of the screen, select Refresh Prisma IKE Key.
![]() A message appears notifying you that Refreshing the IKE key will update all SD-WAN tunnels between the branch and the Prisma Access hub and will require a simultaneous configuration push to all branch and Prisma Access hub devices. Best practice recommendation is to perform the refresh during a maintenance window as traffic can be affected. Do you wish to continue? Select Yes if you wish to continue.Commit and Commit and Push to branch firewalls.Monitor Prisma Access Hub Application and Link Performance to understand the baseline latency, jitter, and packet loss for the links to Prisma Access.This step is required to gather accurate latency, jitter, and packet loss data to fine-tune your Prisma Access hub path quality profiles.
A message appears notifying you that Refreshing the IKE key will update all SD-WAN tunnels between the branch and the Prisma Access hub and will require a simultaneous configuration push to all branch and Prisma Access hub devices. Best practice recommendation is to perform the refresh during a maintenance window as traffic can be affected. Do you wish to continue? Select Yes if you wish to continue.Commit and Commit and Push to branch firewalls.Monitor Prisma Access Hub Application and Link Performance to understand the baseline latency, jitter, and packet loss for the links to Prisma Access.This step is required to gather accurate latency, jitter, and packet loss data to fine-tune your Prisma Access hub path quality profiles.