Advanced Threat Prevention Powered by Precision AI®
Configure Inline Cloud Analysis (PAN-OS & Panorama)
Table of Contents
Configure Inline Cloud Analysis (PAN-OS & Panorama)
Advanced Threat Prevention Inline Cloud Analysis supports multiple detection
engines, which require different minimum PAN-OS releases to enable:
- Detection of advanced C2 (command-and-control) and spyware threats requires PAN-OS 10.2 and later.
- Detection of zero-day exploit threats requires PAN-OS 11.0 and later.
- Support for LDL (Local Deep Learning) requires PAN-OS 11.2 and later.
- Detection of DNS relay attacks requires PAN-OS 11.1 and later, with content update 8948-9284 and later.
- Detection of Encrypted Sliver C2 requires PAN-OS 11.2.7 and later, with content update 9006-9569 and later.
- Install a Device Certificate Repeat for all NGFWs enabled for inline cloud analysis, as well as other cloud services.Log in to the NGFW web interface.To take advanced of inline cloud analysis, you must have a persistent, active cloud connection used by the firewall to handle inline cloud analysis service requests. When the Advanced Threat Prevention license is enabled, the firewall performs PAN-DB URL categorization lookups as part of its internal processing, independent of any URL Filtering license or explicit cloud inline configuration. This is facilitated by the Cloud Content FQDN. The default FQDN connects to hawkeye.services-edge.paloaltonetworks.com and then resolves to the closest cloud services server. You can override the automatic server selection by specifying a regional cloud content server that best meets your data residency and performance requirements.The Cloud Content FQDN is a globally used resource and affects how other services that rely on this connection sends traffic payloads.Verify that the firewall uses the correct Content Cloud FQDN () for your region and change the FQDN if necessary:If your NGFW is configured inline to facilitate a SaaS Security deployment, please note that the FQDNs located in France and Japan do not currently support SaaS Security functionality.
- US Central (Iowa, US)—us.hawkeye.services-edge.paloaltonetworks.com
- Europe (Frankfurt, Germany)—eu.hawkeye.services-edge.paloaltonetworks.com
- APAC (Singapore)—apac.hawkeye.services-edge.paloaltonetworks.com
- India (Mumbai)—in.hawkeye.services-edge.paloaltonetworks.com
- UK (London, England)—uk.hawkeye.services-edge.paloaltonetworks.com
- France (Paris, France)—fr.hawkeye.services-edge.paloaltonetworks.com
- Japan (Tokyo, Japan)—jp.hawkeye.services-edge.paloaltonetworks.com
- Australia (Sydney, Australia)—au.hawkeye.services-edge.paloaltonetworks.com
- Canada (Montréal, Canada)—ca.hawkeye.services-edge.paloaltonetworks.com
- Switzerland (Zürich, Switzerland)—ch.hawkeye.services-edge.paloaltonetworks.com
- Israel (Tel Aviv, Israel)—il.hawkeye.services-edge.paloaltonetworks.com
- FedRAMP Moderate—Refer to the product entry PanOS Cloud Component
- FedRAMP High—Refer to the product entry PanOS CC (Cloud Component)FedRAMP (Moderate and High) currently does not support the following Advanced Threat Prevention features:
- Exfiltration Shield
- UTCP & UUDP Models
- PCAP retrieval for malicious detections
To take advantage of inline cloud analysis, you must have an active Advanced Threat Prevention subscription. For information about subscriptions, refer to: Activate Subscription Licenses.If you are accessing Advanced Threat Prevention through a FedRAMP Moderate or High license, refer to NGFW FedRAMP Moderate and High Support for information about licensing and activation.To verify subscriptions for which you have currently-active licenses, select and verify that the appropriate licenses are available and have not expired.![]() Update or create a new Anti-Spyware Security profile to enable inline cloud analysis (to analyze traffic for advanced C2 (command-and-control), spyware, and DNS relay threats in real-time).
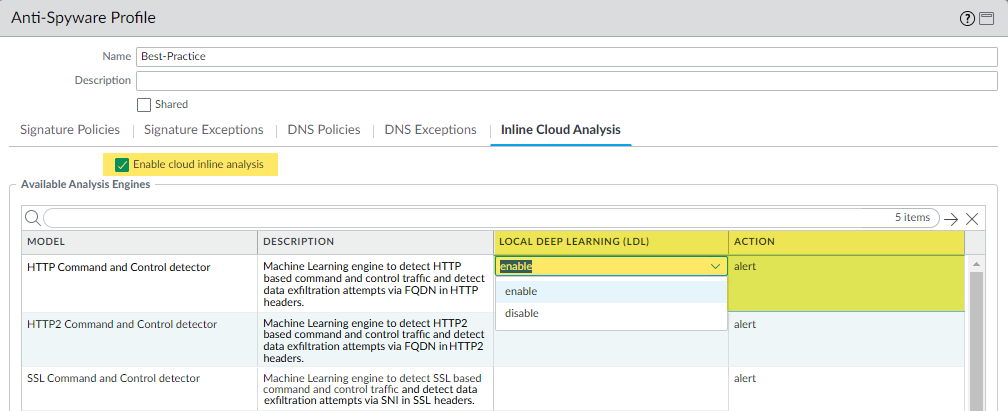
Update or create a new Anti-Spyware Security profile to enable inline cloud analysis (to analyze traffic for advanced C2 (command-and-control), spyware, and DNS relay threats in real-time).![]()
- Select an existing Anti-Spyware Profile or Add a new one ().
- Select your Anti-Spyware profile and then go to Inline Cloud Analysis and Enable inline cloud analysis.
- (Local Deep Learning [Supported in PAN-OS 11.2 and later]) Select enable for each available analysis engine with a Local Deep Learning (LDL) option. The following analysis engines are available with an optional LDL mode: HTTP Command and Control detector and HTTP2 Command and Control detector.While the HTTP Command and Control detector and HTTP2 Command and Control detector supports detection of data exfiltration attempts (DNS relay attacks) as part of the model, the data exfiltration functionality is not supported by LDL.
- Specify an Action to take when a threat is detected using a corresponding analysis engine.The default action for each analysis engine is alert, however, Palo Alto Networks recommends setting all actions to Reset-Both for the best security posture.
- Allow—The request is allowed and no log entry is generated.
- Alert—The request is allowed and a Threat log entry is generated.
- Drop—Drops the request; a reset action is not sent to the host/application.
- Reset-Client—Resets the client-side connection.
- Reset-Server—Resets the server-side connection.
- Reset-Both—Resets the connection on both the client and server ends.
- Click OK to exit the Anti-Spyware Profile configuration dialog and Commit your changes.
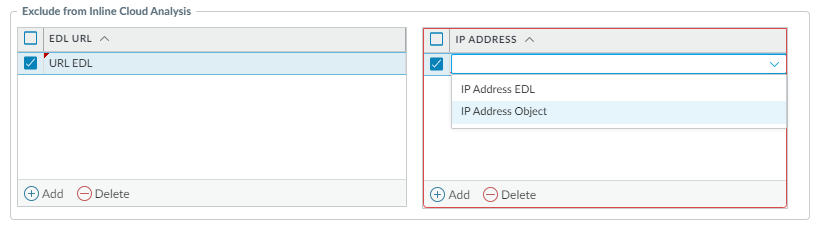
(Optional) Add URL and/or IP address exceptions to your Anti-Spyware profile if Inline Cloud Analysis produces false-positives. You can add exceptions by specifying an EDL URL containing a series of URLs or a custom URL category or an IP address list defined in an EDL or within an Address object.- IP address-based EDLs exclude based on the following criteria:
- Destination IP addresses are excluded for traffic flowing from CTS (client-to-server).
- Source IP addresses are excluded for traffic flowing from STC (server-to-client).
- Only create IP address and URL exceptions when the identified threats do not pose a danger, such as in the case of a false-positive.
Add an External Dynamic Lists or [IP] Addresses object exception.- Select Objects > Security Profiles > Anti-Spyware.
- Select an Anti-Spyware profile for which you want to exclude specific URLs and/or IP addresses and then select Inline Cloud Analysis.
- Add an EDL URL or IP Address, depending on the type of exception you want to add, and then select a pre-existing URL or IP address external dynamic list. If none are available, create a new external dynamic list. For IP address exceptions, you can, optionally, select an Addresses object list.Anti-spyware profiles that are configured as Shared on Panorama-managed firewalls cannot have IP address objects added to the Inline Cloud Analysis exceptions list.
![]()
- Click OK to save the Anti-Spyware profile and Commit your changes.
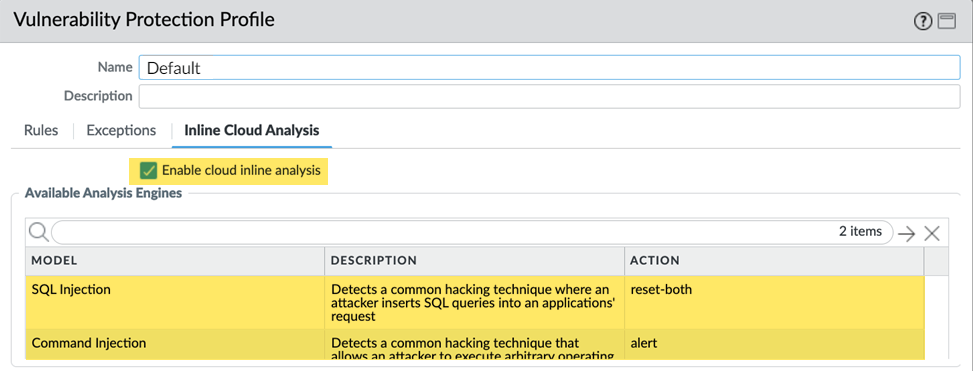
(Supported in PAN-OS 11.0 and later) Update or create a new Vulnerability Protection Security profile to enable inline cloud analysis (to analyze traffic for command injection and SQL injection vulnerabilities in real-time).![]()
- Select an existing Vulnerability Protection security profile or Add a new one ().
- Select your Vulnerability Protection profile and then go to Inline Cloud Analysis and Enable cloud inline analysis.
- Specify an Action to take when a vulnerability exploit is detected using a corresponding analysis engine. There are currently two analysis engines available: SQL Injection and Command Injection.
- Allow—The request is allowed and no log entry is generated.
- Alert—The request is allowed and a Threat log entry is generated.
- Reset-Client—Resets the client-side connection.
- Reset-Server—Resets the server-side connection.
- Reset-Both—Resets the connection on both the client and server ends.
- Click OK to exit the Vulnerability Protection Profile configuration dialog and Commit your changes.
Add URL and/or IP address exceptions to your Vulnerability Protection profile if Inline Cloud Analysis produces false-positives. You can add exceptions by specifying an EDL URL containing a series of URLs or a custom URL category or an IP address list defined in an EDL or within an Address object.- IP address-based EDLs exclude based on the following criteria:
- Destination IP addresses are excluded for traffic flowing from STC (server-to-client).
- Source IP addresses are excluded for traffic flowing from CTS (client-to-server).
- Only create IP address and URL exceptions when the identified threats do not pose a danger, such as in the case of a false-positive.
Add an External Dynamic Lists or [IP] Addresses object exception.- Select Objects > Security Profiles > Vulnerability to return to your Vulnerability Protection profile.
- Select a Vulnerability profile for which you want to exclude specific URLs and/or IP addresses and then select Inline Cloud Analysis.
- Add an EDL URL or IP Address, depending on the type of exception you want to add, and then select a pre-existing URL or IP address external dynamic list. If none are available, create a new external dynamic list. For IP address exceptions, you can, optionally, select an Addresses object list.Vulnerability profiles that are configured as Shared on Panorama-managed firewalls cannot have IP address objects added to the Inline Cloud Analysis exceptions list.
![]()
- Click OK to save the Vulnerability Protection profile and Commit your changes.
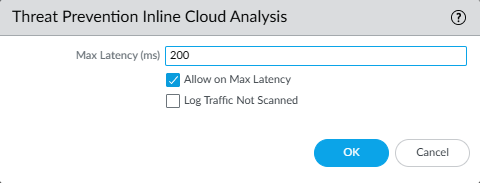
Configure the timeout latency and action to take when the request exceeds the max latency.- Select .
- Specify the timeout value and the associated action to take when latency limits are reached for inline cloud analysis requests. Use the Log Traffic Not Scanned function to fine-tune your Max Latency settings. By testing various threshold values, you can identify the optimal balance for your network environment. If the latency setting is too low, the NGFW bypasses (does not scan) using inline cloud analysis and, instead, generates a threat log entry to notify you that the scan was skipped.
![]()
- Max Latency (ms)—Specify the maximum acceptable processing time, in milliseconds, for Inline Cloud Analysis to return a result. The default value is 200ms.
- Allow on Max Latency—Enables the NGFW to take the action of allow, when the maximum latency is reached. De-selecting this option sets the NGFW action to block.
- Log Traffic Not Scanned— Enables the NGFW to log traffic requests that exhibit anomalous traits indicating the presence of advanced evasive command-and-control (C2) threats and zero-day exploits, but have not been processed by Advanced Threat Prevention Inline Cloud analyzers.The threat logs generated by Log Traffic Not Scanned are defined by the following characteristics:
- Threat Category—inline-cloud-c2
- Application—Either unknown-udp or unknown-tcp
- Does not generate a cloud report.
- Click OK to confirm your changes.
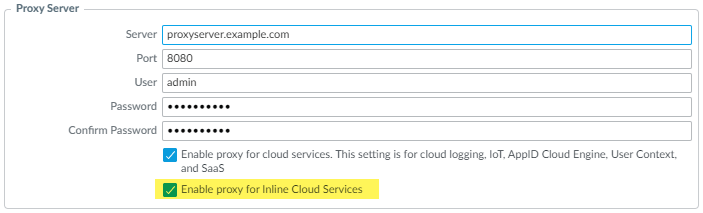
(Required when the firewall is deployed with an explicit proxy server) Configure the proxy server used to access the servers that facilitate requests generated by all configured inline cloud analysis features. A single proxy server can be specified and applies to all Palo Alto Networks update services, including all configured inline cloud and logging services.- (PAN-OS 11.2.3 and later) Configure the proxy server through PAN-OS.
- Select and edit the Services details.
- Specify the Proxy Server settings and Enable proxy for Inline Cloud Services. You can provide either an IP address or FQDN in the Server field.
- You must provide full credentials (username and password) to connect to an explicit proxy server. Credential-less connections are not currently supported.
- The proxy server password must contain a minimum of seven characters.
![]()
- Click OK.
(For the following releases only: PAN-OS 10.2.11 and later and PAN-OS 11.1.5 and later) Configure the proxy server through the firewall CLI.- Configure the base proxy server settings using the following CLI commands:
set deviceconfig system secure-proxy-server <FQDN_or_IP>
set deviceconfig system secure-proxy-port <1-65535>
set deviceconfig system secure-proxy-user <value>
set deviceconfig system secure-proxy-password <value>
- You must provide full credentials (username and password) to connect to an explicit proxy server. Credential-less connections are not currently supported.
- The proxy server password must contain a minimum of seven characters.
- Enable the proxy server to send requests to the inline cloud service servers using the following CLI command:
debug dataplane mica set inline-cloud-proxy enable
- View the current operational status of proxy support for inline cloud services using the following CLI command:
debug dataplane mica show inline-cloud-proxy
For example:debug dataplane mica show inline-cloud-proxy Proxy for Advanced Services is Disabled
(Optional) Verify the status of your firewall connectivity to the Advanced Threat Prevention cloud service.Use the following CLI command on the firewall to view the connection status.show ctd-agent status security-clientFor example:show ctd-agent status security-client ... Security Client AceMlc2(1) Current cloud server: hawkeye.services-edge.paloaltonetworks.com Cloud connection: connected ...
CLI output shortened for brevity.If you are unable to connect to the Advanced Threat Prevention cloud service, verify that the following domains and ports are not blocked:FQDN Port - http://ocsp.paloaltonetworks.com
- http://crl.paloaltonetworks.com
- http://ocsp.godaddy.com
- http://crl.godaddy.com
TCP 80 - hawkeye.services-edge.paloaltonetworks.com
TCP 443 (Optional) Monitor Advanced Threat Prevention