Prisma AIRS
Create a Deployment Profile for Prisma AIRS AI Model Security
Table of Contents
Expand All
|
Collapse All
Prisma AIRS Docs
Create a Deployment Profile for Prisma AIRS AI Model Security
Learn how to create a deployment profile for Prisma AIRS AI Model
Security.
| Where Can I Use This? | What Do I Need? |
|---|---|
|
|
Use this information to deploy a tenant for AI Model Security. Consider the following
when creating a deployment profile:
- AI Model Security is licensed via NGFW credits.
- The deployment profile is accessible to all SCM Pro users.
- The deployment profile is accessible on the Customer Support Portal.
- For this early access release, the deployment profile name is AI Model Security (preview).
You need an active deployment profile and have a proper
Identity & Access to view the AI Model Security and its features in Prisma
AIRS.
Creating a deployment profile for AI Model Security includes the following steps:
- Create the deployment profile.
- Associate the deployment profile with a tenant.
Create a Deployment Profile for Prisma AIRS AI Model Security in the Customer Support Portal
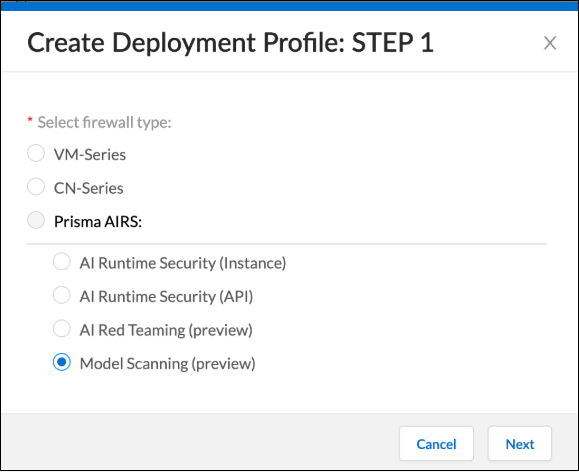
- Log in to the Palo Alto Customer Support Portal (CSP).Navigate to ProductsSoftware/Cloud NGFW Credits.Locate your credit pool and click Create Deployment Profile.Under Select firewall type, expand Prisma AIRS and select Model Scanning (preview).
![]() Select Next.Enter a Profile Name.Click Calculate Estimated Cost to view the credits used for AI Model Security.Click Create Deployment Profile.This takes you to the Software NGFW Credits page in the Customer Support Portal. The page displays the list of deployment profiles within the credit pool for the selected account.After creating the deployment profile, you'll associated it with a tenant.
Select Next.Enter a Profile Name.Click Calculate Estimated Cost to view the credits used for AI Model Security.Click Create Deployment Profile.This takes you to the Software NGFW Credits page in the Customer Support Portal. The page displays the list of deployment profiles within the credit pool for the selected account.After creating the deployment profile, you'll associated it with a tenant.Associate the Deployment Profile with a Tenant
Use the information in this section to associate a deployment profile with a tenant. Consider the following:- Once the deployment profile is created, you're provided with a link to the Palo Alto Networks Hub to associate the profile with a TSG.
- You can create a new tenant (TSG), or, you can associate the profile with an existing tenant.
- If a new tenant is created, a Strata Cloud Manager (SCM) instance is created; this process can take approximately 15-20 minutes to complete.
- If you are using an existing tenant, a SCM instance is typically associated with it.
- Because AI Model Security is accessible for all SCM Pro users, you'll see SCM and Strata Logging Service (SLS) instances being created; these elements are part of the SCM Pro license.
To associate the deployment profile with a tenant:- In the CSP dashboard, locate your deployment profile and click Finish Setup; this redirects you to the Palo Alto Networks hub.
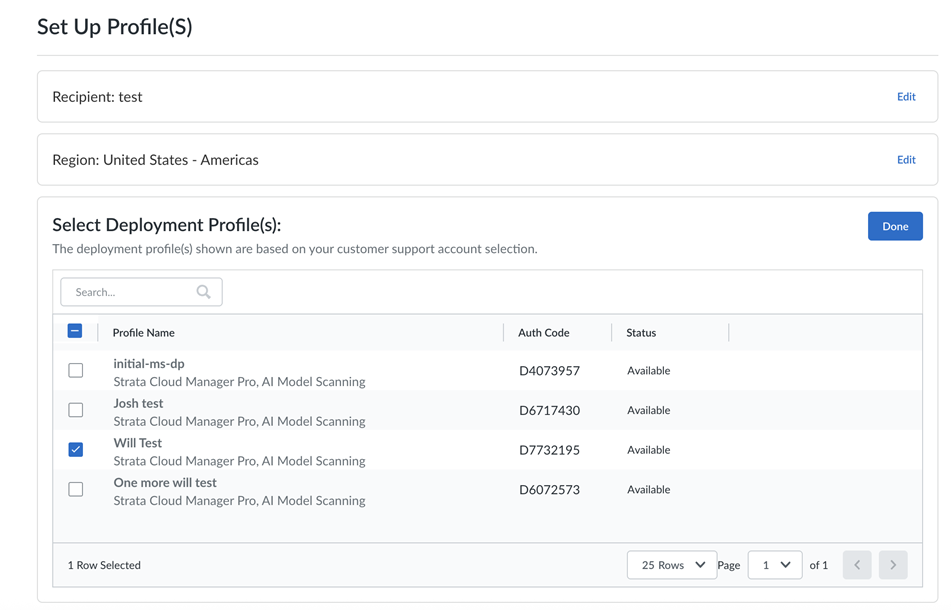
![]() Select the name of the CSP account in which you created the deployment profile.If you select a new tenant, also select the region where the tenant should be created. This is referred to as the platform region. AI Model Security determines which regions are supported.Only Region: United States - Americas is currently supported.Select the deployment profile that you want to associate with the tenant.Select None in Additional Services.
Select the name of the CSP account in which you created the deployment profile.If you select a new tenant, also select the region where the tenant should be created. This is referred to as the platform region. AI Model Security determines which regions are supported.Only Region: United States - Americas is currently supported.Select the deployment profile that you want to associate with the tenant.Select None in Additional Services.![]() Agree to the terms, then click Activate.Deployment Profile activation may take up to two hours. Once activated, the AI model Security will be visible in the Strata Cloud Manager web interface (InsightsPrisma AIRSModel Security).You're redirected to the Tenant Management page which shows the instances for the tenant.Verify the TSG association in the Hub. To do this:
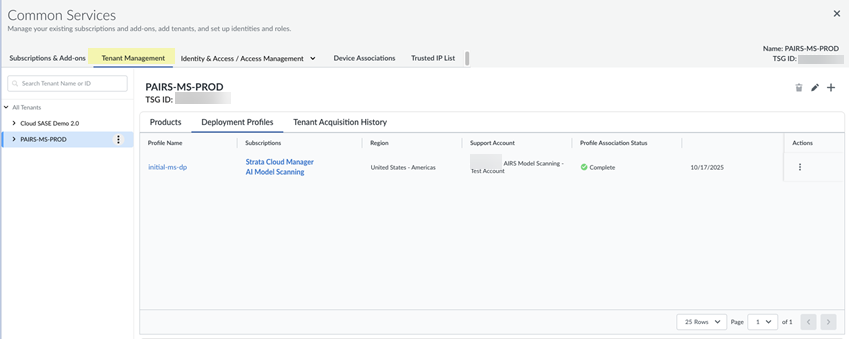
Agree to the terms, then click Activate.Deployment Profile activation may take up to two hours. Once activated, the AI model Security will be visible in the Strata Cloud Manager web interface (InsightsPrisma AIRSModel Security).You're redirected to the Tenant Management page which shows the instances for the tenant.Verify the TSG association in the Hub. To do this:- Navigate to Common ServicesTenant Management.Select the tenant and switch to Deployment Profiles.Confirm that the Profile Association Status is Complete.
![]()
Edit or Update a Deployment Profile
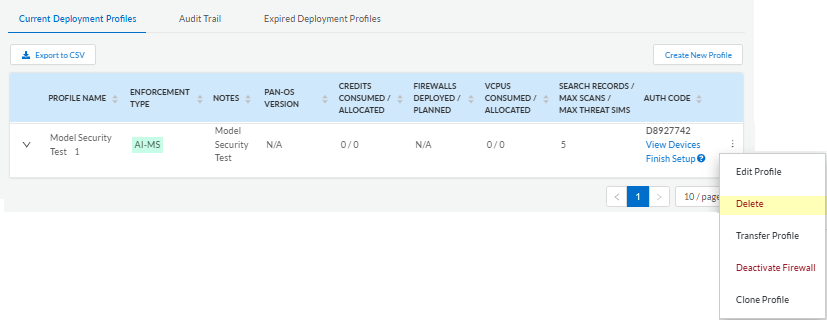
You can edit an existing deployment profile on the CSP as long as AI Model Security supports your updates to the deployment profile. These changes may include changing the number of scans allocated per month.- Log in to the Palo Alto Customer Support Portal (CSP).In the CSP dashboard, click on the three dots (ellipsis or overflow menu) next to your deployment profile.
![]() Edit, delete or deactivate the deployment profile.
Edit, delete or deactivate the deployment profile.Deactivate the Deployment Profile
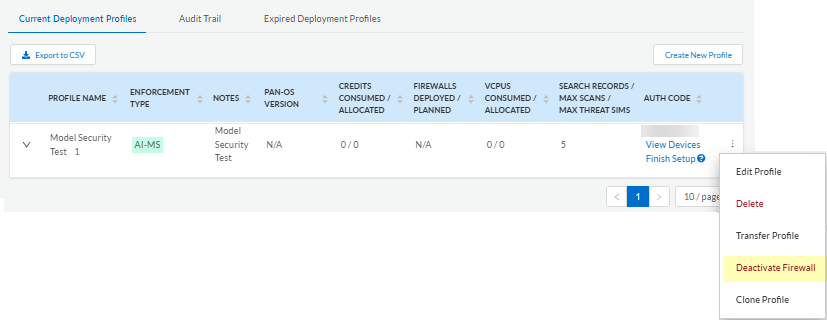
You can deactivate your deployment profile at any time:- Log in to the Palo Alto Customer Support Portal (CSP).In the CSP dashboard, click on the three dots (ellipsis or overflow menu) next to the deployment profile.Select Deactivate Firewall.
![]()
Delete the Deployment Profile
You can delete the deployment profile at any time. Consider the following when deleting the profile:- Ensure that there are no firewalls associated with the deployment profile; you cannot delete the profile if it is attached to an existing firewall.
- Deactivate the firewall from the deployment profile first, then delete it.
- Log in to the Palo Alto Customer Support Portal (CSP).In the CSP dashboard, click on the three dots (ellipsis or overflow menu) next to the deployment profile.If you have not yet deactivated the profile, select Deactivate Firewall.After you have successfully deactivated the profile, select Delete.
![]()

