Cloud NGFW for AWS
Getting Started from an AWS Member Account
Table of Contents
Getting Started from an AWS Member Account
Learn how to subscribe and add users to your Cloud NGFW for AWS
deployment.
| Where Can I Use This? | What Do I Need? |
|---|---|
|
|
Before you subscribe to and deploy Cloud NGFW for AWS in your AWS environment,
consider the following:
- Endpoint configuration (Mandatory)—the cross-account IAM role includes permissions to permit Cloud NGFW to read VPC resource information, which is required for configuring NGFW endpoints.
- Endpoint Creation (Optional)—you can configure Cloud NGFW to create and manage NGFW endpoints in your AWS environment. By selecting Yes, you're giving Cloud NGFW permissions to create and manage the necessary endpoints in your VPCs. If you select No, you must create and view NGFW endpoints manually.
- Permissions for Logging (Optional)—Cloud NGFW allows you to send traffic, threat, and decryption logs to an S3 bucket, Cloudwatch Log Group, or Kinesis Data Firehose. For Cloud NGFW to send those logs to the intended destination, you must provide the necessary permissions.The Cloud NGFW console redirects you to the AWS CloudFormation console and prompts you to create a stack. This stack sets up cross-account IAM roles, designates (but does not create) logging destinations, and lets Cloud NGFW access certificates in your AWS account’s Secrets Manager for decryption.The stack prepopulates the logging destinations for CloudWatch log group and Kinesis Data Firehose delivery stream with a destination called PaloAltoCloudNGFW. The S3 Bucket field is not prepopulated. If you want to send the logs to a different destination, you should create that destination and replace the default value the name before you complete stack creation.For an S3 Bucket log destination, you must provide the name of the destination bucket.If you are using a Kinesis Data Firehose, the source for that delivery stream must Direct PUT.
- Audit Logging (Optional)—you can send audit logs, which track administrator activity, to a Cloudwatch Log Group. The CFT stack includes a default Cloudwatch Log Group destination called PaloAltoCloudNGFWAuditLog. You can create a Cloudwatch Log Group with the default name value or replace the default value with the name of another Cloudwatch Log Group.
- Permissions for Decryption (Optional)—to use Cloud NGFW to inspect encrypted traffic flows, you must allow Cloud NGFW to retrieve the necessary certificate from the AWS Secrets Manager. You must enable Cloud NGFW to use attribute-based access control by specifying a tag when you launch the CFT stack.By default, the CFT includes the tag PaloAltoCloudNGFW. You can change this tag by configuring the ARN in the service and replacing the default value in the CFT.
To set up Cloud NGFW for AWS:
- Confirm that you have an AWS account with the required permissions (IAM admin or equivalent).
- Subscribe to Palo Alto Networks Cloud NGFW in AWS Marketplace.
- Prepare your AWS VPC or subnet structure for deployment.
To subscribe and setup Cloud NGFW for AWS:
- In AWS Marketplace, search for Palo Alto Networks Cloud NGFW, then click Subscribe and complete the setup process.
- Register as a Tenant Admin if you’re prompted (as a first time user); create your account, then set up authentication (including MFA, if required).
The table below provides an explanation of the steps required to get started with
Cloud NGFW for AWS:
| Step Number | Name | Description |
| 1 | Subscribe from AWS Marketplace | Log in to AWS Console, search for Cloud NGFW in AWS Marketplace, select product > subscribe and click Set up your software. |
| 2 | Tenant Onboarding | Choose to create a new tenant by adding your first name, last name, and the email address. The system will create a new tenant and mark your email address as a tenant administrator. |
| 3 | User Onboarding | If you have previously used Palo Alto Network products or your
organization has SAML integration with Palo Alto Networks
(Okta-based Palo Alto Networks identity),
you click login using your email address to
confirm yourself as an administrator of the Cloud NGFW tenant. If
you are a new user to the Palo Alto Networks Identity, the
system will send an activation email to help you onboard as an
admin user to the Cloud NGFW tenant. When you click the
activate button in the email sent to you, the system
will redirect you to the user onboarding workflow in another
browser tab. You will have to sign-up to create a new
Okta-based Palo Alto Networks
identity. Complete the initial setup and
configure multi-factor authentication (MFA) if prompted. Once
you have established a Palo Alto Networks identity, navigate
back to the Tenant onboarding browser tab and click login
to confirm yourself as an administrator of the Cloud NGFW
tenant. |
| 4 | Link your AWS account | After confirming you as the administrator of the Cloud NGFW
tenant, the system will prompt you to login and authorize the
linkage between the AWS account and Cloud NGFW tenant. This action
establishes a billing link between the Cloud NGFW tenant and your
AWS account. Enabling metering records to be sent from Cloud NGFW to
the AWS Marketplace Metering Service. At this point, the AWS
account is subscribed to the Cloud NGFW tenant. |
| 5 | Account Onboarding (Optional) |
You can navigate to the AWS Quick launch window, follow
the guided prompts to launch a Cloud Formation template, which
grants Cloud NGFW the necessary permissions in your AWS account.
such as creating endpoints or storing logs.
Acknowledge the template permissions and click Create
Stack. Then wait for the stack status to show
CREATE_COMPLETE.
Once the stack is complete, your AWS account is now onboarded with the
Cloud NGFW tenant.
|
Step 1: Subscribe from AWS Marketplace
Use this procedure to subscribe from AWS Marketplace:
- Log in to the AWS Console.Navigate to the Cloud NGFW for AWS in the AWS Marketplace.Click Subscribe.Click Set up product. This launches the Configure and Launch (SaaS Quick Launch) page in AWS Marketplace.Click Enable integration on the Configure and Launch page; this ensures that you have the required IAM permissions from AWS.Click Sign in or create an Account.If you are a new user, the Enable integration button automatically appears when the Configure and Launch page first appears.
Step 2: Tenant Onboarding
- Click Sign in or create an account to sign in with an existing account, or, to create a new account.After signing in, the Create a Tenant registration page appears. You can choose to create a new tenant.Enter your First and Last Name and an email address.Click Create. After you click Create:
- This ensures a new Cloud NGFW Tenant is created, and your email address is marked as a Tenant Administrator of the Cloud NGFW tenant.If you are a new user to Palo Alto Networks Identity, an email with an activation link is sent to the email address you specified.
Step 3: User Onboarding
- If you are a new user, you need to create a new user account in Palo Alto Networks Identity:
- In the email you received, click Activate Account to create a User account or validate yourself as a User with Palo Alto Networks Identity.Choose a Password for your user account and click Setup.Enter a Password.Re-enter Password and click Next.Choose one of the MFA methods and click Setup.Complete the MFA verification process and click Continue.Navigate to the Tenant Onboarding browser tab to confirm yourself as the administrator of the Cloud NGFW Tenant.Alternatively, you may already have a user account in Palo Alto Networks Identity. If you previously used Palo Alto Networks products and/or your Organization has SAML integration with Palo Alto Networks Identity. As an existing user:
- Enter your email address and click Log in. You will be prompted with the SSO Sign In page.Enter your email address and click Next.Enter the password and click Log In.Complete the MFA verification process. You will now be able to access the Cloud NGFW tenant page after logging in with your SSO credentials.Additionally, the email address domain of users invited by the tenant admin must match the email address domain of the tenant admin’s login credentials.
Step 4: Link Your AWS Account
After confirming you as the administrator of the Cloud NGFW tenant, the system will prompt you to login authorize the linkage between the AWS account and Cloud NGFW tenant. This action establishes a billing link between the Cloud NGFW tenant and your AWS account, enabling metering records to be sent from Cloud NGFW to the AWS Marketplace Metering Service.- Enter your email address and click Log in. You will be prompted with the SSO Sign In page.Enter your email address and click Next.Enter the password and click Log In.Complete the MFA verification process. You will now be able to access the Cloud NGFW tenant page after logging in with your SSO credentials.Click Continue to Finish Subscription.The Quick Launch page indicates that you have successfully linked your account to the AWS Marketplace subscription. At this point, you have successfully subscribed to the AWS account to the Cloud NGFW tenant.
Step 5: Onboard an AWS Account
After successfully setting up your tenant, you can optionally onboard an AWS account to the tenant using the Quick Launch page using a pre-configured Cloud Formation Template (CFT):- Click Launch Template and select the CFT region, roles and permissions for your tenant.Review the CFT stack; this CFT grants necessary permissions for the NGFW service, such as creating endpoints or storing logs.Cloud NGFW opens the AWS CFT console (associated with the AWS account you specified) in a new browser tab. If you have a pop-up blocker installed, the new tab may fail to appear. If this happens, in the Cloud NGFW console select AWS Accounts and locate the account you just added. Click Pending in the Status column.In the Capabilities section (located at the bottom of the CFT console), select the checkbox I acknowledge that AWS CloudFormation might create IAM resources.Click Create Stack. The CFT associated with the subscription (for example, PaloAltoNetworksCrossAccountRoleSetup) appears.Click Launch your product:
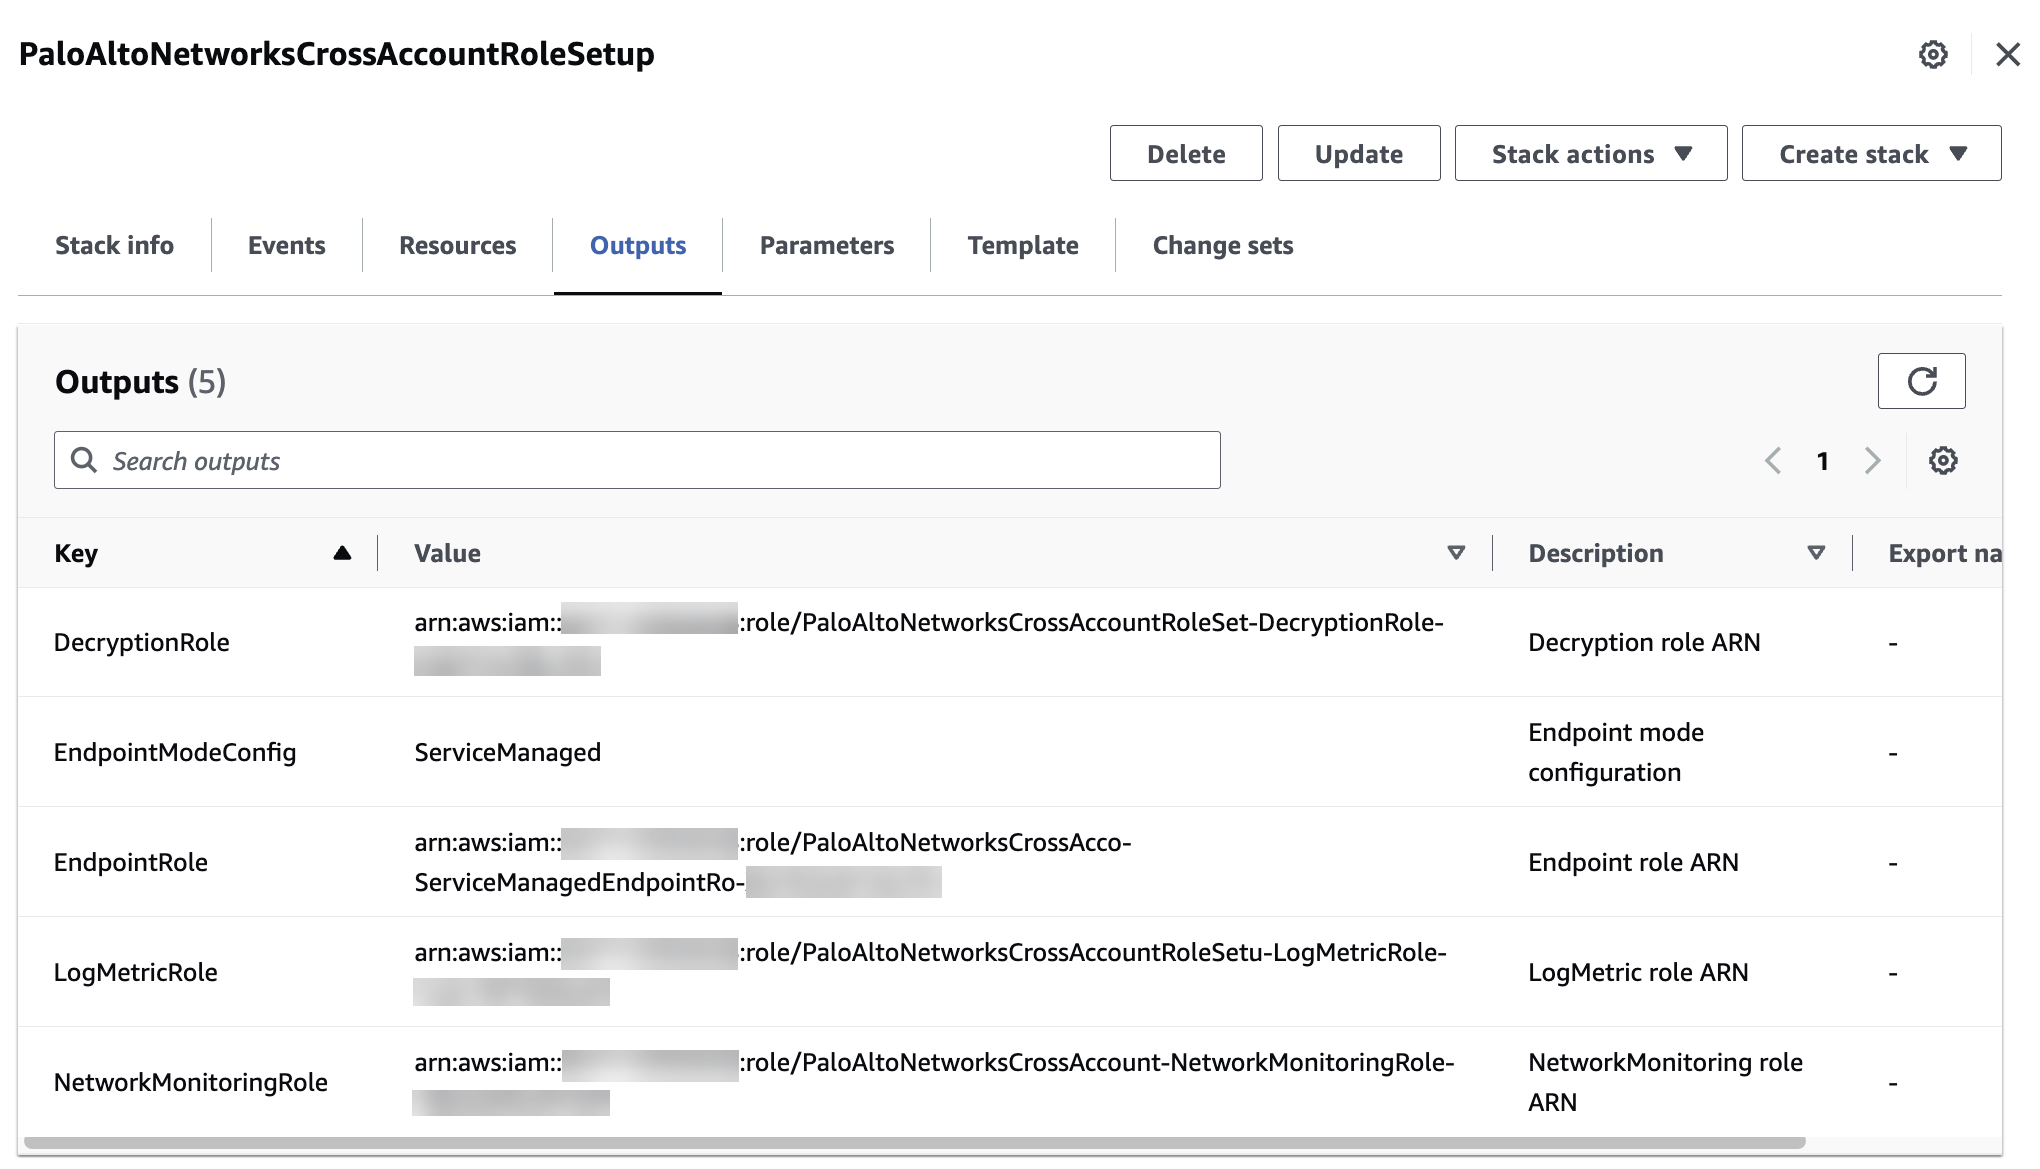
- Enter your email address and password, then click Log In.Select AWS Accounts.Verify that the Status changed to CREATE_COMPLETE.One the status shows CREATE_COMPLETE, copy the Role ARN Value from the Outputs tab in the AWS console:
![]() Add the Role ARN values to the Cloud NGFW console:
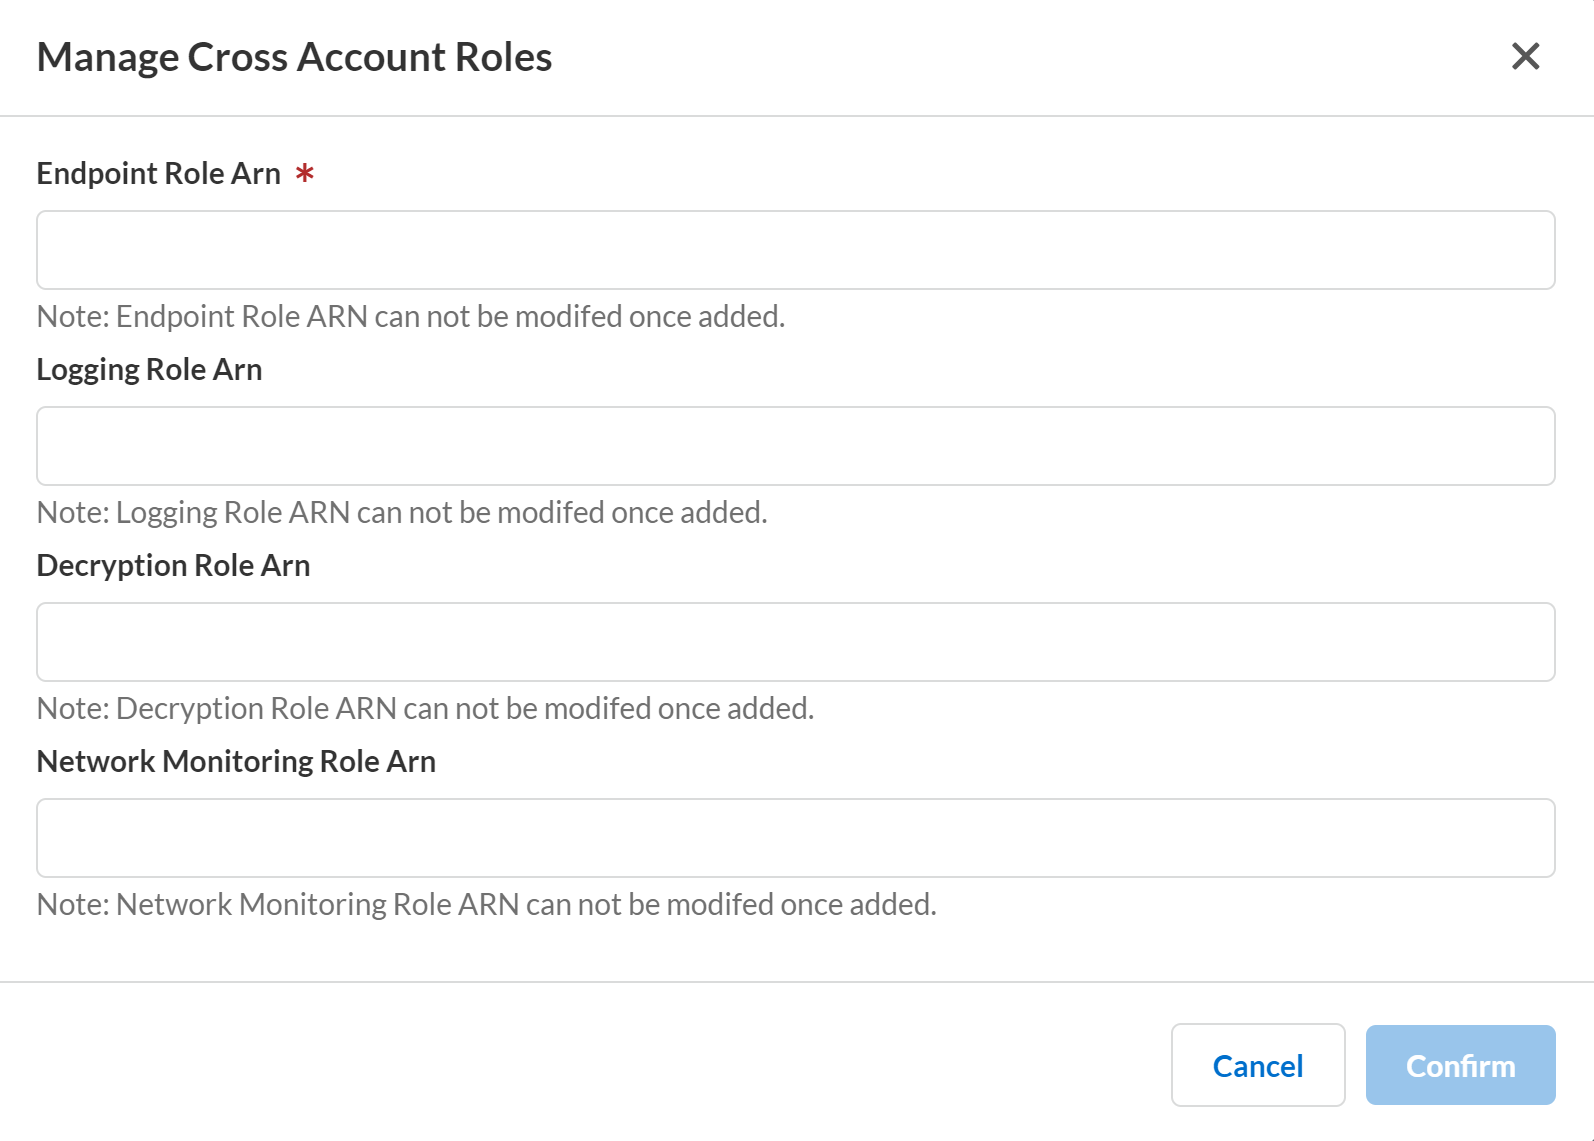
Add the Role ARN values to the Cloud NGFW console:- In the Cloud NGFW console, select Settings > AWS Accounts.Select the radio button corresponding to the AWS account you are adding and select Manage Cross Account Roles from the Actions drop-down.Paste the Role ARN values from the previous step into the corresponding fields.Click Confirm.
![]() Once the stack is complete, your AWS account is now onboarded with the Cloud NGFW tenant.
Once the stack is complete, your AWS account is now onboarded with the Cloud NGFW tenant.Step 6: Register for Support
You can Launch Software and Sign in to the tenant with your registered email and password. For information about registering for support, see Register for Support and Create a Support Case.