Enterprise DLP
Create a Custom Data Pattern
Table of Contents
Create a Custom Data Pattern
Create an Enterprise Data Loss Prevention (E-DLP) custom data pattern using regular expressions or
file properties.
On May 7, 2025, Palo Alto Networks is introducing new Evidence Storage and Syslog Forwarding service IP
addresses to improve performance and expand availability for these services
globally.
You must allow these new service IP addresses on your network
to avoid disruptions for these services. Review the Enterprise DLP
Release Notes for more
information.
| Where Can I Use This? | What Do I Need? |
|---|---|
|
Or any of the following licenses that include the Enterprise DLP license
|
Create an Enterprise Data Loss Prevention (E-DLP) custom data pattern using regular expressions.
Create data patterns to specify the match criteria and identify patterns using
regular expressions and keywords that represent sensitive information on your
network. Enterprise DLP synchronizes all data patterns across your Panorama® management server and Strata Cloud Manager associated with the tenant. You can
edit all custom data patterns created on Panorama or Strata Cloud Manager
as needed.
Strata Cloud Manager
Create an Enterprise Data Loss Prevention (E-DLP) custom data pattern for Prisma Access (Managed by Strata Cloud Manager) and SaaS Security on Strata Cloud Manager.
- Log in to Strata Cloud Manager.Select .Add Data Patterns and select Custom.You can also create a new custom data pattern by copying an existing custom data pattern. To copy a custom data pattern, select the data pattern name to view the data pattern details and copy (). You can then configure the custom data pattern you copied as needed.
![]() Enter a descriptive Data Pattern Name.(Optional) Enter a Description for the data pattern.Select the type of Regular Expression.You can choose Basic or Weighted data patterns. Use the Weighted data pattern to create a basic or weighted regular expression. With weighted regular expressions, each text entry is assigned a score and when the score threshold is exceeded, such as when enough expressions from a pattern match an asset, Enterprise DLP will indicate that the asset is a match for the pattern.Then use the query builder in the Regular Expressions field to add either regular (Basic) or Weighted expressions.(Optional) Enter one or more Proximity Keywords.Proximity keywords are not case-sensitive. You can enter one or more proximity keywords to increase the probability Enterprise DLP accurately detects a regular expression match. Proximity keywords impact the Enterprise DLP confidence level, which reflects how confident Enterprise DLP is when detecting matched traffic. Enterprise DLP determines confidence level by inspecting the distance of regular expressions to proximity keywords.
Enter a descriptive Data Pattern Name.(Optional) Enter a Description for the data pattern.Select the type of Regular Expression.You can choose Basic or Weighted data patterns. Use the Weighted data pattern to create a basic or weighted regular expression. With weighted regular expressions, each text entry is assigned a score and when the score threshold is exceeded, such as when enough expressions from a pattern match an asset, Enterprise DLP will indicate that the asset is a match for the pattern.Then use the query builder in the Regular Expressions field to add either regular (Basic) or Weighted expressions.(Optional) Enter one or more Proximity Keywords.Proximity keywords are not case-sensitive. You can enter one or more proximity keywords to increase the probability Enterprise DLP accurately detects a regular expression match. Proximity keywords impact the Enterprise DLP confidence level, which reflects how confident Enterprise DLP is when detecting matched traffic. Enterprise DLP determines confidence level by inspecting the distance of regular expressions to proximity keywords.![]() Save the data pattern.Create a data profile on Strata Cloud Manager.
Save the data pattern.Create a data profile on Strata Cloud Manager.Panorama
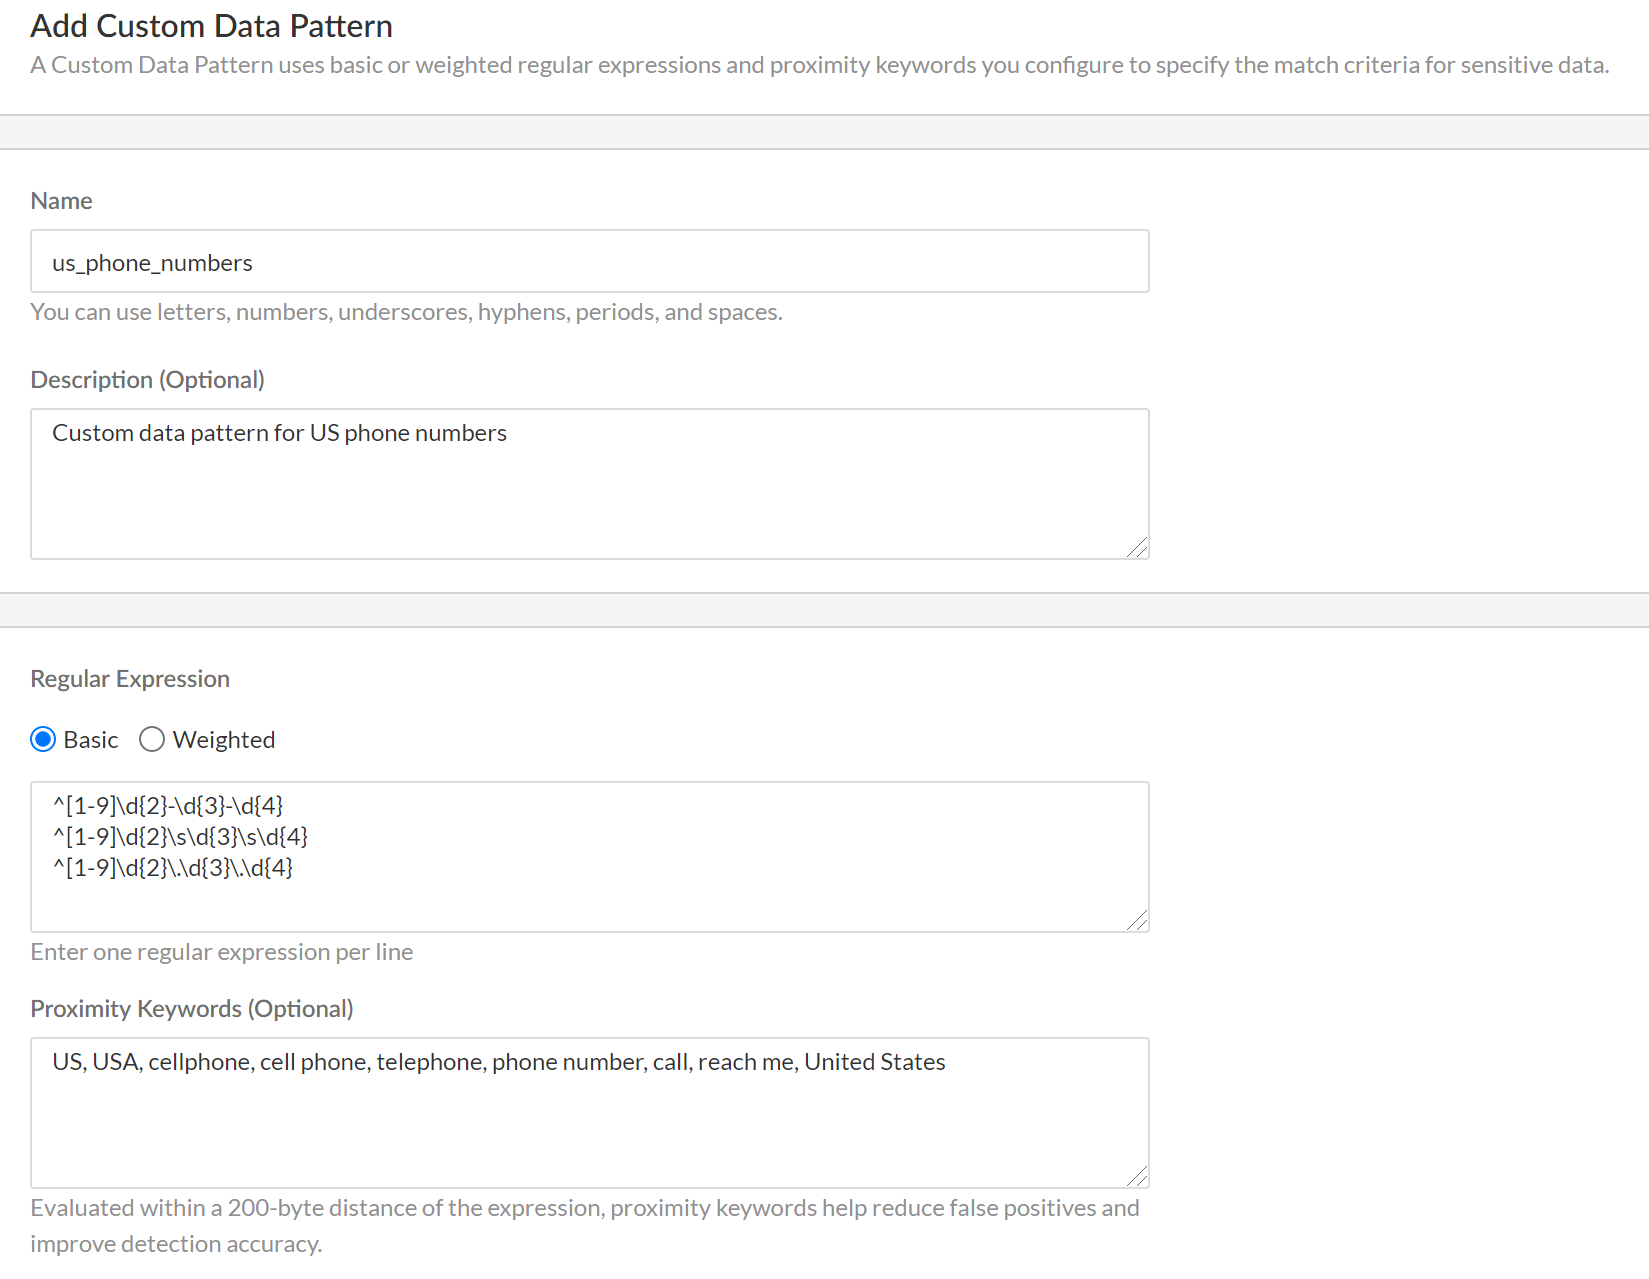
Create a data pattern to identify sensitive information on your network when using Enterprise Data Loss Prevention (E-DLP).- Log in to the Panorama web interface.Select .You do not need to select the device group the managed firewalls using Enterprise DLP are associated with. All data patterns are shared across all device groups by default.Add a new data pattern.Specify a Type and criteria for the data pattern and specify a Name.Use any of the following data pattern types:
- Regular Expression—Create regular expressions to use in the data pattern.You can choose Basic or Advanced data patterns. Use the Advanced data pattern to create a basic or weighted regular expression. With weighted regular expressions, each text entry is assigned a score and when the score threshold is exceeded, such as when enough expressions from a pattern match an asset, Enterprise DLP will indicate that the asset is a match for the pattern.Then use the query builder in the Regular Expressions field to add either regular (Basic) or weighted (Advanced) expressions.You can enter one or more Proximity Keywords to use with the data filtering pattern. Proximity keywords aren’t case-sensitive. You can enter one or more proximity keywords to increase the probability Enterprise DLP accurately detects a regular expression match. Proximity keywords impact the Enterprise DLP confidence level, which reflects how confident Enterprise DLP is when detecting matched traffic. Enterprise DLP determines confidence level by inspecting the distance of regular expressions to proximity keywords.
- File Property—Add a file property pattern on which to match.For data governance and protection of information, if you use classification labels or embed tags in MS Office and PDF documents to include more information for audit and tracking purposes, you can create a file property data pattern to match on the metadata or attributes that are part of the custom or extended properties in the file. Regardless whether you use an automated classification mechanism, such as Titus, or whether require users to add a tag, you can specify a name-value pair on which to match on a custom or extended property embedded in the file.Enterprise DLP supports file property data patterns in MS Office and PDF documents and supports both the OLE (.doc/.ppt) and XML (.docx/.pptx) formats of MS Office.Then add a Tag Name and Tag Value.A Tag Name and Tag Value are an associated pair that specifies the property for which you want to look (for example, you can specify a Tag Name of Label and a Tag Value of Confidential). You can add as many file properties as you’d like and when you later reference the file property data pattern in a data filtering profile, Enterprise DLP will use a boolean OR match in the match criteria.For files protected with Microsoft Azure Information Protection (AIP), you must enter the full AIP label Name that you want to take action on. This can be either the MSIP_Label_<GUID>_Enabled label name or the Sensitivity label name.
Click OK to save the data pattern.Commit and push the new configuration to your managed firewalls.The Commit and Push command isn’t recommended for Enterprise DLP configuration changes. Using the Commit and Push command requires the additional and unnecessary overheard of manually selecting the impacted templates and managed firewalls in the Push Scope Selection.- Full configuration push from Panorama
- Select and Commit.
- Select and Edit Selections.
- Select Device Groups and Include Device and Network Templates.
- Click OK.
- Push your configuration changes to your managed firewalls that are using Enterprise DLP.
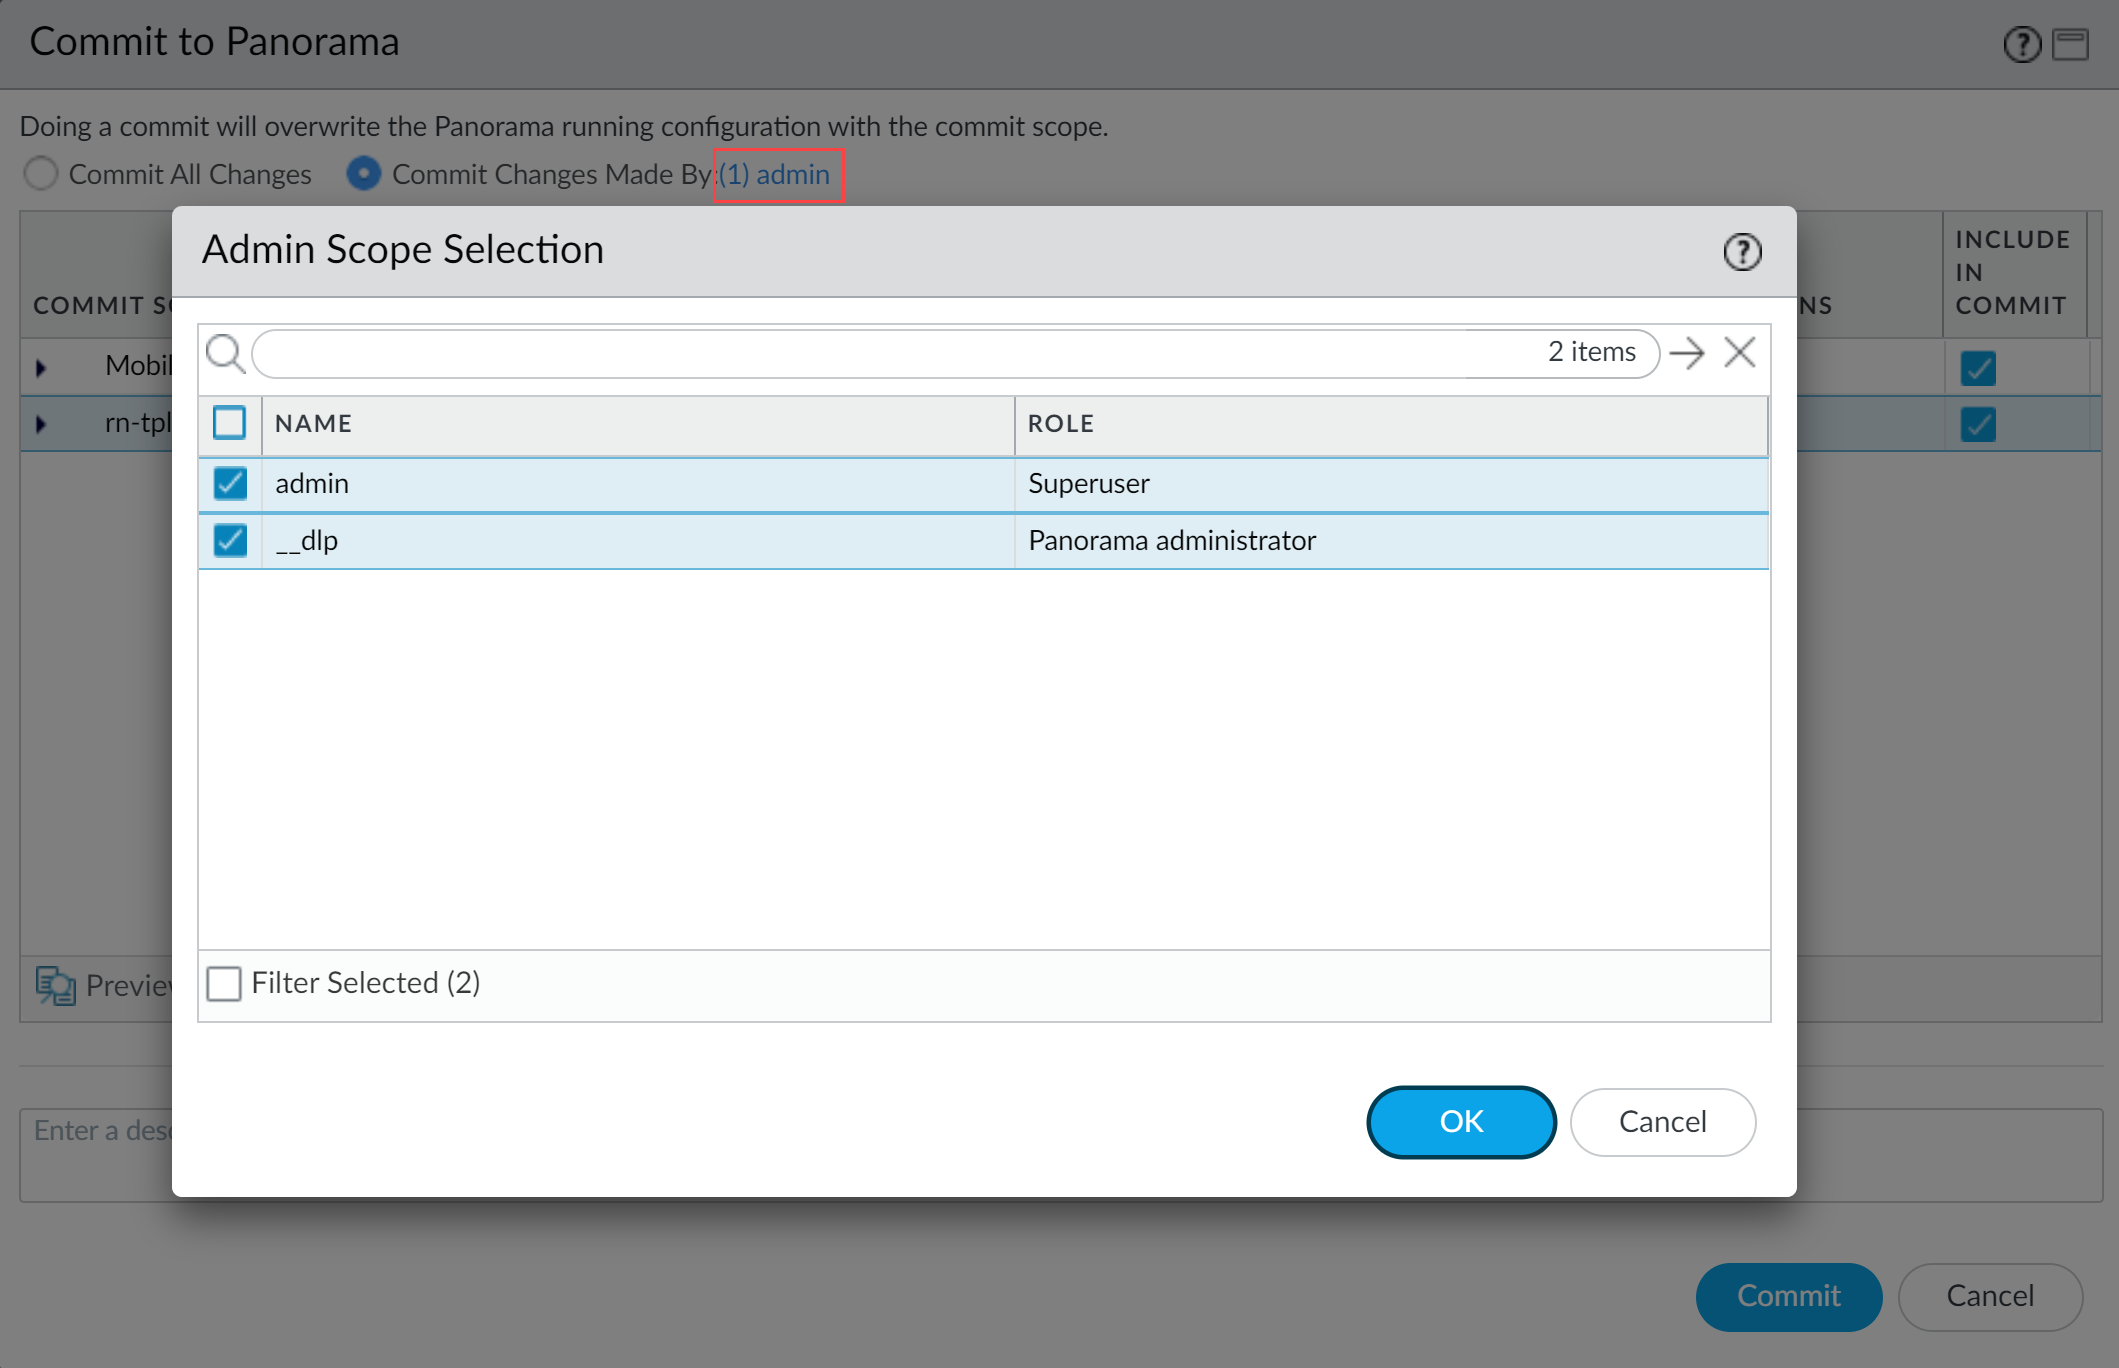
- Partial configuration push from PanoramaYou must always include the temporary __dlp administrator when performing a partial configuration push. This is required to keep Panorama and the DLP cloud service in sync.For example, you have an admin Panorama admin user who is allowed to commit and push configuration changes. The admin user made changes to the Enterprise DLP configuration and only wants to commit and push these changes to managed firewalls. In this case, the admin user is required to also select the __dlp user in the partial commit and push operations.
- Select .
- Select Commit Changes Made By and then click the current Panorama admin user to select additional admins to include in the partial commit.In this example, the admin user is currently logged in and performing the commit operation. The admin user must click admin and then select the __dlp user. If there are additional configuration changes made by other Panorama admins they can be selected here as well.Click OK to continue.
![]()
- Commit.
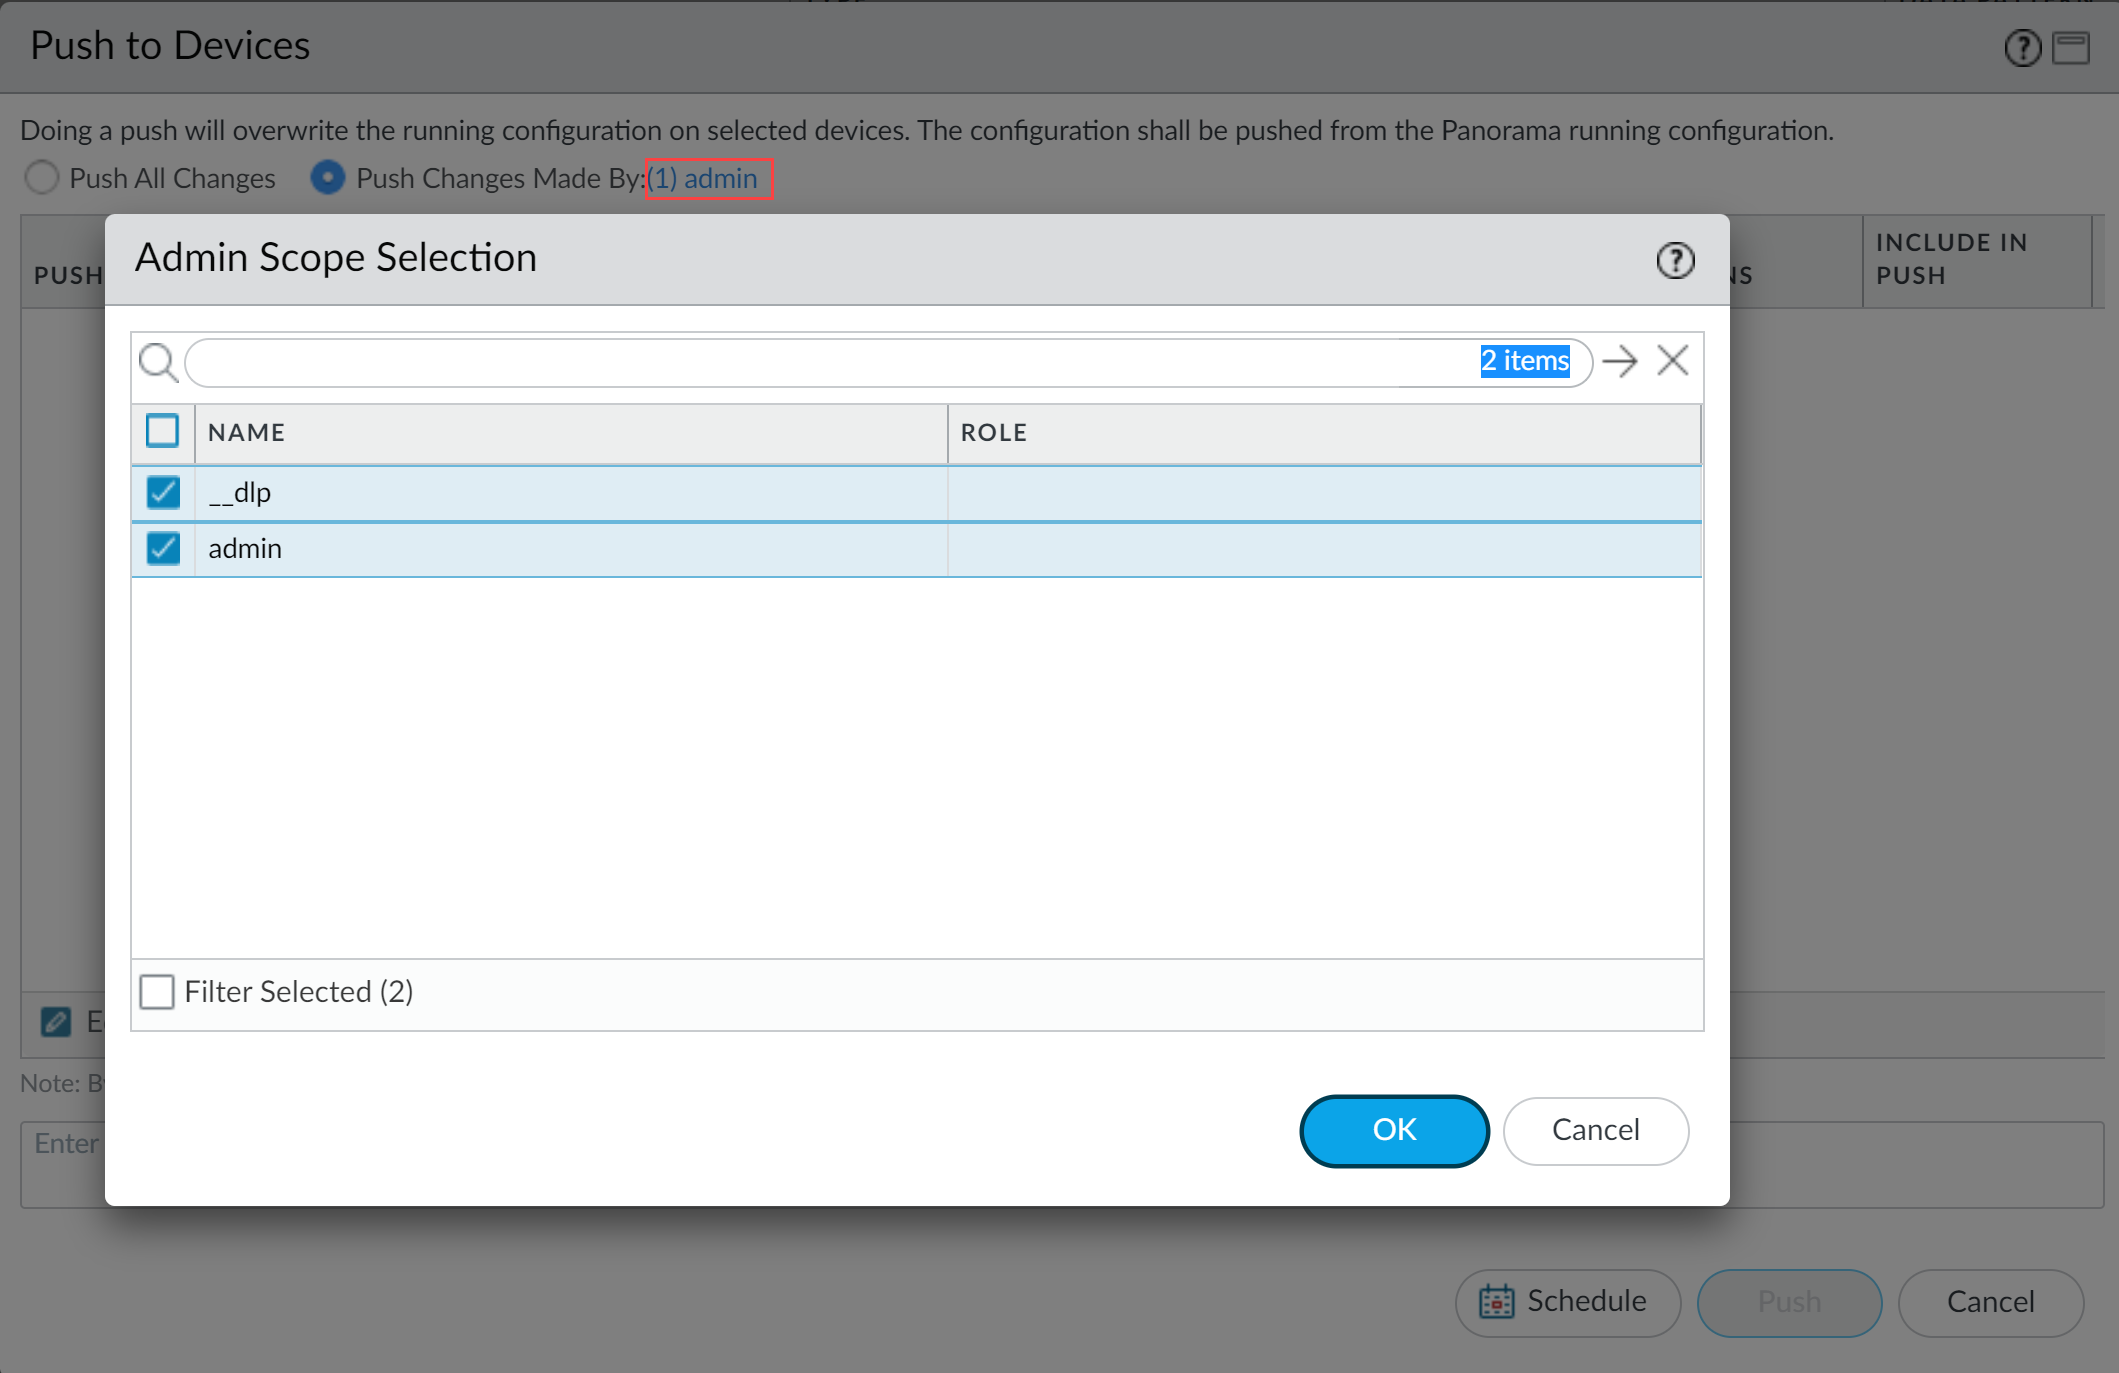
- Select .
- Select Push Changes Made By and then click the current Panorama admin user to select additional admins to include in the partial push.In this example, the admin user is currently logged in and performing the push operation. The admin user must click admin and then select the __dlp user. If there are additional configuration changes made by other Panorama admins they can be selected here as well.Click OK to continue.
![]()
- Select Device Groups and Include Device and Network Templates.
- Click OK.
- Push your configuration changes to your managed firewalls that are using Enterprise DLP.